編輯:關於Android編程
整理總結自鴻洋的博客:http://blog.csdn.net/lmj623565791/article/details/38352503/
一、FlowLayout介紹
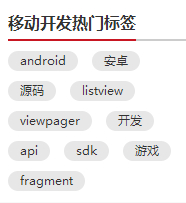
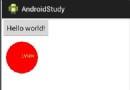
所謂FlowLayout,就是控件根據ViewGroup的寬,自動的往右添加,如果當前行剩余空間不足,則自動添加到下一行。有點像所有的控件都往左飄的感覺,第一行滿了,往第二行飄~所以也叫流式布局。Android並沒有提供流式布局,但是某些場合中,流式布局還是非常適合使用的,比如關鍵字標簽,搜索熱詞列表等,比如下圖:

github上已有現成的FlowLayout,本文是從無到有去制作。
二、制作分析
1、對於FlowLayout,需要指定的LayoutParams,我們目前只需要能夠識別margin即可,即使用MarginLayoutParams.
2、onMeasure中計算所有childView的寬和高,然後根據childView的寬和高,計算自己的寬和高。(當然,如果不是wrap_content,直接使用父ViewGroup傳入的計算值即可)
3、onLayout中對所有的childView進行布局。
三、代碼
1、MainActivity.java
 public class MainActivity extends Activity {

 @Override
 protected void onCreate(Bundle savedInstanceState) {
  super.onCreate(savedInstanceState);
  setContentView(R.layout.activity_main);
//  setContentView(R.layout.activity_main2);
//  setContentView(R.layout.activity_main3);
 }
}
2、CustomViewGroup.java
public class CustomViewGroup extends ViewGroup {

 private final String TAG = getClass().getSimpleName();

 public CustomViewGroup(Context context) {
  super(context);
 }

 public CustomViewGroup(Context context, AttributeSet attrs) {
  super(context, attrs);
 }

 public CustomViewGroup(Context context, AttributeSet attrs, int defStyleAttr) {
  super(context, attrs, defStyleAttr);
 }

 /**
  * 一、重寫generateLayoutParams,確定該ViewGroup的LayoutParams
  * 返回MarginLayoutParams的實例,這樣就為我們的ViewGroup指定了其LayoutParams為MarginLayoutParams
  */
 @Override
 public LayoutParams generateLayoutParams(AttributeSet attrs) {
  return new MarginLayoutParams(getContext(), attrs);
 }

 /**
  * 二、計算所有ChildView的寬度和高度 然後根據ChildView的計算結果,設置自己的寬和高
  */
 @Override
 protected void onMeasure(int widthMeasureSpec, int heightMeasureSpec) {
  super.onMeasure(widthMeasureSpec, heightMeasureSpec);
  //1、獲得此ViewGroup上級容器為其推薦的寬和高,以及計算模式
  int widthMode = MeasureSpec.getMode(widthMeasureSpec);
  int heightMode = MeasureSpec.getMode(heightMeasureSpec);
  int sizeWidth = MeasureSpec.getSize(widthMeasureSpec);
  int sizeHeight = MeasureSpec.getSize(heightMeasureSpec);

  // 2、如果ViewGroup布局是wrap_content時,根據childView的尺寸,計算容器的寬和高
  int width = 0;//ViewGroup的寬度
  int height = 0;//ViewGroup的高度
  int lineWidth = 0;//childView所占據的當前行總寬度
  int lineHeight = 0;//childView所占據的各行總高度
  int cCount = getChildCount();////childView的數量
  for(int i=0; i<cCount; i++){//遍歷每個childView
   View childView = getChildAt(i);
   measureChild(childView, widthMeasureSpec, heightMeasureSpec);// 測量當前child的寬和高
   MarginLayoutParams mlp = (MarginLayoutParams) childView.getLayoutParams();
   int cWidth = childView.getMeasuredWidth() + mlp.leftMargin + mlp.rightMargin;
   int cHeight = childView.getMeasuredHeight() + mlp.topMargin + mlp.bottomMargin;
   if(lineWidth + cWidth > sizeWidth){//如果加入當前childView後超出最大寬度,width取最大高度,累加lineHeight,然後開啟新行
    width = Math.max(lineWidth, cWidth);
    height += lineHeight;
    lineWidth = cWidth;
   }else{//如果加入當前childView後小於最大寬度,則累加lineWidthheight lineHeight取最大高度
    lineWidth += cWidth;
    height = Math.max(lineHeight, cHeight);
   }
   if(i == cCount-1){// 如果是最後一個childView,則將當前記錄的最大寬度和當前lineWidth做比較
    width = Math.max(lineWidth, cWidth);
    height += lineHeight;
   }
  }

  //3、如果是wrap_content設置為我們計算的值;否則直接設置為父容器計算的值
  setMeasuredDimension(
    (widthMode == MeasureSpec.EXACTLY) ? sizeWidth : width,
    (heightMode == MeasureSpec.EXACTLY) ? sizeHeight : height
  );
 }

 /**
  * 三、重寫onLayout,對其所有childView進行定位(設置childView的繪制區域)
  */
 private List<List<View>> allChildViews = new ArrayList<List<View>>();//存儲所有的childView,按行記錄
 private List<Integer> maxLineHeight = new ArrayList<Integer>();//存儲每行的最大高度值
 @Override
 protected void onLayout(boolean changed, int l, int t, int r, int b) {
  allChildViews.clear();
  maxLineHeight.clear();

  int width = getWidth();//每行的最大寬度
  int lineWidth = 0;//每行的即時寬度
  int lineHeight = 0;//每行的即時高度

  List<View> lineChildViews = new ArrayList<View>();//存儲每行所有的childView

  int cCount = getChildCount();
  for(int i=0; i<cCount; i++){//遍歷所有childView
   View childView = getChildAt(i);
   MarginLayoutParams mlp = (MarginLayoutParams) childView.getLayoutParams();
   int cWidth = childView.getMeasuredWidth();
   int cHeight = childView.getMeasuredHeight();
   if(lineWidth + cWidth + mlp.leftMargin + mlp.rightMargin > width){//如果需要換行
    maxLineHeight.add(lineHeight);// 存儲這一行最大高度
    allChildViews.add(lineChildViews);// 將當前行的childView保存,然後開啟新的ArrayList保存下一行的childView
    lineChildViews = new ArrayList<View>();
    lineWidth = 0;// 重置行寬
   }else{//如果不需要換行
    lineWidth += cWidth + mlp.leftMargin + mlp.rightMargin;//即時寬度累加
    lineHeight = Math.max(lineHeight,cHeight + mlp.topMargin + mlp.bottomMargin );//即時高度取最大值
    lineChildViews.add(childView);//把當前childView存入這一行的集合
   }
  }
  // 記錄最後一行
  maxLineHeight.add(lineHeight);
  allChildViews.add(lineChildViews);

  int left = 0;//左坐標
  int top = 0;//上坐標
  int lineNums = allChildViews.size();// 得到總行數
  for (int i = 0; i < lineNums; i++) {
   lineChildViews = allChildViews.get(i);// 取得每一行的所有的views
   lineHeight = maxLineHeight.get(i);// 取得當前行的最大高度

   Log.e(TAG, "第" + i + "行 :" + lineChildViews.size() + " , " + lineChildViews);
   Log.e(TAG, "第" + i + "行, :" + lineHeight);

   // 遍歷當前行所有的View
   for (int j = 0; j < lineChildViews.size(); j++) {
    View childView = lineChildViews.get(j);//取得childView
    if (childView.getVisibility() == View.GONE) {
     continue;
    }
    MarginLayoutParams mlp = (MarginLayoutParams) childView.getLayoutParams();
    //計算childView的left,top,right,bottom
    int lc = left + mlp.leftMargin;
    int tc = top + mlp.topMargin;
    int rc = lc + childView.getMeasuredWidth();
    int bc = tc + childView.getMeasuredHeight();

    Log.e(TAG, childView + " , l = " + lc + " , t = " + t + " , r =" + rc + " , b = " + bc);

    childView.layout(lc, tc, rc, bc);//設置這個childView的位置
    left += childView.getMeasuredWidth() + mlp.rightMargin + mlp.leftMargin;//左坐標累加
   }
   left = 0;//開始新的一行,左坐標重置
   top += lineHeight;//開始新的一行,上坐標累加
  }
 }
}
3、activity_main.xml
<LinearLayout xmlns:android="http://schemas.android.com/apk/res/android"
 xmlns:tools="http://schemas.android.com/tools"
 android:layout_width="fill_parent"
 android:layout_height="fill_parent"
 android:background="#E1E6F6"
 android:orientation="vertical">

 <com.cctvjiatao.customviewgroupflowlayout.view.CustomViewGroup
  android:layout_width="fill_parent"
  android:layout_height="wrap_content">

  <TextView

   android:text="Welcome" />

  <TextView

   android:text="IT工程師" />

  <TextView

   android:text="學習ing" />

  <TextView

   android:text="戀愛ing" />

  <TextView

   android:text="掙錢ing" />

  <TextView

   android:text="努力ing" />

  <TextView

   android:text="I thick i can" />
 </com.cctvjiatao.customviewgroupflowlayout.view.CustomViewGroup>

</LinearLayout>
4、activity_main2.xml
<LinearLayout xmlns:android="http://schemas.android.com/apk/res/android"
 xmlns:tools="http://schemas.android.com/tools"
 android:layout_width="fill_parent"
 android:layout_height="fill_parent"
 android:background="#E1E6F6"
 android:orientation="vertical">

 <com.cctvjiatao.customviewgroupflowlayout.view.CustomViewGroup
  android:layout_width="fill_parent"
  android:layout_height="wrap_content">

  <TextView

   android:text="Welcome" />

  <TextView

   android:text="IT工程師" />

  <TextView

   android:text="學習ing" />

  <TextView

   android:text="戀愛ing" />

  <TextView

   android:text="掙錢ing" />

  <TextView

   android:text="努力ing" />

  <TextView

   android:text="I thick i can" />
 </com.cctvjiatao.customviewgroupflowlayout.view.CustomViewGroup>


 <com.cctvjiatao.customviewgroupflowlayout.view.CustomViewGroup
  android:layout_width="fill_parent"
  android:layout_height="wrap_content"
  android:layout_marginTop="20dp">

  <TextView

   android:background="@drawable/flag_02"
   android:text="Welcome"
   android:textColor="#888888" />

  <TextView

   android:background="@drawable/flag_02"
   android:text="IT工程師"
   android:textColor="#888888" />

  <TextView

   android:background="@drawable/flag_02"
   android:text="學習ing"
   android:textColor="#888888" />

  <TextView

   android:background="@drawable/flag_02"
   android:text="戀愛ing"
   android:textColor="#888888" />

  <TextView

   android:background="@drawable/flag_02"
   android:text="掙錢ing"
   android:textColor="#888888" />

  <TextView

   android:background="@drawable/flag_02"
   android:text="努力ing"
   android:textColor="#888888" />

  <TextView

   android:background="@drawable/flag_02"
   android:text="I thick i can"
   android:textColor="#888888" />
 </com.cctvjiatao.customviewgroupflowlayout.view.CustomViewGroup>

 <com.cctvjiatao.customviewgroupflowlayout.view.CustomViewGroup
  android:layout_width="fill_parent"
  android:layout_height="wrap_content"
  android:layout_marginTop="20dp">

  <TextView

   android:background="@drawable/flag_03"
   android:text="Welcome"
   android:textColor="#43BBE7" />

  <TextView

   android:background="@drawable/flag_03"
   android:text="IT工程師"
   android:textColor="#43BBE7" />

  <TextView

   android:background="@drawable/flag_03"
   android:text="學習ing"
   android:textColor="#43BBE7" />

  <TextView

   android:background="@drawable/flag_03"
   android:text="戀愛ing"
   android:textColor="#43BBE7" />

  <TextView

   android:background="@drawable/flag_03"
   android:text="掙錢ing"
   android:textColor="#43BBE7" />

  <TextView

   android:background="@drawable/flag_03"
   android:text="努力ing"
   android:textColor="#43BBE7" />

  <TextView

   android:background="@drawable/flag_03"
   android:text="I thick i can"
   android:textColor="#43BBE7" />
 </com.cctvjiatao.customviewgroupflowlayout.view.CustomViewGroup>

</LinearLayout>
5、activity_main3.xml
<com.cctvjiatao.customviewgroupflowlayout.view.CustomViewGroup xmlns:android="http://schemas.android.com/apk/res/android"
 xmlns:tools="http://schemas.android.com/tools"
 android:layout_width="200dp"
 android:layout_height="wrap_content"
 android:background="#FFFFFF">

 <TextView

  android:background="@drawable/flag_04"
  android:text="Welcome"
  android:textColor="#323232" />

 <TextView

  android:background="@drawable/flag_04"
  android:text="IT工程師"
  android:textColor="#323232" />

 <TextView

  android:background="@drawable/flag_04"
  android:text="學習ing"
  android:textColor="#323232" />

 <TextView

  android:background="@drawable/flag_04"
  android:text="戀愛ing"
  android:textColor="#323232" />

 <TextView

  android:background="@drawable/flag_04"
  android:text="掙錢ing"
  android:textColor="#323232" />

 <TextView

  android:background="@drawable/flag_04"
  android:text="努力ing"
  android:textColor="#323232" />

 <TextView

  android:background="@drawable/flag_04"
  android:text="I thick i can"
  android:textColor="#323232" />

</com.cctvjiatao.customviewgroupflowlayout.view.CustomViewGroup>
以上就是本文的全部內容,希望對大家的學習有所幫助,也希望大家多多支持本站。
 Android Studio安裝及常見錯誤
Android Studio 1.0 已經放出來了,以後的Android平台開發激昂逐步從Eclipse向Android Studio遷移,為了能不落伍我也特意從Goog
 Android 自定義View的使用介紹
在項目開發中,可能系統自帶的一些widget不能滿足我們的需求,這時就需要自定義View。通過查看系統中的常用widget如Button,TextView,EditTex
 android使用AsyncTask實現多線程下載實例
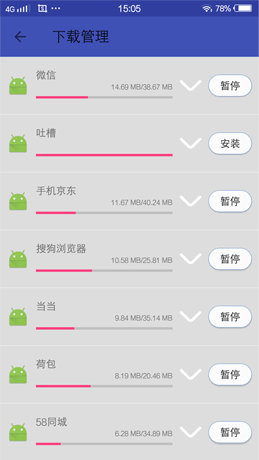
AsyncTask不僅方便我們在子線程中對UI進行更新操作,還可以借助其本身的線程池來實現多線程任務。下面是一個使用AsyncTask來實現的多線程下載例子。01 效果圖
 Android Touch事件傳遞原理分析
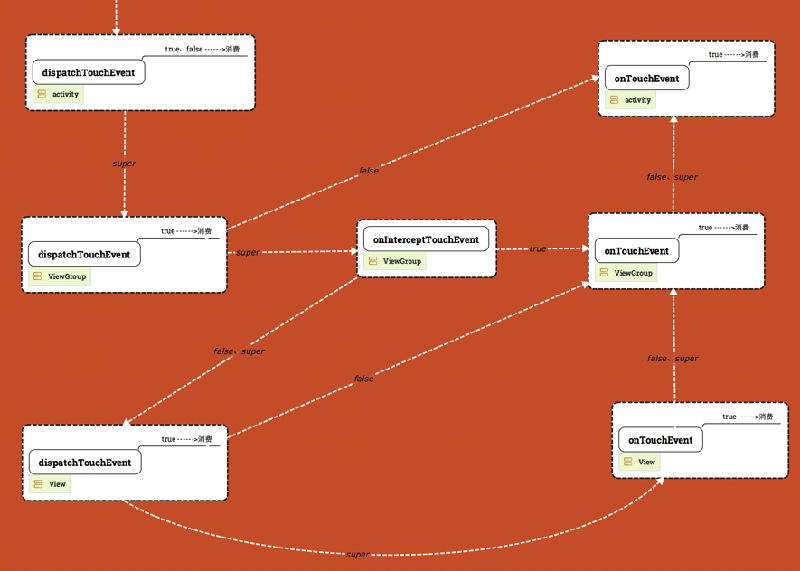
一、Touch事件分析1.Touch事件類型Touch事件被封裝成MotionEvent,用戶當前的touch事件主要類型有:ACTION_DOWN: 表示用戶開始觸摸A