編輯:關於Android編程
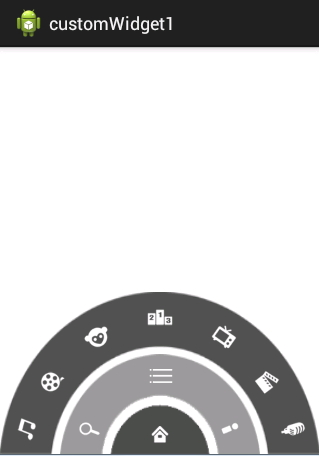
去年的優酷HD版有過這樣一種菜單,如下圖:
應用打開之後,先是三個弧形的三級菜單,點擊實體鍵menu之後,這三個菜單依次旋轉退出,再點擊實體鍵menu之後,一級菜單會旋轉進入,點擊一級菜單,二級菜單旋轉進入,點擊二級菜單的menu鍵,三級菜單旋轉進入,再次點擊二級菜單的旋轉鍵,三級菜單又會旋轉退出,這時再點擊一級菜單,二級菜單退出,最後點擊實體menu鍵,一級菜單退出。
總體來說實現這樣的功能:
(1)點擊實體menu鍵時,如果界面上有菜單顯示,不管有幾個,全部依次退出,如果界面上沒有菜單顯示,則顯示一級菜單。
(2)點擊一級菜單的home鍵時,如果此時界面只有一級菜單,則顯示二級菜單,否則讓除了一級菜單外的菜單全都依次退出。
(3)點擊二級菜單的menu鍵時,如果三級菜單已經顯示,則讓它旋轉退出,如果三級菜單未顯示則讓它旋轉進入。
好了,今天我們主要實現上述效果。
先來看布局文件
<RelativeLayout xmlns:android="http://schemas.android.com/apk/res/android"
 xmlns:tools="http://schemas.android.com/tools"
 android:layout_width="match_parent"
 android:layout_height="match_parent"
 tools:context="com.example.customwidget.MainActivity" >

 <RelativeLayout
  android:id="@+id/menu_level1"
  android:layout_width="100dp"
  android:layout_height="50dp"
  android:layout_alignParentBottom="true"
  android:layout_centerHorizontal="true"
  android:background="@drawable/level1" >

  <ImageButton
   android:id="@+id/level1_home"
   android:layout_width="wrap_content"
   android:layout_height="wrap_content"
   android:layout_centerInParent="true"
   android:layout_marginBottom="10dp"
   android:background="@drawable/icon_home"
   android:onClick="myClick" />
 </RelativeLayout>

 <RelativeLayout
  android:id="@+id/menu_level2"
  android:layout_width="200dp"
  android:layout_height="100dp"
  android:layout_alignParentBottom="true"
  android:layout_centerHorizontal="true"
  android:background="@drawable/level2" >

  <ImageButton
   android:layout_width="wrap_content"
   android:layout_height="wrap_content"
   android:layout_alignParentBottom="true"
   android:layout_marginBottom="10dp"
   android:layout_marginLeft="15dp"
   android:background="@drawable/icon_search" />

  <ImageButton
   android:id="@+id/level2_menu"
   android:layout_width="wrap_content"
   android:layout_height="wrap_content"
   android:layout_centerHorizontal="true"
   android:layout_marginTop="7dp"
   android:background="@drawable/icon_menu"
   android:onClick="myClick" />

  <ImageButton
   android:layout_width="wrap_content"
   android:layout_height="wrap_content"
   android:layout_alignParentBottom="true"
   android:layout_alignParentRight="true"
   android:layout_marginBottom="10dp"
   android:layout_marginRight="15dp"
   android:background="@drawable/icon_myyouku" />
 </RelativeLayout>

 <RelativeLayout
  android:id="@+id/menu_level3"
  android:layout_width="320dp"
  android:layout_height="162dp"
  android:layout_alignParentBottom="true"
  android:layout_centerHorizontal="true"
  android:background="@drawable/level3" >

  <ImageButton
   android:id="@+id/level3_channel1"
   android:layout_width="wrap_content"
   android:layout_height="wrap_content"
   android:layout_alignParentBottom="true"
   android:layout_marginBottom="10dp"
   android:layout_marginLeft="12dp"
   android:background="@drawable/channel1" />

  <ImageButton
   android:id="@+id/level3_channel2"
   android:layout_width="wrap_content"
   android:layout_height="wrap_content"
   android:layout_above="@id/level3_channel1"
   android:layout_marginBottom="17dp"
   android:layout_marginLeft="-5dp"
   android:layout_toRightOf="@id/level3_channel1"
   android:background="@drawable/channel2" />

  <ImageButton
   android:layout_width="wrap_content"
   android:layout_height="wrap_content"
   android:layout_above="@id/level3_channel2"
   android:layout_marginBottom="15dp"
   android:layout_marginLeft="13dp"
   android:layout_toRightOf="@id/level3_channel2"
   android:background="@drawable/channel3" />

  <ImageButton
   android:layout_width="wrap_content"
   android:layout_height="wrap_content"
   android:layout_centerHorizontal="true"
   android:layout_marginTop="10dp"
   android:background="@drawable/channel4" />

  <ImageButton
   android:id="@+id/level3_channel7"
   android:layout_width="wrap_content"
   android:layout_height="wrap_content"
   android:layout_alignParentBottom="true"
   android:layout_alignParentRight="true"
   android:layout_marginBottom="10dp"
   android:layout_marginRight="12dp"
   android:background="@drawable/channel7" />

  <ImageButton
   android:id="@+id/level3_channel6"
   android:layout_width="wrap_content"
   android:layout_height="wrap_content"
   android:layout_above="@id/level3_channel7"
   android:layout_marginBottom="17dp"
   android:layout_marginRight="-5dp"
   android:layout_toLeftOf="@id/level3_channel7"
   android:background="@drawable/channel6" />

  <ImageButton
   android:layout_width="wrap_content"
   android:layout_height="wrap_content"
   android:layout_above="@id/level3_channel6"
   android:layout_marginBottom="15dp"
   android:layout_marginRight="13dp"
   android:layout_toLeftOf="@id/level3_channel6"
   android:background="@drawable/channel5" />
 </RelativeLayout>

</RelativeLayout>
這裡是一個相對布局中嵌套了三個相對布局,嵌套的第一個相對布局負責顯示一級菜單,嵌套的第二個相對布局負責顯示二級菜單,嵌套的第三個相對布局負責顯示三級菜單。三個不同層次的菜單的背景都是弧形。我們通過指定具體的寬高來使三個層次的菜單具有不同的大小。
效果如下:
再看看MainActivity.java
/**
 * 模仿優酷菜單
 * 2015年5月19日
 */
public class MainActivity extends Activity {

 //分別拿到不同等級的菜單
 private RelativeLayout lv1;
 private RelativeLayout lv2;
 private RelativeLayout lv3;
 private Animation animation;
 //各級菜單是否顯示,默認全都顯示
 private boolean isDisplaylv1 = true;
 private boolean isDisplaylv2 = true;
 private boolean isDisplaylv3 = true;
 //動畫是否正在執行,默認動畫沒有執行
 private boolean isAnimationRunning = false;

 @Override
 protected void onCreate(Bundle savedInstanceState) {
  super.onCreate(savedInstanceState);
  setContentView(R.layout.activity_main);
  lv1 = (RelativeLayout) this.findViewById(R.id.menu_level1);
  lv2 = (RelativeLayout) this.findViewById(R.id.menu_level2);
  lv3 = (RelativeLayout) this.findViewById(R.id.menu_level3);
 }

 @Override
 public boolean onKeyDown(int keyCode, KeyEvent event) {
  //如果動畫正在執行,則不處理此事件
  if (isAnimationRunning)
   return super.onKeyDown(keyCode, event);
  //如果點擊的是菜單鍵
  if (keyCode == KeyEvent.KEYCODE_MENU) {
   //如果一級菜單已經顯示,判斷二級菜單是否顯示
   if (isDisplaylv1) {
    //設置動畫啟動延遲時間
    int startOffset = 0;
    //如果二級菜單已經顯示,判斷三級菜單是否顯示,然後退出二級菜單
    if (isDisplaylv2) {
     if (isDisplaylv3) {
      //如果三級菜單已經顯示,執行退出動畫
      exitAnimation(lv3, startOffset);
      //三級菜單退出動畫執行完畢之後,動畫的啟動時間延遲500ms
      startOffset += 500;
      isDisplaylv3 = !isDisplaylv3;
     }
     //二級菜單退出,此時startOffset=500,即動畫啟動時間延遲500ms
     exitAnimation(lv2, startOffset);
     //二級菜單退出動畫執行完畢之後,動畫的啟動時間延遲500ms
     startOffset += 500;
     isDisplaylv2 = !isDisplaylv2;
    }
    //一級菜單退出,此時startOffset=1000,即動畫啟動時間延遲1000ms
    exitAnimation(lv1, startOffset);
   //如果一級菜單未顯示,則一級菜單進入
   } else {
    enterAnimation(lv1);
   }
   isDisplaylv1 = !isDisplaylv1;
   return true;
  }
  return super.onKeyDown(keyCode, event);
 }

 public void myClick(View v) {
  //如果動畫正在執行,則不處理此事件
  if (isAnimationRunning)
   return;
  switch (v.getId()) {
  /**
   * 當點擊二級菜單的menu時,如果三級菜單已經顯示,則執行退出動畫,
   * 否則執行進入動畫
   */
  case R.id.level2_menu:
   if (isDisplaylv3) {
    exitAnimation(lv3, 0);
   } else {
    enterAnimation(lv3);
   }
   isDisplaylv3 = !isDisplaylv3;
   break;
  case R.id.level1_home:
   // 如果二級菜單已經顯示,再判斷三級菜單是否顯示
   if (isDisplaylv2) {
    //通過設置動畫啟動延遲時間,來實現動畫依次退出效果
    int startOffset = 0;
    // 如果三級菜單也顯示了,則讓他們依次退出
    if (isDisplaylv3) {
     exitAnimation(lv3, startOffset);
     startOffset = 700;
     isDisplaylv3 = !isDisplaylv3;
    }
    exitAnimation(lv2, startOffset);
    isDisplaylv2 = !isDisplaylv2;
    // 如果二級菜單沒有顯示,就讓二級菜單顯示出來
   } else {
    enterAnimation(lv2);
    isDisplaylv2 = !isDisplaylv2;
   }
   break;
  }
 }

 /**
  * 退出動畫
  * @param layout 執行動畫的布局文件
  * @param startOffset 動畫啟動的延遲時間
  */
 public void exitAnimation(RelativeLayout layout, long startOffset) {
  animation = AnimationUtils.loadAnimation(this, R.anim.exit_menu);
  animation.setFillAfter(true);
  animation.setStartOffset(startOffset);
  animation.setAnimationListener(new MyAnimationListener());
  layout.startAnimation(animation);
 }

 /**
  * 進入動畫
  * @param layout 執行動畫的布局文件
  */
 public void enterAnimation(RelativeLayout layout) {
  animation = AnimationUtils.loadAnimation(this, R.anim.enter_menu);
  animation.setFillAfter(true);
  animation.setAnimationListener(new MyAnimationListener());
  layout.startAnimation(animation);
 }

 /**
  * 判斷動畫是否正在執行
  * @author 王松
  *
  */
 private class MyAnimationListener implements AnimationListener {

  //動畫開始執行
  @Override
  public void onAnimationStart(Animation animation) {
   isAnimationRunning = true;
  }

  //動畫執行結束
  @Override
  public void onAnimationEnd(Animation animation) {
   isAnimationRunning = false;
  }

  @Override
  public void onAnimationRepeat(Animation animation) {
  }

 }
}
代碼中注釋已經寫的很詳細了,這裡不再贅述。最後在給大家看看兩個動畫文件:
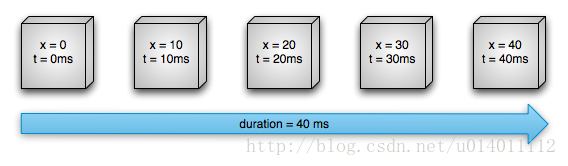
enter_menu.xml
<?xml version="1.0" encoding="utf-8"?>
<set xmlns:android="http://schemas.android.com/apk/res/android"
 android:shareInterpolator="true">
 <rotate
  android:duration="1000"
  android:fromDegrees="-180"
  android:toDegrees="0"
  android:pivotX="50%"
  android:pivotY="100%" />
</set>
exit_menu.xml
<?xml version="1.0" encoding="utf-8"?>
<set xmlns:android="http://schemas.android.com/apk/res/android"
 android:shareInterpolator="true">
 <rotate
  android:duration="1000"
  android:fromDegrees="0"
  android:toDegrees="-180"
  android:pivotX="50%"
  android:pivotY="100%" />
</set>
關於動畫如果不太懂可以看這裡:Android基礎知識之tween動畫效果 Android基礎知識之frame動畫效果
源碼下載:http://xiazai.jb51.net/201606/yuanma/Androidyouku(jb51.net).rar
原文鏈接:http://blog.csdn.net/u012702547/article/details/45842963
以上就是本文的全部內容,希望對大家的學習有所幫助,也希望大家多多支持本站。
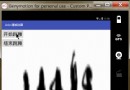
 初步編寫IDEA\AndroidStudio翻譯插件
先放兩張效果圖 一、准備由於AndroidStudio不具備開發插件的功能,需要安裝IDEA 翻譯使用的是有道的翻譯接口,需要申請,接口申請的網址點這裡 json解析使用
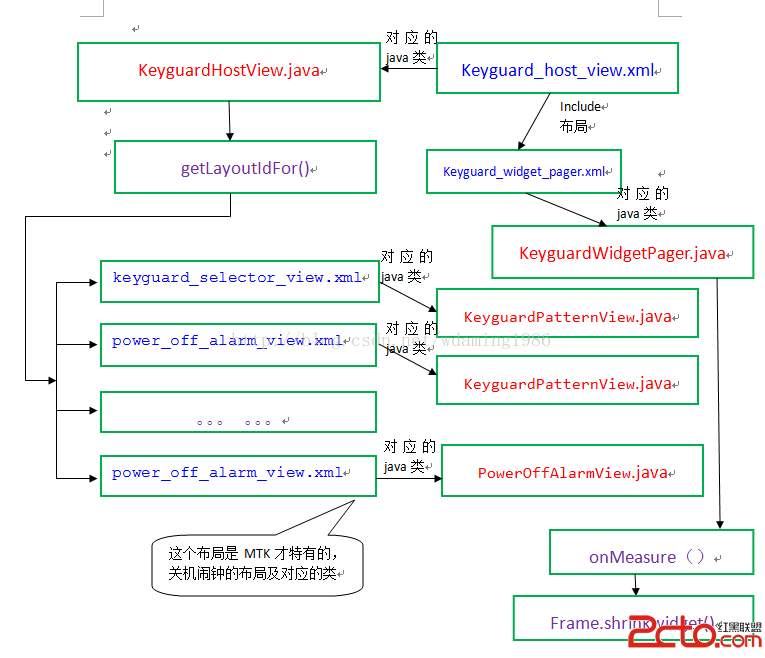 從 鎖屏服務AIDL線程通信案例看Android 底層啟動
從 鎖屏服務AIDL線程通信案例看Android 底層啟動請確保 你已經閱讀過 我的 Android Window、PhoneWindow、WindowManager、A
 Android動畫之逐幀動畫(Frame Animation)基礎學習
前言在Android中,動畫Animation的實現有兩種方式:Tween Animation(補間動畫)和Frame Animation(幀動畫)。漸變動畫是通過對場景
 FloatingActionButton增強版一個按鈕跳出多個按鈕第三方開源之FloatingActionButton
FloatingActionButton項目在github上的主頁:https://github.com/futuresimple/android-floating-ac