編輯:關於Android編程

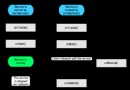
上圖為代碼結構圖。
現在我們看下具體的代碼。
Send.java
package cn.com.sms.send;

import java.util.ArrayList;
import java.util.Iterator;

import android.app.Activity;
import android.app.PendingIntent;
import android.content.Intent;
import android.os.Bundle;
import android.telephony.SmsManager;
import android.util.Log;
import android.view.View;
import android.widget.Button;
import android.widget.EditText;
import android.widget.Toast;

public class Send extends Activity {
  private String message;
  private String number ;
  private EditText editText;
  private EditText editText2;
  @Override
  public void onCreate(Bundle savedInstanceState) {
    super.onCreate(savedInstanceState);
    setContentView(R.layout.main);
     editText = (EditText) this.findViewById(R.id.number);
     editText2 = (EditText)this.findViewById(R.id.message);

    Button button = (Button)this.findViewById(R.id.button);
    button.setOnClickListener(new View.OnClickListener() {

      public void onClick(View v) {
         number = editText.getText().toString();
         message = editText2.getText().toString();
         // 在LogCat中可以查看到number和message的相關信息
         Log.i("number", number);
         Log.i("message", message);
         /*獲取系統默認的信息管理器,一定要注意的是SmsManager是android.telephony.SmsManager;這和
         *我們使用的版本有關,在 Android 2.0 以前 應該使用 android.telephony.gsm.SmsManager
         *Android 2.0 之後的版本應該用 android.telephony.SmsManager。
         */
        SmsManager smsManager = SmsManager.getDefault();
        /*PendingIntent.getBroadcast返回一個用於廣播的PendingIntent對象,類似於調用Content.sendBroadcast();
         */
        PendingIntent paIntent = PendingIntent.getBroadcast(Send.this, 0, new Intent("SMS_SENT"), 0);
        PendingIntent deliveryIntent = PendingIntent.getBroadcast(Send.this, 0, new Intent("SMS_DELIVERED"), 0);
        // smsManager.divideMessage有些時候短信如果超過了字數,我們就需要這個方法來幫我們拆分短信內容。
        ArrayList<String> smses = smsManager.divideMessage(message);
        Iterator<String> iterator = smses.iterator();
        while(iterator.hasNext()){
          String temp = iterator.next();
          //發送短信
          smsManager.sendTextMessage(number, null, temp, paIntent, deliveryIntent);
        }
        // 彈出一個浮動框顯示提示內容,Toast.LENGTH_LONG代表浮動框顯示時間的長短
        Toast.makeText(Send.this, "短信發送完成", Toast.LENGTH_LONG).show();


      }
    });

  }
}
main.xml
<?xml version="1.0" encoding="utf-8"?>
<LinearLayout xmlns:android="http://schemas.android.com/apk/res/android"
  android:orientation="vertical"
  android:layout_width="fill_parent"
  android:layout_height="fill_parent"
  >
<TextView
  android:layout_width="fill_parent"
  android:layout_height="wrap_content"
  android:text="歡迎使用短信發送器,請輸入電話號碼"
  />
 <EditText
  android:id="@+id/number"
  android:layout_width="fill_parent"
  android:layout_height="wrap_content"
  android:hint="這裡輸入電話號碼"
 />
 <TextView
 android:layout_width="fill_parent"
  android:layout_height="wrap_content"
  android:text="歡迎使用短信發送器,請輸入短信內容"
 />
 <EditText
  android:id="@+id/message"
  android:layout_width="fill_parent"
  android:layout_height="wrap_content"
  android:minLines="3"
  android:hint="這裡輸入短信內容"
 />
 <Button
  android:id="@+id/button"
  android:layout_width="wrap_content"
  android:layout_height="wrap_content"
  android:text="send"
 />
</LinearLayout>
AndroidManifest.xml
<?xml version="1.0" encoding="utf-8"?>
<manifest xmlns:android="http://schemas.android.com/apk/res/android"
   package="cn.com.sms.send"
   android:versionCode="1"
   android:versionName="1.0">
  <uses-sdk android:minSdkVersion="8" />
  <uses-permission android:name="android.permission.SEND_SMS"></uses-permission>

  <application android:icon="@drawable/icon" android:label="@string/app_name">
    <activity android:name=".Send"
         android:label="@string/app_name">
      <intent-filter>
        <action android:name="android.intent.action.MAIN" />
        <category android:name="android.intent.category.LAUNCHER" />
      </intent-filter>
    </activity>

  </application>
</manifest>
最終效果圖為:

和打電話小程序一樣,這裡也需要開啟兩個AVD才能進行功能測試。
碎碎念:
發短信應用的主要的類就是SmsManager。 在 Android 2.0 以前 應該使用 android.telephony.gsm.SmsManager
之後應該用 android.telephony.SmsManager;
SmsManager smsManager = SmsManager.getDefault();
意思為獲取系統默認的信息管理器
smsManager.sendTextMessage(destinationAddress, scAddress, text, sentIntent, deliveryIntent)
-- destinationAddress:目標電話號碼
-- scAddress:服務商的短信中心號碼(例如中國移動的短信中心號碼),測試可以不填。
-- text: 短信內容
-- sentIntent:發送 -->中國移動 --> 中國移動發送失敗 --> 返回發送成功或失敗信號 --> 後續處理 即,這個意圖包裝了短信發送狀態的信息
-- deliveryIntent: 發送 -->中國移動 --> 中國移動發送成功 --> 返回對方是否收到這個信息 --> 後續處理 即:這個意圖包裝了短信是否被對方收到的狀態信息(供應商已經發送成功,但是對方沒有收到)。
public static PendingIntent getBroadcast (Context context, int requestCode, Intent intent, int flags)
返回一個用於廣播的PendingIntent,類似於調用Context.sendBroadcast()函數
requestCode 暫時不用
intent 是用於廣播的intent
flag 有:FLAG_ONE_SHOT, FLAG_NO_CREATE, FLAG_CANCEL_CURRENT, FLAG_UPDATE_CURRENT 用於設置新建的PendingIntent是使用一次、如無則不創建、取消當前、更新當前等屬性。
此外,我們還要在AndroidManifest.xml中聲明短信發送權限。
<uses-permission android:name="android.permission.SEND_SMS"/>
有的時候,我們兩個AVD進行模擬發短信時,會發現有時候該程序無法正常使用。系統會提示我們NO DNS servers found,找不到DNS服務。這種情況一般是由於你的電腦沒有聯入網絡的原因造成的。
發送短信:
SmsManager smsMgr = SmsManager.getDefault();
smsMgr.sendTextMessage(address, null, message, null, null);
顯示寫短信界面:
Uri smsToUri = Uri.parse("smsto://10086");
Intent mIntent = new Intent( android.content.Intent.ACTION_SENDTO, smsToUri );
startActivity( mIntent );
發送電子郵件:
Intent i = new Intent(Intent.ACTION_SEND);
i.putExtra(Intent.EXTRA_EMAIL, address);
i.putExtra(Intent.EXTRA_SUBJECT, filename);
i.putExtra(Intent.EXTRA_STREAM, Uri.parse("file://" + filename)); ;
i.setType("text/csv");
startActivity(Intent.createChooser(i, "EMail File"));
升級版:
該代碼為其添加了廣播接收者的監聽。詳細代碼如下
package cn.com.sms.send;

import java.util.ArrayList;
import java.util.Iterator;

import android.app.Activity;
import android.app.PendingIntent;
import android.content.BroadcastReceiver;
import android.content.Context;
import android.content.Intent;
import android.content.IntentFilter;
import android.os.Bundle;
import android.telephony.SmsManager;
import android.util.Log;
import android.view.View;
import android.widget.Button;
import android.widget.EditText;
import android.widget.Toast;

public class Send extends Activity {
  private String message;
  private String number ;
  private EditText editText;
  private EditText editText2;
  @Override
  public void onCreate(Bundle savedInstanceState) {
    super.onCreate(savedInstanceState);
    setContentView(R.layout.main);
     editText = (EditText) this.findViewById(R.id.number);
     editText2 = (EditText)this.findViewById(R.id.message);

    Button button = (Button)this.findViewById(R.id.button);
    button.setOnClickListener(new View.OnClickListener() {

      public void onClick(View v) {
         number = editText.getText().toString();
         message = editText2.getText().toString();
         // 在LogCat中可以查看到number和message的相關信息
         Log.i("number", number);
         Log.i("message", message);
         /*獲取系統默認的信息管理器,一定要注意的是SmsManager是android.telephony.SmsManager;這和
         *我們使用的版本有關,在 Android 2.0 以前 應該使用 android.telephony.gsm.SmsManager
         *Android 2.0 之後的版本應該用 android.telephony.SmsManager。
         */
        SmsManager smsManager = SmsManager.getDefault();
        /*PendingIntent.getBroadcast返回一個用於廣播的PendingIntent對象,類似於調用Content.sendBroadcast();
         */
        PendingIntent paIntent = PendingIntent.getBroadcast(Send.this, 0, new Intent("SMS_SENT2"), 0);
        PendingIntent deliveryIntent = PendingIntent.getBroadcast(Send.this, 0, new Intent("SMS_DELIVERED2"), 0);

        // 注冊一個BroadcastReceiver,當有匹配它的IntentFilter的Intent出現時,該方法會被觸發
        registerReceiver(new BroadcastReceiver(){

          @Override
          public void onReceive(Context context, Intent intent) {
            int resultCode = getResultCode();
            switch(resultCode){
            case Activity.RESULT_OK:
              Toast.makeText(getBaseContext(), "信息發送成功了哦、", Toast.LENGTH_LONG).show();
              break;
            default:
              Toast.makeText(getBaseContext(), "信息發送失敗了哦、", Toast.LENGTH_LONG).show();

            }
          }


        }, new IntentFilter("SMS_SENT2"));


        registerReceiver(new BroadcastReceiver() {

          @Override
          public void onReceive(Context context, Intent intent) {
            Toast.makeText(getBaseContext(), "deliveryIntent", Toast.LENGTH_LONG).show();
            Log.i("短信接收人是否查看信息", "看了");
          }
        }, new IntentFilter("SMS_DELIVERED2"));


        // smsManager.divideMessage有些時候短信如果超過了字數,我們就需要這個方法來幫我們拆分短信內容。
        ArrayList<String> smses = smsManager.divideMessage(message);
        Iterator<String> iterator = smses.iterator();
        while(iterator.hasNext()){
          String temp = iterator.next();
          //發送短信
          smsManager.sendTextMessage(number, null, temp, paIntent, deliveryIntent);
        }
        // 彈出一個浮動框顯示提示內容,Toast.LENGTH_LONG代表浮動框顯示時間的長短
        Toast.makeText(Send.this, "短信發送完成", Toast.LENGTH_LONG).show();


      }
    });

  }
}
main.xml與AndroidManifest.xml和前面的代碼一樣。
registerReceiver()用於注冊廣播接受者。該方法在Content中這樣定義的。
public abstract Intent registerReceiver(BroadcastReceiver receiver,IntentFilter filter);系統如果查詢到滿足filter的廣播,便會教給receiver,讓其處理。一般都是在其onReceive()方法中處理。
如果不是在代碼中主動通過registerReceiver()進行注冊,那麼就要從AndroidManifest.xml進行配置,代碼如下
<receiver android:name="類名">
<intent-filter>
<action android:name="接收者中Intent參數的action屬性" />
</intent-filter>
</receiver>
這裡需要注意,在配置文件中activity標簽和receiver標簽是平級的。
在模擬器中發送中文會接收方出現亂碼的問題,但是在真機中,就不會出現亂碼的情況了。所以開發者只需要正常開發短信功能,不需要編碼轉換。