編輯:關於Android編程
本文實例講述了Android中Bitmap用法。分享給大家供大家參考,具體如下:
一般在android程序中把圖片文件放在res/drawable目錄下就可以通過R.drawable.id來使用,但在存儲卡中的圖片怎樣引用呢?下面通過實現這個功能來介紹Bitmap的用法。
程序如下:
import java.io.File;
import android.app.Activity;
import android.graphics.Bitmap;
import android.graphics.BitmapFactory;
import android.os.Bundle;
import android.view.View;
import android.view.View.OnClickListener;
import android.widget.Button;
import android.widget.ImageView;
import android.widget.TextView;
public class A10Activity extends Activity {
 private Button b;
 private ImageView iv;
 private TextView tv;
 private String fileName="sdcard/picture/紅葉.jpg";
 //private String fileName="sdcard/picture/紅葉.jpg";這種寫法是錯誤的,路徑不是以
//設備開頭
  /** Called when the activity is first created. */
  @Override
  public void onCreate(Bundle savedInstanceState) {
    super.onCreate(savedInstanceState);
    setContentView(R.layout.main);
    b=(Button)findViewById(R.id.button);
    b.setOnClickListener(new OnClickListener(){
  @Override
  public void onClick(View v) {
  // TODO Auto-generated method stub
  iv=(ImageView)findViewById(R.id.imageview);
  tv=(TextView)findViewById(R.id.textview);
  File f=new File(fileName);
//先判斷圖片文件是否存在
  if(f.exists()){
//如果存在,通過Bitmap將圖片放入ImageView中顯示出來
/*BitmapFactory(Android.graphics.BitmapFactory)是Android API提供的對象,該對象
*的decodeFile()方法將手機中的圖片文件轉換成Bitmap對象。*/
   Bitmap bm=BitmapFactory.decodeFile(fileName);
   iv.setImageBitmap(bm);
   tv.setText(fileName);
  }
  else{
   tv.setText("文件不存在");
  }
  }
  });
  }
}
BitmapFactory也提供了其他方法,例如decodeResource()可以將res/drawable內預先存入的圖片文件轉換成Bitmap對象,decodeStream()方法可將InputStream轉化成Bitmap對象。
下面這個例子是利用Matrix.setRotate()方法來實現ImageView的旋轉。原理是將ImageView放入Bitmap中,然後利用Bitmap.createBitmap()方法來創建新的Bitmap對象,在創建的同時,Matrix對象裡的setRotate()方法動態旋轉新創建的Bitmap.然後將旋轉好的Bitmap對象以新構造的方式創建新的Bitmap,並將其放入原來的ImageView中。
程序如下所示:
import android.app.Activity;
import android.graphics.Bitmap;
import android.graphics.BitmapFactory;
import android.graphics.Matrix;
import android.graphics.drawable.BitmapDrawable;
import android.os.Bundle;
import android.view.View;
import android.view.View.OnClickListener;
import android.widget.Button;
import android.widget.ImageView;
import android.widget.TextView;
public class A11Activity extends Activity {
 private ImageView iv;
 private TextView tv;
 private Button left,right;
 private int times;
 private int angle;
  /** Called when the activity is first created. */
  @Override
  public void onCreate(Bundle savedInstanceState) {
    super.onCreate(savedInstanceState);
    setContentView(R.layout.main);
    times=1;
    angle=1;
    iv=(ImageView)findViewById(R.id.iv);
    tv=(TextView)findViewById(R.id.tv);
    left=(Button)findViewById(R.id.left);
    left.setText("向左轉");
    right=(Button)findViewById(R.id.right);
    right.setText("向右轉");
    final Bitmap bmp=BitmapFactory.decodeResource(getResources(), R.drawable.a); //自己引入一張圖片a.png
    final int width=bmp.getWidth();
    final int height=bmp.getHeight();
    iv.setImageBitmap(bmp);
    left.setOnClickListener(new OnClickListener(){
  @Override
  public void onClick(View v) {
  // TODO Auto-generated method stub
  angle--;
  if(angle<-20){ //設置最多旋轉20度
   angle=-20;
  }
  int width01=width*times;
  int height01=height*times;
  float width02=(float)(width01/width);
  float height02=(float)(width02/height);
  Matrix m=new Matrix();
  m.postScale(width02, height02);
  m.setRotate(5*angle);
  Bitmap bmp01=Bitmap.createBitmap(bmp, 0, 0, width, height, m, true);
  BitmapDrawable bd=new BitmapDrawable(bmp01);
  iv.setImageDrawable(bd);
  tv.setText(Integer.toString(5*angle));
  }
  });
  right.setOnClickListener(new OnClickListener(){
  @Override
  public void onClick(View v) {
  // TODO Auto-generated method stub
  angle++;
  if(angle>20){
   angle=20;
  }
  int width01=width*times;
  int height01=height*times;
  float width02=(float)(width01/width);
  float height02=(float)(width02/height);
  Matrix m=new Matrix();
  m.postScale(width02, height02);
  m.setRotate(5*angle);
  Bitmap bmp01=Bitmap.createBitmap(bmp, 0, 0, width, height, m, true);
  BitmapDrawable bd=new BitmapDrawable(bmp01);
  iv.setImageDrawable(bd);
  tv.setText(Integer.toString(5*angle));
  }
  });
  }
}
res/layout/main.xml如下:
<?xml version="1.0" encoding="utf-8"?>
<LinearLayout xmlns:android="http://schemas.android.com/apk/res/android"
  android:layout_width="fill_parent"
  android:layout_height="fill_parent"
  android:orientation="vertical" >
  <TextView
    android:id="@+id/tv"
    android:layout_width="fill_parent"
    android:layout_height="wrap_content"
    android:text="@string/hello" />
  <Button
    android:id="@+id/left"
    android:layout_width="fill_parent"
    android:layout_height="wrap_content"
    />
  <Button
    android:id="@+id/right"
    android:layout_width="fill_parent"
    android:layout_height="wrap_content"
    />
  <ImageView
    android:id="@+id/iv"
    android:layout_width="fill_parent"
    android:layout_height="wrap_content"
    />
</LinearLayout>
更多關於Android相關內容感興趣的讀者可查看本站專題:《Android開發入門與進階教程》及《Android圖形與圖像處理技巧總結》
希望本文所述對大家Android程序設計有所幫助。
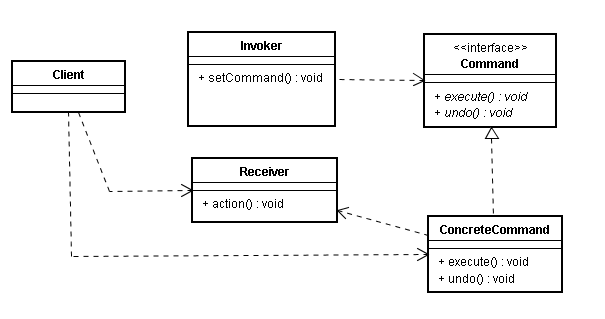 Android源碼中的命令模式
寫在前面從裝飾者模式到Context類族當觀察者模式和回調機制遇上Android源碼Android源碼中的靜態工廠方法Android中的工廠方法模式前面跟大家分享了裝飾者
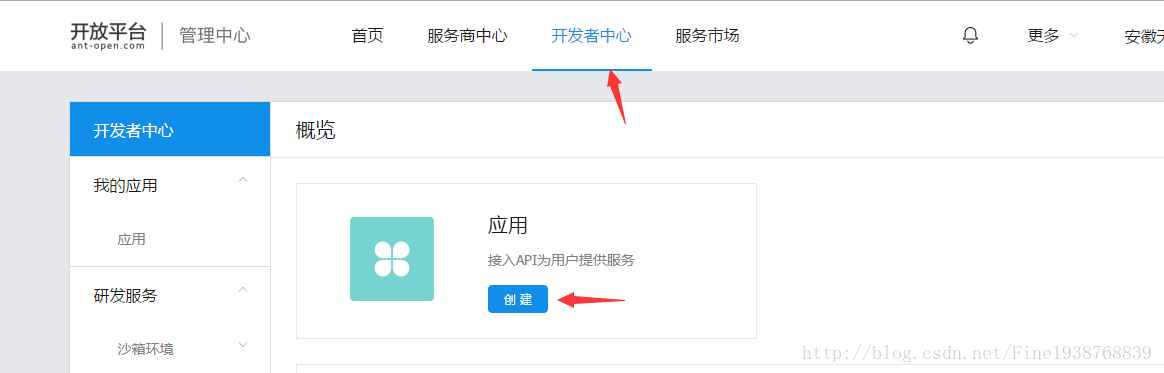 Android-支付寶支付
前言:緊接著上一篇的微信支付,本篇是集成支付寶支付,相對於微信支付,支付寶的集成就簡單了很多。話不多說,我們來看看怎麼簡單集成支付寶支付。1.看文檔:我們先要去螞蟻金服開
 android.support.v4.view.ViewPager 如何動態更換顯示內容
看一段簡單的代碼,在一個pager裡面顯示兩個TextView List items = new ArrayList();adapter = new MyPag
 RecyclerView.Adapter的優化與封裝
說實在的,敲代碼和看書相比較,我還是看書或是看博文看得多,到現在好久都沒練練手了,然後在簡書上面看了別人對adapter的封裝和優化,嘿,還真的挺不錯的,adapter真