編輯:關於Android編程
本文將向大家展示如何拍照截圖。
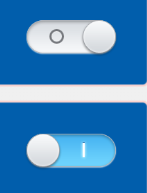
先看看效果圖:

拍照截圖有點兒特殊,要知道,現在的Android智能手機的攝像頭都是幾百萬的像素,拍出來的圖片都是非常大的。因此,我們不能像對待相冊截圖一樣使用Bitmap小圖,無論大圖小圖都統一使用Uri進行操作。
一、首先准備好需要使用到的Uri:
private

static
final
String IMAGE_FILE_LOCATION = "file:///sdcard/temp.jpg";//temp
 file

Uri
 imageUri = Uri.parse(IMAGE_FILE_LOCATION);//The
 Uri to store the big bitmap
二、使用MediaStore.ACTION_IMAGE_CAPTURE可以輕松調用Camera程序進行拍照:
Intent
 intent = new

Intent(MediaStore.ACTION_IMAGE_CAPTURE);//action
 is capture

intent.putExtra(MediaStore.EXTRA_OUTPUT,
 imageUri);

startActivityForResult(intent,
 TAKE_BIG_PICTURE);//or
 TAKE_SMALL_PICTURE
三、接下來就可以在 onActivityResult中拿到返回的數據(Uri),並將Uri傳遞給截圖的程序。
switch

(requestCode) {

case

TAKE_BIG_PICTURE:

  Log.d(TAG,
"TAKE_BIG_PICTURE:
 data = "
+ data);//it
 seems to be null

  //TODO
 sent to crop

  cropImageUri(imageUri,
800,
400,
 CROP_BIG_PICTURE);


  break;

case

TAKE_SMALL_PICTURE:

  Log.i(TAG,
"TAKE_SMALL_PICTURE:
 data = "
+ data);

  //TODO
 sent to crop

  cropImageUri(imageUri,
300,
150,
 CROP_SMALL_PICTURE);


  break;

default:

  break;

}
可以看到,無論是拍大圖片還是小圖片,都是使用的Uri,只是尺寸不同而已。我們將這個操作封裝在一個方法裡面
private

void
cropImageUri(Uri uri, int

outputX, int

outputY, int

requestCode){

  Intent
 intent = new

Intent("com.android.camera.action.CROP");

  intent.setDataAndType(uri,
"image/*");

  intent.putExtra("crop",
"true");

  intent.putExtra("aspectX",
2);

  intent.putExtra("aspectY",
1);

  intent.putExtra("outputX",
 outputX);

  intent.putExtra("outputY",
 outputY);

  intent.putExtra("scale",
true);

  intent.putExtra(MediaStore.EXTRA_OUTPUT,
 uri);

  intent.putExtra("return-data",
false);

  intent.putExtra("outputFormat",
 Bitmap.CompressFormat.JPEG.toString());

  intent.putExtra("noFaceDetection",
true);
//
 no face detection

  startActivityForResult(intent,
 requestCode);

}
四、最後一步,我們已經將數據傳入裁剪圖片程序,接下來要做的就是處理返回的數據了:
switch

(requestCode) {

case

CROP_BIG_PICTURE://from
 crop_big_picture

  Log.d(TAG,
"CROP_BIG_PICTURE:
 data = "
+ data);//it
 seems to be null

  if(imageUri
 != null){

    Bitmap
 bitmap = decodeUriAsBitmap(imageUri);

    imageView.setImageBitmap(bitmap);

  }

  break;

case

CROP_SMALL_PICTURE:

  if(imageUri
 != null){

    Bitmap
 bitmap = decodeUriAsBitmap(imageUri);

    imageView.setImageBitmap(bitmap);

  }else{

    Log.e(TAG,
"CROP_SMALL_PICTURE:
 data = "
+ data);

  }

  break;

default:

  break;

}
以上就是Android實現拍照截圖功能的方法,希望對大家的學習有所幫助。
 Android開發之單元測試(一)
Android開發之單元測試(一) 請尊重他人的勞動成果,轉載請注明出處 : Android開發之單元測試(一) http://blog.csdn.net/fengy
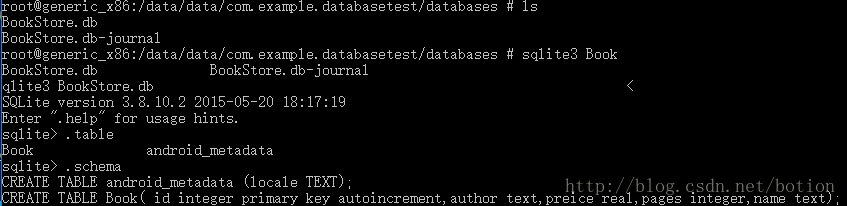 Android知識(SQLite數據庫存儲)
借助SQLiteOpenHelper幫助類實現對數據庫的創建和升級。MainActivity.javapackage com.example.databasetest;i
 Java重難點面試(一)
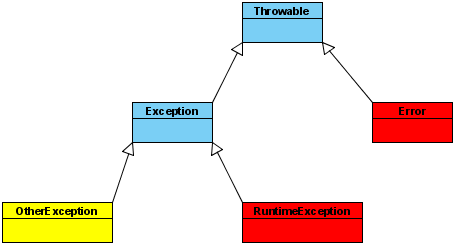
1 . 以下集合對象中哪幾個是線程安全的?(B,C,D )A: ArrayListB: VectorC: HashtableD: Stack解析:下面是這些線程安全的同步
 ListView(1)控件架構與ArrayAdapter詳解
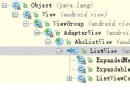
ListView是Android開發中比較常用的一個組件,它以列表的形式展示信息,並能根據信息的長度自適應顯示。比如說我們手機裡的通訊錄就用到了ListView顯示聯系人
 Android從零開搞系列:自定義View(6)ScrollTo+ScrollBy+Scroller+NestedScrolling機制(上)
本菜開源的一個自己寫的Demo,希望能給Androider們有所幫助,