編輯:關於Android編程
本文實例講述了android編程實現局部界面動態切換的方法。分享給大家供大家參考,具體如下:
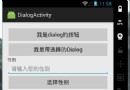
局部界面固定,局部界面可以動態切換。效果如下:


這個效果由3個layout構成
main.xml
<?xml version="1.0" encoding="utf-8"?>
<LinearLayout xmlns:android="http://schemas.android.com/apk/res/android"
  android:layout_width="fill_parent"
  android:layout_height="fill_parent"
  android:orientation="horizontal" >
  <LinearLayout
    android:layout_width="fill_parent"
    android:layout_height="fill_parent"
    android:layout_weight="1"
    android:background="@android:color/black" >
    <Button
      android:id="@+id/btnSwitch"
      android:layout_width="wrap_content"
      android:layout_height="wrap_content"
      android:text="switch" />
    <Button
      android:id="@+id/btnScreen"
      android:layout_width="wrap_content"
      android:layout_height="wrap_content"
      android:text="screen" />
  </LinearLayout>
  <LinearLayout
    android:id="@+id/frameSwitch"
    android:layout_width="160dp"
    android:layout_height="fill_parent"
    android:background="@android:color/white" >
  </LinearLayout>
</LinearLayout>
one.xml
<?xml version="1.0" encoding="utf-8"?>
<LinearLayout xmlns:android="http://schemas.android.com/apk/res/android"
  android:layout_width="fill_parent"
  android:layout_height="fill_parent"
  android:background="@color/yellow"
  android:orientation="vertical" >
  <TextView
    android:layout_width="wrap_content"
    android:layout_height="wrap_content"
    android:text="this is linearLayout one" />
</LinearLayout>
two.xml
<?xml version="1.0" encoding="utf-8"?>
<LinearLayout xmlns:android="http://schemas.android.com/apk/res/android"
  android:layout_width="match_parent"
  android:layout_height="match_parent"
  android:orientation="vertical" >
  <TextView
    android:layout_width="wrap_content"
    android:layout_height="wrap_content"
    android:text="this is linearLayout two" />
  <Button
    android:id="@+id/btnSecond"
    android:layout_width="wrap_content"
    android:layout_height="wrap_content"
    android:text="btnSecond" />
</LinearLayout>
下面是Java代碼
public class ZzzAndroidActivity extends Activity {
  private LinearLayout frameSwitch;
  /** Called when the activity is first created. */
  @Override
  public void onCreate(Bundle savedInstanceState) {
    super.onCreate(savedInstanceState);
    setContentView(R.layout.main);
    frameSwitch = (LinearLayout) findViewById(R.id.frameSwitch);
    Button btnSwitch = (Button) findViewById(R.id.btnSwitch);
    btnSwitch.setOnClickListener(new OnClickListener() {
      boolean boo = false;
      @Override
      public void onClick(View v) {
        boo = !boo;
        if (boo) {
          getViewOne();
        } else {
          getViewSecond();
        }
      }
    });
    /*
     * 是否全屏
     */
    Button btnScreen = (Button) findViewById(R.id.btnScreen);
    btnScreen.setOnClickListener(new OnClickListener() {
      boolean isScreen = false;
      @Override
      public void onClick(View v) {
        isScreen = !isScreen;
        if (isScreen) {
          frameSwitch.setVisibility(android.view.View.GONE);
        } else {
          frameSwitch.setVisibility(android.view.View.VISIBLE);
        }
      }
    });
  }
  public void getViewOne() {
    View viewOne = getLayoutInflater().inflate(R.layout.one, null);
    frameSwitch.removeAllViews();
    frameSwitch.addView(viewOne, LayoutParams.FILL_PARENT,
        LayoutParams.FILL_PARENT);
  }
  public void getViewSecond() {
    View viewSecond = getLayoutInflater().inflate(R.layout.two, null);
    Button btn = (Button) viewSecond.findViewById(R.id.btnSecond);
    btn.setOnClickListener(new OnClickListener() {
      @Override
      public void onClick(View v) {
        Toast.makeText(ZzzAndroidActivity.this, "hello world",
            Toast.LENGTH_LONG).show();
      }
    });
    frameSwitch.removeAllViews();
    frameSwitch.addView(viewSecond, LayoutParams.FILL_PARENT,
        LayoutParams.FILL_PARENT);
  }
}
希望本文所述對大家Android程序設計有所幫助。
 文卓爺安卓模擬器安裝不上教程
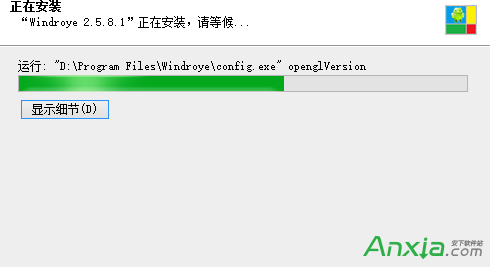
文卓爺(Windroye)產品是在PC上模擬安卓系統,使得安卓應用能運行在Windows平台上。文卓爺模擬器安裝不上怎麼辦?下面是文卓爺安卓模擬器安裝不上解
 Android基礎入門教程——7.6.2 基於TCP協議的Socket通信(1)
Android基礎入門教程——7.6.2 基於TCP協議的Socket通信(1)標簽(空格分隔): Android基礎入門教程本節引言: 上一節的
 ES文件浏覽器怎麼開啟保護跟打開網絡保護
ES文件浏覽器怎麼開啟保護跟打開網絡保護。ES文件浏覽器很強大的一個軟件。有時我們防止別人進入手機文件,偷看我們的文件的時候,我們設置對ES文件浏覽器開啟保
 Android字體大小怎麼自適應不同分辨率?
今天有人問我,android系統不同分辨率,不同大小的手機,字體大小怎麼去適應呢?其實字體的適應和圖片的適應是一個道理的。 一、 原理如下: 假設需要適應320x240,