編輯:關於Android編程
這篇文章沒有什麼可看性,主要是源碼注釋太多,推薦自己看源碼,更容易理解些,在這裡主要介紹,其運作流程,貼代碼片段。
自定義View要重寫三個方法:onMeasure,onLayout,onDraw,這三個方法各有個的作用,onMeasure是對組件的寬高進行測量,onLayout是對子控件的位置進行擺放,onDraw是對自定義控件進行繪制,已經對onMeasure,onLayout方法進行了運用,那個源碼注釋也很多,如果有興趣的可以去看看,本章是對onDraw方法進行使用,順帶使用Path對象。
好了,先談談為什麼我要重復造輪子,要做一個有簽到功能的日歷,由於自己對自定義的組件ondraw方法還沒怎麼用過,所以重復造輪子咯,是不是理由不是很充分,沒關系,開心就好。
先來張效果圖

這個CalendarView的API
    String clickLeftMonth();    //上一個月 return String(年-月)
    String clickRightMonth();   //下一個月 return String(年-月)
    Surface getSurface();       //獲取整個組件畫圖對象,可進行設置字體顏色等 return Surface
    String getYearAndmonth();   // 獲得當前應該顯示的年月 return String(年-月)
    boolean isSelectMore();     //返回是否多選
    setSelectMore(boolean flag);//設置是否多選
    setFlagData(String[] flags);//設置要進行標記的數據
    setOnItemClickListener(OnItemClickListener); //點擊一個日期的回調事件
    setWritingFlag(String str); //設置標記字符,默認為簽到
OK,先來簡述下這個組件跑起來的流程,
1.初始化數據。
2.測量組件大小,即調用了OnMeasure方法
3.調用onDraw方法。
步驟是不是很簡單呀?OK,通過源碼簡單的跑一下流程。
    public CalendarView(Context context) {
        super(context);
        // 初始化數據
        init();
    }

    public CalendarView(Context context, AttributeSet attrs) {
        super(context, attrs);
        // 初始化數據
        init();
    }

    /**
     * 初始化數據 ,初始化事件對象 ,初始化日期格式類對象 ,Surface布局對象初始化 ,獲取屏幕密度比例 ,設置View背景 ,設置觸摸事件
     */
    private void init() {
        // 創建一個Date對象並將引用給顯示的月,選擇開始,選擇結束,今天的日期
        curDate = selectedStartDate = selectedEndDate = today = new Date();
        // 獲取一個日期類對象
        calendar = Calendar.getInstance();
        // 設置日期
        calendar.setTime(curDate);
        // 創建一個布局路徑
        surface = new Surface(this);
        // 獲取屏幕密度比例
        surface.density = getResources().getDisplayMetrics().density;
        // 給整個控件設置觸摸事件
        setOnTouchListener(this);
    }
這一塊看出,在組件進行實例化的時候調用了init方法,然後看見了new Surface() 創建了一個Surface對象。ok來看下這個Surface類,其他的應該都知道是什麼。(像我注釋這麼密的看不懂才怪(*\^__^*))。
    public void init() {
        float temp = height / 7f;// 將整個視圖分成了7份,每份所占的高度
        monthHeight = 0;// (float) ((temp + temp * 0.3f) * 0.6);
        weekHeight = (float) ((temp + temp * 0.3f) * 0.5);
        cellHeight = (height - monthHeight - weekHeight) / 6f;
        cellWidth = width / 7f;
        // 創建一個邊框的畫筆並設置其屬性
        borderPaint = new Paint();
        borderPaint.setColor(cellBorderColor);
        borderPaint.setStyle(Paint.Style.STROKE);
        // 邊框的寬度
        borderWidth = (float) (0.5 * density);
        borderWidth = borderWidth < 1 ? 1 : borderWidth;
        borderPaint.setStrokeWidth(borderWidth);

        // 創建星期畫筆並設置其屬性
        weekPaint = new Paint();
        weekPaint.setColor(textWeekColor);
        weekPaint.setAntiAlias(true);
        float weekTextSize = weekHeight * 0.6f;
        weekPaint.setTextSize(weekTextSize);
        weekPaint.setTypeface(Typeface.DEFAULT_BOLD);

        // 創建時間畫筆並設置其屬性
        datePaint = new Paint();
        datePaint.setAntiAlias(true);
        float cellTextSize = cellHeight * 0.3f;
        datePaint.setTextSize(cellTextSize);
        datePaint.setTypeface(Typeface.DEFAULT_BOLD);

        // 創建一個Path對象用於記錄畫筆所畫的路徑
        boxPath = new Path();
        // 畫第一行,現在起點是0,0
        boxPath.rLineTo(width, 0);
        // 將起點向下移動一個星期格子的高度
        boxPath.moveTo(0, monthHeight + weekHeight);
        // 畫第二行
        boxPath.rLineTo(width, 0);

        // 循環畫縱線和號數的橫線
        for (int i = 1; i < 7; i++) {
            // 縱線
            boxPath.moveTo(i * cellWidth, monthHeight);
            boxPath.rLineTo(0, height - monthHeight);
            // 橫線
            boxPath.moveTo(0, monthHeight + weekHeight + i * cellHeight);
            boxPath.rLineTo(width, 0);
        }

        // 表格被選擇後使用的畫筆
        cellBgPaint = new Paint();
        cellBgPaint.setAntiAlias(true);
        cellBgPaint.setStyle(Paint.Style.FILL);
        cellBgPaint.setColor(cellSelectBgColor);
    }
其實這個類也沒做什麼,就一個init方法就是初始化各種畫筆,然後動態計算各種高度和寬度。這裡面的那個for循環裡面的boxPath就是通過path對象記錄繪制的表格路徑。
ok回到CalendarView類,這個組件被實例化了,就開始進行調用onMeasure方法了。這方法裡面沒啥可說的就是測量這個組件的大小,確定這個組件需要的寬高是多少如果
onMeasure和onLayout會被執行兩次,然後才執行onDraw方法,看下這個onDraw方法。
首先調用了這個calculateDate方法。這個方法是動態計算日期的。
/**
     * 計算日期,計算出上月,這月下月的日期裝入到一個數組裡面進行保存
     */
    private void calculateDate() {
        calendar.setTime(curDate);
        calendar.set(Calendar.DAY_OF_MONTH, 1);
        int dayInWeek = calendar.get(Calendar.DAY_OF_WEEK);
        Log.d(TAG, "day in week:" + dayInWeek);
        int monthStart = dayInWeek;
        monthStart -= 1; // 以日為開頭-1,以星期一為開頭-2
        curStartIndex = monthStart;
        date[monthStart] = 1;
        // last month
        if (monthStart > 0) {
            calendar.set(Calendar.DAY_OF_MONTH, 0);
            int dayInmonth = calendar.get(Calendar.DAY_OF_MONTH);
            for (int i = monthStart - 1; i >= 0; i--) {
                date[i] = dayInmonth;
                dayInmonth--;
            }
            calendar.set(Calendar.DAY_OF_MONTH, date[0]);
        }
        showFirstDate = calendar.getTime();

        // this month
        calendar.setTime(curDate);
        calendar.add(Calendar.MONTH, 1);
        calendar.set(Calendar.DAY_OF_MONTH, 0);
        int monthDay = calendar.get(Calendar.DAY_OF_MONTH);
        for (int i = 1; i < monthDay; i++) {
            date[monthStart + i] = i + 1;
        }
        curEndIndex = monthStart + monthDay;

        // next month
        for (int i = monthStart + monthDay; i < 42; i++) {
            date[i] = i - (monthStart + monthDay) + 1;
        }
        if (curEndIndex < 42) {
            // 顯示了下一月的
            calendar.add(Calendar.DAY_OF_MONTH, 1);
        }
        calendar.set(Calendar.DAY_OF_MONTH, date[41]);
        showLastDate = calendar.getTime();
    }
這個方法動態計算日期,顯示計算上個月所剩下的日期裝入數組date裡面,然後裝當前月份的,最後裝下個月開頭部分日期。
為什麼會在這個onDraw方法裡面調用呢,因為如果在構造方法裡面執行一次就沒法執行了,如果我點擊下一個月那數據就不變了,onMeasure和onLayout都執行兩遍所以不行。因此只能在onDraw方法繪制一次,計算一下。
往下看,這段代碼是繪制星期天的。
        // 畫用於分隔顯示號數的表格框
        canvas.drawPath(surface.boxPath, surface.borderPaint);
        // 星期計算
        float weekTextY = surface.monthHeight + surface.weekHeight * 3 / 4f;
        // 繪制星期1.2.3等字體
        for (int i = 0; i < surface.weekText.length; i++) {
            float weekTextX = i
                    * surface.cellWidth
                    + (surface.cellWidth - surface.weekPaint
                    .measureText(surface.weekText[i])) / 2f;
            canvas.drawText(surface.weekText[i], weekTextX, weekTextY,
                    surface.weekPaint);
        }
動態計算星期1-7的位置然後在所處位置繪制文字。
再下面就是繪制選擇格子的背景顏色,默認是當前月的當前號數。
    /**
     * @param canvas
     */
    private void drawDownOrSelectedBg(Canvas canvas) {
        // down and not up
        if (downDate != null) {
            drawCellBg(canvas, downIndex, surface.cellDownBgColor);
        }
        // selected bg color
        if (!selectedEndDate.before(showFirstDate)
                && !selectedStartDate.after(showLastDate)) {
            int[] section = new int[]{-1, -1};
            calendar.setTime(curDate);
            calendar.add(Calendar.MONTH, -1);
            findSelectedIndex(0, curStartIndex, calendar, section);
            if (section[1] == -1) {
                calendar.setTime(curDate);
                findSelectedIndex(curStartIndex, curEndIndex, calendar, section);
            }
            if (section[1] == -1) {
                calendar.setTime(curDate);
                calendar.add(Calendar.MONTH, 1);
                findSelectedIndex(curEndIndex, 42, calendar, section);
            }
            if (section[0] == -1) {
                section[0] = 0;
            }
            if (section[1] == -1) {
                section[1] = 41;
            }
            for (int i = section[0]; i <= section[1]; i++) {
                drawCellBg(canvas, i, surface.cellSelectBgColor);
            }
        }
    }
後面就是開始繪制日期,即將畫出來的表格填充數字。
        for (int i = 0; i < num; i++) {
            // 這個月的字體顏色
            int color = surface.textInstantColor;
            if (isLastMonth(i)) {
                // 上個月字體顏色
                color = surface.textOtherColor;
            } else if (isNextMonth(i)) {
                // 下個月字體顏色
                color = surface.textOtherColor;
            } else if (todayIndex != -1) {
                // 循環為簽到的日期加標記
                int flagLen = flagData == null ? 0 : flagData.length;
                for (int j = 0; j < flagLen; j++) {
                    if ((date[i] + "").equals(flagData[j]))
                        drawCellFlag(canvas, i, surface.textFlagBgColor,
                                surface.textFlagColor);
                }
                // 如果todayIndex不等於-1且等於今天
                if (i == todayIndex) {
                    // 今天字體顏色
                    color = surface.textTodayColor;
                }
            }
            drawCellText(canvas, i, date[i] + "", color);
        }
在這值得一提的就是這個添加簽到標簽的方法drawCellFlag。
    /**
     * 在格子的右上角進行繪制標簽
     *
     * @param canvas     畫布
     * @param index     下標
     * @param bgcolor   背景顏色
     * @param textcolor 字體顏色
     */
    private void drawCellFlag(Canvas canvas, int index, int bgcolor,
                              int textcolor) {
        int x = getXByIndex(index);
        int y = getYByIndex(index);
        // 計算一個方格子的上下左右距離組件邊框的距離,以此來推出其坐標
        float left = surface.cellWidth * (x - 1) + surface.borderWidth;
        float top = surface.monthHeight + surface.weekHeight + (y - 1)
                * surface.cellHeight - surface.borderWidth;
        float right = left + surface.cellWidth + surface.borderWidth;
        float botton = top + surface.cellHeight - surface.borderWidth;

        surface.cellBgPaint.setColor(bgcolor);
        // 通過Path來記錄路徑,畫一個梯形圖
        Path path = new Path();
        path.moveTo(right - surface.cellWidth * 2 / 3, top);
        path.lineTo(right - surface.cellWidth / 4, top);
        path.lineTo(right, botton - surface.cellHeight * 3 / 4);
        path.lineTo(right, botton - surface.cellHeight / 3);
        canvas.drawPath(path, surface.cellBgPaint);

        // 因為下面的繪制的文字將要進行旋轉因此我將以上Canvas繪制的圖案進行保存,這樣就不會被旋轉給影響到了
        canvas.save();
        // 將字體進行旋轉40度,以文字開始繪制的坐標點進行旋轉
        canvas.rotate((float) 45, right - surface.cellWidth * 3 / 7, botton
                - surface.cellHeight * 5 / 6);
        surface.cellBgPaint.setColor(textcolor);
        // 動態的計算字體大小
        float a = surface.cellWidth / 4;
        float b = surface.cellHeight / 4;
        float c = (float) Math.sqrt(a * a + b * b);
        surface.cellBgPaint.setTextSize(c * 3 / 5);
        surface.cellBgPaint.setTypeface(Typeface.DEFAULT_BOLD);
        // 繪制文字
        canvas.drawText(writingFlag, right - surface.cellWidth * 3 / 7, botton
                - surface.cellHeight * 5 / 6, surface.cellBgPaint);
        // 釋放旋轉狀態,恢復sava時的狀態
        canvas.restore();
    }
這個方法裡面能計算出每個表格的left,right,top,botton的位置,即就可以動態計算梯形四個點,這四個點就是
A(right - surface.cellWidth * 2 / 3, top)
B(right - surface.cellWidth / 4, top)
C(right, botton - surface.cellHeight * 3 / 4)
D(right, botton - surface.cellHeight / 3)
通過Path對象記錄這四個點串起來的路徑然後canvas繪制就ok了。
而這個標簽“簽到”的位置也是這樣給算出來的。
ok,大概流程講完了。詳細的可以去看源碼,裡面注釋多多,你一定能看懂的。(*^__^*)。
 android動態設置app當前運行語言
android開發中有時候碰到切換語言的需求,這時候需要通過代碼動態改變當前運行語言。 package com.example.androidtest; import
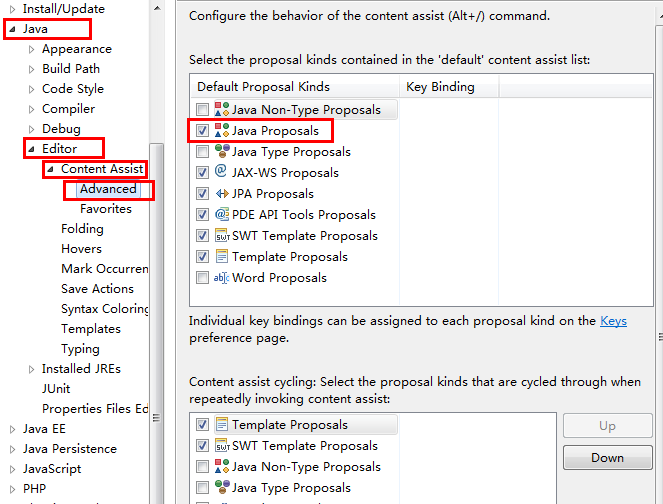 android開發 eclipse alt+”/”自動提示失效的解決方法
1、用於沒有一點提示的情況:依次打開eclipse上面的windows ——preferences ——java ——editor —— content assist ,
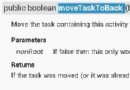 Android之後台啟動Activity
在實際開發中,Activity需要啟動但界面又不能顯示出來,這時就需要後台啟動,但又不是finish(),這時就要用到Activity中的moveTaskToBack函數
 Android提供的系統服務之--AlarmManager(鬧鐘服務)
本節引言: 本節主要介紹的是Android系統服務中的---AlarmManager(鬧鐘服務), 除了開發手機鬧鐘外,更多的時候是作為一個全