編輯:關於Android編程
本文實例講述了Android編程實現二級下拉菜單及快速搜索的方法。分享給大家供大家參考,具體如下:
一、我們要做什麼?

上面有個搜索框,下面是一個二級下拉菜單。

輸入查詢內容,下面列表將顯示查詢結果。
二、界面設計
(1)這是主框架(部分屬性已經省去,請看源碼),從上至下分別是文本框,列表,二級列表。
<?xml version="1.0" encoding="utf-8"?>
<LinearLayout>
 <LinearLayout
  android:id="@+id/city_middle">
  <EditText
   android:id="@+id/txtfind"
   android:hint="請輸入" >
  </EditText>
  <ListView
   android:id="@+id/listfind" >
  </ListView>
  <ExpandableListView
   android:id="@+id/exList" />
 </LinearLayout>
</LinearLayout>
(2)一級菜單欄樣式,圖片將區別是否展開
<?xml version="1.0" encoding="utf-8"?>
<LinearLayout >
 <TextView
  android:id="@+id/group" >
 </TextView>
 <ImageView
  android:id="@+id/tubiao">
 </ImageView>
</LinearLayout>
(3)二級菜單欄樣式
<?xml version="1.0" encoding="utf-8"?>
<LinearLayout >
 <TextView
  android:id="@+id/child">
 </TextView>
</LinearLayout>
三、代碼設計
(1) 定義菜單對應數據
public static List<BasicNameValuePair> fatherList = new ArrayList<BasicNameValuePair>();
public static List<List<BasicNameValuePair>> childList = new ArrayList<List<BasicNameValuePair>>();
生成測試數據
for (int i = 0; i < 20; i++) {
 fatherList.add(new BasicNameValuePair("father" + i, "father" + i));
 List<BasicNameValuePair> cList = new ArrayList<BasicNameValuePair>();
 for (int j = 0; j < 5; j++) {
  cList.add(new BasicNameValuePair("child" + i + ":" + j, "child"
    + i + ":" + j));
 }
 childList.add(cList);
}
(2)定義列表適配器
protected class ListAdapter extends BaseAdapter {
  private LayoutInflater mInflater;
  //查詢結果列表
  private List<BasicNameValuePair> list = new ArrayList<BasicNameValuePair>();
  public ListAdapter(Context context, String strin) {
   mInflater = LayoutInflater.from(context);
   //查詢匹配
   for (int i = 0; i < childList.size(); i++) {
    for (int j = 0; j < childList.get(i).size(); j++) {
     String tmp = childList.get(i).get(j).getValue();
     if (tmp.indexOf(strin) >= 0) {
      list.add(new BasicNameValuePair(childList.get(i).get(j)
        .getName(), tmp));
     }
    }
   }
  }
  public int getCount() {
   return list.size();
  }
  public Object getItem(int position) {
   return position;
  }
  public long getItemId(int position) {
   return position;
  }
  public View getView(final int position, View convertView,
    ViewGroup parent) {
   convertView = mInflater.inflate(R.layout.child, null);
   TextView title = (TextView) convertView.findViewById(R.id.child);
   title.setText(list.get(position).getValue());
   return convertView;
  }
 }
初始化列表,默認為隱藏
list = (ListView) findViewById(R.id.listfind);
list.setVisibility(View.GONE);
(3)定義二級列表適配器
protected class ExAdapter extends BaseExpandableListAdapter {
  @Override
  public int getGroupCount() {
   return fatherList.size();
  }
  @Override
  public int getChildrenCount(int groupPosition) {
   return childList.get(groupPosition).size();
  }
  @Override
  public Object getGroup(int groupPosition) {
   return fatherList.get(groupPosition).getValue();
  }
  @Override
  public Object getChild(int groupPosition, int childPosition) {
   return childList.get(groupPosition).get(childPosition).getValue();
  }
  @Override
  public long getGroupId(int groupPosition) {
   return groupPosition;
  }
  @Override
  public long getChildId(int groupPosition, int childPosition) {
   return childPosition;
  }
  @Override
  public View getGroupView(int groupPosition, boolean isExpanded,
    View convertView, ViewGroup parent) {
   View view = convertView;
   if (view == null) {
    LayoutInflater inflater = (LayoutInflater) getSystemService(Context.LAYOUT_INFLATER_SERVICE);
    view = inflater.inflate(R.layout.group, null);
   }
   TextView t = (TextView) view.findViewById(R.id.group);
   t.setText(fatherList.get(groupPosition).getValue());
   //展開,改變圖片
   ImageView gImg = (ImageView) view.findViewById(R.id.tubiao);
   if (isExpanded)
    gImg.setBackgroundResource(R.drawable.mm_submenu_down_normal);
   else
    gImg.setBackgroundResource(R.drawable.mm_submenu_normal);
   return view;
  }
  @Override
  public View getChildView(int groupPosition, int childPosition,
    boolean isLastChild, View convertView, ViewGroup parent) {
   View view = convertView;
   if (view == null) {
    LayoutInflater inflater = (LayoutInflater) getSystemService(Context.LAYOUT_INFLATER_SERVICE);
    view = inflater.inflate(R.layout.child, null);
   }
   TextView t = (TextView) view.findViewById(R.id.child);
   t.setText(childList.get(groupPosition).get(childPosition)
     .getValue());
   return view;
  }
  @Override
  public boolean hasStableIds() {
   return true;
  }
  @Override
  public boolean isChildSelectable(int groupPosition, int childPosition) {
   return true;
  }
}
初始化二級菜單
exList = (ExpandableListView) findViewById(R.id.exList);
exList.setAdapter(new ExAdapter());
exList.setGroupIndicator(null);
exList.setDivider(null);
(4)搜索事件,輸入改變即觸發
txtFind = (EditText) findViewById(R.id.txtfind);
txtFind.addTextChangedListener(new TextWatcher() {
 @Override
 public void beforeTextChanged(CharSequence s, int start, int count,
   int after) {
 }
 @Override
 public void onTextChanged(CharSequence s, int start, int before,
   int count) {
 }
 @Override
 public void afterTextChanged(Editable s) {
  if (s != null && !s.toString().equals("")) {
   list.setAdapter(new ListAdapter(DWinterDemoActivity.this, s
     .toString()));
   list.setVisibility(View.VISIBLE);
   exList.setVisibility(View.GONE);
  } else {
   list.setVisibility(View.GONE);
   exList.setVisibility(View.VISIBLE);
  }
 }
});
(5)去除焦點自動彈出輸入
getWindow().setSoftInputMode(
WindowManager.LayoutParams.SOFT_INPUT_STATE_ALWAYS_HIDDEN);
希望本文所述對大家Android程序設計有所幫助。
 [Android&Java]設計模式代碼篇:觀察者模式
觀察者,就如同一個人,對很多東西都感興趣,就好像音樂、電子產品、Game、股票等,這些東西的變化都能引起愛好者們的注意並時刻關注他們。在代碼中,我們也有這樣的一種方式來設
 Android實現平鋪圖片效果
最近開發App,美工設計了一個有鋸齒邊沿效果的背景圖,只給了我一個鋸齒,然後需要平鋪展示鋸齒效果: android中實現平鋪圖片有兩種方式:(1)在drawable中的d
 Android開發之Navigationdrawer導航抽屜功能的實現(源代碼分享)
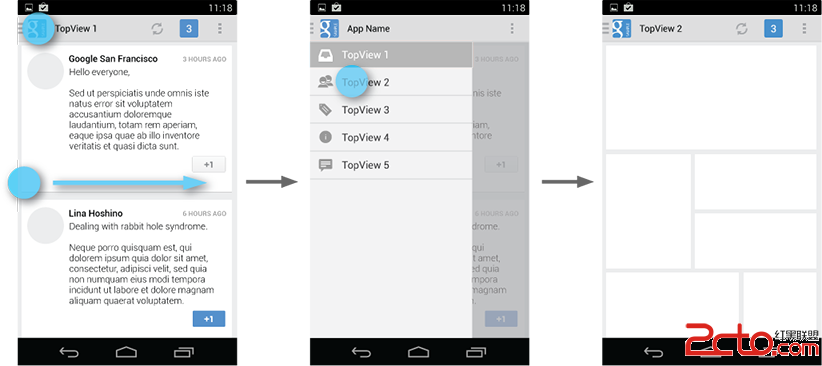
導航抽屜(navigationdrawer)是一個從屏幕左邊滑入的面板,用於顯示應用的主要導航項目。用戶可以通過在屏幕左邊緣滑入或者觸摸操作欄的應用圖標打開導航抽屜。導航
 android ListView和ProgressBar(進度條控件)的使用方法
ListView控件的使用:ListView控件裡面裝的是一行一行的數據,一行中可能有多列,選中一行,則該行的幾列都被選中,同時可以觸發一個事件,這種控件在平時還是用得很