編輯:關於Android編程
在上篇文章給大家介紹深入淺析Android Fragment(上篇),包括一些基本的用法和各種API,如果還想深入學習請繼續關注本篇文章。
本篇將介紹上篇提到的:如何管理Fragment回退棧,Fragment如何與Activity交互,Fragment與Activity交互的最佳實踐,沒有視圖的Fragment的用處,使用Fragment創建對話框,如何與ActionBar,MenuItem集成等~~
1、管理Fragment回退棧
類似與Android系統為Activity維護一個任務棧,我們也可以通過Activity維護一個回退棧來保存每次Fragment事務發生的變化。如果你將Fragment任務添加到回退棧,當用戶點擊後退按鈕時,將看到上一次的保存的Fragment。一旦Fragment完全從後退棧中彈出,用戶再次點擊後退鍵,則退出當前Activity。
看這樣一個效果圖:
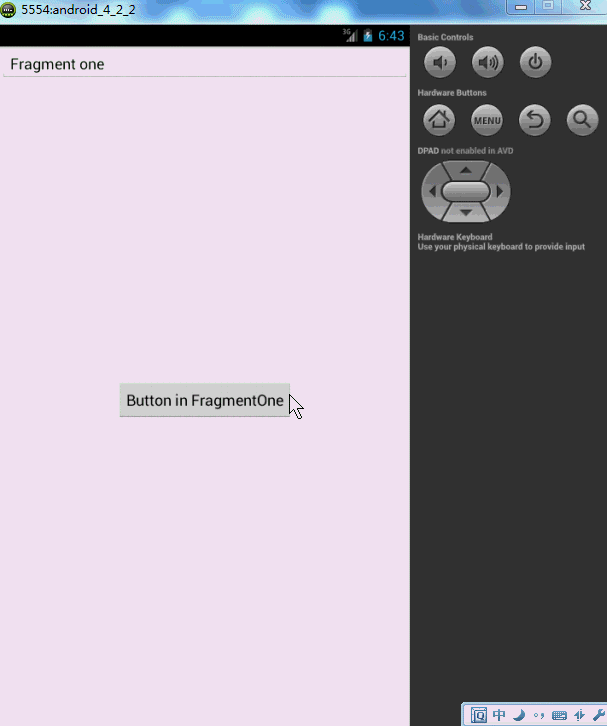
點擊第一個按鈕,切換到第二個界面,點擊第二個按鈕,切換到第三個界面,然後點擊Back鍵依次回退。這像不像初學Android時的Activity跳轉,當然了,這裡肯定不是,不然我就跪了。這裡是Fragment實現的,用戶點擊Back,實際是Fragment回退棧不斷的彈棧。
如何添加一個Fragment事務到回退棧:
FragmentTransaction.addToBackStack(String)
下面講解代碼:很明顯一共是3個Fragment和一個Activity.
先看Activity的布局文件:
<RelativeLayout xmlns:android="http://schemas.android.com/apk/res/android"
  xmlns:tools="http://schemas.android.com/tools"
  android:layout_width="match_parent"
  android:layout_height="match_parent" >
  <FrameLayout
    android:id="@+id/id_content"
    android:layout_width="fill_parent"
    android:layout_height="fill_parent" >
  </FrameLayout>
</RelativeLayout>
不同的Fragment就在這個FrameLayout中顯示。
MainActivity.java
package com.zhy.zhy_fragments;
import android.app.Activity;
import android.app.FragmentManager;
import android.app.FragmentTransaction;
import android.os.Bundle;
import android.view.Window;
public class MainActivity extends Activity
{
  @Override
  protected void onCreate(Bundle savedInstanceState)
  {
    super.onCreate(savedInstanceState);
    requestWindowFeature(Window.FEATURE_NO_TITLE);
    setContentView(R.layout.activity_main);
    FragmentManager fm = getFragmentManager();
    FragmentTransaction tx = fm.beginTransaction();
    tx.add(R.id.id_content, new FragmentOne(),"ONE");
    tx.commit();
  }
}
很簡單,直接將FragmentOne添加到布局文件中的FrameLayout中,注意這裡並沒有調用FragmentTransaction.addToBackStack(String),因為我不喜歡在當前顯示時,點擊Back鍵出現白板。而是正確的相應Back鍵,即退出我們的Activity.
下面是FragmentOne
package com.zhy.zhy_fragments;
import android.app.Fragment;
import android.app.FragmentManager;
import android.app.FragmentTransaction;
import android.os.Bundle;
import android.view.LayoutInflater;
import android.view.View;
import android.view.View.OnClickListener;
import android.view.ViewGroup;
import android.widget.Button;
public class FragmentOne extends Fragment implements OnClickListener
{
  private Button mBtn;
  @Override
  public View onCreateView(LayoutInflater inflater, ViewGroup container,
      Bundle savedInstanceState)
  {
    View view = inflater.inflate(R.layout.fragment_one, container, false);
    mBtn = (Button) view.findViewById(R.id.id_fragment_one_btn);
    mBtn.setOnClickListener(this);
    return view;
  }
  @Override
  public void onClick(View v)
  {
    FragmentTwo fTwo = new FragmentTwo();
    FragmentManager fm = getFragmentManager();
    FragmentTransaction tx = fm.beginTransaction();
    tx.replace(R.id.id_content, fTwo, "TWO");
    tx.addToBackStack(null);
    tx.commit();
  }
}
我們在點擊FragmentOne中的按鈕時,使用了replace方法,如果你看了前一篇博客,一定記得replace是remove和add的合體,並且如果不添加事務到回退棧,前一個Fragment實例會被銷毀。這裡很明顯,我們調用tx.addToBackStack(null);將當前的事務添加到了回退棧,所以FragmentOne實例不會被銷毀,但是視圖層次依然會被銷毀,即會調用onDestoryView和onCreateView,證據就是:仔細看上面的效果圖,我們在跳轉前在文本框輸入的內容,在用戶Back得到第一個界面的時候不見了。
接下來FragmentTwo
package com.zhy.zhy_fragments;
import android.app.Fragment;
import android.app.FragmentManager;
import android.app.FragmentTransaction;
import android.os.Bundle;
import android.view.LayoutInflater;
import android.view.View;
import android.view.View.OnClickListener;
import android.view.ViewGroup;
import android.widget.Button;
public class FragmentTwo extends Fragment implements OnClickListener
{
  private Button mBtn ;
  @Override
  public View onCreateView(LayoutInflater inflater, ViewGroup container,
      Bundle savedInstanceState)
  {
    View view = inflater.inflate(R.layout.fragment_two, container, false);
    mBtn = (Button) view.findViewById(R.id.id_fragment_two_btn);
    mBtn.setOnClickListener(this);
    return view ;
  }
  @Override
  public void onClick(View v)
  {
    FragmentThree fThree = new FragmentThree();
    FragmentManager fm = getFragmentManager();
    FragmentTransaction tx = fm.beginTransaction();
    tx.hide(this);
    tx.add(R.id.id_content , fThree, "THREE");
//   tx.replace(R.id.id_content, fThree, "THREE");
    tx.addToBackStack(null);
    tx.commit();
  }
}
這裡點擊時,我們沒有使用replace,而是先隱藏了當前的Fragment,然後添加了FragmentThree的實例,最後將事務添加到回退棧。這樣做的目的是為了給大家提供一種方案:如果不希望視圖重繪該怎麼做,請再次仔細看效果圖,我們在FragmentTwo的EditText填寫的內容,用戶Back回來時,數據還在~~~
最後FragmentThree就是簡單的Toast了:
package com.zhy.zhy_fragments;
import android.app.Fragment;
import android.os.Bundle;
import android.view.LayoutInflater;
import android.view.View;
import android.view.View.OnClickListener;
import android.view.ViewGroup;
import android.widget.Button;
import android.widget.Toast;
public class FragmentThree extends Fragment implements OnClickListener
{
  private Button mBtn;
  @Override
  public View onCreateView(LayoutInflater inflater, ViewGroup container,
      Bundle savedInstanceState)
  {
    View view = inflater.inflate(R.layout.fragment_three, container, false);
    mBtn = (Button) view.findViewById(R.id.id_fragment_three_btn);
    mBtn.setOnClickListener(this);
    return view;
  }
  @Override
  public void onClick(View v)
  {
    Toast.makeText(getActivity(), " i am a btn in Fragment three",
        Toast.LENGTH_SHORT).show();
  }
}
好了,經過上面的介紹,應該已經知道Fragment回退棧是怎麼一回事了,以及hide,replace等各自的應用的場景。
這裡極其注意一點:上面的整體代碼不具有任何參考價值,純粹為了顯示回退棧,在後面講解了Fragment與Activity通信以後,會重構上面的代碼!
2、Fragment與Activity通信
因為所有的Fragment都是依附於Activity的,所以通信起來並不復雜,大概歸納為:
a、如果你Activity中包含自己管理的Fragment的引用,可以通過引用直接訪問所有的Fragment的public方法
b、如果Activity中未保存任何Fragment的引用,那麼沒關系,每個Fragment都有一個唯一的TAG或者ID,可以通過getFragmentManager.findFragmentByTag()或者findFragmentById()獲得任何Fragment實例,然後進行操作。
c、在Fragment中可以通過getActivity得到當前綁定的Activity的實例,然後進行操作。
注:如果在Fragment中需要Context,可以通過調用getActivity(),如果該Context需要在Activity被銷毀後還存在,則使用getActivity().getApplicationContext()。
3、Fragment與Activity通信的最佳實踐
因為要考慮Fragment的重復使用,所以必須降低Fragment與Activity的耦合,而且Fragment更不應該直接操作別的Fragment,畢竟Fragment操作應該由它的管理者Activity來決定。
下面我通過兩種方式的代碼,分別重構,FragmentOne和FragmentTwo的點擊事件,以及Activity對點擊事件的響應:
首先看FragmentOne
package com.zhy.zhy_fragments;
import android.app.Fragment;
import android.os.Bundle;
import android.view.LayoutInflater;
import android.view.View;
import android.view.View.OnClickListener;
import android.view.ViewGroup;
import android.widget.Button;
public class FragmentOne extends Fragment implements OnClickListener
{
  private Button mBtn;
  /**
   * 設置按鈕點擊的回調
   * @author zhy
   *
   */
  public interface FOneBtnClickListener
  {
    void onFOneBtnClick();
  }
  @Override
  public View onCreateView(LayoutInflater inflater, ViewGroup container,
      Bundle savedInstanceState)
  {
    View view = inflater.inflate(R.layout.fragment_one, container, false);
    mBtn = (Button) view.findViewById(R.id.id_fragment_one_btn);
    mBtn.setOnClickListener(this);
    return view;
  }
  /**
   * 交給宿主Activity處理,如果它希望處理
   */
  @Override
  public void onClick(View v)
  {
    if (getActivity() instanceof FOneBtnClickListener)
    {
      ((FOneBtnClickListener) getActivity()).onFOneBtnClick();
    }
  }
}
可以看到現在的FragmentOne不和任何Activity耦合,任何Activity都可以使用;並且我們聲明了一個接口,來回調其點擊事件,想要管理其點擊事件的Activity實現此接口就即可。可以看到我們在onClick中首先判斷了當前綁定的Activity是否實現了該接口,如果實現了則調用。
再看FragmentTwo
package com.zhy.zhy_fragments;
import android.app.Fragment;
import android.os.Bundle;
import android.view.LayoutInflater;
import android.view.View;
import android.view.View.OnClickListener;
import android.view.ViewGroup;
import android.widget.Button;
public class FragmentTwo extends Fragment implements OnClickListener
{
  private Button mBtn ;
  private FTwoBtnClickListener fTwoBtnClickListener ;
  public interface FTwoBtnClickListener
  {
    void onFTwoBtnClick();
  }
  //設置回調接口
  public void setfTwoBtnClickListener(FTwoBtnClickListener fTwoBtnClickListener)
  {
    this.fTwoBtnClickListener = fTwoBtnClickListener;
  }
  @Override
  public View onCreateView(LayoutInflater inflater, ViewGroup container,
      Bundle savedInstanceState)
  {
    View view = inflater.inflate(R.layout.fragment_two, container, false);
    mBtn = (Button) view.findViewById(R.id.id_fragment_two_btn);
    mBtn.setOnClickListener(this);
    return view ;
  }
  @Override
  public void onClick(View v)
  {
    if(fTwoBtnClickListener != null)
    {
      fTwoBtnClickListener.onFTwoBtnClick();
    }
  }
}
與FragmentOne極其類似,但是我們提供了setListener這樣的方法,意味著Activity不僅需要實現該接口,還必須顯示調用mFTwo.setfTwoBtnClickListener(this)。
最後看Activity :
package com.zhy.zhy_fragments;
import android.app.Activity;
import android.app.FragmentManager;
import android.app.FragmentTransaction;
import android.os.Bundle;
import android.view.Window;
import com.zhy.zhy_fragments.FragmentOne.FOneBtnClickListener;
import com.zhy.zhy_fragments.FragmentTwo.FTwoBtnClickListener;
public class MainActivity extends Activity implements FOneBtnClickListener,
    FTwoBtnClickListener
{
  private FragmentOne mFOne;
  private FragmentTwo mFTwo;
  private FragmentThree mFThree;
  @Override
  protected void onCreate(Bundle savedInstanceState)
  {
    super.onCreate(savedInstanceState);
    requestWindowFeature(Window.FEATURE_NO_TITLE);
    setContentView(R.layout.activity_main);
    mFOne = new FragmentOne();
    FragmentManager fm = getFragmentManager();
    FragmentTransaction tx = fm.beginTransaction();
    tx.add(R.id.id_content, mFOne, "ONE");
    tx.commit();
  }
  /**
   * FragmentOne 按鈕點擊時的回調
   */
  @Override
  public void onFOneBtnClick()
  {
    if (mFTwo == null)
    {
      mFTwo = new FragmentTwo();
      mFTwo.setfTwoBtnClickListener(this);
    }
    FragmentManager fm = getFragmentManager();
    FragmentTransaction tx = fm.beginTransaction();
    tx.replace(R.id.id_content, mFTwo, "TWO");
    tx.addToBackStack(null);
    tx.commit();
  }
  /**
   * FragmentTwo 按鈕點擊時的回調
   */
  @Override
  public void onFTwoBtnClick()
  {
    if (mFThree == null)
    {
      mFThree = new FragmentThree();
    }
    FragmentManager fm = getFragmentManager();
    FragmentTransaction tx = fm.beginTransaction();
    tx.hide(mFTwo);
    tx.add(R.id.id_content, mFThree, "THREE");
    // tx.replace(R.id.id_content, fThree, "THREE");
    tx.addToBackStack(null);
    tx.commit();
  }
}
代碼重構結束,與開始的效果一模一樣。上面兩種通信方式都是值得推薦的,隨便選擇一種自己喜歡的。這裡再提一下:雖然Fragment和Activity可以通過getActivity與findFragmentByTag或者findFragmentById,進行任何操作,甚至在Fragment裡面操作另外的Fragment,但是沒有特殊理由是絕對不提倡的。Activity擔任的是Fragment間類似總線一樣的角色,應當由它決定Fragment如何操作。另外雖然Fragment不能響應Intent打開,但是Activity可以,Activity可以接收Intent,然後根據參數判斷顯示哪個Fragment。
4、如何處理運行時配置發生變化
運行時配置發生變化,最常見的就是屏幕發生旋轉,如果你不知道如何處理屏幕變化可以參考:Android 屏幕旋轉 處理 AsyncTask 和 ProgressDialog 的最佳方案
這裡提一下:很多人覺得強制設置屏幕的方向就可以了,但是有一點,當你的應用被至於後台(例如用戶點擊了home),長時間沒有返回的時候,你的應用也會被重新啟動。比如上例:如果你把上面的例子你至於FragmentThree界面,然後處於後台狀態,長時間後你會發現當你再次通過home打開時,上面FragmentThree與FragmentOne疊加在一起,這就是因為你的Activity重新啟動,在原來的FragmentThree上又繪制了一個FragmentOne。
好了,下面看一段代碼:
Activity:
package com.zhy.zhy_fragments;
import android.app.Activity;
import android.app.FragmentManager;
import android.app.FragmentTransaction;
import android.os.Bundle;
import android.view.Window;
public class MainActivity extends Activity
{
  private FragmentOne mFOne;
  @Override
  protected void onCreate(Bundle savedInstanceState)
  {
    super.onCreate(savedInstanceState);
    requestWindowFeature(Window.FEATURE_NO_TITLE);
    setContentView(R.layout.activity_main);
    mFOne = new FragmentOne();
    FragmentManager fm = getFragmentManager();
    FragmentTransaction tx = fm.beginTransaction();
    tx.add(R.id.id_content, mFOne, "ONE");
    tx.commit();
  }
}
Fragment
package com.zhy.zhy_fragments;
import android.app.Fragment;
import android.os.Bundle;
import android.util.Log;
import android.view.LayoutInflater;
import android.view.View;
import android.view.ViewGroup;
public class FragmentOne extends Fragment
{
  private static final String TAG = "FragmentOne";
  @Override
  public View onCreateView(LayoutInflater inflater, ViewGroup container,
      Bundle savedInstanceState)
  {
    Log.e(TAG, "onCreateView");
    View view = inflater.inflate(R.layout.fragment_one, container, false);
    return view;
  }
  @Override
  public void onCreate(Bundle savedInstanceState)
  {
    // TODO Auto-generated method stub
    super.onCreate(savedInstanceState);
    Log.e(TAG, "onCreate");
  }
  @Override
  public void onDestroyView()
  {
    // TODO Auto-generated method stub
    super.onDestroyView();
    Log.e(TAG, "onDestroyView");
  }
  @Override
  public void onDestroy()
  {
    // TODO Auto-generated method stub
    super.onDestroy();
    Log.e(TAG, "onDestroy");
  }
}
很簡單的代碼,當你運行之後,不斷的旋轉屏幕,你會發現每旋轉一次屏幕,屏幕上就多了一個FragmentOne的實例,並且後台log會打印出許多套生命周期的回調。
類似:
07-20 08:18:46.651: E/FragmentOne(1633): onCreate
07-20 08:18:46.651: E/FragmentOne(1633): onCreate
07-20 08:18:46.651: E/FragmentOne(1633): onCreate
07-20 08:18:46.681: E/FragmentOne(1633): onCreateView
07-20 08:18:46.831: E/FragmentOne(1633): onCreateView
07-20 08:18:46.891: E/FragmentOne(1633): onCreateView
這是為什麼呢,因為當屏幕發生旋轉,Activity發生重新啟動,默認的Activity中的Fragment也會跟著Activity重新創建;這樣造成當旋轉的時候,本身存在的Fragment會重新啟動,然後當執行Activity的onCreate時,又會再次實例化一個新的Fragment,這就是出現的原因。
那麼如何解決呢:
其實通過檢查onCreate的參數Bundle savedInstanceState就可以判斷,當前是否發生Activity的重新創建:
默認的savedInstanceState會存儲一些數據,包括Fragment的實例:通過打印可以看出:
07-20 08:23:12.952: E/FragmentOne(1782): Bundle[{android:fragments=android.app.FragmentManagerState@40d0b7b8, android:viewHierarchyState=Bundle[{android:focusedViewId=2131230721, android:views=android.util.SparseArray@40d0af68}]}]
所以,我們簡單改一下代碼,只有在savedInstanceState==null時,才進行創建Fragment實例:
package com.zhy.zhy_fragments;
import android.app.Activity;
import android.app.FragmentManager;
import android.app.FragmentTransaction;
import android.os.Bundle;
import android.util.Log;
import android.view.Window;
public class MainActivity extends Activity
{
  private static final String TAG = "FragmentOne";
  private FragmentOne mFOne;
  @Override
  protected void onCreate(Bundle savedInstanceState)
  {
    super.onCreate(savedInstanceState);
    requestWindowFeature(Window.FEATURE_NO_TITLE);
    setContentView(R.layout.activity_main);
    Log.e(TAG, savedInstanceState+"");
    if(savedInstanceState == null)
    {
      mFOne = new FragmentOne();
      FragmentManager fm = getFragmentManager();
      FragmentTransaction tx = fm.beginTransaction();
      tx.add(R.id.id_content, mFOne, "ONE");
      tx.commit();
    }
  }
}
現在無論進行多次旋轉都只會有一個Fragment實例在Activity中。
現在還存在一個問題,就是重新繪制時,Fragment發生重建,原本的數據如何保持?
其實和Activity類似,Fragment也有onSaveInstanceState的方法,在此方法中進行保存數據,然後在onCreate或者onCreateView或者onActivityCreated進行恢復都可以。
由於篇幅原因,就不貼測試代碼了。
5、Fragmeny與ActionBar和MenuItem集成
Fragment可以添加自己的MenuItem到Activity的ActionBar或者可選菜單中。
a、在Fragment的onCreate中調用 setHasOptionsMenu(true);
b、然後在Fragment子類中實現onCreateOptionsMenu
c、如果希望在Fragment中處理MenuItem的點擊,也可以實現onOptionsItemSelected;當然了Activity也可以直接處理該MenuItem的點擊事件。
代碼:
Fragment
package com.zhy.zhy_fragments;
import android.app.Fragment;
import android.os.Bundle;
import android.view.LayoutInflater;
import android.view.Menu;
import android.view.MenuInflater;
import android.view.MenuItem;
import android.view.View;
import android.view.ViewGroup;
import android.widget.Toast;
public class FragmentOne extends Fragment
{
  @Override
  public void onCreate(Bundle savedInstanceState)
  {
    super.onCreate(savedInstanceState);
    setHasOptionsMenu(true);
  }
  @Override
  public View onCreateView(LayoutInflater inflater, ViewGroup container,
      Bundle savedInstanceState)
  {
    View view = inflater.inflate(R.layout.fragment_one, container, false);
    return view;
  }
  @Override
  public void onCreateOptionsMenu(Menu menu, MenuInflater inflater)
  {
    inflater.inflate(R.menu.fragment_menu, menu);
  }
  @Override
  public boolean onOptionsItemSelected(MenuItem item)
  {
    switch (item.getItemId())
    {
    case R.id.id_menu_fra_test:
      Toast.makeText(getActivity(), "FragmentMenuItem1", Toast.LENGTH_SHORT).show();
      break;
    }
    return true;
  }
}
Activity
package com.zhy.zhy_fragments;
import android.app.Activity;
import android.app.FragmentManager;
import android.app.FragmentTransaction;
import android.os.Bundle;
import android.util.Log;
import android.view.Menu;
import android.view.MenuItem;
import android.view.Window;
import android.widget.Toast;
public class MainActivity extends Activity
{
  private static final String TAG = "FragmentOne";
  private FragmentOne mFOne;
  @Override
  protected void onCreate(Bundle savedInstanceState)
  {
    super.onCreate(savedInstanceState);
    requestWindowFeature(Window.FEATURE_NO_TITLE);
    setContentView(R.layout.activity_main);
    Log.e(TAG, savedInstanceState + "");
    if (savedInstanceState == null)
    {
      mFOne = new FragmentOne();
      FragmentManager fm = getFragmentManager();
      FragmentTransaction tx = fm.beginTransaction();
      tx.add(R.id.id_content, mFOne, "ONE");
      tx.commit();
    }
  }
  @Override
  public boolean onCreateOptionsMenu(Menu menu)
  {
    super.onCreateOptionsMenu(menu);
    getMenuInflater().inflate(R.menu.main, menu);
    return true;
  }
  @Override
  public boolean onOptionsItemSelected(MenuItem item)
  {
    switch (item.getItemId())
    {
    case R.id.action_settings:
      Toast.makeText(this, "setting", Toast.LENGTH_SHORT).show();
      return true;
    default:
      //如果希望Fragment自己處理MenuItem點擊事件,一定不要忘了調用super.xxx
      return super.onOptionsItemSelected(item);
    }
  }
}
效果圖:
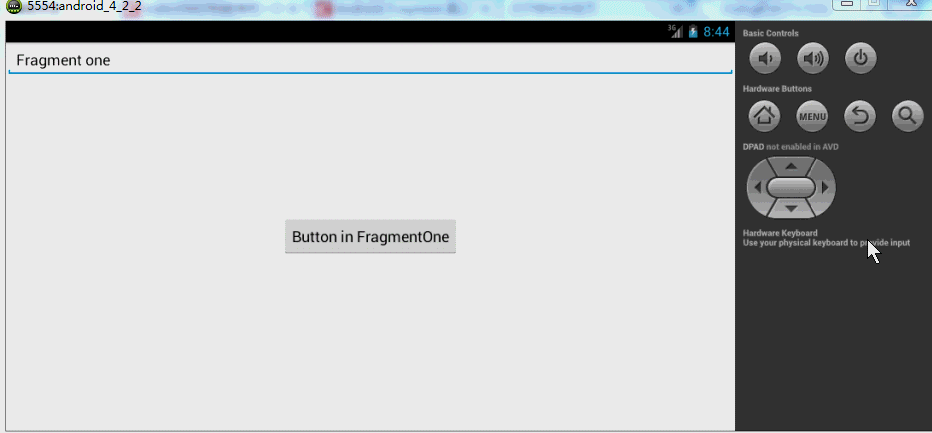
好了,可以很好的看到,Fragment可以添加MenuItem,也可以自己處理點擊~~~
6、沒有布局的Fragment的作用
沒有布局文件Fragment實際上是為了保存,當Activity重啟時,保存大量數據准備的
請參考博客:Android 屏幕旋轉 處理 AsyncTask 和 ProgressDialog 的最佳方案
7、使用Fragment創建對話框
這是Google推薦的方式,我也單獨寫過博客介紹,請參考:Android 官方推薦 : DialogFragment 創建對話框
好了,終於把Fragment相關的聯系到一起了,上述基本包含了Fragment所有的用法~~~相信大家如果能夠看完,一定有不少的收獲~~~通過兩種文章的結合學習,相信對fragment有不少收獲吧,結合實際應用到項目中去吧,有任何問題,歡迎給我留言,謝謝!
 Android學習之獲取系統應用信息列表的實現
前言:好幾天電腦打不開CSDN博客,也不知道怎麼回事,今天下班回來突然能打開了,遂將周末實現的一個效果貼上。實現功能:獲取手機應用圖標,名稱,時間(安裝時間/更新時間),
 Android編程獲取控件寬和高的方法總結分析
本文總結分析了Android編程獲取控件寬和高的方法。分享給大家供大家參考,具體如下:我們都知道在onCreate()裡面獲取控件的高度是0,這是為什麼呢?我們來
 Android Studio 1.0 (穩定版) 完全攻略
這篇博文中主要從以下幾點進行敘述: 1、Android Studio安裝與使用 2、Android Studio特
 Android實現多線程下載文件的方法
本文實例講述了Android實現多線程下載文件的方法。分享給大家供大家參考。具體如下:多線程下載大概思路就是通過Range 屬性實現文件分段,然後用RandomAcces