編輯:關於Android編程
本文實例講述了Android實現滑動加載數據的方法。分享給大家供大家參考。具體實現方法如下:
EndLessActivity.java如下:
package com.ScrollListView;
import Android.app.ListActivity;
import Android.os.Bundle;
import Android.view.Gravity;
import Android.view.View;
import Android.view.ViewGroup;
import Android.widget.AbsListView;
import Android.widget.BaseAdapter;
import Android.widget.LinearLayout;
import Android.widget.ProgressBar;
import Android.widget.TextView;
import Android.widget.AbsListView.OnScrollListener;
public class EndLessActivity extends ListActivity implements OnScrollListener {
 Aleph0 adapter = new Aleph0();
  int mProgressStatus = 0 ;
 ProgressBar progressBar;
  protected void onCreate(Bundle savedInstanceState) {
   super .onCreate(savedInstanceState);
  LinearLayout searchLayout = new LinearLayout( this );
  searchLayout.setOrientation(LinearLayout.HORIZONTAL);
    progressBar = new ProgressBar( this );
    progressBar.setPadding( 0 , 0 , 15 , 0 );
    searchLayout.addView(progressBar, new LinearLayout.LayoutParams(
    LinearLayout.LayoutParams.WRAP_CONTENT,
    LinearLayout.LayoutParams.WRAP_CONTENT
    ));
    TextView textView = new TextView( this );
    textView.setText( " 加載中... " );
    textView.setGravity(Gravity.CENTER_VERTICAL);
    searchLayout.addView(textView, new LinearLayout.LayoutParams(
    LinearLayout.LayoutParams.FILL_PARENT,
    LinearLayout.LayoutParams.FILL_PARENT
    ));
    searchLayout.setGravity(Gravity.CENTER);
    LinearLayout loadingLayout = new LinearLayout( this );
    loadingLayout.addView(searchLayout, new LinearLayout.LayoutParams(
    LinearLayout.LayoutParams.WRAP_CONTENT,
    LinearLayout.LayoutParams.WRAP_CONTENT
    ));
    loadingLayout.setGravity(Gravity.CENTER);
    getListView().addFooterView(loadingLayout);
  setListAdapter(adapter);
  getListView().setOnScrollListener( this );
 }
  public void onScroll(AbsListView view,
   int firstVisible, int visibleCount, int totalCount) {
   boolean loadMore = /* maybe add a padding */
   firstVisible + visibleCount >= totalCount;
   if (loadMore) {
   adapter.count += visibleCount; // or any other amount
   adapter.notifyDataSetChanged();
  }
 }
  public void onScrollStateChanged(AbsListView v, int s) { }
  class Aleph0 extends BaseAdapter {
   int count = 40 ; /* starting amount */
   public int getCount() { return count; }
   public Object getItem( int pos) { return pos; }
   public long getItemId( int pos) { return pos; }
   public View getView( int pos, View v, ViewGroup p) {
    TextView view = new TextView(EndLessActivity. this );
    view.setText( " entry " + pos);
     return view;
  }
 }
}
listview下部是按鈕控制:
package com.ScrollListView;
import Android.app.ListActivity;
import Android.os.Bundle;
import Android.view.Gravity;
import Android.view.View;
import Android.view.ViewGroup;
import Android.widget.AbsListView;
import Android.widget.BaseAdapter;
import Android.widget.Button;
import Android.widget.LinearLayout;
import Android.widget.ProgressBar;
import Android.widget.TextView;
import Android.widget.AbsListView.OnScrollListener;
public class EndLessActivity extends ListActivity {
 Aleph0 adapter = new Aleph0();
  int mProgressStatus = 0 ;
  protected void onCreate(Bundle savedInstanceState) {
   super .onCreate(savedInstanceState);
  LinearLayout searchLayout = new LinearLayout( this );
  searchLayout.setOrientation(LinearLayout.HORIZONTAL);
    Button textView = new Button( this );
    textView.setText( " 加載中... " );
    textView.setGravity(Gravity.CENTER_VERTICAL);
    searchLayout.addView(textView, new LinearLayout.LayoutParams(
    LinearLayout.LayoutParams.FILL_PARENT,
    LinearLayout.LayoutParams.FILL_PARENT
    ));
    searchLayout.setGravity(Gravity.CENTER);
    LinearLayout loadingLayout = new LinearLayout( this );
    loadingLayout.addView(searchLayout, new LinearLayout.LayoutParams(
    LinearLayout.LayoutParams.WRAP_CONTENT,
    LinearLayout.LayoutParams.WRAP_CONTENT
    ));
    loadingLayout.setGravity(Gravity.CENTER);
    getListView().addFooterView(loadingLayout);
    textView.setOnClickListener( new Button.OnClickListener()
    {  @Override
     public void onClick(View v)
    {
     adapter.count += 10 ;
     adapter.notifyDataSetChanged();
     }
    });
  setListAdapter(adapter);
   // getListView().setOnScrollListener(this);
 }
 /* public void onScroll(AbsListView view,
  int firstVisible, int visibleCount, int totalCount) {
  boolean loadMore =
   firstVisible + visibleCount >= totalCount;
  if(loadMore) {
   adapter.count += visibleCount;
   adapter.notifyDataSetChanged();
  }
 } */
  public void onScrollStateChanged(AbsListView v, int s) { }
  class Aleph0 extends BaseAdapter {
   int count = 40 ; /* starting amount */
   public int getCount() { return count; }
   public Object getItem( int pos) { return pos; }
   public long getItemId( int pos) { return pos; }
   public View getView( int pos, View v, ViewGroup p) {
    TextView view = new TextView(EndLessActivity. this );
    view.setText( " entry " + pos);
     return view;
  }
 }
}
希望本文所述對大家的Android程序設計有所幫助。
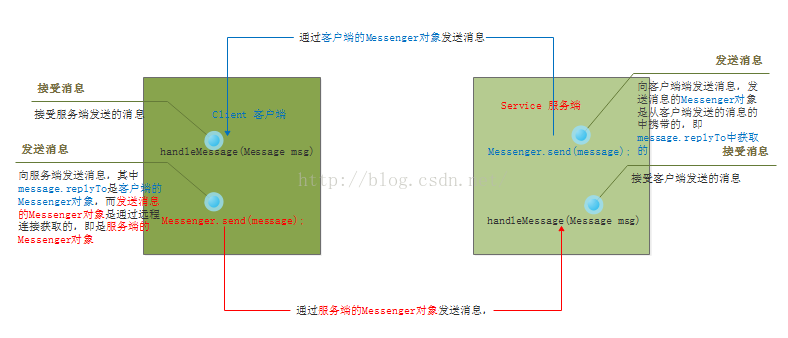 Android IPC之Messenger淺談
之前寫過一篇有關IPC之AIDL淺談的文章。今天再來介紹另一種IPC-Messenger。一、概述。首先看Messenger介紹, Reference to
 自定義控件 編輯和選取圓形頭像
android大家都有很多需要用戶上傳頭像的需求,有的是選方形,有的是圓角矩形,有的是圓形。首先我們要做一個處理圖片的自定義控件,把傳入的圖片,經過用戶選擇區域,處理成一
 Android px, dp, sp的區別
Android自興起以來,開發者不斷增加,與此同時市場上參差不齊的設備也不斷增加,隨之而來的則是開發者需要適配眾多機型而帶來的困擾與抱怨。並且隨著不同廠家定制化不同的RO
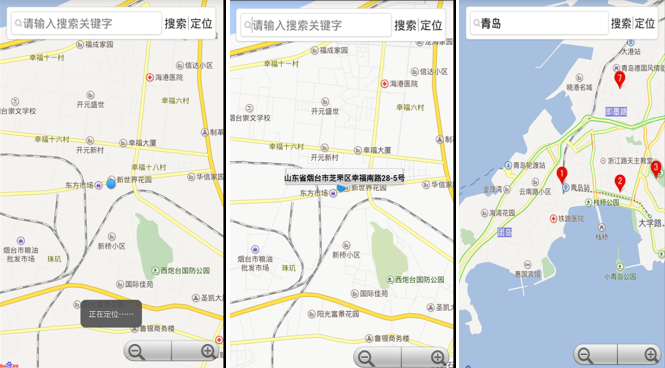 Android百度地圖實現搜索和定位及自定義圖標繪制並點擊時彈出泡泡
一、問題描述 上一次我們使用百度地圖實現基本的定位功能,接下來我們繼續實現搜索和定位,並使用LocationOverlay繪制定位位置,同時展示如何使用自定義圖標繪制並