編輯:關於Android編程
Service概念及用途:
Android中的服務,它與Activity不同,它是不能與用戶交互的,不能自己啟動的,運行在後台的程序,如果我們退出應用時,Service進程並沒有結束,它仍然在後台運行,那 我們什麼時候會用到Service呢?比如我們播放音樂的時候,有可能想邊聽音樂邊干些其他事情,當我們退出播放音樂的應用,如果不用Service,我 們就聽不到歌了,所以這時候就得用到Service了,又比如當我們一個應用的數據是通過網絡獲取的,不同時間(一段時間)的數據是不同的這時候我們可以 用Service在後台定時更新,而不用每打開應用的時候在去獲取。
Service生命周期 :
Android Service的生命周期並不像Activity那麼復雜,它只繼承了onCreate(),onStart(),onDestroy()三個方法,當我們第一次啟動Service時,先後調用了onCreate(),onStart()這兩個方法,當停止Service時,則執行onDestroy()方法,這裡需要注意的是,如果Service已經啟動了,當我們再次啟動Service時,不會在執行onCreate()方法,而是直接執行onStart()方法,具體的可以看下面的實例。
Service與Activity通信:
Service後端的數據最終還是要呈現在前端Activity之上的,因為啟動Service時,系統會重新開啟一個新的進程,這就涉及到不同進程間通信的問題了(AIDL)這一節我不作過多描述,當我們想獲取啟動的Service實例時,我們可以用到bindService和onBindService方法,它們分別執行了Service中IBinder()和onUnbind()方法。
為了讓大家 更容易理解,我寫了一個簡單的Demo,大家可以模仿著我,一步一步的來。
第一步:新建一個Android工程,我這裡命名為ServiceDemo.
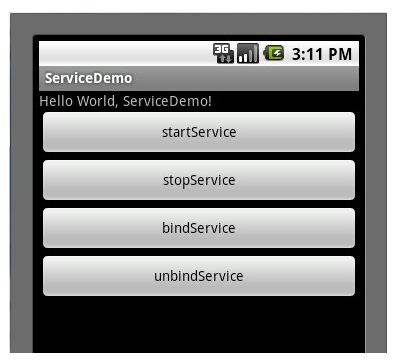
第二步:修改main.xml代碼,我這裡增加了四個按鈕,代碼如下:
第三步:新建一個Service,命名為MyService.java代碼如下:
package com.tutor.servicedemo;
import android.app.Service;
import android.content.Intent;
import android.os.Binder;
import android.os.IBinder;
import android.text.format.Time;
import android.util.Log;
public class MyService extends Service {
    //定義個一個Tag標簽
    private static final String TAG = "MyService";
    //這裡定義吧一個Binder類,用在onBind()有方法裡,這樣Activity那邊可以獲取到
    private MyBinder mBinder = new MyBinder();
    @Override
    public IBinder onBind(Intent intent) {
        Log.e(TAG, "start IBinder~~~");
        return mBinder;
    }
    @Override
    public void onCreate() {
        Log.e(TAG, "start onCreate~~~");
        super.onCreate();
    }

    @Override
    public void onStart(Intent intent, int startId) {
        Log.e(TAG, "start onStart~~~");
        super.onStart(intent, startId);
    }

    @Override
    public void onDestroy() {
        Log.e(TAG, "start onDestroy~~~");
        super.onDestroy();
    }


    @Override
    public boolean onUnbind(Intent intent) {
        Log.e(TAG, "start onUnbind~~~");
        return super.onUnbind(intent);
    }

    //這裡我寫了一個獲取當前時間的函數,不過沒有格式化就先這麼著吧
    public String getSystemTime(){

        Time t = new Time();
        t.setToNow();
        return t.toString();
    }

    public class MyBinder extends Binder{
        MyService getService()
        {
            return MyService.this;
        }
    }
}
第四步:修改ServiceDemo.java,代碼如下:
package com.tutor.servicedemo;
import android.app.Activity;
import android.content.ComponentName;
import android.content.Context;
import android.content.Intent;
import android.content.ServiceConnection;
import android.os.Bundle;
import android.os.IBinder;
import android.view.View;
import android.view.View.OnClickListener;
import android.widget.Button;
import android.widget.TextView;

public class ServiceDemo extends Activity implements OnClickListener{

    private MyService  mMyService;
    private TextView mTextView;
    private Button startServiceButton;
    private Button stopServiceButton;
    private Button bindServiceButton;
    private Button unbindServiceButton;
    private Context mContext;

    //這裡需要用到ServiceConnection在Context.bindService和context.unBindService()裡用到
    private ServiceConnection mServiceConnection = new ServiceConnection() {
        //當我bindService時,讓TextView顯示MyService裡getSystemTime()方法的返回值
        public void onServiceConnected(ComponentName name, IBinder service) {
            // TODO Auto-generated method stub
            mMyService = ((MyService.MyBinder)service).getService();
            mTextView.setText("I am frome Service :" + mMyService.getSystemTime());
        }

        public void onServiceDisconnected(ComponentName name) {
            // TODO Auto-generated method stub

        }
    };

    public void onCreate(Bundle savedInstanceState) {
        super.onCreate(savedInstanceState);
        setContentView(R.layout.main);
        setupViews();
    }

    public void setupViews(){
        mContext = ServiceDemo.this;
        mTextView = (TextView)findViewById(R.id.text);

        startServiceButton = (Button)findViewById(R.id.startservice);
        stopServiceButton = (Button)findViewById(R.id.stopservice);
        bindServiceButton = (Button)findViewById(R.id.bindservice);
        unbindServiceButton = (Button)findViewById(R.id.unbindservice);

        startServiceButton.setOnClickListener(this);
        stopServiceButton.setOnClickListener(this);
        bindServiceButton.setOnClickListener(this);
        unbindServiceButton.setOnClickListener(this);
    }

    public void onClick(View v) {
        // TODO Auto-generated method stub
        if(v == startServiceButton){
            Intent i  = new Intent();
            i.setClass(ServiceDemo.this, MyService.class);
            mContext.startService(i);
        }else if(v == stopServiceButton){
            Intent i  = new Intent();
            i.setClass(ServiceDemo.this, MyService.class);
            mContext.stopService(i);
        }else if(v == bindServiceButton){
            Intent i  = new Intent();
            i.setClass(ServiceDemo.this, MyService.class);
            mContext.bindService(i, mServiceConnection, BIND_AUTO_CREATE);
        }else{
            mContext.unbindService(mServiceConnection);
        }
    }
}
第五步:修改AndroidManifest.xml代碼(將我們新建的MyService注冊進去如下代碼第14行:)
第六步:執行上述工程,效果圖如下:
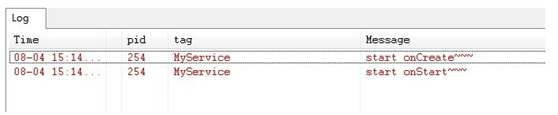
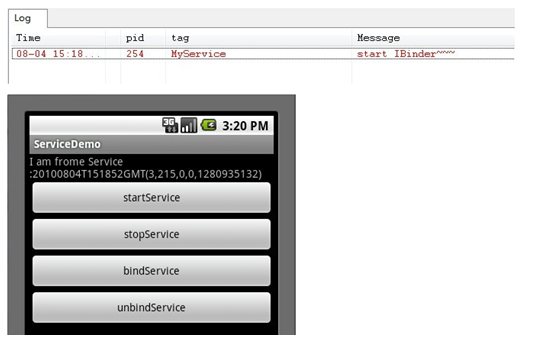
點擊startServie按鈕時先後執行了Service中onCreate()->onStart()這兩個方法,打開Logcat視窗效果如下圖:
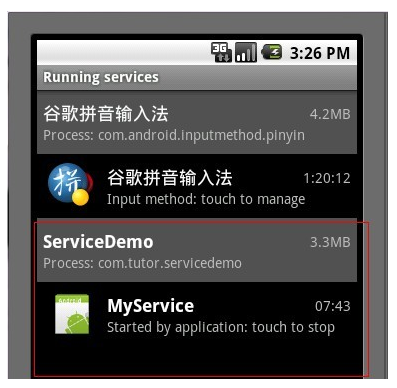
我們這時可以按HOME鍵進入Settings(設置)->Applications(應用)->Running Services(正在運行的服務)看一下我們新啟動了一個服務,效果如下:
點擊stopService按鈕時,Service則執行了onDestroy()方法,效果圖如下所示:

這時候我們再次點擊startService按鈕,然後點擊bindService按鈕(通常bindService都是bind已經啟動的Service),我們看一下Service執行了IBinder()方法,以及TextView的值也有所變化了,如下兩張圖所示:
最後點擊unbindService按鈕,則Service執行了onUnbind()方法,如下圖所示:
啟動一個Service的代碼段如下:
Intent i  = new Intent();
i.setClass(ServiceDemo.this, MyService.class);
mContext.startService(i);
但這種方式只能啟動與Activity在同一個package內的Service。如果Service與Activity不在同一個Package內怎麼辦呢?
下面是打開modem silent log相關Service的例子,這裡邊的第一個參數就是SilentLogService所在的Package的名字。
這個名字就是SilentLogService所在的AndroidManifest.xml裡邊設定的Package名字!!
Intent SvcIntent = new Intent();
SvcIntent.setClassName("com.sec.modem.settings",
                                       "com.sec.modem.settings.cplogging.SilentLogService");
SvcIntent.putExtra("action", 2/* =SilentLog.SILENT_LOG_START */);
startService(SvcIntent);
 Android自定義控件之自定義圓形進度條
項目中常用到的圓形進度條有好多個,從網上搜到的自定義進度條多是封裝的比較好的代碼,但是不利於初學者,現在本博客就教給大家如何一步步實現自定義進度條的效果先看效果如圖&he
 Android 異步任務:AsyncTask機制 源碼詳細版解析
相信大家對AsyncTask機制都不陌生?基本的使用的方法和注意事項都清楚,編寫一個類,繼承AsyncTask類,必須重寫doInBackground()方法,運行在子線
 Android Gradle項目Andfix熱修復技術的接入指南
前言很多團隊都有接入Android Andfix的剛性需求,但是早些版本的Andfix接入成本略高。如只支持maven工程、定制的打包插件有很多額外限制、摩天輪打包不支持
 android notification完全解析
Notifications in Android 4.4 and Lower notification是很重要的部分,它與service,BroadcastReceive