編輯:關於Android編程
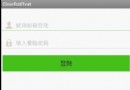
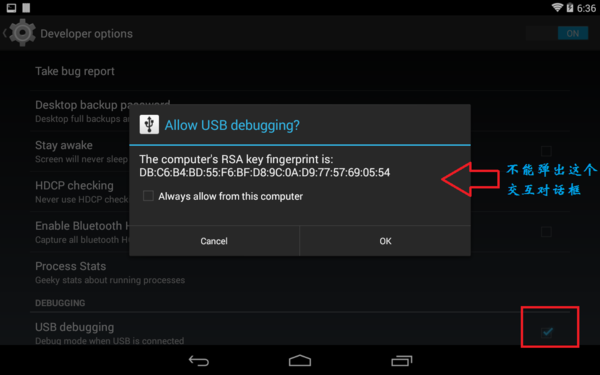
當我們調試安卓機器時,第一次插上usb線,會彈出一個授權的對話框,(前提是打開了usb調試功能)點擊確認,才會允許調試.
如果我們想機器默認就可以調試該怎麼做呢?
如果我們想動態攔截,需要用戶輸入帳號密碼,才確認是否可以調試,該怎麼做呢?或者只是單純的想改變這個不好看的UI,又該怎麼做呢?
分析的源碼基於android 5.0.2_r1
前面所說的情況1,想在默認情況下就允許usb調試,需要修改源碼下的/build/core/main.mk文件,然後重新編譯,刷機,具體
至於後面的那一種,就是我要說的重點,需要去看一看android源碼,然後做一些適當的修改.首先,我們要找到關於usb的源碼,主要在/frameworks/base/services/java/目錄下,也就是這幾個文件:
UsbDebuggingManager.java
UsbDeviceManager.java
UsbHostManager.java
UsbService.java
UsbSettingsManager.java
其中涉及到的一些資源文件在/frameworks/base/core/res/res/目錄下
源碼與資源文件都在這了,從哪入手,我也是一頭霧水,還好,只有5個java文件,去讀一讀,看看有什麼收獲.
你會發現,在UsbDebuggingmanager類中,你會發現有這樣的幾個方法:
startConfirmation(String key, String fingerprints)

startConfirmationActivity(ComponentName componentName, String key,
            String fingerprints)

startConfirmationService(ComponentName componentName, String key,
            String fingerprints)
會不會就是這些方法彈出了對話框呢?繼續追蹤,發現startConfirmationActivity()和startConfirmationService()都是在startConfirmation()方法中調用的,現在我們來看下startConfirmation()方法:
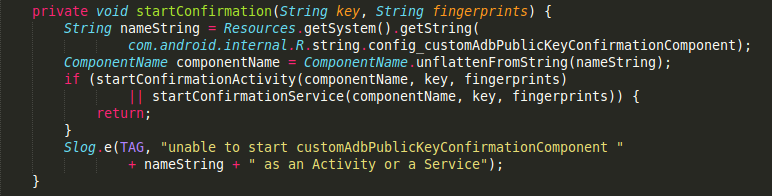
首先通過資源文件拿到一個String類型的nameString,然後通過unflattenFromString()方法,傳入nameString得到一個ComponentName對象,那麼nameString到底是什麼呢?
在/frameworks/base/core/res/res/values/config.xml 文件中,我們看到:

原來ConponentName就是:
包名為com.android.systemui
組件為com.android.systemui.usb.UsbDebuggingActivity的類
彈窗UI在這修改
哦哦,原來我們彈出的授權對話框就是systemui app中的一個activity,如果你只是單純的想改變這個UI,你現在只要到/frameworks/base/packages/SystemUI/usb/目錄下,找到UsbDebuggingActivity這個類,修改它的布局文件即可.等會再來看下這個類,做了哪些事情.
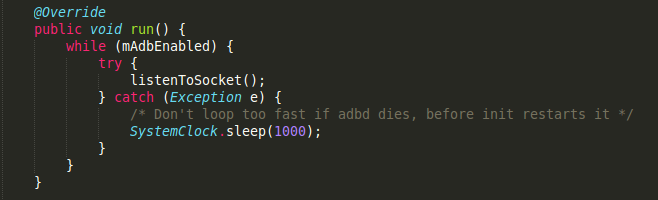
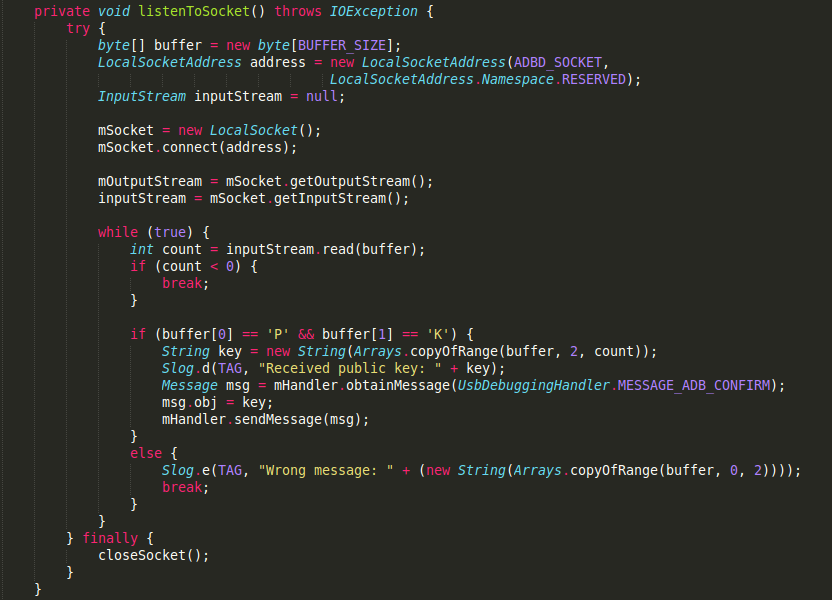
繼續回到上面的分析,你會發現startConfirmation()方法在一個Handler被調用,什麼情況下會出發這個Handler呢?原來,UsbDebuggingManager實現了Runnable,在run()方法中開啟了一個LocalSocket,去讀取底層的usb信息,做出響應的操作.至於該線程的開啟,也在Handler中,只要你調用了setAdbEnabled(),如果參數為true,就開啟該線程.
現在我們只要看看在哪個地方實例化了UsbDebuggingManager類,調用了setAdbEnabled()方法.
追蹤發現在UsbDeviceManager中,它的構造方法中初始化了UsbDebuggingManager類.
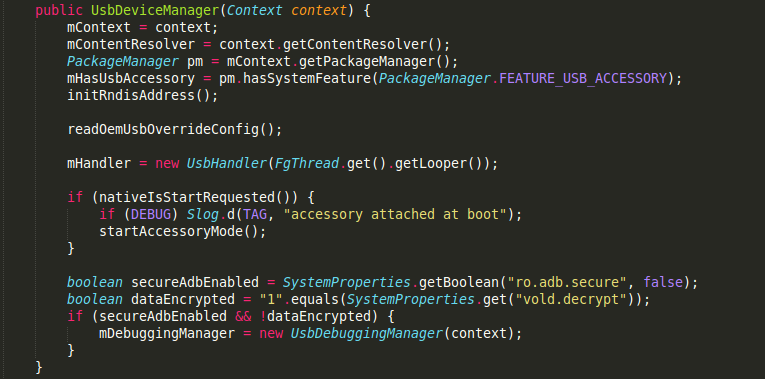
可以看到會通過SystemProperties讀取ro.adb.secure 和 vold.decrypt的值,這兩個值,我請教了做rom的同事,說這些值是在編譯的時候修改的,主要來區分user,eng版本,這兩個值主要就是來進行是否進行usb認證機制的.
然後就初始化了UsbDeviceManager類,在看看調用mDebuggingManager.setAdbEnabled(mAdbEnabled)的地方.
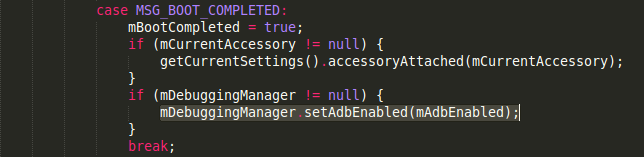
也是在UsbDeviceManager的Handler中調用的,它注冊啦一個開機廣播,每次開機就會觸發它.代碼只截取了一小部分…
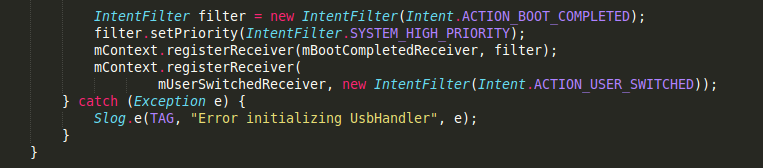

當然,還有幾個地方調用了setAdbEnabled()方法,比如在這個Handler初始化的時候,我就沒有追蹤了,如果你有興趣,可以去調試下~
接下來,繼續往上追蹤,看看UsbDeviceManager在哪被實例化了.它是通過UsbService的構造方法來實例化的.
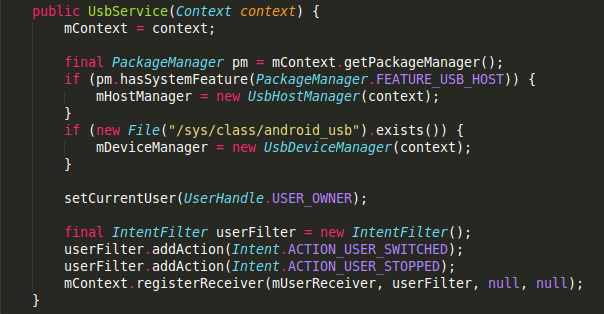
在UsbService這個類中,它是繼承自IUsbManager.Stub類的,也就是IUsbManager.aidl這個文件,它在/frameworks/base/core/java/android/hardware/usb/文件夾下,這個接口是@hide的,因為外部不可以引用,文件內容如下:
// 只摘錄了IUsbManager中的幾個方法
/** @hide */
interface IUsbManager{

    /* Allow USB debugging from the attached host. If alwaysAllow is true, add the
     * the public key to list of host keys that the user has approved.
     */
    void allowUsbDebugging(boolean alwaysAllow, String publicKey);

    /* Deny USB debugging from the attached host */
    void denyUsbDebugging();

    /* Clear public keys installed for secure USB debugging */
    void clearUsbDebuggingKeys();
}
看方法名就大致能猜出來該方法的作用,允許授權,拒絕授權,清除授權.
在看看UsbService在哪被實例化?在UsbService中有一個Lifecycle靜態內部類,繼承自SystemService,在onStart()方法中,實例化了UsbService類.
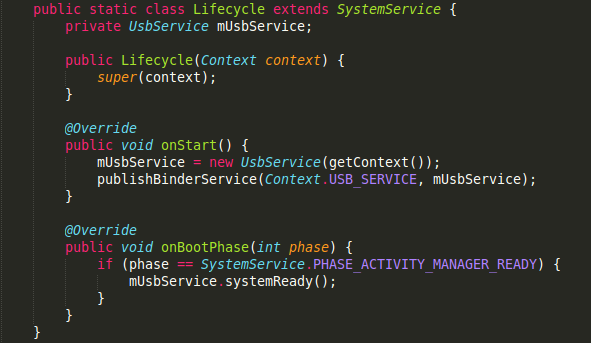
那是在何處調用了Lifecycle類呢?通過查找發現,原來是在SystemService這個類調用的.
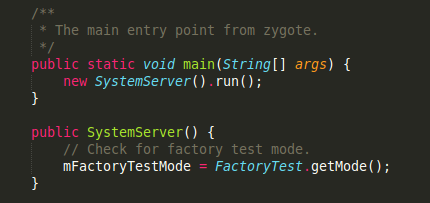
對於SystemService類,我也不是很了解,具體的相關信息可以去查詢.SystemService是android系統一個很重要的服務,它是由zytote來初始化的,然後會啟動android系統的一些必要服務和支持組件,地位相當重要.直接看看代碼吧.
    private void run() {
        // If a device's clock is before 1970 (before 0), a lot of
        // APIs crash dealing with negative numbers, notably
        // java.io.File#setLastModified, so instead we fake it and
        // hope that time from cell towers or NTP fixes it shortly.
        if (System.currentTimeMillis() < EARLIEST_SUPPORTED_TIME) {
            Slog.w(TAG, "System clock is before 1970; setting to 1970.");
            SystemClock.setCurrentTimeMillis(EARLIEST_SUPPORTED_TIME);
        }

        // Here we go!
        Slog.i(TAG, "Entered the Android system server!");
        EventLog.writeEvent(EventLogTags.BOOT_PROGRESS_SYSTEM_RUN, SystemClock.uptimeMillis());

        // In case the runtime switched since last boot (such as when
        // the old runtime was removed in an OTA), set the system
        // property so that it is in sync. We can't do this in
        // libnativehelper's JniInvocation::Init code where we already
        // had to fallback to a different runtime because it is
        // running as root and we need to be the system user to set
        // the property. http://b/11463182
        SystemProperties.set("persist.sys.dalvik.vm.lib.2", VMRuntime.getRuntime().vmLibrary());

        // Enable the sampling profiler.
        if (SamplingProfilerIntegration.isEnabled()) {
            SamplingProfilerIntegration.start();
            mProfilerSnapshotTimer = new Timer();
            mProfilerSnapshotTimer.schedule(new TimerTask() {
                @Override
                public void run() {
                    SamplingProfilerIntegration.writeSnapshot("system_server", null);
                }
            }, SNAPSHOT_INTERVAL, SNAPSHOT_INTERVAL);
        }

        // Mmmmmm... more memory!
        VMRuntime.getRuntime().clearGrowthLimit();

        // The system server has to run all of the time, so it needs to be
        // as efficient as possible with its memory usage.
        VMRuntime.getRuntime().setTargetHeapUtilization(0.8f);

        // Some devices rely on runtime fingerprint generation, so make sure
        // we've defined it before booting further.
        Build.ensureFingerprintProperty();

        // Within the system server, it is an error to access Environment paths without
        // explicitly specifying a user.
        Environment.setUserRequired(true);

        // Ensure binder calls into the system always run at foreground priority.
        BinderInternal.disableBackgroundScheduling(true);

        // Prepare the main looper thread (this thread).
        android.os.Process.setThreadPriority(
                android.os.Process.THREAD_PRIORITY_FOREGROUND);
        android.os.Process.setCanSelfBackground(false);
        Looper.prepareMainLooper();

        // Initialize native services.
        System.loadLibrary("android_servers");
        nativeInit();

        // Check whether we failed to shut down last time we tried.
        // This call may not return.
        performPendingShutdown();

        // Initialize the system context.
        createSystemContext();

        // Create the system service manager.
        mSystemServiceManager = new SystemServiceManager(mSystemContext);
        LocalServices.addService(SystemServiceManager.class, mSystemServiceManager);

        // Start services.
        try {
            startBootstrapServices();
            startCoreServices();
            startOtherServices();
        } catch (Throwable ex) {
            Slog.e("System", "******************************************");
            Slog.e("System", "************ Failure starting system services", ex);
            throw ex;
        }

        // For debug builds, log event loop stalls to dropbox for analysis.
        if (StrictMode.conditionallyEnableDebugLogging()) {
            Slog.i(TAG, "Enabled StrictMode for system server main thread.");
        }

        // Loop forever.
        Looper.loop();
        throw new RuntimeException("Main thread loop unexpectedly exited");
    }
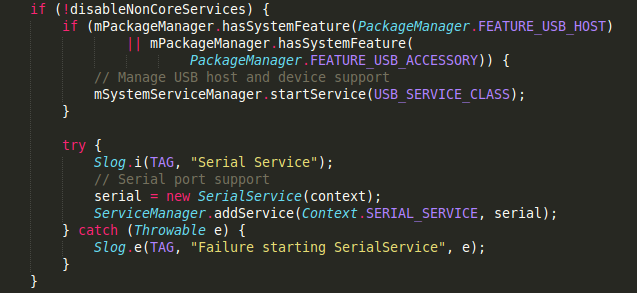
可以看到初始化很多東西,創建Context,加載android_servers,初始化主線程…最後調用了startBootstrapServices(),startCoreServices(),startOtherServices()方法,在這個方法中,啟動了Lifecycle服務.
這樣的話,整體流程就串起來了.
1.首先android系統啟動,初始化了SystemServer
2.在由SystemServer去啟動UsbService$Lifecycle服務,然後實例化UsbService
3.在由UsbService初始化了UsbHostManager和UsbDeviceManager.
4.然後UsbDeviceManager通過讀取ro.adb.secure和vold.decrypt的值,來判定是否開啟調試攔截流程(也就是初始化UsbDebuggingManager)
5.如果初始化UsbDebuggingManager,它會一直監聽LocalSocketAddress(“adbd”, LocalSocketAddress.Namespace.RESERVED)這個端口,判斷是否彈出授權窗口
分析彈出授權的UI窗口
也就是UsbDebuggingActivity類,繼承自AlertActivity,我們主要看一些確認和取消的事件.
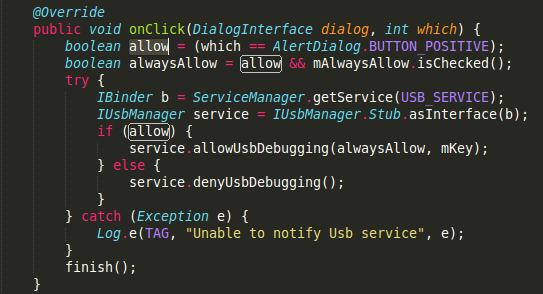
通過ServiceManager得到一個IBinder對象,然後通過IBinder得到一個IUsbManager對象,這個就是前面所說的aidl接口,UsbService實現了IUsbManager接口,調用allowUsbDebugging()和denyUsbDebugging(),同意授權和不同意授權.
那我們在回過頭來,看一看IUsbManager接口中的allowUsbDebugging()和denyUsbDebugging()的實現.
在UsbService中:
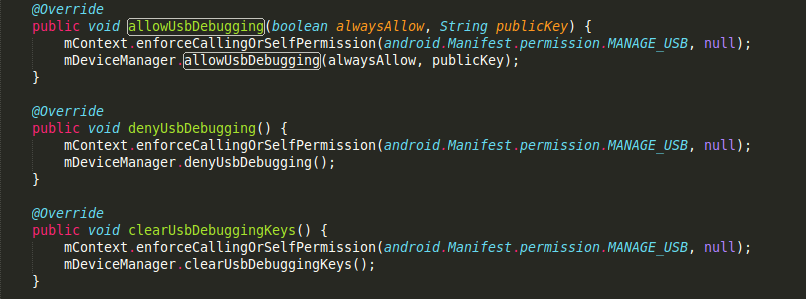
其實調用的是UsbDeviceManager中的方法:
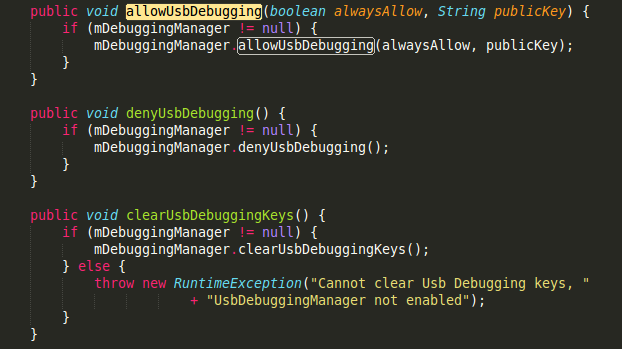
最終發現原來調用的是UsbDebuggingManager中的方法:
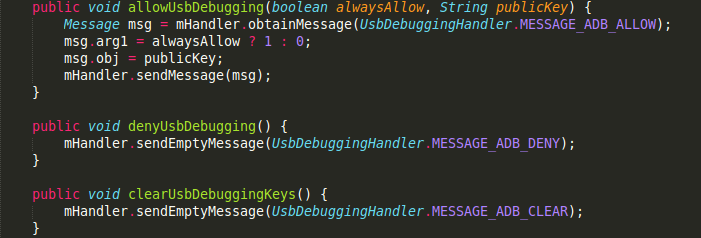
最終,找到了原來所有的操作還是在它的UsbDebuggingHandler中,如果授權成功了,會向文件中寫入這個key和相關信息,然後通過上面所說的Socket寫入一條”OK”這樣的信息.如果取消授權,會通過Socket寫入一條”NO”這樣的信息.到此,整個流程就走完了.
至於Socket的另一端,暫時沒有去尋找它,據個人估計,可能與驅動方面有關.(咱待研究)
1.如果你只是想改動彈出的UI,只需要修改UsbDebuggingActivity的布局文件就可以了.
2.如該想改動相關邏輯,就需要在UsbDebuggingManager類中改動,是否彈窗,或者根本不想用systemui裡面的Activity,都可以在這裡面進行改動.
不過上層如果想要授權的話,需要調用IUsbManager的授權和取消授權方法.
如果獲取不到該類或者它的實現類UsbService(好像是因為IUsbManager是@hide,我沒有試過),建議你仿照IUsbManager.adil文件,上下層都去實現其中的幾個重要方法,就可以拿來用了.
3.如果你根本想不攔截調試授權的話,就需要在main.mk文件中做一些相應的修改了,具體的話,可以去網上搜一下.
4.當然,如果你修改UsbDeviceManager類的,在初始化的時候給它再加一個判斷條件的話,也可以顯示自由攔截功能.
暫時就研究到這了,因為公司需要定制這東西,等需求有變化了,可能需要在做研究,到時候在補充吧~
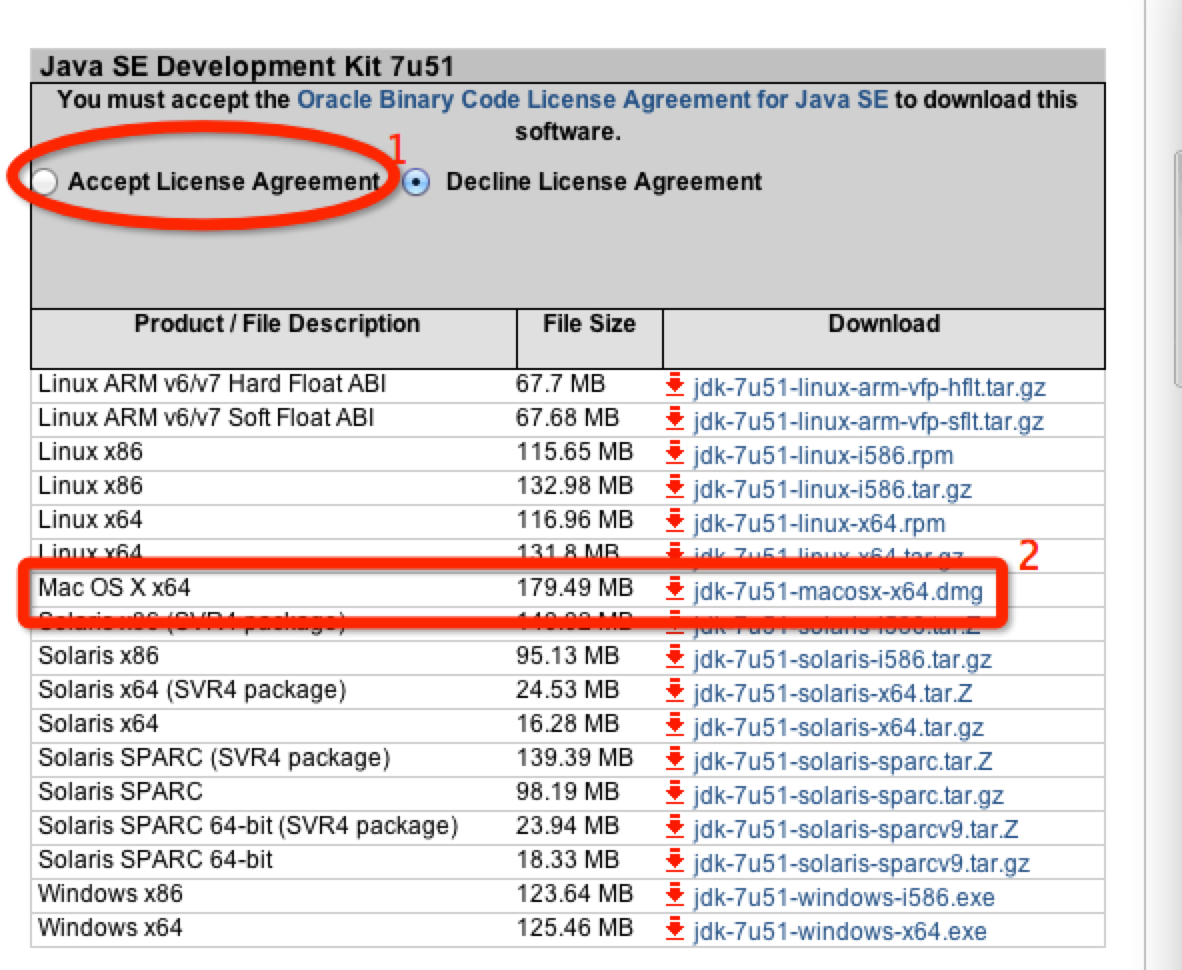 mac開發android環境搭建步驟圖解
1.Java JDK需要先說明下,OS X系統是自帶有Java JDK1.6的。不過這裡我安裝的是JDK7,下載地址:http://www.oracle.co
 ImageLoad(三級緩存(NetCache,MemoryCache,DiskCache),開源框架,OOM)
一.前言首先再說三級緩存之前我們首先了解一下垃圾回收機制下面是目前我所了解的幾種引用關系(一).強引用(StrongReference) 垃圾回收機制不會回收強引用所指
 如何刪除小米手機保存的WIFI密碼
小米手機的WIFI設置是在沒有某WIFI熱點的情況下,即使已經保存了的WIFI密碼也是不顯示的,這樣就造成我們沒法將其刪除.只能再回到原來的WIFI熱點下才
 Android - HttpURLConnection 拋出異常
HttpURLConnection 拋出異常 Http的URL鏈接, 會發生錯誤, 主要原因是 在主UI線程中, 使用網絡調用(network call),