編輯:關於Android編程
每一個Activity組件都有一個關聯的Window對象,用來描述一個應用程序窗口。每一個應用程序窗口內部又包含有一個View對象,用來描述應用程序窗口的視圖。應用程序窗口視圖是真正用來實現UI內容和布局的,也就是說,每一個Activity組件的UI內容和布局都是通過與其所關聯的一個Window對象的內部的一個View對象來實現的。在本文中,我們就詳細分析應用程序窗口視圖的創建過程。
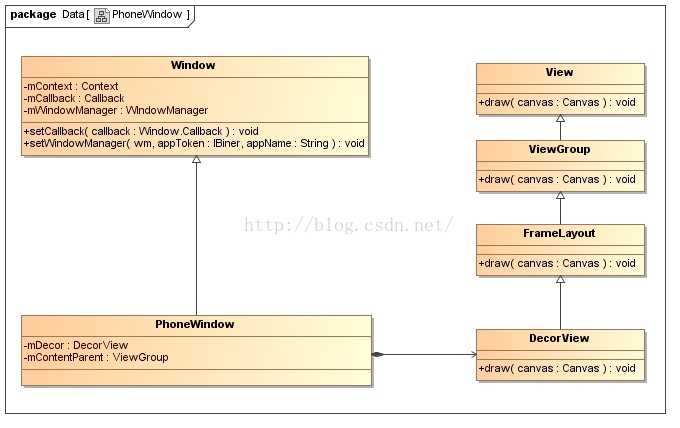
應用程序窗口內部所包含的視圖對象的實際類型為DecorView。DecorView類繼承了View類,是作為容器(ViewGroup)來使用的,它的實現如圖
每一個Activity對象都有一個關聯的ViewRootImpl對象,相當於是MVC模型中的Controller,它有以下職責:
1. 負責為應用程序窗口視圖創建Surface。
2. 配合WindowManagerService來管理系統的應用程序窗口。
3. 負責管理、布局和渲染應用程序窗口視圖的UI。
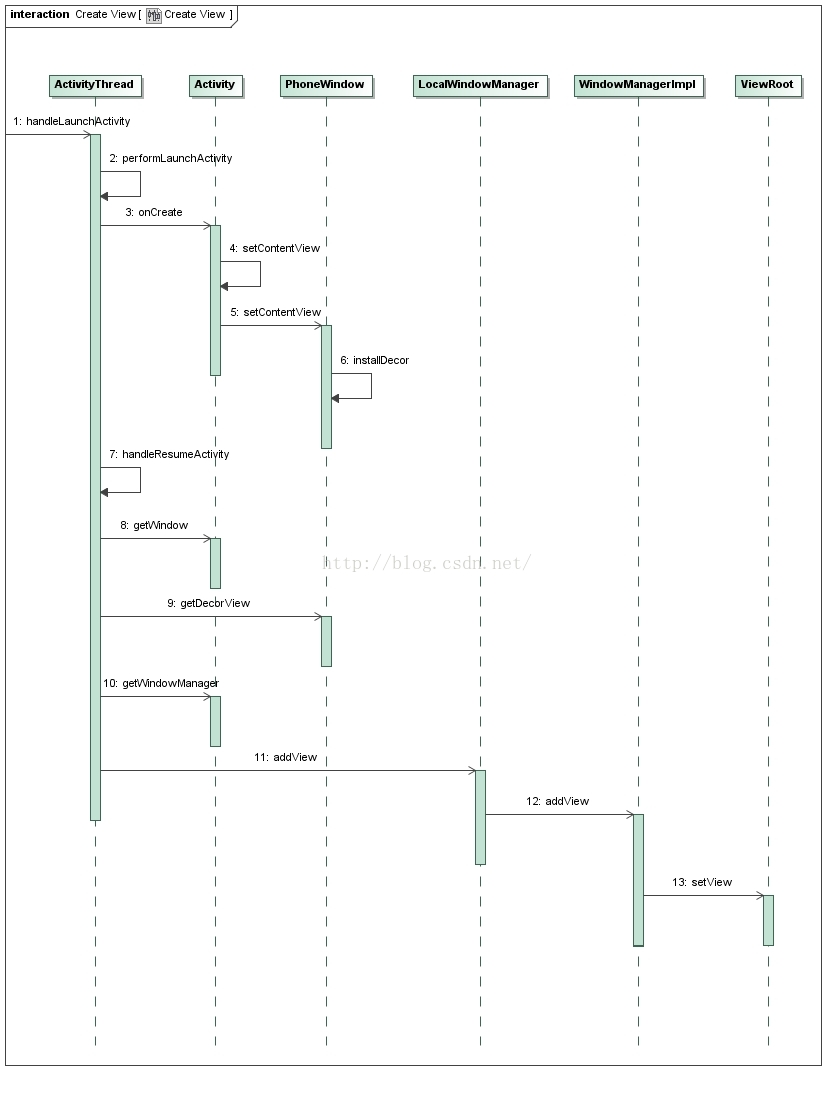
從前面Android應用程序啟動過程源代碼分析一文可以知道,Activity組件在啟動的過程中,會調用ActivityThread類的成員函數handleLaunchActivity,用來創建以及首次激活Activity組件,因此,接下來我們就從這個函數開始,具體分析應用程序窗口的視圖對象及其所關聯的ViewRootImpl對象的創建過程,如圖所示
一般在Activity的子類的onCreate方法中都會實現setContentView函數,我們來看Activity的這個函數:
    public void setContentView(View view) {
        getWindow().setContentView(view);
        initWindowDecorActionBar();
    }
調用了PhoneWindow的setContentView函數,而在這個函數中調用了installDecor函數來創建DecorView對象
    @Override
    public void setContentView(View view, ViewGroup.LayoutParams params) {
        // Note: FEATURE_CONTENT_TRANSITIONS may be set in the process of installing the window
        // decor, when theme attributes and the like are crystalized. Do not check the feature
        // before this happens.
        if (mContentParent == null) {
            installDecor();
        } else if (!hasFeature(FEATURE_CONTENT_TRANSITIONS)) {
            mContentParent.removeAllViews();
        }

        if (hasFeature(FEATURE_CONTENT_TRANSITIONS)) {
            view.setLayoutParams(params);
            final Scene newScene = new Scene(mContentParent, view);
            transitionTo(newScene);
        } else {
            mContentParent.addView(view, params);
        }
        mContentParent.requestApplyInsets();
        final Callback cb = getCallback();
        if (cb != null && !isDestroyed()) {
            cb.onContentChanged();
        }
    }
在installDecor函數中調用了generateDecor函數來創建DecorView
    private void installDecor() {
        if (mDecor == null) {
            mDecor = generateDecor();
......
    protected DecorView generateDecor() {
        return new DecorView(getContext(), -1);
    }
下面我們再從ActivityThread的handleResumeActivity函數看,先調用了performResumeActivity函數來查找這個Activity,後面主要調用了WindowManager的addView函數。
    final void handleResumeActivity(IBinder token,
            boolean clearHide, boolean isForward, boolean reallyResume) {
        // If we are getting ready to gc after going to the background, well
        // we are back active so skip it.
        unscheduleGcIdler();
        mSomeActivitiesChanged = true;

        // TODO Push resumeArgs into the activity for consideration
        ActivityClientRecord r = performResumeActivity(token, clearHide);

        if (r != null) {
            final Activity a = r.activity;

            if (localLOGV) Slog.v(
                TAG, "Resume " + r + " started activity: " +
                a.mStartedActivity + ", hideForNow: " + r.hideForNow
                + ", finished: " + a.mFinished);

            final int forwardBit = isForward ?
                    WindowManager.LayoutParams.SOFT_INPUT_IS_FORWARD_NAVIGATION : 0;

            // If the window hasn't yet been added to the window manager,
            // and this guy didn't finish itself or start another activity,
            // then go ahead and add the window.
            boolean willBeVisible = !a.mStartedActivity;
            if (!willBeVisible) {
                try {
                    willBeVisible = ActivityManagerNative.getDefault().willActivityBeVisible(
                            a.getActivityToken());
                } catch (RemoteException e) {
                }
            }
            if (r.window == null && !a.mFinished && willBeVisible) {
                r.window = r.activity.getWindow();
                View decor = r.window.getDecorView();
                decor.setVisibility(View.INVISIBLE);
                ViewManager wm = a.getWindowManager();
                WindowManager.LayoutParams l = r.window.getAttributes();
                a.mDecor = decor;
                l.type = WindowManager.LayoutParams.TYPE_BASE_APPLICATION;
                l.softInputMode |= forwardBit;
                if (a.mVisibleFromClient) {
                    a.mWindowAdded = true;
                    wm.addView(decor, l);
                }
我們先來看performResumeActivity函數,這個函數主要是根據token來尋找ActivityClientRecord,然後調用了Activity的performResume方法。
    public final ActivityClientRecord performResumeActivity(IBinder token,
            boolean clearHide) {
        ActivityClientRecord r = mActivities.get(token);
        if (localLOGV) Slog.v(TAG, "Performing resume of " + r
                + " finished=" + r.activity.mFinished);
        if (r != null && !r.activity.mFinished) {
            if (clearHide) {
                r.hideForNow = false;
                r.activity.mStartedActivity = false;
            }
            try {
                r.activity.onStateNotSaved();
                r.activity.mFragments.noteStateNotSaved();
                if (r.pendingIntents != null) {
                    deliverNewIntents(r, r.pendingIntents);
                    r.pendingIntents = null;
                }
                if (r.pendingResults != null) {
                    deliverResults(r, r.pendingResults);
                    r.pendingResults = null;
                }
                r.activity.performResume();

                EventLog.writeEvent(LOG_AM_ON_RESUME_CALLED,
                        UserHandle.myUserId(), r.activity.getComponentName().getClassName());

                r.paused = false;
                r.stopped = false;
                r.state = null;
                r.persistentState = null;
            } catch (Exception e) {
                if (!mInstrumentation.onException(r.activity, e)) {
                    throw new RuntimeException(
                        "Unable to resume activity "
                        + r.intent.getComponent().toShortString()
                        + ": " + e.toString(), e);
                }
            }
        }
        return r;
    }
後面有調用了Activity的getWindowManager方法獲取WindowManager,之前的博客有分析過,這個WindowManager就是WindowManagerImpl對象。下面也就是調用了WindowManagerImpl的addView函數。
我們來看WindowManagerImpl的addView函數,其實就是調用了WindowManagerGlobal的addView函數
    @Override
    public void addView(@NonNull View view, @NonNull ViewGroup.LayoutParams params) {
        applyDefaultToken(params);
        mGlobal.addView(view, params, mDisplay, mParentWindow);
    }
之前也分析過WindowManagerGlobal,它有3個重要的成員變量:
    private final ArrayList mViews = new ArrayList();//所有的DecorView對象
    private final ArrayList mRoots = new ArrayList();//所有的ViewRootImpl對象
    private final ArrayList mParams =//所有頂層View的layout參數
            new ArrayList();
我們再來看WindowManagerGlobal的addView函數,這個函數主要是創建了ViewRootImpl,並且把DecorView,RootViewRootImpl,layout參數都保存起來了。然後調用了ViewRootImpl的setView函數。
    public void addView(View view, ViewGroup.LayoutParams params,
            Display display, Window parentWindow) {
        ......

            root = new ViewRootImpl(view.getContext(), display);

            view.setLayoutParams(wparams);

            mViews.add(view);
            mRoots.add(root);
            mParams.add(wparams);
        }

        // do this last because it fires off messages to start doing things
        try {
            root.setView(view, wparams, panelParentView);
        } catch (RuntimeException e) {
            // BadTokenException or InvalidDisplayException, clean up.
            synchronized (mLock) {
                final int index = findViewLocked(view, false);
                if (index >= 0) {
                    removeViewLocked(index, true);
                }
            }
            throw e;
        }
    }
下面我們再來看看ViewRootImpl的setView函數:
    public void setView(View view, WindowManager.LayoutParams attrs, View panelParentView) {
        synchronized (this) {
            if (mView == null) {
                mView = view;

                mAttachInfo.mDisplayState = mDisplay.getState();
                mDisplayManager.registerDisplayListener(mDisplayListener, mHandler);

                mViewLayoutDirectionInitial = mView.getRawLayoutDirection();
                mFallbackEventHandler.setView(view);
                mWindowAttributes.copyFrom(attrs);
                if (mWindowAttributes.packageName == null) {
                    mWindowAttributes.packageName = mBasePackageName;
                }
                attrs = mWindowAttributes;
                // Keep track of the actual window flags supplied by the client.
                mClientWindowLayoutFlags = attrs.flags;

                setAccessibilityFocus(null, null);

                if (view instanceof RootViewSurfaceTaker) {
                    mSurfaceHolderCallback =
                            ((RootViewSurfaceTaker)view).willYouTakeTheSurface();
                    if (mSurfaceHolderCallback != null) {
                        mSurfaceHolder = new TakenSurfaceHolder();
                        mSurfaceHolder.setFormat(PixelFormat.UNKNOWN);
                    }
                }

                // Compute surface insets required to draw at specified Z value.
                // TODO: Use real shadow insets for a constant max Z.
                if (!attrs.hasManualSurfaceInsets) {
                    final int surfaceInset = (int) Math.ceil(view.getZ() * 2);
                    attrs.surfaceInsets.set(surfaceInset, surfaceInset, surfaceInset, surfaceInset);
                }

                CompatibilityInfo compatibilityInfo = mDisplayAdjustments.getCompatibilityInfo();
                mTranslator = compatibilityInfo.getTranslator();

                // If the application owns the surface, don't enable hardware acceleration
                if (mSurfaceHolder == null) {
                    enableHardwareAcceleration(attrs);
                }

                boolean restore = false;
                if (mTranslator != null) {
                    mSurface.setCompatibilityTranslator(mTranslator);
                    restore = true;
                    attrs.backup();
                    mTranslator.translateWindowLayout(attrs);
                }
                if (DEBUG_LAYOUT) Log.d(TAG, "WindowLayout in setView:" + attrs);

                if (!compatibilityInfo.supportsScreen()) {
                    attrs.privateFlags |= WindowManager.LayoutParams.PRIVATE_FLAG_COMPATIBLE_WINDOW;
                    mLastInCompatMode = true;
                }

                mSoftInputMode = attrs.softInputMode;
                mWindowAttributesChanged = true;
                mWindowAttributesChangesFlag = WindowManager.LayoutParams.EVERYTHING_CHANGED;
                mAttachInfo.mRootView = view;
                mAttachInfo.mScalingRequired = mTranslator != null;
                mAttachInfo.mApplicationScale =
                        mTranslator == null ? 1.0f : mTranslator.applicationScale;
                if (panelParentView != null) {
                    mAttachInfo.mPanelParentWindowToken
                            = panelParentView.getApplicationWindowToken();
                }
                mAdded = true;
                int res; /* = WindowManagerImpl.ADD_OKAY; */

                // Schedule the first layout -before- adding to the window
                // manager, to make sure we do the relayout before receiving
                // any other events from the system.
                requestLayout();//繪制UI布局
                if ((mWindowAttributes.inputFeatures
                        & WindowManager.LayoutParams.INPUT_FEATURE_NO_INPUT_CHANNEL) == 0) {
                    mInputChannel = new InputChannel();//創建按鍵通道
                }
                try {
                    mOrigWindowType = mWindowAttributes.type;
                    mAttachInfo.mRecomputeGlobalAttributes = true;
                    collectViewAttributes();
                    res = mWindowSession.addToDisplay(mWindow, mSeq, mWindowAttributes,
                            getHostVisibility(), mDisplay.getDisplayId(),
                            mAttachInfo.mContentInsets, mAttachInfo.mStableInsets,
                            mAttachInfo.mOutsets, mInputChannel);
                } catch (RemoteException e) {
                    mAdded = false;
                    mView = null;
                    mAttachInfo.mRootView = null;
                    mInputChannel = null;
                    mFallbackEventHandler.setView(null);
                    unscheduleTraversals();
                    setAccessibilityFocus(null, null);
                    throw new RuntimeException("Adding window failed", e);
                } finally {
                    if (restore) {
                        attrs.restore();
                    }
                }

                if (mTranslator != null) {
                    mTranslator.translateRectInScreenToAppWindow(mAttachInfo.mContentInsets);
                }
                mPendingOverscanInsets.set(0, 0, 0, 0);
                mPendingContentInsets.set(mAttachInfo.mContentInsets);
                mPendingStableInsets.set(mAttachInfo.mStableInsets);
                mPendingVisibleInsets.set(0, 0, 0, 0);
                if (DEBUG_LAYOUT) Log.v(TAG, "Added window " + mWindow);
                if (res < WindowManagerGlobal.ADD_OKAY) {
                    mAttachInfo.mRootView = null;
                    mAdded = false;
                    mFallbackEventHandler.setView(null);
                    unscheduleTraversals();
                    setAccessibilityFocus(null, null);
                    switch (res) {
                        case WindowManagerGlobal.ADD_BAD_APP_TOKEN:
                        case WindowManagerGlobal.ADD_BAD_SUBWINDOW_TOKEN:
                            throw new WindowManager.BadTokenException(
                                    "Unable to add window -- token " + attrs.token
                                    + " is not valid; is your activity running?");
                        case WindowManagerGlobal.ADD_NOT_APP_TOKEN:
                            throw new WindowManager.BadTokenException(
                                    "Unable to add window -- token " + attrs.token
                                    + " is not for an application");
                        case WindowManagerGlobal.ADD_APP_EXITING:
                            throw new WindowManager.BadTokenException(
                                    "Unable to add window -- app for token " + attrs.token
                                    + " is exiting");
                        case WindowManagerGlobal.ADD_DUPLICATE_ADD:
                            throw new WindowManager.BadTokenException(
                                    "Unable to add window -- window " + mWindow
                                    + " has already been added");
                        case WindowManagerGlobal.ADD_STARTING_NOT_NEEDED:
                            // Silently ignore -- we would have just removed it
                            // right away, anyway.
                            return;
                        case WindowManagerGlobal.ADD_MULTIPLE_SINGLETON:
                            throw new WindowManager.BadTokenException(
                                    "Unable to add window " + mWindow +
                                    " -- another window of this type already exists");
                        case WindowManagerGlobal.ADD_PERMISSION_DENIED:
                            throw new WindowManager.BadTokenException(
                                    "Unable to add window " + mWindow +
                                    " -- permission denied for this window type");
                        case WindowManagerGlobal.ADD_INVALID_DISPLAY:
                            throw new WindowManager.InvalidDisplayException(
                                    "Unable to add window " + mWindow +
                                    " -- the specified display can not be found");
                        case WindowManagerGlobal.ADD_INVALID_TYPE:
                            throw new WindowManager.InvalidDisplayException(
                                    "Unable to add window " + mWindow
                                    + " -- the specified window type is not valid");
                    }
                    throw new RuntimeException(
                            "Unable to add window -- unknown error code " + res);
                }

                if (view instanceof RootViewSurfaceTaker) {
                    mInputQueueCallback =
                        ((RootViewSurfaceTaker)view).willYouTakeTheInputQueue();
                }
                if (mInputChannel != null) {
                    if (mInputQueueCallback != null) {
                        mInputQueue = new InputQueue();
                        mInputQueueCallback.onInputQueueCreated(mInputQueue);
                    }
                    mInputEventReceiver = new WindowInputEventReceiver(mInputChannel,//創建按鍵應用層接受對象
                            Looper.myLooper());
                }

                view.assignParent(this);
                mAddedTouchMode = (res & WindowManagerGlobal.ADD_FLAG_IN_TOUCH_MODE) != 0;
                mAppVisible = (res & WindowManagerGlobal.ADD_FLAG_APP_VISIBLE) != 0;

                if (mAccessibilityManager.isEnabled()) {
                    mAccessibilityInteractionConnectionManager.ensureConnection();
                }

                if (view.getImportantForAccessibility() == View.IMPORTANT_FOR_ACCESSIBILITY_AUTO) {
                    view.setImportantForAccessibility(View.IMPORTANT_FOR_ACCESSIBILITY_YES);
                }

                // Set up the input pipeline.
                CharSequence counterSuffix = attrs.getTitle();
                mSyntheticInputStage = new SyntheticInputStage();//按鍵的一些流程類
                InputStage viewPostImeStage = new ViewPostImeInputStage(mSyntheticInputStage);
                InputStage nativePostImeStage = new NativePostImeInputStage(viewPostImeStage,
                        "aq:native-post-ime:" + counterSuffix);
                InputStage earlyPostImeStage = new EarlyPostImeInputStage(nativePostImeStage);
                InputStage imeStage = new ImeInputStage(earlyPostImeStage,
                        "aq:ime:" + counterSuffix);
                InputStage viewPreImeStage = new ViewPreImeInputStage(imeStage);
                InputStage nativePreImeStage = new NativePreImeInputStage(viewPreImeStage,
                        "aq:native-pre-ime:" + counterSuffix);

                mFirstInputStage = nativePreImeStage;
                mFirstPostImeInputStage = earlyPostImeStage;
                mPendingInputEventQueueLengthCounterName = "aq:pending:" + counterSuffix;
            }
        }
    }
這個函數主要是調用了requestLayout函數來對應用窗口的UI布局,然後創建了InputChannel。調用ViewRoot類的靜態成員變量sWindowSession所描述的一個類型為Session的Binder代理對象的成員函數add來請求WindowManagerService增加一個WindowState對象,以便可以用來描述當前正在處理的一個ViewRootImpl所關聯的一個應用程序窗口。
最後創建了WindowInputEventReceiver應用層的按鍵接受,以及一些按鍵在應用層的流程的相關類。
 Android應用APP自動更新功能的代碼實現
由於Android項目開源所致,市面上出現了N多安卓軟件市場。為了讓我們開發的軟件有更多的用戶使用,我們需要向N多市場發布,軟件升級後,我們也必須到安卓市場上進行更新,給
 如何搭配最新的安卓開發環境
本章只是寫了如何配置JDK,以及adt-bundle的配置。對於以前的adt-bundle的版本,會自帶CPU/ABI系統鏡像,經過本文所描述的兩個步驟後可以直接創建AV
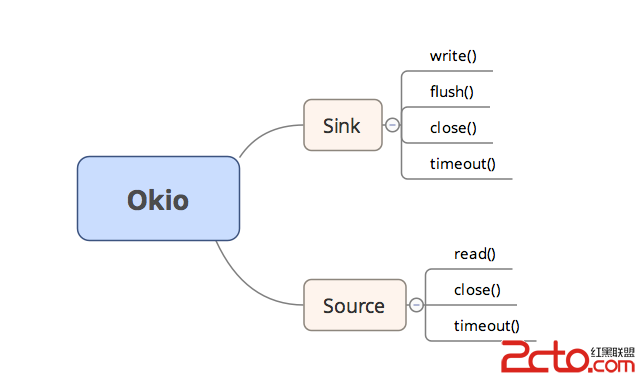 Android 善用Okio簡化處理I/O操作
Okio庫是一個由square公司開發的,它補充了java.io和java.nio的不足,以便能夠更加方便,快速的訪問、存儲和處理你的數據。而OkHttp的底層也使用該庫
 從源碼角度帶你分析 Android View 事件分發 dispatchTouchEvent,onTouch,onTouchEvent,onClick邏輯順序過程(一)
關於Android View 事件分發過程的文章網絡上可以搜到一把大,這裡貼一篇代碼性的文章,作者也是個牛人:Android事件分發機制完全解析,帶你從源碼的角度徹底理解