編輯:關於Android編程
關於Android View 事件分發過程的文章網絡上可以搜到一把大,這裡貼一篇代碼性的文章,作者也是個牛人:Android事件分發機制完全解析,帶你從源碼的角度徹底理解(上)。
雖然講的很好,但是看完之後還是感覺有那麼點一知半解,於是自己花了點時間從源碼研究android 觸摸事件分發流程,以下內容僅僅個人理解,如有差錯希望指出。
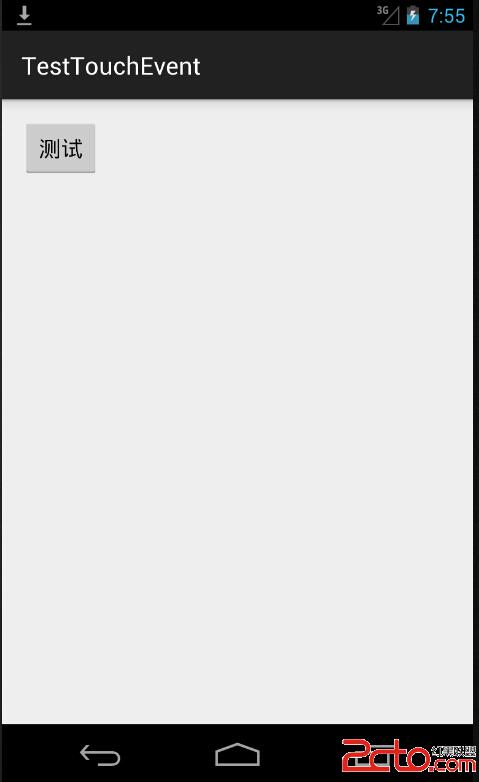
我們先從一個例子看起,先重寫一個MyButton 繼承Button,代碼如下:
public class MyButton extends Button {

    public MyButton(Context context) {
        super(context);
    }

    public MyButton(Context context, AttributeSet attrs) {
        super(context, attrs);
    }

    public MyButton(Context context, AttributeSet attrs, int defStyleAttr) {
        super(context, attrs, defStyleAttr);
    }


    @Override
    public boolean dispatchTouchEvent(MotionEvent event) {

        switch (event.getAction()) {
            case MotionEvent.ACTION_DOWN:
                MyLog.e("dispatchTouchEvent====MyButton=====ACTION_DOWN");
                break;
            case MotionEvent.ACTION_MOVE:
                MyLog.e("dispatchTouchEvent====MyButton=====ACTION_MOVE");
                break;
            case MotionEvent.ACTION_UP:
                MyLog.e("dispatchTouchEvent====MyButton=====ACTION_UP");
                break;
        }

        return super.dispatchTouchEvent(event);
    }

    @Override
    public boolean onTouchEvent(MotionEvent event) {

        switch (event.getAction()) {
            case MotionEvent.ACTION_DOWN:
                MyLog.e("onTouchEvent====MyButton=====ACTION_DOWN");
                break;
            case MotionEvent.ACTION_MOVE:
                MyLog.e("onTouchEvent====MyButton=====ACTION_MOVE");
                break;
            case MotionEvent.ACTION_UP:
                MyLog.e("onTouchEvent====MyButton=====ACTION_UP");
                break;
        }

        return super.onTouchEvent(event);
    }
布局文件如下:
public class MainActivity extends ActionBarActivity {

    private Button myButton;


    @Override
    protected void onCreate(Bundle savedInstanceState) {
        super.onCreate(savedInstanceState);
        setContentView(R.layout.activity_main);

        myButton = (Button) findViewById(R.id.myButton);

        myButton.setOnTouchListener(new View.OnTouchListener() {
            @Override
            public boolean onTouch(View v, MotionEvent event) {
                switch (event.getAction()) {
                    case MotionEvent.ACTION_DOWN:
                        MyLog.e("onTouch====MyButton=====ACTION_DOWN");
                        break;
                    case MotionEvent.ACTION_MOVE:
                        MyLog.e("onTouch====MyButton=====ACTION_MOVE");
                        break;
                    case MotionEvent.ACTION_UP:
                        MyLog.e("onTouch====MyButton=====ACTION_UP");
                        break;
                }
                return false;
            }
        });

        myButton.setOnClickListener(new View.OnClickListener() {
            @Override
            public void onClick(View v) {
                MyLog.e("onClick====MyButton=====onClick");
            }
        });


    }


}

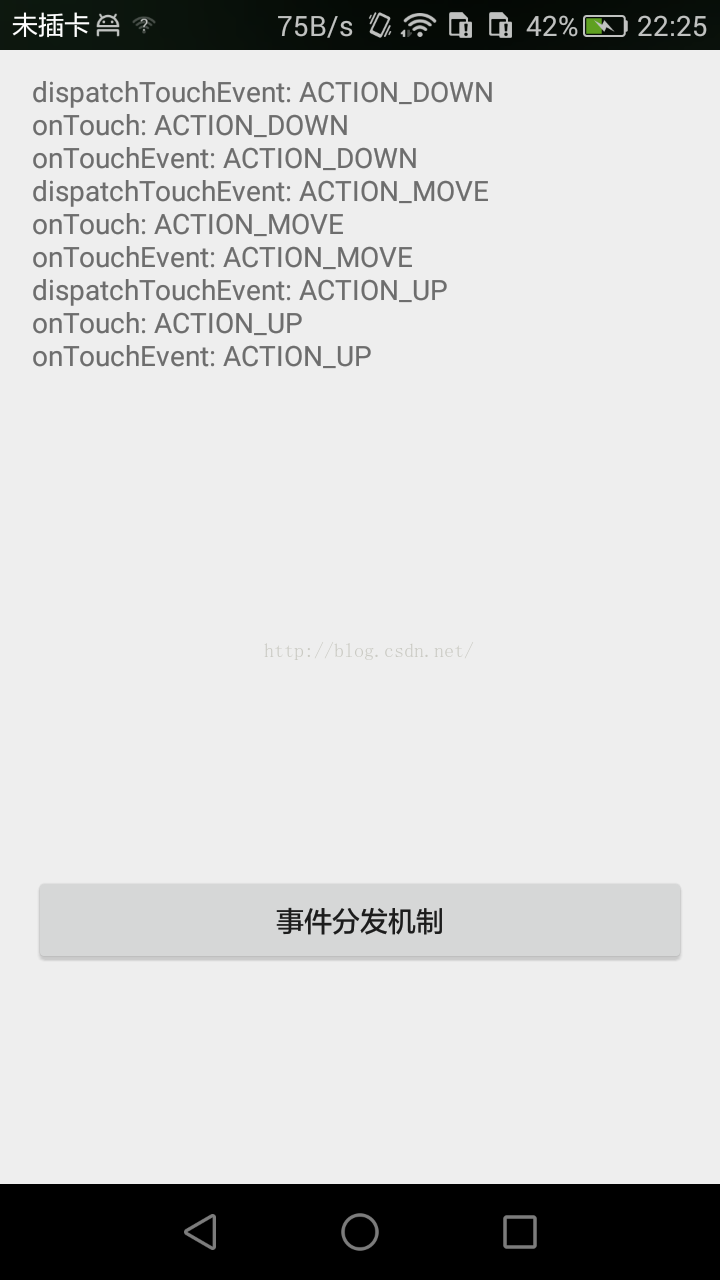
我們從打印結果可以直觀看到,點擊Button按鈕事件分發過程如下 dispatchTouchEvent---->onTouch---->onTouchEvent----->onClick。並且如果仔細的你會發現,都是在ACTION_UP事件之後才觸發onClick點擊事件,為什麼會是這樣??現在我們不得而知。我們僅僅是從打印結果推測事件分發的結論,現在我們從源碼分析下這個事件分發流程為什麼是這樣子。
事件分發都是從dispatchTouchEvent方法開始的,那麼我們這裡是重寫了dispatchTouchEvent方法,並且最後也調用了父類的super.dispatchTouchEvent(event)方法。那麼我們看看父類中的方法到底做了什麼??點擊進入父類的dispatchTouchEvent方法,發現此方法在View類中找到,其實也不奇怪,所有控件的父類都是View。這裡我貼出最新源碼如下:
    public boolean dispatchTouchEvent(MotionEvent event) {
        boolean result = false;

        if (mInputEventConsistencyVerifier != null) {
            mInputEventConsistencyVerifier.onTouchEvent(event, 0);
        }

        final int actionMasked = event.getActionMasked();
        if (actionMasked == MotionEvent.ACTION_DOWN) {
            // Defensive cleanup for new gesture
            stopNestedScroll();
        }

        if (onFilterTouchEventForSecurity(event)) {
            //noinspection SimplifiableIfStatement
            ListenerInfo li = mListenerInfo;
            if (li != null && li.mOnTouchListener != null
                    && (mViewFlags & ENABLED_MASK) == ENABLED
                    && li.mOnTouchListener.onTouch(this, event)) {
                result = true;
            }

            if (!result && onTouchEvent(event)) {
                result = true;
            }
        }

        if (!result && mInputEventConsistencyVerifier != null) {
            mInputEventConsistencyVerifier.onUnhandledEvent(event, 0);
        }

        // Clean up after nested scrolls if this is the end of a gesture;
        // also cancel it if we tried an ACTION_DOWN but we didn't want the rest
        // of the gesture.
        if (actionMasked == MotionEvent.ACTION_UP ||
                actionMasked == MotionEvent.ACTION_CANCEL ||
                (actionMasked == MotionEvent.ACTION_DOWN && !result)) {
            stopNestedScroll();
        }

        return result;
    }
忽略其他無關代碼,我們直接看17--25行。第17行的if判斷關鍵在於li.mOnTouchListener.onTouch(this, event) 的返回值,這個接口回調就是我們外面寫的myButton.setOnTouchListener事件(Button 的onTouch事件),在MainActivity代碼裡,我們setOnTouchListener返回的值是false,所以在源碼中我們可以看到 17行的條件不成立,那麼條件不成立,result=false;因此,源碼的第23行if 判斷第一個條件成立,繼續執行第二個條件,也就是onTouchEvent。我們跳到這個方法裡看看裡面干啥了?看如下代碼:
public boolean onTouchEvent(MotionEvent event) {

        if (((viewFlags & CLICKABLE) == CLICKABLE ||
                (viewFlags & LONG_CLICKABLE) == LONG_CLICKABLE)) {
            switch (event.getAction()) {
                case MotionEvent.ACTION_UP:
                    boolean prepressed = (mPrivateFlags & PFLAG_PREPRESSED) != 0;
                    if ((mPrivateFlags & PFLAG_PRESSED) != 0 || prepressed) {
                        // take focus if we don't have it already and we should in
                        // touch mode.
                        boolean focusTaken = false;
                        if (isFocusable() && isFocusableInTouchMode() && !isFocused()) {
                            focusTaken = requestFocus();
                        }

                        if (prepressed) {
                            // The button is being released before we actually
                            // showed it as pressed.  Make it show the pressed
                            // state now (before scheduling the click) to ensure
                            // the user sees it.
                            setPressed(true, x, y);
                       }

                        if (!mHasPerformedLongPress) {
                            // This is a tap, so remove the longpress check
                            removeLongPressCallback();

                            // Only perform take click actions if we were in the pressed state
                            if (!focusTaken) {
                                // Use a Runnable and post this rather than calling
                                // performClick directly. This lets other visual state
                                // of the view update before click actions start.
                                if (mPerformClick == null) {
                                    mPerformClick = new PerformClick();
                                }
                                if (!post(mPerformClick)) {
                                    performClick();
                                }
                            }
                        }

                        if (mUnsetPressedState == null) {
                            mUnsetPressedState = new UnsetPressedState();
                        }

                        if (prepressed) {
                            postDelayed(mUnsetPressedState,
                                    ViewConfiguration.getPressedStateDuration());
                        } else if (!post(mUnsetPressedState)) {
                            // If the post failed, unpress right now
                            mUnsetPressedState.run();
                        }

                        removeTapCallback();
                    }
                    break;
            return true;
        }

        return false;
    }
public boolean performClick() {
        final boolean result;
        final ListenerInfo li = mListenerInfo;
        if (li != null && li.mOnClickListener != null) {
            playSoundEffect(SoundEffectConstants.CLICK);
            li.mOnClickListener.onClick(this);
            result = true;
        } else {
            result = false;
        }

        sendAccessibilityEvent(AccessibilityEvent.TYPE_VIEW_CLICKED);
        return result;
    }
看見沒??第6行 li.mOnClickListener.onClick(this); 這個接口回調就是我們Button的 onClick事件。到此為止,我們從源碼分析了Button事件分發過程
現在我們來看看其他情況:當onTouch返回為true,打印結果如下:

驚奇的發現,竟然沒有執行onClick事件是吧????如果你仔細閱讀上面的文章,估計你知道為什麼了吧?還是跟大家一起分析一下吧:源碼如下:
 public boolean dispatchTouchEvent(MotionEvent event) {
        boolean result = false;

        if (mInputEventConsistencyVerifier != null) {
            mInputEventConsistencyVerifier.onTouchEvent(event, 0);
        }

        final int actionMasked = event.getActionMasked();
        if (actionMasked == MotionEvent.ACTION_DOWN) {
            // Defensive cleanup for new gesture
            stopNestedScroll();
        }

        if (onFilterTouchEventForSecurity(event)) {
            //noinspection SimplifiableIfStatement
            ListenerInfo li = mListenerInfo;
            if (li != null && li.mOnTouchListener != null
                    && (mViewFlags & ENABLED_MASK) == ENABLED
                    && li.mOnTouchListener.onTouch(this, event)) {
                result = true;
            }

            if (!result && onTouchEvent(event)) {
                result = true;
            }
        }

        if (!result && mInputEventConsistencyVerifier != null) {
            mInputEventConsistencyVerifier.onUnhandledEvent(event, 0);
        }

        // Clean up after nested scrolls if this is the end of a gesture;
        // also cancel it if we tried an ACTION_DOWN but we didn't want the rest
        // of the gesture.
        if (actionMasked == MotionEvent.ACTION_UP ||
                actionMasked == MotionEvent.ACTION_CANCEL ||
                (actionMasked == MotionEvent.ACTION_DOWN && !result)) {
            stopNestedScroll();
        }

        return result;
    }
給個簡單的流程圖如下
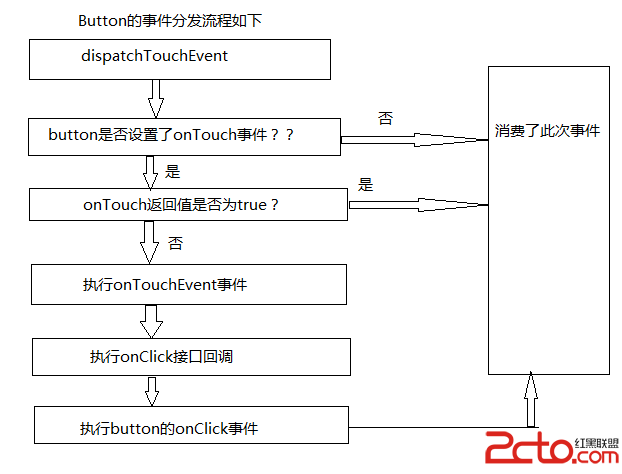
因此,事件分發之間的關系是:dispatchTouchEvent方法中線執行 onTouch接口回調,然後根據onTouch方法的返回值判斷是否執行onTouchEvent方法,onTouchEvent方法中執行了onClick接口回調。
 android開發之記錄ListView滾動位置
這個問題本身不難,但是由於項目中的需求太過於復雜,結果導致這個問題變得不是那麼容易實現。在網上一搜,結果如下:int scrollPos = refreshListVie
 Android Listview上下拉動刷新tab滑動切換功能
近期要做一個含有兩個tab切換頁面,兩個頁面有公共的描述信息區域,兩個tab都是listview,可以向上或向下拉動刷新,在頁面中部有一個tab切換區域,向上滑動的時候t
 View的事件分發機制學習筆記
好不容易周末有空,作為一個零基礎非計算機專業剛培訓出來7個月的小白,對付博大精深的Android源碼真的是心有余而力不足,但是東西還是要學滴,這不!找到Hongyang大
 android Tween Animation屬性設置方法實例
在Android開發中,Animation是用來給控件制作效果的。大多數的控件都可以用這個類,這個類包含了4種基本動作,分別為移動,旋轉,淡入淡出,縮放。在使用Anima