編輯:關於Android編程
看段Android官方的簡介
Class Overview
Displays text to the user and optionally allows them to edit it. A TextView is a complete text editor, however the basic class is configured to not allow editing; see EditText for a subclass that configures the text view for editing.
To allow users to copy some or all of the TextView’s value and paste it somewhere else, set the XML attribute android:textIsSelectable to “true” or call setTextIsSelectable(true). The textIsSelectable flag allows users to make selection gestures in the TextView, which in turn triggers the system’s built-in copy/paste controls.
TextView主要用於給用戶展示文字,並且讓用戶隨意的可以對文字進行編輯。但是普通的TextView是不允許用來編輯的,只有EditText才可以。
如果在XML中設置了android:textIsSelectable 或者在Java代碼中調用了setTextIsSelectable(true)方法,就可以允許對TextView的部分或者全部文字進行復制,然後粘貼到其他地方。textIsSelectable 標簽是允許用戶在TextView上使用選擇手勢。
順便提下,大家如果想看API文檔的話,可以在
file:///E:/AndroidEnvironment/SDK/docs/reference/android/widget/TextView.html
你安裝SDK的目錄下/docs/reference/android/widget/TextView.html找到你想要查看控件的API
一般自定義view都需要滿足2個條件,展示我們期望的UI,正確傳遞或者接收處理點擊或者觸摸事件。
所以對於TextView的分析也從這三個地方展開
繪制過程
onMeasure()
onLayout()
onDraw()
事件接收處理
由於TextView繼承於View,所以主要分析onTouchEvent()方法就好了
一些和TextView有關的類如何實現,比如Spans,Layout,接收輸入的InputConnection
本文基於Android SDK API-19的基礎上分析
在分析之前,我們先來看個小彩蛋

不知道這個//TODO是某個哥們自問自答呢,還是別人在對他的代碼review的時候給注上的
再分析之前,順便拋出一個問題供大家思考下,maxEms這個屬性到底是用來做什麼的?
網上的答案五花八門,在下面的源碼中我們可以一窺究竟。
首先來看onMeasure()部分代碼
@Override
    protected void onMeasure(int widthMeasureSpec, int heightMeasureSpec) {
    //首先接收到父容器傳遞過來的MeasureSpec
    //關於MeasureSpec是如果計算的,可以查看之前的博文
    //[LinearLayout源碼解析](http://blog.csdn.net/wz249863091/article/details/51702980)
        int widthMode = MeasureSpec.getMode(widthMeasureSpec);
        int heightMode = MeasureSpec.getMode(heightMeasureSpec);
        int widthSize = MeasureSpec.getSize(widthMeasureSpec);
        int heightSize = MeasureSpec.getSize(heightMeasureSpec);

        int width;
        int height;

        //這裡解釋下什麼叫作boring
        //A BoringLayout is a very simple Layout implementation for text that
        //fits on a single line and is all left-to-right characters.
        //boring就是指布局所用的文本裡面不包含任何Span,所有的文本方向都是從左到右的布局,
        //並且僅需一行就能顯示完全的布局
        //這裡將TextView和Hint的boring初始化
        BoringLayout.Metrics boring = UNKNOWN_BORING;
        BoringLayout.Metrics hintBoring = UNKNOWN_BORING;

        //獲得文字的排序方式。一共有6種
        //FIRSTSTRONG_RTL,FIRSTSTRONG_LTR Unicode雙向算法
        //ANYRTL_LTR
        //LTR,RTL 左到右或者右到左排序
        //LOCALE
        //first strong算法 有興趣的同學可以自行研究下,一般情況下都是左到右排序
        if (mTextDir == null) {
            mTextDir = getTextDirectionHeuristic();
        }

        int des = -1;
        boolean fromexisting = false;

        //如果寬度是精確模式了,那就那父容器給的寬度當作當前TextView的寬度
        if (widthMode == MeasureSpec.EXACTLY) {
            // Parent has told us how big to be. So be it.
            width = widthSize;
        } else {
            if (mLayout != null && mEllipsize == null) {
            //首先計算下期望值,如果行數大於1就返回-1,否則返回單行寬度
            //具體代碼貼在下面
                des = desired(mLayout);
            }

            //如果小於0,即行數大於1行,就去判斷是否是boring
            //isBoring()這個方法也在下面有詳細分析,大家可以閱讀後
            //再回過頭來看看
            if (des < 0) {
                boring = BoringLayout.isBoring(mTransformed, mTextPaint, mTextDir, mBoring);
                //閱讀過下面的方法,就知道boring是一個Metrics矩陣,
                //包含了文本樣式 width, ascent, and descen等
                if (boring != null) {
                    mBoring = boring;
                }
            } else {
                fromexisting = true;
            }

            //再次判斷boring是否為null
            //這裡有2種情況會為null
            //1.des>0,即Textview只顯示一行文字,就不會去計算boring的值了
            //2.Textview包含的內容不是boring的,多行,有縮進或者包含spann
            if (boring == null || boring == UNKNOWN_BORING) {
                //如果是多行文字的
                if (des < 0) {
                    des = (int) FloatMath.ceil(Layout.getDesiredWidth(mTransformed, mTextPaint));
                }
                width = des;
            } else {
            //如果是boring模式的就很簡單了,把boring剛測量得到的width賦給TextView
            //即文字的寬度
                width = boring.width;
            }

            //這裡就是加上Drawable的寬度
            final Drawables dr = mDrawables;
            if (dr != null) {
                width = Math.max(width, dr.mDrawableWidthTop);
                width = Math.max(width, dr.mDrawableWidthBottom);
            }

            //這裡會再計算一次hint的寬度,流程和上面的一模一樣,就不再重復了
            if (mHint != null) {
                int hintDes = -1;
                int hintWidth;

                if (mHintLayout != null && mEllipsize == null) {
                    hintDes = desired(mHintLayout);
                }

                if (hintDes < 0) {
                    hintBoring = BoringLayout.isBoring(mHint, mTextPaint, mTextDir, mHintBoring);
                    if (hintBoring != null) {
                        mHintBoring = hintBoring;
                    }
                }

                if (hintBoring == null || hintBoring == UNKNOWN_BORING) {
                    if (hintDes < 0) {
                        hintDes = (int) FloatMath.ceil(Layout.getDesiredWidth(mHint, mTextPaint));
                    }
                    hintWidth = hintDes;
                } else {
                    hintWidth = hintBoring.width;
                }

                if (hintWidth > width) {
                    width = hintWidth;
                }
            }

            //這裡再加上padding的值
            //順便說一句,padding的值是在子view裡自己算的
            //margin的值是在父容器裡算的
            //在自定義view和viewgroup的時候,千萬注意
            //width += getCompoundPaddingLeft() + getCompoundPaddingRight();

            //在這,就能解答之前的疑問,EMS這個屬性到底是干嘛的
            //如果我們設置了maxEms這個屬性
            //public void setMaxEms(int maxems) {
           // mMaxWidth = maxems;
            //mMaxWidthMode = EMS;

            //requestLayout();
            //invalidate();
                //}
            //mMaxWidth的值就是EMS的值
            //如果設置了maxLength,那麼mMaxWidth的值就是maxWidth的值
            //然後再來看如果是EMS模式
            //Math.min(width, mMaxWidth * getLineHeight())
            //我們的最大寬度就是EMS的值乘以lineHeight的值
            //而lineHeight的值 官方是這麼解釋的
            //return the height of one standard line in pixels
            //public int getLineHeight() {
           // return FastMath.round(mTextPaint.getFontMetricsInt(null) *
           //mSpacingMult + mSpacingAdd);
           //就是行間距乘以字體大小
           //所以在不同行間距和字體大小下,EMS所產生的mMaxWidth也是不同的
    }
            if (mMaxWidthMode == EMS) {
                width = Math.min(width, mMaxWidth * getLineHeight());
            } else {
                width = Math.min(width, mMaxWidth);
            }

            if (mMinWidthMode == EMS) {
                width = Math.max(width, mMinWidth * getLineHeight());
            } else {
                width = Math.max(width, mMinWidth);
            }

            // Check against our minimum width
            width = Math.max(width, getSuggestedMinimumWidth());

            //如果是Wrap的,會在父容器給的size和實際最大size中取小的
            if (widthMode == MeasureSpec.AT_MOST) {
                width = Math.min(widthSize, width);
            }
        }

        //最後根據上面計算得到的size-padding的值就是我們單行text實際可以展示的大小
        int want = width - getCompoundPaddingLeft() - getCompoundPaddingRight();
        int unpaddedWidth = want;

        //如果是水平方向可以scroll的,那麼寬度就是無限大了,因為可以滑嘛
        if (mHorizontallyScrolling) want = VERY_WIDE;

        int hintWant = want;
        int hintWidth = (mHintLayout == null) ? hintWant : mHintLayout.getWidth();

        //這裡會牽扯到makeNewLayout(...)這個方法,也會在下面得到詳細分析
        if (mLayout == null) {
            makeNewLayout(want, hintWant, boring, hintBoring,
                          width - getCompoundPaddingLeft() - getCompoundPaddingRight(), false);
        } else {
            final boolean layoutChanged = (mLayout.getWidth() != want) ||
                    (hintWidth != hintWant) ||
                    (mLayout.getEllipsizedWidth() !=
                            width - getCompoundPaddingLeft() - getCompoundPaddingRight());

            final boolean widthChanged = (mHint == null) &&
                    (mEllipsize == null) &&
                    (want > mLayout.getWidth()) &&
                    (mLayout instanceof BoringLayout || (fromexisting && des >= 0 && des <= want));

            final boolean maximumChanged = (mMaxMode != mOldMaxMode) || (mMaximum != mOldMaximum);

            if (layoutChanged || maximumChanged) {
                if (!maximumChanged && widthChanged) {
                    mLayout.increaseWidthTo(want);
                } else {
                    makeNewLayout(want, hintWant, boring, hintBoring,
                            width - getCompoundPaddingLeft() - getCompoundPaddingRight(), false);
                }
            } else {
                // Nothing has changed
            }
        }

        //然後開始計算高度,這部分代碼相對於寬度,就簡單的多了
        //如果是精確模式,那麼高度就等於TextView要求的高度
        if (heightMode == MeasureSpec.EXACTLY) {
            // Parent has told us how big to be. So be it.
            height = heightSize;
            mDesiredHeightAtMeasure = -1;
        } else {
            //計算下想要的高度
            //這裡邏輯比較簡單
            //只需要比較下文字高度和hint的高度,取大的那個值就可以了
            //至於文字高度和hint高度的計算:
            //1.當行高度*行數
            //如果設置了Drawable的話,比較2個值得大小,取大的
            //如果設置了maxLines或者maxHeight計算下當前高度有沒超過最大高度,超過的話取最大高度
            //如果設置了minLines或者minHeight的話,比較下當前高度和最小高度,取小的
            int desired = getDesiredHeight();

            height = desired;
            mDesiredHeightAtMeasure = desired;

            //如果是warp模式,就取父容器算的和實際需要小的值
            if (heightMode == MeasureSpec.AT_MOST) {
                height = Math.min(desired, heightSize);
            }
        }

        int unpaddedHeight = height - getCompoundPaddingTop() - getCompoundPaddingBottom();
        if (mMaxMode == LINES && mLayout.getLineCount() > mMaximum) {
            unpaddedHeight = Math.min(unpaddedHeight, mLayout.getLineTop(mMaximum));
        }

        /*
         * We didn't let makeNewLayout() register to bring the cursor into view,
         * so do it here if there is any possibility that it is needed.
         */
         //這裡就是處理下滾動條
        if (mMovement != null ||
            mLayout.getWidth() > unpaddedWidth ||
            mLayout.getHeight() > unpaddedHeight) {
            registerForPreDraw();
        } else {
            scrollTo(0, 0);
        }

        setMeasuredDimension(width, height);
    }
desire()方法
private static int desired(Layout layout) {
        //首先獲得行數
        int n = layout.getLineCount();
        CharSequence text = layout.getText();
        float max = 0;

        // if any line was wrapped, we can't use it.
        // but it's ok for the last line not to have a newline
        //如果行數大於1,就返回-1
        for (int i = 0; i < n - 1; i++) {
            if (text.charAt(layout.getLineEnd(i) - 1) != '\n')
                return -1;
        }

        //將寬度和0比較,如果大於0,就取寬度
        for (int i = 0; i < n; i++) {
            max = Math.max(max, layout.getLineWidth(i));
        }

        return (int) FloatMath.ceil(max);
    }
isBoring()實現
/**
     * Returns null if not boring; the width, ascent, and descent in the
     * provided Metrics object (or a new one if the provided one was null)
     * if boring.
     * @hide
     */
     //如果是boring模式的就返回Metrics object,不是就返回null
     //什麼是boring模式 開頭已經講過了,根據他的定義也不難猜到這個方法有幾個條件判斷
    public static Metrics isBoring(CharSequence text, TextPaint paint,
            TextDirectionHeuristic textDir, Metrics metrics) {
        //首先獲得一個char型數組,這裡值得一提的是TextUtils.obtain(500)這個方法
        //在我們自己寫代碼的時候也可以借鑒,減少內存的交換
        //這裡把字符串分成了以500個字符為一組
        char[] temp = TextUtils.obtain(500);
        int length = text.length();
        boolean boring = true;

        outer:
        for (int i = 0; i < length; i += 500) {
            int j = i + 500;

            //首先判斷是否當前組的字符串是否有500個
            //沒有就取實際長度
            if (j > length)
                j = length;

            //根據長度取出字符串的子串
            TextUtils.getChars(text, i, j, temp, 0);

            //子串的長度
            int n = j - i;

            //遍歷整個子串
            for (int a = 0; a < n; a++) {
                char c = temp[a];

                //這裡有3個條件
                //1.如果有換行 \n
                //2.如果有縮進 \t
                //3.如果不是LTR 左到右模式
                //如果有其中1種情況,就視為不是boring模式
                if (c == '\n' || c == '\t' || c >= FIRST_RIGHT_TO_LEFT) {
                    boring = false;
                    break outer;
                }
            }

            if (textDir != null && textDir.isRtl(temp, 0, n)) {
               boring = false;
               break outer;
            }
        }

        //把temp回收
        TextUtils.recycle(temp);

        //如果包含了span,那麼也視為不是boring模式
        if (boring && text instanceof Spanned) {
            Spanned sp = (Spanned) text;
            Object[] styles = sp.getSpans(0, length, ParagraphStyle.class);
            if (styles.length > 0) {
                boring = false;
            }
        }

        //如果是boring模式,那就返回Metrics對象
        if (boring) {
            Metrics fm = metrics;
            //首先判斷傳進來的Metrics是否為空,如果為空,就新建一個對象
            if (fm == null) {
                fm = new Metrics();
            }

            //設置TextLine,文本樣式
            TextLine line = TextLine.obtain();
            line.set(paint, text, 0, length, Layout.DIR_LEFT_TO_RIGHT,
                    Layout.DIRS_ALL_LEFT_TO_RIGHT, false, null);
            fm.width = (int) FloatMath.ceil(line.metrics(fm));
            TextLine.recycle(line);

            return fm;
        } else {
            return null;
        }
    }
makeNewLayout(…)方法
/**
     * The width passed in is now the desired layout width,
     * not the full view width with padding.
     * {@hide}
     */
    protected void makeNewLayout(int wantWidth, int hintWidth,
                                 BoringLayout.Metrics boring,
                                 BoringLayout.Metrics hintBoring,
                                 int ellipsisWidth, boolean bringIntoView) {
        //首先,如果有跑馬燈效果,先把跑馬燈停了
        stopMarquee();

        // Update "old" cached values
        //把最大寬度和最大行數先保存起來
        mOldMaximum = mMaximum;
        mOldMaxMode = mMaxMode;

        mHighlightPathBogus = true;

        if (wantWidth < 0) {
            wantWidth = 0;
        }
        if (hintWidth < 0) {
            hintWidth = 0;
        }

        //獲得對其方式
        Layout.Alignment alignment = getLayoutAlignment();
        final boolean testDirChange = mSingleLine && mLayout != null &&
            (alignment == Layout.Alignment.ALIGN_NORMAL ||
             alignment == Layout.Alignment.ALIGN_OPPOSITE);
        int oldDir = 0;
        if (testDirChange) oldDir = mLayout.getParagraphDirection(0);
        //是否需要省略號,這個值是根據我們在XML中寫的Ellipsize來定的
        boolean shouldEllipsize = mEllipsize != null && getKeyListener() == null;
        //省略號主要分開始位置,中間位置和結束位置3個常規位置
        //還有跑馬燈這種非常規位置
        //mMarqueeFadeMode分為3種效果
        //MARQUEE_FADE_NORMAL
        //MARQUEE_FADE_SWITCH_SHOW_ELLIPSIS
        //MARQUEE_FADE_SWITCH_SHOW_FADE
        //這裡判斷是否為常規的marquee
        final boolean switchEllipsize = mEllipsize == TruncateAt.MARQUEE &&
                mMarqueeFadeMode != MARQUEE_FADE_NORMAL;
        TruncateAt effectiveEllipsize = mEllipsize;

        if (mEllipsize == TruncateAt.MARQUEE &&
                mMarqueeFadeMode == MARQUEE_FADE_SWITCH_SHOW_ELLIPSIS) {
            effectiveEllipsize = TruncateAt.END_SMALL;
        }

        //獲得排序方向,一般是LTR 左到右
        if (mTextDir == null) {
            mTextDir = getTextDirectionHeuristic();
        }

        //獲得一個singleLayout,這個方法在下面分析
        mLayout = makeSingleLayout(wantWidth, boring, ellipsisWidth, alignment, shouldEllipsize,
                effectiveEllipsize, effectiveEllipsize == mEllipsize);
        //如果是非常規的跑馬燈,需要再創建一個mSavedMarqueeModeLayout,在播放跑馬燈的時候
        //把這個layout作為mLayout
        if (switchEllipsize) {
            TruncateAt oppositeEllipsize = effectiveEllipsize == TruncateAt.MARQUEE ?
                    TruncateAt.END : TruncateAt.MARQUEE;
            mSavedMarqueeModeLayout = makeSingleLayout(wantWidth, boring, ellipsisWidth, alignment,
                    shouldEllipsize, oppositeEllipsize, effectiveEllipsize != mEllipsize);
        }

        shouldEllipsize = mEllipsize != null;
        mHintLayout = null;

        //如果有默認提示,還要計算hintLayout
        if (mHint != null) {
            //如果有省略號,那麼提示文字的寬度就是實際能分配的寬度
            if (shouldEllipsize) hintWidth = wantWidth;

            //這段代碼看著眼熟不?就是剛在onLayout()裡分析的那段
            if (hintBoring == UNKNOWN_BORING) {
               //如果hint只是單行,無縮進,無spann那麼就是把boring的矩陣賦值hintBoring
                hintBoring = BoringLayout.isBoring(mHint, mTextPaint, mTextDir,
                                                   mHintBoring);
                if (hintBoring != null) {
                    mHintBoring = hintBoring;
                }
            }

            //這裡有3層if嵌套,如果不仔細看,很容易暈
            //主要分為3層邏輯
            //最外層當前的hint是否是boring的,即單行無span
            //第二層主要判斷是否需要省略號,當前hint實際需要寬度是否大於計算得到的寬度
            //如果仔細看了前面分析可以知道wantWidth,hintWidth和ellipsisWidth
            //其實都是一個值 width-paddingleft-paddingRight
            //即實際可以提供的寬度
            //然後最裡面那層就是判斷mSavedHintLayout是否為null
            //如果為null就make一個新的,不為null就把老的值更新
            //先看如果是boring模式
            if (hintBoring != null) {
                //首先判斷hint需要寬度是否小於實際給的寬度
                if (hintBoring.width <= hintWidth &&
                    (!shouldEllipsize || hintBoring.width <= ellipsisWidth)) {
                    if (mSavedHintLayout != null) {
                        mHintLayout = mSavedHintLayout.
                                replaceOrMake(mHint, mTextPaint,
                                hintWidth, alignment, mSpacingMult, mSpacingAdd,
                                hintBoring, mIncludePad);
                    } else {
                        mHintLayout = BoringLayout.make(mHint, mTextPaint,
                                hintWidth, alignment, mSpacingMult, mSpacingAdd,
                                hintBoring, mIncludePad);
                    }

                    mSavedHintLayout = (BoringLayout) mHintLayout;
                //如果不滿足上面的要求
                //再判斷是否需要省略號,並且需要寬度是否小於實際給的寬度
                //如果進入這個if條件的,都是設置了省略號,但是不需要顯示的
                } else if (shouldEllipsize && hintBoring.width <= hintWidth) {
                    if (mSavedHintLayout != null) {
                        mHintLayout = mSavedHintLayout.
                                replaceOrMake(mHint, mTextPaint,
                                hintWidth, alignment, mSpacingMult, mSpacingAdd,
                                hintBoring, mIncludePad, mEllipsize,
                                ellipsisWidth);
                    } else {
                        mHintLayout = BoringLayout.make(mHint, mTextPaint,
                                hintWidth, alignment, mSpacingMult, mSpacingAdd,
                                hintBoring, mIncludePad, mEllipsize,
                                ellipsisWidth);
                    }
                //如果還是不滿足
                //到了這就應該是需要省略號,但是需要寬度是大於實際給的寬度
                //那麼就應該顯示省略號了
                } else if (shouldEllipsize) {
                    mHintLayout = new StaticLayout(mHint,
                                0, mHint.length(),
                                mTextPaint, hintWidth, alignment, mTextDir, mSpacingMult,
                                mSpacingAdd, mIncludePad, mEllipsize,
                                ellipsisWidth, mMaxMode == LINES ? mMaximum : Integer.MAX_VALUE);
                } else {
                    mHintLayout = new StaticLayout(mHint, mTextPaint,
                            hintWidth, alignment, mTextDir, mSpacingMult, mSpacingAdd,
                            mIncludePad);
                }
            //到了這開始處理不是boring的hint
            //如果不是boring的,需要省略號
            } else if (shouldEllipsize) {
                mHintLayout = new StaticLayout(mHint,
                            0, mHint.length(),
                            mTextPaint, hintWidth, alignment, mTextDir, mSpacingMult,
                            mSpacingAdd, mIncludePad, mEllipsize,
                            ellipsisWidth, mMaxMode == LINES ? mMaximum : Integer.MAX_VALUE);
            //如果不是boring的,不需要省略號
            } else {
                mHintLayout = new StaticLayout(mHint, mTextPaint,
                        hintWidth, alignment, mTextDir, mSpacingMult, mSpacingAdd,
                        mIncludePad);
            }
        }

        //如果文字方向發生變化了,就重新注冊OnPreDrawListener
        //OnPreDrawListener回調的時機是
        //即將繪制視圖樹時執行的回調函數。這時所有的視圖都測量完成並確定了框架。 客戶端可以
        //使用該方法來調整滾動邊框,甚至可以在繪制之前請求新的布局。
        if (bringIntoView || (testDirChange && oldDir != mLayout.getParagraphDirection(0))) {
            registerForPreDraw();
        }

        //這裡開始處理跑馬燈
        //如果需要播放跑馬燈
        if (mEllipsize == TextUtils.TruncateAt.MARQUEE) {
            if (!compressText(ellipsisWidth)) {
                final int height = mLayoutParams.height;
                // If the size of the view does not depend on the size of the text, try to
                // start the marquee immediately
                //這裡值得稍微留意是
                //如果當前TextView的寬度不需要依賴內部文字的話
                //直接就可以播放跑馬燈了
                if (height != LayoutParams.WRAP_CONTENT && height != LayoutParams.MATCH_PARENT) {
                    startMarquee();
                } else {
                    // Defer the start of the marquee until we know our width (see setFrame())
                    mRestartMarquee = true;
                }
            }
        }

        // CursorControllers need a non-null mLayout
        if (mEditor != null) mEditor.prepareCursorControllers();
    }
分析到這onMeasure()就結束了
讓我們來看下onLayout()是如何實現的
 @Override
    protected void onLayout(boolean changed, int left, int top, int right, int bottom) {
        super.onLayout(changed, left, top, right, bottom);
        //這裡主要的邏輯就是bringPointIntoView
        if (mDeferScroll >= 0) {
            int curs = mDeferScroll;
            mDeferScroll = -1;
            bringPointIntoView(Math.min(curs, mText.length()));
        }
    }
最後我們看下onDraw()的實現,看看文字是如何被繪制到屏幕上的
@Override
    protected void onDraw(Canvas canvas) {
        restartMarqueeIfNeeded();

        // Draw the background for this view
        super.onDraw(canvas);

        //首先先計算padding和scorll的值
        //還有判斷是LTR還是RTS方向
        final int compoundPaddingLeft = getCompoundPaddingLeft();
        final int compoundPaddingTop = getCompoundPaddingTop();
        final int compoundPaddingRight = getCompoundPaddingRight();
        final int compoundPaddingBottom = getCompoundPaddingBottom();
        final int scrollX = mScrollX;
        final int scrollY = mScrollY;
        final int right = mRight;
        final int left = mLeft;
        final int bottom = mBottom;
        final int top = mTop;
        final boolean isLayoutRtl = isLayoutRtl();
        final int offset = getHorizontalOffsetForDrawables();
        final int leftOffset = isLayoutRtl ? 0 : offset;
        final int rightOffset = isLayoutRtl ? offset : 0 ;

        //如果有drawable,那麼先繪制draw
        final Drawables dr = mDrawables;
        if (dr != null) {
            /*
             * Compound, not extended, because the icon is not clipped
             * if the text height is smaller.
             */
            //計算水平和垂直空間
            int vspace = bottom - top - compoundPaddingBottom - compoundPaddingTop;
            int hspace = right - left - compoundPaddingRight - compoundPaddingLeft;

            // IMPORTANT: The coordinates computed are also used in invalidateDrawable()
            // Make sure to update invalidateDrawable() when changing this code.
            //開始繪制DrawableLeft
            if (dr.mDrawableLeft != null) {
            //這裡簡單介紹下canvas.save()和canvas.restore()
            //調用save之後,可以對canvas進行平移和旋轉,確定新的原點然後繪制
            //等繪制完了之後,可以把原點恢復原狀
                canvas.save();
                canvas.translate(scrollX + mPaddingLeft + leftOffset,
                                 scrollY + compoundPaddingTop +
                                 (vspace - dr.mDrawableHeightLeft) / 2);
                //個人認為TextView整個控件寫了十分出彩
                //TextView需要繪制背景,文字,Drawable
                //谷歌在處理這個控件的時候,把不同的事交給不同的類去完成,充分解耦
                //文字部分用Editor和layout處理
                //圖片部分用Drawable自行繪制
                //整個TextView其實只是充當了容器作用
                dr.mDrawableLeft.draw(canvas);
                canvas.restore();
            }

            // IMPORTANT: The coordinates computed are also used in invalidateDrawable()
            // Make sure to update invalidateDrawable() when changing this code.
            if (dr.mDrawableRight != null) {
                canvas.save();
                canvas.translate(scrollX + right - left - mPaddingRight
                        - dr.mDrawableSizeRight - rightOffset,
                         scrollY + compoundPaddingTop + (vspace - dr.mDrawableHeightRight) / 2);
                dr.mDrawableRight.draw(canvas);
                canvas.restore();
            }

            // IMPORTANT: The coordinates computed are also used in invalidateDrawable()
            // Make sure to update invalidateDrawable() when changing this code.
            if (dr.mDrawableTop != null) {
                canvas.save();
                canvas.translate(scrollX + compoundPaddingLeft +
                        (hspace - dr.mDrawableWidthTop) / 2, scrollY + mPaddingTop);
                dr.mDrawableTop.draw(canvas);
                canvas.restore();
            }

            // IMPORTANT: The coordinates computed are also used in invalidateDrawable()
            // Make sure to update invalidateDrawable() when changing this code.
            if (dr.mDrawableBottom != null) {
                canvas.save();
                canvas.translate(scrollX + compoundPaddingLeft +
                        (hspace - dr.mDrawableWidthBottom) / 2,
                         scrollY + bottom - top - mPaddingBottom - dr.mDrawableSizeBottom);
                dr.mDrawableBottom.draw(canvas);
                canvas.restore();
            }
        }

        int color = mCurTextColor;

        //如果layout為null,通過剛分析的makeNewLayout()方法,再去獲得一個Layout
        if (mLayout == null) {
            assumeLayout();
        }

        Layout layout = mLayout;

        //如果當前沒有文字,並且設置了hint,那麼就顯示hint
        if (mHint != null && mText.length() == 0) {
            if (mHintTextColor != null) {
                color = mCurHintTextColor;
            }

            layout = mHintLayout;
        }

        mTextPaint.setColor(color);
        mTextPaint.drawableState = getDrawableState();

        canvas.save();
        //感覺寫TextView控件這位工程師對自己寫的代碼不是很自信,留下了很多疑問
        //也許是Review之後忘了刪除了,自己看的時候有時候會和有代入感,感覺在給別人review代碼
        /*  Would be faster if we didn't have to do this. Can we chop the
            (displayable) text so that we don't need to do this ever?
        */

        int extendedPaddingTop = getExtendedPaddingTop();
        int extendedPaddingBottom = getExtendedPaddingBottom();

        final int vspace = mBottom - mTop - compoundPaddingBottom - compoundPaddingTop;
        final int maxScrollY = mLayout.getHeight() - vspace;

        //計算矩陣的上下左右4個坐標值
        float clipLeft = compoundPaddingLeft + scrollX;
        float clipTop = (scrollY == 0) ? 0 : extendedPaddingTop + scrollY;
        float clipRight = right - left - compoundPaddingRight + scrollX;
        float clipBottom = bottom - top + scrollY -
                ((scrollY == maxScrollY) ? 0 : extendedPaddingBottom);

        //這裡是處理文字陰影
        if (mShadowRadius != 0) {
            clipLeft += Math.min(0, mShadowDx - mShadowRadius);
            clipRight += Math.max(0, mShadowDx + mShadowRadius);

            clipTop += Math.min(0, mShadowDy - mShadowRadius);
            clipBottom += Math.max(0, mShadowDy + mShadowRadius);
        }

        //在畫布中裁剪出剛計算出來的矩陣大小
        canvas.clipRect(clipLeft, clipTop, clipRight, clipBottom);

        int voffsetText = 0;
        int voffsetCursor = 0;

        // translate in by our padding
        /* shortcircuit calling getVerticaOffset() */
        if ((mGravity & Gravity.VERTICAL_GRAVITY_MASK) != Gravity.TOP) {
            voffsetText = getVerticalOffset(false);
            voffsetCursor = getVerticalOffset(true);
        }
        canvas.translate(compoundPaddingLeft, extendedPaddingTop + voffsetText);

        final int layoutDirection = getLayoutDirection();
        final int absoluteGravity = Gravity.getAbsoluteGravity(mGravity, layoutDirection);
        //如果有跑馬燈,並且不是MARQUEE_FADE_SWITCH_SHOW_ELLIPSIS模式的話
        if (mEllipsize == TextUtils.TruncateAt.MARQUEE &&
                mMarqueeFadeMode != MARQUEE_FADE_SWITCH_SHOW_ELLIPSIS) {
            //如果當前只有1行顯示,並且不是SingleLine的,也不是Gravity.LEFT
            if (!mSingleLine && getLineCount() == 1 && canMarquee() &&
                    (absoluteGravity & Gravity.HORIZONTAL_GRAVITY_MASK) != Gravity.LEFT) {
                final int width = mRight - mLeft;
                final int padding = getCompoundPaddingLeft() + getCompoundPaddingRight();
                //dx值就是layout的寬度減去實際寬度再減去padding的值,主要是給RTL模式計算偏移量
                final float dx = mLayout.getLineRight(0) - (width - padding);
                canvas.translate(isLayoutRtl ? -dx : +dx, 0.0f);
            }

            if (mMarquee != null && mMarquee.isRunning()) {
                final float dx = -mMarquee.getScroll();
                canvas.translate(isLayoutRtl ? -dx : +dx, 0.0f);
            }
        }

        final int cursorOffsetVertical = voffsetCursor - voffsetText;

        //這裡終於開始繪制文字了
        Path highlight = getUpdatedHighlightPath();
        //如果是EditText的就交給mEditor繪制,普通TextView,就交給layout處理
        if (mEditor != null) {
            mEditor.onDraw(canvas, layout, highlight, mHighlightPaint, cursorOffsetVertical);
        } else {
            layout.draw(canvas, highlight, mHighlightPaint, cursorOffsetVertical);
        }

        if (mMarquee != null && mMarquee.shouldDrawGhost()) {
            final int dx = (int) mMarquee.getGhostOffset();
            canvas.translate(isLayoutRtl ? -dx : dx, 0.0f);
            layout.draw(canvas, highlight, mHighlightPaint, cursorOffsetVertical);
        }

        canvas.restore();
    }
上文中主要分析了TextView的整個繪制流程,主要是從過程的角度分析了幾個比較重要的階段。
在下一篇TextView源碼分析(二)中會具體分析Layout,Editor和Drawable是如何完成繪制,排版。
 Android群英傳第五章筆記·Android Scroll分析
發生滑動效果的原因Android坐標系獲取view在屏幕上的坐標(view左上角的坐標) View view = (View) findViewById(R.id.
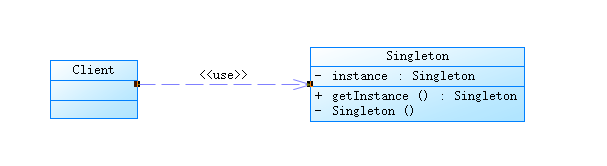 java/android 設計模式學習筆記(一)---單例模式
前段時間公司一些同事在討論單例模式(我是最渣的一個,都插不上嘴 T__T ),這個模式使用的頻率很高,也可能是很多人最熟悉的設計模式,當然單例模式也算是最簡單的設計模式之
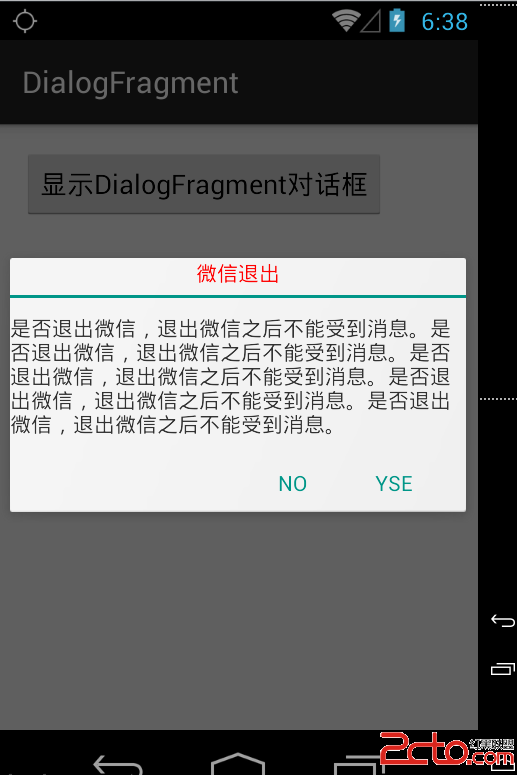 Android DialogFragment對話框
寫在前面從事Android開發至今,一提及Android開發中使用的對話框就想起AlertDialog或者PopupWindow,我在上一篇博客中也總結了這兩種對話框的使
 android文件上傳示例分享(android圖片上傳)
主要思路是調用系統文件管理器或者其他媒體采集資源來獲取要上傳的文件,然後將文件的上傳進度實時展示到進度條中。主Activity復制代碼 代碼如下:package com.