編輯:關於Android編程
有些時候,自己要在布局文件中重復書寫大量的代碼來定義一個布局。這是最基本的使用,當然要掌握;但是有些場景都去對應的布局裡面寫對應的屬性,就顯得很無力。會發現,系統自帶的控件無法滿足我們的要求,這個時候就要考慮自定義控件。自定義view的世界,也很浩瀚,個人需要學的地方還有很多很多。自定義view,會節省開發效率,很有必要學習其基本原理和方法。接下來就對自定義view,做一個初步的認識,一步步了解封裝的重要性。但是,也僅僅是一個初步,因為它實在太靈活了。
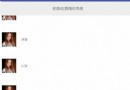
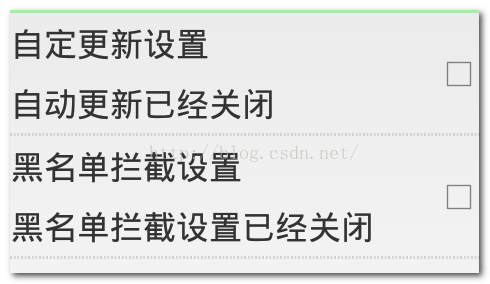
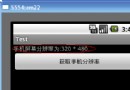
有這麼一種場景,看圖:
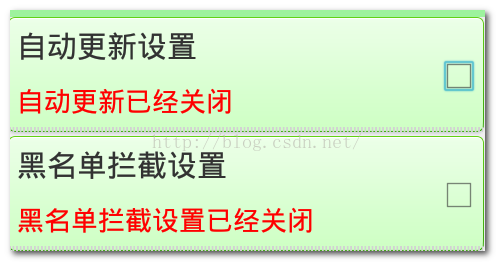
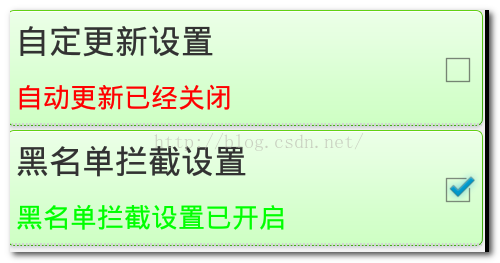
除了布局之外,還有一點。當用戶點擊的時候,會自動選中復選框,而且紅色textview變為綠色。且改變了內容。
那就一點點的看看怎麼通過自定義view和自定義屬性來完成上述功能。
首先,它是顯示在一個活動中的。這個活動,就定位為SettingCenterActivity,要在這個活動中加載上面的的布局。通過以前的方式來完成一下布局上的功能。就使用線性布局,冗余的代碼寫了出來:
定義一個activity_settingcenter.xml:
運行程序,已經實現了效果。但是,如果繼續顯示“黑名單攔截設置”設置更多的話,或者要修改每一項的參數屬性值的話,就要不斷的重復寫代碼了,這樣顯然浪費時間。
所以,做第一步封裝:
把這個布局抽取成一個布局,item_settingcenterview.xml
activity_settingcenter.xml中像類似引用textview一樣就好了!其實,textview在代碼中是一個類,繼承自view才有了view的功能。那麼我們就自己定義一個類,繼承自某個容器類型的view,會不會有view的屬性和功能了?答案是肯定的,因為子類使用父類功能,天經地義,子類都比父類要強大!能像使用LinearLayout一樣使用自定義的view
繼續改進(自定義view解決上面的一切問題)。
新建一個類SettingCenterItenView繼承自LinearLayout類,加入如下功能:
package com.example.ydlmobileguard.views;

import android.content.Context;
import android.util.AttributeSet;
import android.widget.LinearLayout;

public class SettingCenterItemView extends LinearLayout {

	public SettingCenterItemView(Context context, AttributeSet attrs) {
		super(context, attrs);
		initView();
	}


	public SettingCenterItemView(Context context) {
		super(context);
		initView();
	}

	private void initView() {
		// TODO Auto-generated method stub

	}


}
繼承自LinearLayout,因為LinearLayout屬於容器類型的view,他可以填充其他的view。你也可以繼承自RelativeLayout都可以
package com.example.ydlmobileguard.views;

import com.example.ydlmobileguard.R;

import android.content.Context;
import android.util.AttributeSet;
import android.view.View;
import android.widget.LinearLayout;

public class SettingCenterItemView extends LinearLayout {

	public SettingCenterItemView(Context context, AttributeSet attrs) {
		super(context, attrs);
		initView();
	}


	public SettingCenterItemView(Context context) {
		super(context);
		initView();
	}

	private void initView() {
		View view = View.inflate(getContext(), R.layout.item_settingcenter_view, null);
		addView(view);
	}


}
還沒結束。如果就這麼結束了,就成了蒙你了。。。因為還是無法修改每一項的內容,場景還沒解決。接下來,還要自定義屬性對文字做一個動態修改。
在自定義屬性前,先看一下系統的屬性是怎麼來設置的。
都會發現每一個配置文件中有一行命名空間:xmlns:android="http://schemas.android.com/apk/res/android" 這是系統自帶的,它的原理是:通過命名空間的前綴,找到包的信息(這裡是最後一個名稱android),通過包的信息,找到工程,找到工程後。就可以找到這個工程的資源信息(values----attrs屬性配置文件),從attrs文件裡找到屬性配置的信息。先在activity_settingcenter.xml裡面加入自己供自定義view使用的命名空間前綴 如下:xmlns:itydl="http://schemas.android.com/apk/res/com.example.ydlmobileguard"
再參考一下系統的attrs文件怎麼寫的——
在這裡面,起著最主要作用的是一個是屬性名稱,在布局文件中可以直引用,一個是屬性值得類型。
比對之,定義自己的屬性文件
新建attrs.xml文件,加入針對自定義view要添加的屬性名和屬性值
在SettingCenterItemView類中完成代碼如下:
package com.example.ydlmobileguard.views;

import com.example.ydlmobileguard.R;

import android.content.Context;
import android.util.AttributeSet;
import android.view.View;
import android.widget.CheckBox;
import android.widget.LinearLayout;
import android.widget.TextView;

public class SettingCenterItemView extends LinearLayout {
	private TextView tv_title;
	private TextView tv_content;
	private CheckBox cb_checkBox;
	/**
	 * 代碼實例化,調用構造函數。引用這個自定義view,就會自動調用這裡的構造函數
	 * @param context
	 * @param attrs
	 */
	public SettingCenterItemView(Context context, AttributeSet attrs) {
		super(context, attrs);
		initView();
		/**
		 * namespace :The namespace of the attribute to get the value from.
           name :The name of the attribute to get the value from.
		 */
		//根據命名空間/屬性文件中的屬性值。在自定義組件xml文件中得到值
		String title =attrs.getAttributeValue("http://schemas.android.com/apk/res/com.example.ydlmobileguard", "title");
		String content = attrs.getAttributeValue("http://schemas.android.com/apk/res/com.example.ydlmobileguard", "content");
		//把獲取到的值,加載到view上顯示
		tv_title.setText(title);
		tv_content.setText(content);
	}


	public SettingCenterItemView(Context context) {
		super(context);
		initView();
	}
	/**
	 * 初始化LinearLayout子組件
	 */
	private void initView() {
		//給LinearLayout加上子組件
		View view = View.inflate(getContext(), R.layout.item_settingcenter_view, null);
		//每一項的標題
		tv_title = (TextView) view.findViewById(R.id.tv_settingcenter_autoupdate_title);
		//每一項內容
		tv_content = (TextView) view.findViewById(R.id.tv_settingcenter_autoupdate_content);
		//每一項的復選框
		cb_checkBox = (CheckBox) view.findViewById(R.id.cb_settingcenter_autoupdate_checked);
		addView(view);//Adds a child view.
	}


}
這個時候自定義view算是介紹完了。
最後完成“”特效“,添加背景顏色,添加選擇器,點擊每一項,chackbox也跟著選中或者取消選中。完整代碼在線面給出:
package com.example.ydlmobileguard.views;

import android.content.Context;
import android.graphics.Color;
import android.util.AttributeSet;
import android.view.View;
import android.widget.CheckBox;
import android.widget.CompoundButton;
import android.widget.CompoundButton.OnCheckedChangeListener;
import android.widget.LinearLayout;
import android.widget.TextView;

import com.example.ydlmobileguard.R;

public class SettingCenterItemView extends LinearLayout {
	private TextView tv_title;
	private TextView tv_content;
	private CheckBox cb_checkBox;
	private String[] contents;
	private View item;
	/**
	 * 代碼實例化,調用構造函數。引用這個自定義view,就會自動調用這裡的構造函數
	 * @param context
	 * @param attrs
	 */
	public SettingCenterItemView(Context context, AttributeSet attrs) {
		super(context, attrs);
		initView();//初始化組件界面
		initEvent();//初始化組件事件
		/**
		 * namespace :The namespace of the attribute to get the value from.
           name :The name of the attribute to get the value from.
		 */
		//根據命名空間/屬性文件中的屬性值。在自定義組件xml文件中得到值
		String title =attrs.getAttributeValue("http://schemas.android.com/apk/res/com.example.ydlmobileguard", "title");
		String content = attrs.getAttributeValue("http://schemas.android.com/apk/res/com.example.ydlmobileguard", "content");
		//把獲取到的值,加載到view上顯示
		tv_title.setText(title);
		//利用正則表達式,截取content內容。自動更新已經關閉-自動更新已經開啟。其中,contents[0]=自動更新已經關閉;contents[1]=自動更新已經開啟
		contents = content.split("-");
	}

/**
 * chu shi hua fu xuan kuang zu jian
 */
	private void initEvent() {
		//item
		item.setOnClickListener(new OnClickListener() {

			@Override
			public void onClick(View v) {
				cb_checkBox.setChecked(!cb_checkBox.isChecked());

			}
		});

		cb_checkBox.setOnCheckedChangeListener(new OnCheckedChangeListener() {

			@Override
			public void onCheckedChanged(CompoundButton buttonView, boolean isChecked) {
				if(isChecked){//clicked
					tv_content.setTextColor(Color.GREEN);
					tv_content.setText(contents[1]);
				}else{//unclicked
					tv_content.setTextColor(Color.RED);
					tv_content.setText(contents[0]);
				}

			}
		});

	}


	public SettingCenterItemView(Context context) {
		super(context);
		initView();
	}
	/**
	 * 初始化LinearLayout子組件
	 */
	private void initView() {
		//給LinearLayout加上子組件。這個item指的就是item_settingcenter_view文件裡的RelativeLayout
		item = View.inflate(getContext(), R.layout.item_settingcenter_view, null);
		//每一項的標題
		tv_title = (TextView) item.findViewById(R.id.tv_settingcenter_autoupdate_title);
		//每一項內容
		tv_content = (TextView) item.findViewById(R.id.tv_settingcenter_autoupdate_content);
		//每一項的復選框
		cb_checkBox = (CheckBox) item.findViewById(R.id.cb_settingcenter_autoupdate_checked);
		addView(item);//Adds a child view.
	}


}
最後再總結一下自定義屬性:
1,自定義命名空間
     xmlns:itheima="http://schemas.android.com/apk/res/工程的包名"
2,創建attrs.xml文件


3,在自定義組件中使用自定義屬性
public SettingCenterItemView(Context context, AttributeSet attrs) {
        super(context, attrs);
        initView();
        initEvent();
        String content = attrs.getAttributeValue("http://schemas.android.com/apk/res/工程包名", "自定義屬性名");

        String title = attrs.getAttributeValue("http://schemas.android.com/apk/res/com.itydl.mobileguard", "title");

        tv_title.setText(title);

        contents = content.split("-");

    }
這僅僅是一個簡單的demo,還有更復雜的自定義view也會在以後繼續討論。
 Android基礎第十篇-內容提供者
1. 訪問私有數據庫創建一個項目,在項目中利用SQLiteOpenHelper創建一個名稱為account的數據庫,並在數據庫中創建一張名為info的表。public c
 Android流式標簽布局,自定義標簽控件tagView
我們在一些項目中會用到自定義流式布局,我個人覺得流式布局將呆板的布局錯綜排列,來提升用戶體驗度.(還可以不辜負美工妹子們的期望,人家畢竟也辛辛苦苦設計半天)。今天終於有時
 Android代碼混淆及反編譯
概述:如果你目前還是一名學生或是沒有在應用商店中上傳過應用,恐怕對此的感受不深。而在企業中對Java代碼的混淆卻是一步很重要的步驟,從安全的角度來說,代碼混淆,防止居心不
 Android中獲取手機屏幕大小的方法
本文為大家解析Android中如何獲取手機屏幕大小,提供一個解決方法,分享給大家供大家參考,具體內容如下運行效果圖:運行程序後,當我們點擊Button按鈕時,可以看到下面