編輯:關於Android編程
    public boolean onLongClick(View v) {
        if (!isDraggingEnabled()) return false;
        if (isWorkspaceLocked()) return false;
        if (mState != State.WORKSPACE) return false;

        // 長按空白處
        if (v instanceof Workspace) {
            if (!mWorkspace.isInOverviewMode()) {// 判斷是否在縮略圖模式下
                if (mWorkspace.enterOverviewMode()) {// 進入縮略圖模式
                    mWorkspace.performHapticFeedback(HapticFeedbackConstants.LONG_PRESS,
                            HapticFeedbackConstants.FLAG_IGNORE_VIEW_SETTING);
                    return true;
                } else {
                    return false;
                }
            } else {
                return false;
            }
        }

        // 非空白處
        CellLayout.CellInfo longClickCellInfo = null;
        View itemUnderLongClick = null;
        if (v.getTag() instanceof ItemInfo) {// ItemInfo子類
            ItemInfo info = (ItemInfo) v.getTag();
            longClickCellInfo = new CellLayout.CellInfo(v, info);;
            itemUnderLongClick = longClickCellInfo.cell;
            resetAddInfo();
        }

        // The hotseat touch handling does not go through Workspace, and we always allow long press
        // on hotseat items.
        final boolean inHotseat = isHotseatLayout(v);// 是否熱鍵欄
        boolean allowLongPress = inHotseat || mWorkspace.allowLongPress();// 是否允許長按處理
        if (allowLongPress && !mDragController.isDragging()) {// 允許長按 && 沒有進行拖拽
            if (itemUnderLongClick == null) {// 如果itemUnderLongClick為null,進行長按空白處一樣的處理
                // User long pressed on empty space
                mWorkspace.performHapticFeedback(HapticFeedbackConstants.LONG_PRESS,
                        HapticFeedbackConstants.FLAG_IGNORE_VIEW_SETTING);
                if (mWorkspace.isInOverviewMode()) {
                    mWorkspace.startReordering(v);
                } else {
                    mWorkspace.enterOverviewMode();
                }
            } else {
                final boolean isAllAppsButton = inHotseat && isAllAppsButtonRank(
                        mHotseat.getOrderInHotseat(
                                longClickCellInfo.cellX,
                                longClickCellInfo.cellY));// 判斷長按是否allapp按鈕
                if (!(itemUnderLongClick instanceof Folder || isAllAppsButton)) {// 長按的不是allapp按鈕也不在文件夾展開的布局中
                    // User long pressed on an item
                    mWorkspace.startDrag(longClickCellInfo);// 開始拖拽
                }
            }
        }
        return true;
    }
該方法用來執行長按事件,整個長按操作分幾種情況,不同情況的處理也是不一樣的,流程圖表示如下,
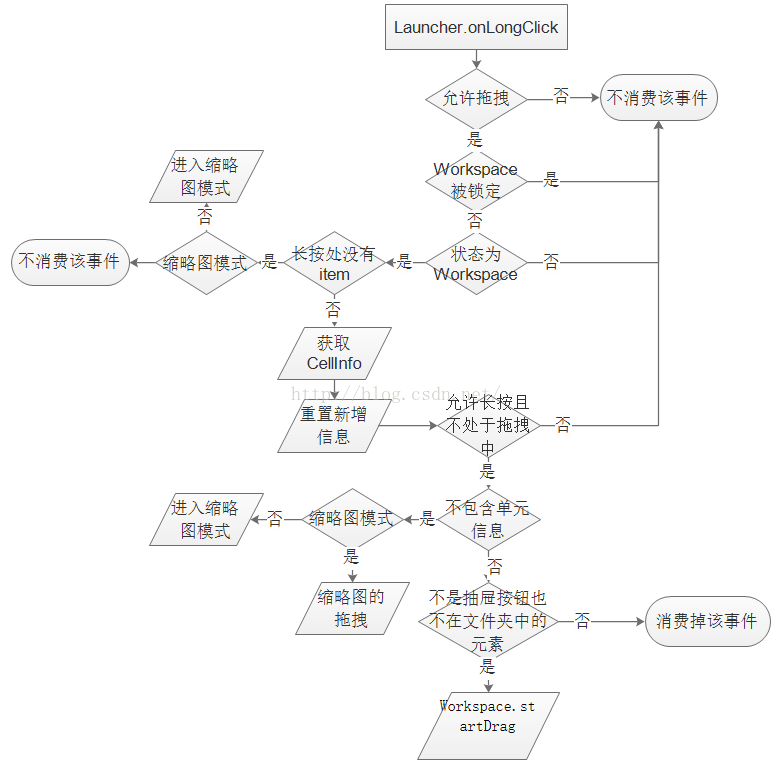 圖1
我們這裡以長按快捷圖標為例,最終執行到如下代碼,
圖1
我們這裡以長按快捷圖標為例,最終執行到如下代碼,
mWorkspace.startDrag(longClickCellInfo);// 開始拖拽
    void startDrag(CellLayout.CellInfo cellInfo) {
        View child = cellInfo.cell;

        // Make sure the drag was started by a long press as opposed to a long click.
        if (!child.isInTouchMode()) {
            return;
        }

        mDragInfo = cellInfo;// 更新單元信息
        child.setVisibility(INVISIBLE);// 拖拽對象在原來的位置設為不可見
        CellLayout layout = (CellLayout) child.getParent().getParent();// 拖拽對象所在的屏幕
        layout.prepareChildForDrag(child);

        beginDragShared(child, this);
    }
先判斷拖拽對象是否處於touch狀態,如果是的就直接返回;然後隱藏拖拽對象;標記該位置為未占用,目的是讓在拖拽擠壓的過程中,可以讓其他圖標占據;最後到beginDragShared方法。
    public void beginDragShared(View child, DragSource source) {
        child.clearFocus();
        child.setPressed(false);

        // The outline is used to visualize where the item will land if dropped
        // 創建拖拽對象投射輪廓
        mDragOutline = createDragOutline(child, DRAG_BITMAP_PADDING);

        mLauncher.onDragStarted(child);
        // The drag bitmap follows the touch point around on the screen
        AtomicInteger padding = new AtomicInteger(DRAG_BITMAP_PADDING);
        final Bitmap b = createDragBitmap(child, padding);// 創建拖拽圖像

        final int bmpWidth = b.getWidth();
        final int bmpHeight = b.getHeight();

        float scale = mLauncher.getDragLayer().getLocationInDragLayer(child, mTempXY);
        int dragLayerX = Math.round(mTempXY[0] - (bmpWidth - scale * child.getWidth()) / 2);
        int dragLayerY = Math.round(mTempXY[1] - (bmpHeight - scale * bmpHeight) / 2 - padding.get() / 2);

        LauncherAppState app = LauncherAppState.getInstance();
        DeviceProfile grid = app.getDynamicGrid().getDeviceProfile();
        Point dragVisualizeOffset = null;
        Rect dragRect = null;
        if (child instanceof BubbleTextView) {
            int iconSize = grid.iconSizePx;
            int top = child.getPaddingTop();
            int left = (bmpWidth - iconSize) / 2;
            int right = left + iconSize;
            int bottom = top + iconSize;
            dragLayerY += top;
            // Note: The drag region is used to calculate drag layer offsets, but the
            // dragVisualizeOffset in addition to the dragRect (the size) to position the outline.
            dragVisualizeOffset = new Point(-padding.get() / 2, padding.get() / 2);
            dragRect = new Rect(left, top, right, bottom);
        } else if (child instanceof FolderIcon) {
            int previewSize = grid.folderIconSizePx;
            dragRect = new Rect(0, child.getPaddingTop(), child.getWidth(), previewSize);
        }

        // Clear the pressed state if necessary
        if (child instanceof BubbleTextView) {
            BubbleTextView icon = (BubbleTextView) child;
            icon.clearPressedBackground();
        }

        if (child.getTag() == null || !(child.getTag() instanceof ItemInfo)) {
            String msg = "Drag started with a view that has no tag set. This "
                    + "will cause a crash (issue 11627249) down the line. "
                    + "View: " + child + "  tag: " + child.getTag();
            throw new IllegalStateException(msg);
        }

        // 創建拖拽視圖
        DragView dv = mDragController.startDrag(b, dragLayerX, dragLayerY, source, child.getTag(),
                DragController.DRAG_ACTION_MOVE, dragVisualizeOffset, dragRect, scale);
        dv.setIntrinsicIconScaleFactor(source.getIntrinsicIconScaleFactor());

        if (child.getParent() instanceof ShortcutAndWidgetContainer) {
            mDragSourceInternal = (ShortcutAndWidgetContainer) child.getParent();
        }

        b.recycle();
    }
用流程表示,
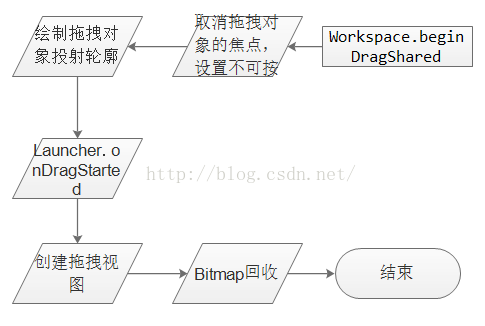 圖2
圖2
    public DragView startDrag(Bitmap b, int dragLayerX, int dragLayerY,
            DragSource source, Object dragInfo, int dragAction, Point dragOffset, Rect dragRegion,
            float initialDragViewScale) {
        if (PROFILE_DRAWING_DURING_DRAG) {
            android.os.Debug.startMethodTracing("Launcher");
        }

        // Hide soft keyboard, if visible
        // 隱藏軟件盤
        if (mInputMethodManager == null) {
            mInputMethodManager = (InputMethodManager)
                    mLauncher.getSystemService(Context.INPUT_METHOD_SERVICE);
        }
        mInputMethodManager.hideSoftInputFromWindow(mWindowToken, 0);

        // 調用各個監聽對象
        for (DragListener listener : mListeners) {
            listener.onDragStart(source, dragInfo, dragAction);
        }

        final int registrationX = mMotionDownX - dragLayerX;
        final int registrationY = mMotionDownY - dragLayerY;

        final int dragRegionLeft = dragRegion == null ? 0 : dragRegion.left;
        final int dragRegionTop = dragRegion == null ? 0 : dragRegion.top;

        // 記錄當前的狀態
        mDragging = true;

        mDragObject = new DropTarget.DragObject();

        mDragObject.dragComplete = false;
        mDragObject.xOffset = mMotionDownX - (dragLayerX + dragRegionLeft);
        mDragObject.yOffset = mMotionDownY - (dragLayerY + dragRegionTop);
        mDragObject.dragSource = source;
        mDragObject.dragInfo = dragInfo;

        // 創建DragView對象
        final DragView dragView = mDragObject.dragView = new DragView(mLauncher, b, registrationX,
                registrationY, 0, 0, b.getWidth(), b.getHeight(), initialDragViewScale);

        if (dragOffset != null) {
            dragView.setDragVisualizeOffset(new Point(dragOffset));
        }
        if (dragRegion != null) {
            dragView.setDragRegion(new Rect(dragRegion));
        }

        // 觸摸反饋
        mLauncher.getDragLayer().performHapticFeedback(HapticFeedbackConstants.LONG_PRESS);
        // 顯示DragView對象(將該DragView添加到DragLayer上)
        dragView.show(mMotionDownX, mMotionDownY);
        // 根據當前的位置處理移動事件
        handleMoveEvent(mMotionDownX, mMotionDownY);
        return dragView;
    }
隱藏軟鍵盤;調用各個監聽對象實現的onDragStart方法,這裡就是在Workspace中的實現;顯示DragView對象;根據當前位置處理移動事件。
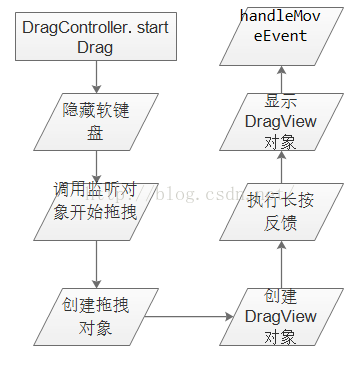 圖3
主要調用方法:
圖3
主要調用方法:
    public void onDragStart(final DragSource source, Object info, int dragAction) {
        Log.d(TAG, "onDragStart...");
        mIsDragOccuring = true;
        updateChildrenLayersEnabled(false);
        mLauncher.lockScreenOrientation();// 鎖定屏幕
        mLauncher.onInteractionBegin();
        setChildrenBackgroundAlphaMultipliers(1f);
        // Prevent any Un/InstallShortcutReceivers from updating the db while we are dragging
        // 正在拖拽的時候,防止卸載或安裝導致快捷圖標變化更新數據庫的操作
        InstallShortcutReceiver.enableInstallQueue();
        UninstallShortcutReceiver.enableUninstallQueue();
        post(new Runnable() {
            @Override
            public void run() {
                if (mIsDragOccuring) {
                    mDeferRemoveExtraEmptyScreen = false;
                    addExtraEmptyScreenOnDrag();// 添加額外的空白頁
                }
            }
        });
    }
    // 顯示DragView對象(將該DragView添加到DragLayer上)
    public void show(int touchX, int touchY) {
        mDragLayer.addView(this);

        // Start the pick-up animation
        DragLayer.LayoutParams lp = new DragLayer.LayoutParams(0, 0);
        lp.width = mBitmap.getWidth();
        lp.height = mBitmap.getHeight();
        lp.customPosition = true;
        setLayoutParams(lp);
        // 設置顯示位置
        setTranslationX(touchX - mRegistrationX);
        setTranslationY(touchY - mRegistrationY);
        // Post the animation to skip other expensive work happening on the first frame
        //動畫播放
        post(new Runnable() {
                public void run() {
                    mAnim.start();
                }
            });
    }
    // 根據當前的位置處理移動事件
    private void handleMoveEvent(int x, int y) {
        // 移動View,DragView繼承至View,在方法move()中設置setTranslationX()、setTranslationY()即可移動view
        mDragObject.dragView.move(x, y);
        // Drop on someone?
        final int[] coordinates = mCoordinatesTemp;
        // 查找拖拽目標
        DropTarget dropTarget = findDropTarget(x, y, coordinates);
        mDragObject.x = coordinates[0];
        mDragObject.y = coordinates[1];
        checkTouchMove(dropTarget);// 檢查拖動時的狀態

        // Check if we are hovering over the scroll areas
        mDistanceSinceScroll += Math.sqrt(Math.pow(mLastTouch[0] - x, 2) + Math.pow(mLastTouch[1] - y, 2));
        mLastTouch[0] = x;
        mLastTouch[1] = y;
        checkScrollState(x, y); // 對拖動時的翻頁進行判斷處理
    }
方法中都有注釋,還是比較容易理解的,其中handleMoveEvent處理拖拽時的移動事件,是整個過程的一個很重要的方法,在下面的講解中會詳細介紹。
四、觸摸事件的攔截和分發
onInterceptTouchEvent
DragLayer繼承自ViewGroup,其onInterceptTouchEvent方法若返回true,說明需要攔截觸屏事件,則後續的一系列事件將傳遞給自身的onTouchEvent方法,而不再向其子控件傳遞。DragController的onInterceptTouchEvent由DragLayer的onInterceptTouchEvent調用,用於攔截觸屏事件的處理。當用戶點擊屏幕時,觸發ACTION_DOWN事件,記錄當前觸摸位置。當抬起時,觸發ACTION_UP事件,結束拖拽。若抬起時處於拖拽中,在當前位置釋放被拖拽物。因此,若此時處於拖拽中,後續的觸屏事件將只傳遞到DragLayer的onTouchEvent。
onTouchEvent
onTouchEvent處理觸屏事件,若返回true,則表示消費掉該事件,事件不再向父控件的onTouchEvent傳遞。DragController的onTouchEvent由DragLayer的onTouchEvent調用,用於處理被拖拽物的移動。當startDrag執行完畢,DragController設置拖拽狀態為true,這樣,觸屏事件將最終轉到onTouchEvent中,在此處調用handleMoveEvent進行物體的移動。
DragLayer是Launcher上所有布局的父容器,主要進行事件的攔截和分發,但是具體工作都是交由DragController來處理的,我們直接看DragController的onInterceptTouchEvent的攔截處理。
    /**
     * Call this from a drag source view.
     */
    //DragLayer是Launcher所有布局的父容器,它的onInterceptTouchEvent()已交由DragController.onInterceptTouchEvent()來處理
    public boolean onInterceptTouchEvent(MotionEvent ev) {
        @SuppressWarnings("all") // suppress dead code warning
        final boolean debug = false;
        if (debug) {
            Log.d(Launcher.TAG, "DragController.onInterceptTouchEvent " + ev + " mDragging="
                    + mDragging);
        }

        // Update the velocity tracker
        acquireVelocityTrackerAndAddMovement(ev);

        final int action = ev.getAction();
        final int[] dragLayerPos = getClampedDragLayerPos(ev.getX(), ev.getY());
        final int dragLayerX = dragLayerPos[0];
        final int dragLayerY = dragLayerPos[1];

        switch (action) {
            case MotionEvent.ACTION_MOVE:
                break;
            case MotionEvent.ACTION_DOWN:
                // Remember location of down touch
                mMotionDownX = dragLayerX;
                mMotionDownY = dragLayerY;
                mLastDropTarget = null;
                break;
            case MotionEvent.ACTION_UP:
                mLastTouchUpTime = System.currentTimeMillis();
                if (mDragging) {
                    PointF vec = isFlingingToDelete(mDragObject.dragSource);
                    if (!DeleteDropTarget.willAcceptDrop(mDragObject.dragInfo)) {
                        vec = null;
                    }
                    if (vec != null) {
                        dropOnFlingToDeleteTarget(dragLayerX, dragLayerY, vec);
                    } else {
                        drop(dragLayerX, dragLayerY);
                    }
                }
                endDrag();
                break;
            case MotionEvent.ACTION_CANCEL:
                cancelDrag();
                break;
        }

        return mDragging;
    }
是否攔截,主要看返回值,這裡返回mDragging,在startDrag的時候設為true,所以DragLayer對touch事件進行了攔截,在DragController的onTouchEvent中進行處理,
    /**
     * Call this from a drag source view.
     */
    public boolean onTouchEvent(MotionEvent ev) {
        if (!mDragging) {
            return false;
        }

        // Update the velocity tracker
        acquireVelocityTrackerAndAddMovement(ev);

        final int action = ev.getAction();
        final int[] dragLayerPos = getClampedDragLayerPos(ev.getX(), ev.getY());
        final int dragLayerX = dragLayerPos[0];
        final int dragLayerY = dragLayerPos[1];

        switch (action) {
        case MotionEvent.ACTION_DOWN:
            // Remember where the motion event started
            mMotionDownX = dragLayerX;
            mMotionDownY = dragLayerY;

            if ((dragLayerX < mScrollZone) || (dragLayerX > mScrollView.getWidth() - mScrollZone)) {
                mScrollState = SCROLL_WAITING_IN_ZONE;
                mHandler.postDelayed(mScrollRunnable, SCROLL_DELAY);
            } else {
                mScrollState = SCROLL_OUTSIDE_ZONE;
            }
            handleMoveEvent(dragLayerX, dragLayerY);
            break;
        case MotionEvent.ACTION_MOVE:
            handleMoveEvent(dragLayerX, dragLayerY);
            break;
        case MotionEvent.ACTION_UP:
            // Ensure that we've processed a move event at the current pointer location.
            handleMoveEvent(dragLayerX, dragLayerY);
            mHandler.removeCallbacks(mScrollRunnable);

            if (mDragging) {
                // 判斷是否到達可刪除的區域
                PointF vec = isFlingingToDelete(mDragObject.dragSource);
                if (!DeleteDropTarget.willAcceptDrop(mDragObject.dragInfo)) {
                    vec = null;
                }
                if (vec != null) {
                    // 拖動到垃圾箱中進行刪除
                    dropOnFlingToDeleteTarget(dragLayerX, dragLayerY, vec);
                } else {
                    drop(dragLayerX, dragLayerY);
                }
            }
            // 拖放結束
            endDrag();
            break;
        case MotionEvent.ACTION_CANCEL:
            mHandler.removeCallbacks(mScrollRunnable);
            cancelDrag();
            break;
        }

        return true;
    }
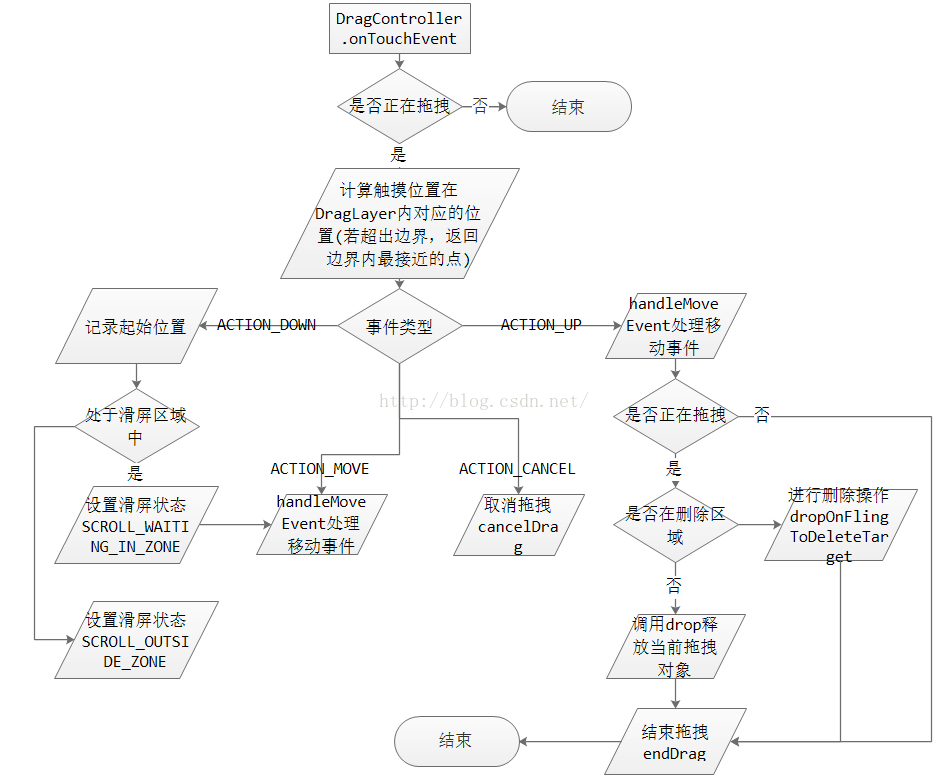 圖4
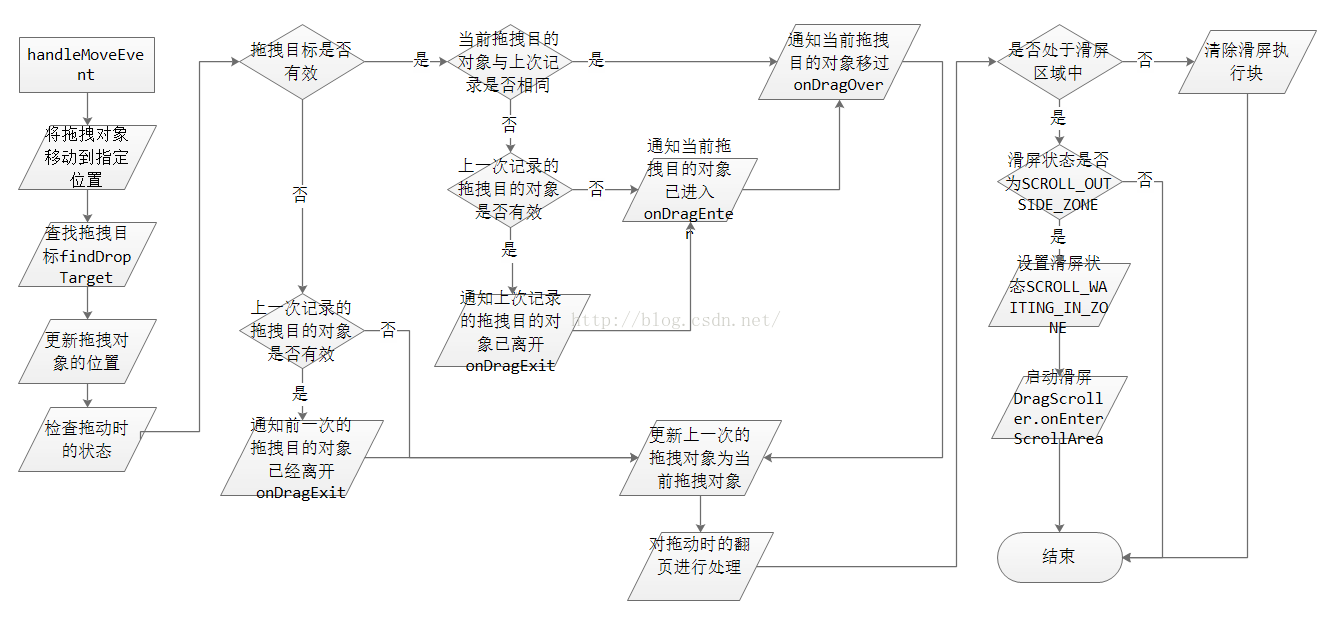
五、handleMoveEvent
handleMoveEvent是拖拽的主要方法,當用戶觸發拖拽後,DragController將通過該方法移動被拖拽物視圖,並通知各個釋放目的對象相應狀態的改變。若進入滑屏區域且允許滑屏,執行相應的滑屏操作。
圖4
五、handleMoveEvent
handleMoveEvent是拖拽的主要方法,當用戶觸發拖拽後,DragController將通過該方法移動被拖拽物視圖,並通知各個釋放目的對象相應狀態的改變。若進入滑屏區域且允許滑屏,執行相應的滑屏操作。
    // 根據當前的位置處理移動事件
    private void handleMoveEvent(int x, int y) {
        // 移動View,DragView繼承至View,在方法move()中設置setTranslationX()、setTranslationY()即可移動view
        mDragObject.dragView.move(x, y);
        // Drop on someone?
        final int[] coordinates = mCoordinatesTemp;
        // 查找拖拽目標
        DropTarget dropTarget = findDropTarget(x, y, coordinates);
        mDragObject.x = coordinates[0];
        mDragObject.y = coordinates[1];
        checkTouchMove(dropTarget);// 檢查拖動時的狀態

        // Check if we are hovering over the scroll areas
        mDistanceSinceScroll += Math.sqrt(Math.pow(mLastTouch[0] - x, 2) + Math.pow(mLastTouch[1] - y, 2));
        mLastTouch[0] = x;
        mLastTouch[1] = y;
        checkScrollState(x, y); // 對拖動時的翻頁進行判斷處理
    }
    // 檢查拖動時的狀態
    private void checkTouchMove(DropTarget dropTarget) {
        if (dropTarget != null) {// 拖拽目的對象是否有效
            if (mLastDropTarget != dropTarget) {// 當前的拖拽目的對象與前一次記錄的是否相同
                if (mLastDropTarget != null) {// 前一次記錄的拖拽目的對象是否有效
                    mLastDropTarget.onDragExit(mDragObject);// 通知前一次記錄的拖拽目的對象已離開
                }
                dropTarget.onDragEnter(mDragObject);// 通知當前拖拽目的對象已進入
            }
            dropTarget.onDragOver(mDragObject);// 通知當前拖拽目的對象移過
        } else {
            if (mLastDropTarget != null) {
                mLastDropTarget.onDragExit(mDragObject);
            }
        }
        mLastDropTarget = dropTarget;// 更新前一次記錄的拖拽目的對象為當前拖拽目的對象
    }
    // 對拖動時的翻頁進行判斷處理
    private void checkScrollState(int x, int y) {
        final int slop = ViewConfiguration.get(mLauncher).getScaledWindowTouchSlop();
        final int delay = mDistanceSinceScroll < slop ? RESCROLL_DELAY : SCROLL_DELAY;
        final DragLayer dragLayer = mLauncher.getDragLayer();
        final boolean isRtl = (dragLayer.getLayoutDirection() == View.LAYOUT_DIRECTION_RTL);
        final int forwardDirection = isRtl ? SCROLL_RIGHT : SCROLL_LEFT;
        final int backwardsDirection = isRtl ? SCROLL_LEFT : SCROLL_RIGHT;

        if (x < mScrollZone) {
            if (mScrollState == SCROLL_OUTSIDE_ZONE) {
                mScrollState = SCROLL_WAITING_IN_ZONE;
                if (mDragScroller.onEnterScrollArea(x, y, forwardDirection)) {
                    dragLayer.onEnterScrollArea(forwardDirection);
                    mScrollRunnable.setDirection(forwardDirection);
                    mHandler.postDelayed(mScrollRunnable, delay);
                }
            }
        } else if (x > mScrollView.getWidth() - mScrollZone) {
            if (mScrollState == SCROLL_OUTSIDE_ZONE) {
                mScrollState = SCROLL_WAITING_IN_ZONE;
                if (mDragScroller.onEnterScrollArea(x, y, backwardsDirection)) {
                    dragLayer.onEnterScrollArea(backwardsDirection);
                    mScrollRunnable.setDirection(backwardsDirection);
                    mHandler.postDelayed(mScrollRunnable, delay);
                }
            }
        } else {
            clearScrollRunnable();
        }
    }
當用戶將被拖拽物移動到相應位置後,可以將手指從屏幕上移開。此時,將在onInterceptTouchEvent與onTouchEvent中調用drop方法釋放被拖拽物。其主要功能,就是查找拖拽目的對象(DropTarget),若找到且接受釋放,通知該對象被拖拽物的放入。最後,通知拖拽源(被拖拽物最初所在的容器)拖拽結果。
        case MotionEvent.ACTION_UP:
            // Ensure that we've processed a move event at the current pointer location.
            handleMoveEvent(dragLayerX, dragLayerY);
            mHandler.removeCallbacks(mScrollRunnable);

            if (mDragging) {
                // 判斷是否到達可刪除的區域
                PointF vec = isFlingingToDelete(mDragObject.dragSource);
                if (!DeleteDropTarget.willAcceptDrop(mDragObject.dragInfo)) {
                    vec = null;
                }
                if (vec != null) {
                    // 拖動到垃圾箱中進行刪除
                    dropOnFlingToDeleteTarget(dragLayerX, dragLayerY, vec);
                } else {
                    drop(dragLayerX, dragLayerY);
                }
            }
            // 拖放結束
            endDrag();
            break;
先判斷是否在刪除區域,如果在並且可以刪除就將該圖標刪除,否則進行drop處理,及釋放拖拽物到當前位置,
    // 釋放被拖拽物到當前位置
    private void drop(float x, float y) {
        final int[] coordinates = mCoordinatesTemp;
        // x,y所在區域是否有合適的目標
        final DropTarget dropTarget = findDropTarget((int) x, (int) y, coordinates);

        mDragObject.x = coordinates[0];
        mDragObject.y = coordinates[1];
        boolean accepted = false;
        if (dropTarget != null) {// 找到有效的拖拽目的對象
            mDragObject.dragComplete = true;// 標記拖拽完成
            dropTarget.onDragExit(mDragObject);// 通知拖拽目的對象已離開
            if (dropTarget.acceptDrop(mDragObject)) {// 是否支持放入
                dropTarget.onDrop(mDragObject);// 拖拽物被放置到拖拽目的
                accepted = true;
            }
        }
        mDragObject.dragSource.onDropCompleted((View) dropTarget, mDragObject, false, accepted);
    }
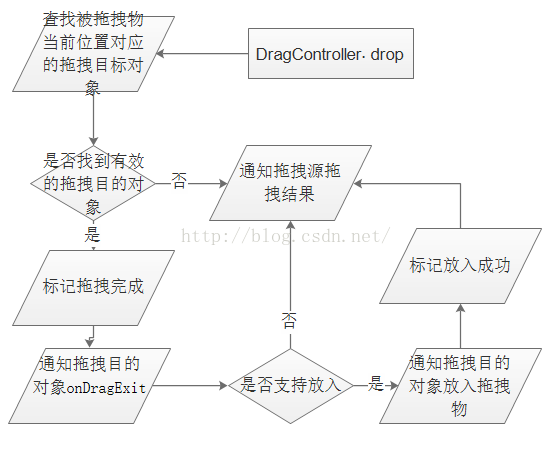 圖6
圖6
    // 取得當前的具體的DropTarget對象
    private DropTarget findDropTarget(int x, int y, int[] dropCoordinates) {
        final Rect r = mRectTemp;

        final ArrayList dropTargets = mDropTargets;
        final int count = dropTargets.size();
        for (int i=count-1; i>=0; i--) {// 遍歷拖拽目的對象
            DropTarget target = dropTargets.get(i);
            if (!target.isDropEnabled())// 是否支持放入
                continue;

            target.getHitRectRelativeToDragLayer(r);// 計算當前拖拽目的對象的有效觸發范圍

            mDragObject.x = x;// 更新被拖拽物的位置信息
            mDragObject.y = y;
            if (r.contains(x, y)) {// 指定位置是否位於有效出發范圍內

                dropCoordinates[0] = x;
                dropCoordinates[1] = y;
                mLauncher.getDragLayer().mapCoordInSelfToDescendent((View) target, dropCoordinates);

                return target;
            }
        }
        return null;
    }
DropTarget.onDrop
這個方法最終將拖拽對象放置到目標位置,Workspace實現該方法,
    // 拖拽對象被放置到目標位置
    public void onDrop(final DragObject d) {
        mDragViewVisualCenter = getDragViewVisualCenter(d.x, d.y, d.xOffset, d.yOffset, d.dragView,
                mDragViewVisualCenter);// 計算拖動View的視覺中心

        CellLayout dropTargetLayout = mDropToLayout;// Drop的Celllayout對象

        // We want the point to be mapped to the dragTarget.
        // 判斷當前是否在Hotseat上,求出相對於dropTargetLayout的視覺中心坐標
        if (dropTargetLayout != null) {
            if (mLauncher.isHotseatLayout(dropTargetLayout)) {
                mapPointFromSelfToHotseatLayout(mLauncher.getHotseat(), mDragViewVisualCenter);
            } else {
                mapPointFromSelfToChild(dropTargetLayout, mDragViewVisualCenter, null);
            }
        }

        int snapScreen = -1;
        boolean resizeOnDrop = false;
        // 如果DragObject-dragSource!= Worspace,轉而調用onDropExternal(),否則繼續處理onDrop()的內容
        if (d.dragSource != this) {
            final int[] touchXY = new int[] { (int) mDragViewVisualCenter[0],
                    (int) mDragViewVisualCenter[1] };
            onDropExternal(touchXY, d.dragInfo, dropTargetLayout, false, d);
        } else if (mDragInfo != null) {
            final View cell = mDragInfo.cell;

            Runnable resizeRunnable = null;
            if (dropTargetLayout != null && !d.cancelled) {
                // Move internally
                boolean hasMovedLayouts = (getParentCellLayoutForView(cell) != dropTargetLayout);
                boolean hasMovedIntoHotseat = mLauncher.isHotseatLayout(dropTargetLayout);
                long container = hasMovedIntoHotseat ?
                        LauncherSettings.Favorites.CONTAINER_HOTSEAT :
                        LauncherSettings.Favorites.CONTAINER_DESKTOP;
                long screenId = (mTargetCell[0] < 0) ?
                        mDragInfo.screenId : getIdForScreen(dropTargetLayout);
                int spanX = mDragInfo != null ? mDragInfo.spanX : 1;
                int spanY = mDragInfo != null ? mDragInfo.spanY : 1;
                // First we find the cell nearest to point at which the item is
                // dropped, without any consideration to whether there is an item there.

                mTargetCell = findNearestArea((int) mDragViewVisualCenter[0], (int)
                        mDragViewVisualCenter[1], spanX, spanY, dropTargetLayout, mTargetCell);
                float distance = dropTargetLayout.getDistanceFromCell(mDragViewVisualCenter[0],
                        mDragViewVisualCenter[1], mTargetCell);

                // If the item being dropped is a shortcut and the nearest drop
                // cell also contains a shortcut, then create a folder with the two shortcuts.
                // 如果拖拽的對象是一個快捷圖標並且最近的位置上也是一個快捷圖標,就創建一個文件夾來防止這兩個圖標
                if (!mInScrollArea && createUserFolderIfNecessary(cell, container,
                        dropTargetLayout, mTargetCell, distance, false, d.dragView, null)) {
                    return;
                }

                // 添加到已存在的文件夾上
                if (addToExistingFolderIfNecessary(cell, dropTargetLayout, mTargetCell,
                        distance, d, false)) {
                    return;
                }

                // Aside from the special case where we're dropping a shortcut onto a shortcut,
                // we need to find the nearest cell location that is vacant
                ItemInfo item = (ItemInfo) d.dragInfo;
                int minSpanX = item.spanX;
                int minSpanY = item.spanY;
                if (item.minSpanX > 0 && item.minSpanY > 0) {
                    minSpanX = item.minSpanX;
                    minSpanY = item.minSpanY;
                }

                //如果不滿足文件夾的條件,則調用CellLayout-performReorder方法,這個方法就是處理拖動圖標時,如果當前落點被占據時,擠開當前圖標的效果
                int[] resultSpan = new int[2];
                mTargetCell = dropTargetLayout.performReorder((int) mDragViewVisualCenter[0],
                        (int) mDragViewVisualCenter[1], minSpanX, minSpanY, spanX, spanY, cell,
                        mTargetCell, resultSpan, CellLayout.MODE_ON_DROP);

                boolean foundCell = mTargetCell[0] >= 0 && mTargetCell[1] >= 0;

                // if the widget resizes on drop
                if (foundCell && (cell instanceof AppWidgetHostView) &&
                        (resultSpan[0] != item.spanX || resultSpan[1] != item.spanY)) {
                    resizeOnDrop = true;
                    item.spanX = resultSpan[0];
                    item.spanY = resultSpan[1];
                    AppWidgetHostView awhv = (AppWidgetHostView) cell;
                    AppWidgetResizeFrame.updateWidgetSizeRanges(awhv, mLauncher, resultSpan[0],
                            resultSpan[1]);// AppWidget可能在拖動時發生縮小,因此會調用AppWidgetResizeFrame-updateWidgetSizeRanges方法
                }

                // 拖動時可能落點在別的頁面,所以還會有頁面滑動的效果
                if (getScreenIdForPageIndex(mCurrentPage) != screenId && !hasMovedIntoHotseat) {
                    snapScreen = getPageIndexForScreenId(screenId);
                    snapToPage(snapScreen);
                }

                // 如果滿足則更新位置,保存新的位置信息到數據庫中,播放動畫效果,否則彈回原來位置
                if (foundCell) {
                    final ItemInfo info = (ItemInfo) cell.getTag();
                    if (hasMovedLayouts) {
                        // Reparent the view
                        CellLayout parentCell = getParentCellLayoutForView(cell);
                        if (parentCell != null) {
                            parentCell.removeView(cell);
                        } else if (LauncherAppState.isDogfoodBuild()) {
                            throw new NullPointerException("mDragInfo.cell has null parent");
                        }
                        addInScreen(cell, container, screenId, mTargetCell[0], mTargetCell[1],
                                info.spanX, info.spanY);
                    }

                    // update the item's position after drop
                    CellLayout.LayoutParams lp = (CellLayout.LayoutParams) cell.getLayoutParams();
                    lp.cellX = lp.tmpCellX = mTargetCell[0];
                    lp.cellY = lp.tmpCellY = mTargetCell[1];
                    lp.cellHSpan = item.spanX;
                    lp.cellVSpan = item.spanY;
                    lp.isLockedToGrid = true;

                    if (container != LauncherSettings.Favorites.CONTAINER_HOTSEAT &&
                            cell instanceof LauncherAppWidgetHostView) {
                        final CellLayout cellLayout = dropTargetLayout;
                        // We post this call so that the widget has a chance to be placed
                        // in its final location

                        final LauncherAppWidgetHostView hostView = (LauncherAppWidgetHostView) cell;
                        AppWidgetProviderInfo pinfo = hostView.getAppWidgetInfo();
                        if (pinfo != null &&
                                pinfo.resizeMode != AppWidgetProviderInfo.RESIZE_NONE) {
                            final Runnable addResizeFrame = new Runnable() {
                                public void run() {
                                    DragLayer dragLayer = mLauncher.getDragLayer();
                                    dragLayer.addResizeFrame(info, hostView, cellLayout);
                                }
                            };
                            resizeRunnable = (new Runnable() {
                                public void run() {
                                    if (!isPageMoving()) {
                                        addResizeFrame.run();
                                    } else {
                                        mDelayedResizeRunnable = addResizeFrame;
                                    }
                                }
                            });
                        }
                    }

                    LauncherModel.modifyItemInDatabase(mLauncher, info, container, screenId, lp.cellX,
                            lp.cellY, item.spanX, item.spanY);// 更新數據庫
                } else {
                    // If we can't find a drop location, we return the item to its original position
                    CellLayout.LayoutParams lp = (CellLayout.LayoutParams) cell.getLayoutParams();
                    mTargetCell[0] = lp.cellX;
                    mTargetCell[1] = lp.cellY;
                    CellLayout layout = (CellLayout) cell.getParent().getParent();
                    layout.markCellsAsOccupiedForView(cell);
                }
            }

            final CellLayout parent = (CellLayout) cell.getParent().getParent();
            final Runnable finalResizeRunnable = resizeRunnable;
            // Prepare it to be animated into its new position
            // This must be called after the view has been re-parented
            final Runnable onCompleteRunnable = new Runnable() {
                @Override
                public void run() {
                    mAnimatingViewIntoPlace = false;
                    updateChildrenLayersEnabled(false);
                    if (finalResizeRunnable != null) {
                        finalResizeRunnable.run();
                    }
                }
            };
            mAnimatingViewIntoPlace = true;
            if (d.dragView.hasDrawn()) {
                final ItemInfo info = (ItemInfo) cell.getTag();
                if (info.itemType == LauncherSettings.Favorites.ITEM_TYPE_APPWIDGET) {
                    int animationType = resizeOnDrop ? ANIMATE_INTO_POSITION_AND_RESIZE :
                            ANIMATE_INTO_POSITION_AND_DISAPPEAR;
                    animateWidgetDrop(info, parent, d.dragView,
                            onCompleteRunnable, animationType, cell, false);
                } else {
                    int duration = snapScreen < 0 ? -1 : ADJACENT_SCREEN_DROP_DURATION;
                    mLauncher.getDragLayer().animateViewIntoPosition(d.dragView, cell, duration,
                            onCompleteRunnable, this);
                }
            } else {
                d.deferDragViewCleanupPostAnimation = false;
                cell.setVisibility(VISIBLE);
            }
            parent.onDropChild(cell);
        }
    }
 Android Studio 打多渠道包
最近,公司的項目開始使用谷歌官方最新推出的IDE——Android Studio 1.0,發現使用studio打渠道包很容易。 下面
 Android基礎入門教程——10.4 Vibrator(振動器)
本節引言: 本節我們介紹的是Vibrator(振動器),是手機自帶的振動器,別去百度直接搜針振動器,因為 你的搜索結果可能是如圖所示的神秘的道具,或者其他神秘
 Android簡易實戰教程--第七話《在內存中存儲用戶名和密碼》
首先是配置文件: 活動中的代碼如下: package com.itydl.rwinrom;import jav
 Android提高之多級樹形菜單的實現方法
一般來說在Android裡要實現樹形菜單,都是用ExpandableList(也有高手自己繼承ListView或者LinearLayout來做),但是Expandable