編輯:關於Android編程
前言:前段時間做項目用到了圖片裁剪,調用系統裁剪圖片,結果在我的小米3上一直有問題,裁剪界面打不開,在其他設備上沒問題,於是研究其他軟件是怎麼做的,淘寶的裁剪圖片是自己做的,當然沒問題,京東的是調用的系統的也是打不開裁剪界面。但是不知道為什麼會出現這個問題,在其他小米設備上貌似沒有問題。看來調用系統的裁剪圖片還是不靠譜的。
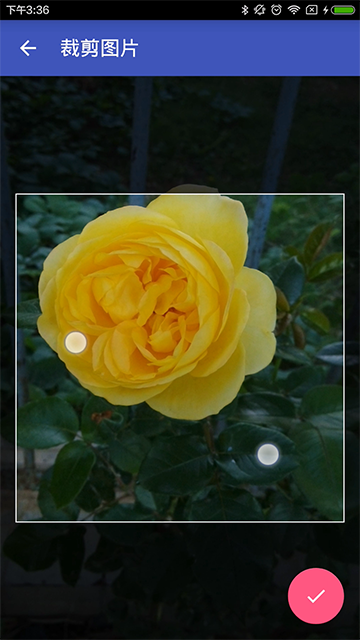
按照之前博客的風格,首先看下實現效果。
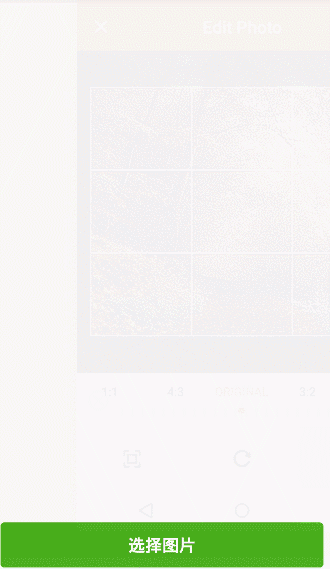
想起之前看到的Yalantis/uCrop效果比較絢,但是研究源碼之後發現在定制界面方面還是有一點的限制,於是在它的基礎上做了修改Android-Crop" target="_blank">Android-Crop,把定制界面獨立出來,讓用戶去自由設置。下圖為使用Android-Crop實現的模仿微信選擇圖片並裁剪Demo。
public SelectPicturePopupWindow(Context context) {
    super(context);
    LayoutInflater inflater = (LayoutInflater) context.getSystemService(Context.LAYOUT_INFLATER_SERVICE);
    mMenuView = inflater.inflate(R.layout.layout_picture_selector, null);
    takePhotoBtn = (Button) mMenuView.findViewById(R.id.picture_selector_take_photo_btn);
    pickPictureBtn = (Button) mMenuView.findViewById(R.id.picture_selector_pick_picture_btn);
    cancelBtn = (Button) mMenuView.findViewById(R.id.picture_selector_cancel_btn);
    // 設置按鈕監聽
    takePhotoBtn.setOnClickListener(this);
    pickPictureBtn.setOnClickListener(this);
    cancelBtn.setOnClickListener(this);
}
/**
 * 選擇監聽接口
 */
public interface OnSelectedListener {
    void OnSelected(View v, int position);
}
回調的參數為點擊的按鈕View以及當前按鈕的索引,那麼只要在選擇監聽裡面返回接口的回調就可以啦。
@Override
public void onClick(View v) {
    switch (v.getId()) {
        case R.id.picture_selector_take_photo_btn:
            if(null != mOnSelectedListener) {
                mOnSelectedListener.OnSelected(v, 0);
            }
            break;
        case R.id.picture_selector_pick_picture_btn:
            if(null != mOnSelectedListener) {
                mOnSelectedListener.OnSelected(v, 1);
            }
            break;
        case R.id.picture_selector_cancel_btn:
            if(null != mOnSelectedListener) {
                mOnSelectedListener.OnSelected(v, 2);
            }
            break;
    }
}
/**
 * 把一個View控件添加到PopupWindow上並且顯示
 *
 * @param activity
 */
public void showPopupWindow(Activity activity) {
    popupWindow = new PopupWindow(mMenuView,    // 添加到popupWindow
    ViewGroup.LayoutParams.MATCH_PARENT, ViewGroup.LayoutParams.WRAP_CONTENT);
    popupWindow.setBackgroundDrawable(new ColorDrawable(Color.TRANSPARENT));
    popupWindow.showAtLocation(activity.getWindow().getDecorView(), Gravity.CENTER | Gravity.BOTTOM, 0, 0);
    popupWindow.setAnimationStyle(android.R.style.Animation_InputMethod);   // 設置窗口顯示的動畫效果
    popupWindow.setFocusable(false);                                        // 點擊其他地方隱藏鍵盤 popupWindow
    popupWindow.update();
}
/**
 * 移除PopupWindow
 */
public void dismissPopupWindow() {
    if (popupWindow != null && popupWindow.isShowing()) {
        popupWindow.dismiss();
        popupWindow = null;
    }
}
OK,到這裡選擇框的實現就完成了。
mSelectPicturePopupWindow = new SelectPicturePopupWindow(mContext);
mSelectPicturePopupWindow.setOnSelectedListener(this);
@Override
public void OnSelected(View v, int position) {
    switch (position) {
        case 0:
            // TODO: "拍照"按鈕被點擊了
            break;
        case 1:
            // TODO: "從相冊選擇"按鈕被點擊了
            break;
        case 2:
            // TODO: "取消"按鈕被點擊了
            break;
    }
}
@Override
public void OnSelected(View v, int position) {
    switch (position) {
        case 0:
            // "拍照"按鈕被點擊了
            mSelectPicturePopupWindow.dismissPopupWindow();
            Intent takeIntent = new Intent(MediaStore.ACTION_IMAGE_CAPTURE);
            //下面這句指定調用相機拍照後的照片存儲的路徑
            takeIntent.putExtra(MediaStore.EXTRA_OUTPUT, Uri.fromFile(new File(mTempPhotoPath)));
            startActivityForResult(takeIntent, CAMERA_REQUEST_CODE);
            break;
        case 1:
            // TODO: "從相冊選擇"按鈕被點擊了
            break;
        case 2:
            // TODO: "取消"按鈕被點擊了
            break;
    }
}
這裡的指定位置為sd卡本目錄下
mTempPhotoPath = Environment.getExternalStorageDirectory() + File.separator + "photo.jpeg";
@Override
public void onActivityResult(int requestCode, int resultCode, Intent data) {
    if (resultCode == mActivity.RESULT_OK) {
        switch (requestCode) {
            case CAMERA_REQUEST_CODE:
                // TODO: 調用相機拍照
                break;
        }
    }
    super.onActivityResult(requestCode, resultCode, data);
}
@Override
public void OnSelected(View v, int position) {
    switch (position) {
        case 0:
            // "拍照"按鈕被點擊了
            mSelectPicturePopupWindow.dismissPopupWindow();
            Intent takeIntent = new Intent(MediaStore.ACTION_IMAGE_CAPTURE);
            // 下面這句指定調用相機拍照後的照片存儲的路徑
            takeIntent.putExtra(MediaStore.EXTRA_OUTPUT, Uri.fromFile(new File(mTempPhotoPath)));
            startActivityForResult(takeIntent, CAMERA_REQUEST_CODE);
            break;
        case 1:
            // "從相冊選擇"按鈕被點擊了
            mSelectPicturePopupWindow.dismissPopupWindow();
            Intent pickIntent = new Intent(Intent.ACTION_PICK, null);
            // 如果限制上傳到服務器的圖片類型時可以直接寫如:"image/jpeg 、 image/png等的類型"
            pickIntent.setDataAndType(MediaStore.Images.Media.EXTERNAL_CONTENT_URI, "image/*");
            startActivityForResult(pickIntent, GALLERY_REQUEST_CODE);
            break;
        case 2:
           // TODO: "取消"按鈕被點擊了
            break;
    }
}
當拍選擇圖片完成時會回調到onActivityResult,在這裡處理選擇的返回結果。
@Override
public void onActivityResult(int requestCode, int resultCode, Intent data) {
    if (resultCode == mActivity.RESULT_OK) {
        switch (requestCode) {
            case CAMERA_REQUEST_CODE:
                // TODO: 調用相機拍照
                break;
            case GALLERY_REQUEST_CODE:
                // TODO: 直接從相冊獲取
                break;
        }
    }
    super.onActivityResult(requestCode, resultCode, data);
}
/**
 * 裁剪圖片方法實現
 *
 * @param uri
 */
public void startCropActivity(Uri uri) {
    UCrop.of(uri, mDestinationUri)
            .withAspectRatio(1, 1)
            .withMaxResultSize(512, 512)
            .withTargetActivity(CropActivity.class)
            .start(mActivity, this);
}
CropActiivty裁剪完成時會回調到onActivityResult,在這裡處理選擇的返回結果。
@Override
public void onActivityResult(int requestCode, int resultCode, Intent data) {
    if (resultCode == mActivity.RESULT_OK) {
        switch (requestCode) {
            case CAMERA_REQUEST_CODE:   // 調用相機拍照
                File temp = new File(mTempPhotoPath);
                startCropActivity(Uri.fromFile(temp));
                break;
            case GALLERY_REQUEST_CODE:  // 直接從相冊獲取
                startCropActivity(data.getData());
                break;
            case UCrop.REQUEST_CROP:
                // TODO: 裁剪圖片結果
                break;
            case UCrop.RESULT_ERROR:
                // TODO: 裁剪圖片錯誤
                break;
        }
    }
    super.onActivityResult(requestCode, resultCode, data);
}
CropActivity的界面如下所示:
具體的設計請看源碼,比較簡單,這裡不詳細說明。 處理裁剪成功的返回值
/**
 * 處理剪切成功的返回值
 *
 * @param result
 */
private void handleCropResult(Intent result) {
    deleteTempPhotoFile();
    final Uri resultUri = UCrop.getOutput(result);
    if (null != resultUri && null != mOnPictureSelectedListener) {
        Bitmap bitmap = null;
        try {
            bitmap = MediaStore.Images.Media.getBitmap(mActivity.getContentResolver(), resultUri);
        } catch (FileNotFoundException e) {
            e.printStackTrace();
        } catch (IOException e) {
            e.printStackTrace();
        }
        mOnPictureSelectedListener.onPictureSelected(resultUri, bitmap);
    } else {
        Toast.makeText(mContext, "無法剪切選擇圖片", Toast.LENGTH_SHORT).show();
    }
}
處理裁剪失敗的返回值
/**
 * 處理剪切失敗的返回值
 *
 * @param result
 */
private void handleCropError(Intent result) {
    deleteTempPhotoFile();
    final Throwable cropError = UCrop.getError(result);
    if (cropError != null) {
        Log.e(TAG, "handleCropError: ", cropError);
        Toast.makeText(mContext, cropError.getMessage(), Toast.LENGTH_LONG).show();
    } else {
        Toast.makeText(mContext, "無法剪切選擇圖片", Toast.LENGTH_SHORT).show();
    }
}
/**
 * 圖片選擇的回調接口
 */
public interface OnPictureSelectedListener {
    /**
     * 圖片選擇的監聽回調
     *
     * @param fileUri
     * @param bitmap
     */
    void onPictureSelected(Uri fileUri, Bitmap bitmap);
}
經過五、六、七步驟,我們的PictureSelectFragment就搞定了,在使用的時候只要繼承它,幾行代碼就搞定了。
// 設置圖片點擊監聽
mPictureIv.setOnClickListener(new View.OnClickListener() {
    @Override
    public void onClick(View v) {
        selectPicture();
    }
});
// 設置裁剪圖片結果監聽
setOnPictureSelectedListener(new OnPictureSelectedListener() {
    @Override
    public void onPictureSelected(Uri fileUri, Bitmap bitmap) {
        mPictureIv.setImageBitmap(bitmap);

        String filePath = fileUri.getEncodedPath();
        String imagePath = Uri.decode(filePath);
        Toast.makeText(mContext, "圖片已經保存到:" + imagePath, Toast.LENGTH_LONG).show();
    }
});
 Android自定義控件之繼承ViewGroup創建新容器
歡迎大家來學習本節內容,前幾節我們已經學習了其他幾種自定義控件,分別是Andriod 自定義控件之音頻條及 Andriod 自定義控件之創建可以復用的組合控件還沒有學習的
 Android 源碼解析View的touch事件分發機制
概述本篇主要分析的是touch事件的分發機制,網上關於這個知識點的分析文章非常多。但是還是想通過結合自身的總結,來加深自己的理解。對於事件分發機制,我將使用兩篇文章對其進
 Android-Async-Http使用記錄
介紹: Android-Async-Http是一個Android的開源網絡請求類庫。官方項目地址:http://loopj.com/a
 Android studio 百度地圖開發分析(3)地圖導航
Android studio 百度地圖開發(3)地圖導航email:chentravelling@163.com開發環境:win7 64位,Android Studio,