編輯:關於Android編程
本文均屬自己閱讀源碼的點滴總結,轉賬請注明出處謝謝。
歡迎和大家交流。qq:1037701636 email:gzzaigcn2009@163.com
Software:系統源碼Android5.1
前沿:
之前的兩篇博文算是比較詳細的記錄了整個Camera3 HAL3架構下完全不同於HAL1的preview預覽處理過程,包括主要涉及到的控制流和視頻流等。比較詳細的闡述了Camera2Client下streamProcessor、CallbackProcessor、CaptureSequencer等模塊在Camera3架構下的功能。分析得出每個模塊下均會在Camera3Device下以一個Stream的形式存在,而每個stream又是由多個buffer來構成主體的。與HAL3進行數據的交互時,以Request和result來作為數據傳輸的載體。在這些基礎上本文將描述具體拍照Capture模式下的數據流和控制流,主要會涉及到jpegprocessor、CaptureSequencer這幾個模塊的工作原理。鑒於Capture模式下的數據流更復雜,在這裡重點會分析數據流result回傳時,每個模塊的響應以及處理過程,填補前一博文的空白。
1. HAL3中Camera2Client下的take picture的入口函數
作為標准的capture picture功能的入口,主要完成了以下兩件事情:
updateProcessorStream(mJpegProcessor, l.mParameters);
mCaptureSequencer->startCapture(msgType)
對於JpegProcessor模塊而言,他的stream流第一次是在preview階段進行了create與初始化,這裡之所以再次調用JpegProcessor::updateStream目的是參考原先JpegProcessor stream的width與height是否變化即是否照片要求的分辨率發生了變化,如果是的話就需要delete原先的stream,重新建立一個stream。
在JpegProcessor中重點關注CpuConsumer與Surface的生產者與消費者處理模式,官方稱之為Create CPU buffer queue endpoint。
2. CaptureSequencer模塊
CaptureSequencer模塊是take picture下操作的重點,在Camera2Client中進行了創建,首先來看CaptureSequencer線程的threadLoop函數:
bool CaptureSequencer::threadLoop() {

    sp client = mClient.promote();
    if (client == 0) return false;

    CaptureState currentState;
    {
        Mutex::Autolock l(mStateMutex);
        currentState = mCaptureState;
    }

    currentState = (this->*kStateManagers[currentState])(client);

    Mutex::Autolock l(mStateMutex);
    if (currentState != mCaptureState) {
        if (mCaptureState != IDLE) {
            ATRACE_ASYNC_END(kStateNames[mCaptureState], mStateTransitionCount);
        }
        mCaptureState = currentState;//保留新的狀態
        mStateTransitionCount++;
        if (mCaptureState != IDLE) {
            ATRACE_ASYNC_BEGIN(kStateNames[mCaptureState], mStateTransitionCount);
        }
        ALOGV("Camera %d: New capture state %s",
                client->getCameraId(), kStateNames[mCaptureState]);
        mStateChanged.signal();
    }

    if (mCaptureState == ERROR) {
        ALOGE("Camera %d: Stopping capture sequencer due to error",
                client->getCameraId());
        return false;
    }

    return true;
}
CaptureSequencer是一個以不同的state狀態機來循環工作的模塊, currentState = (this->*kStateManagers[currentState])(client)函數是執行對應狀態機下的執行函數,其中的state值如下:
const CaptureSequencer::StateManager
        CaptureSequencer::kStateManagers[CaptureSequencer::NUM_CAPTURE_STATES-1] = {
    &CaptureSequencer::manageIdle,
    &CaptureSequencer::manageStart,
    &CaptureSequencer::manageZslStart,
    &CaptureSequencer::manageZslWaiting,
    &CaptureSequencer::manageZslReprocessing,
    &CaptureSequencer::manageStandardStart,
    &CaptureSequencer::manageStandardPrecaptureWait,
    &CaptureSequencer::manageStandardCapture,
    &CaptureSequencer::manageStandardCaptureWait,
    &CaptureSequencer::manageBurstCaptureStart,
    &CaptureSequencer::manageBurstCaptureWait,
    &CaptureSequencer::manageDone,
};
我們以一個standard capture的操作模式,來分析一次完成的take picture的過程。初始化的 mCaptureState(IDLE),進入的函數入口為manageIdle:
CaptureSequencer::CaptureState CaptureSequencer::manageIdle(
        sp &/*client*/) {
    status_t res;
    Mutex::Autolock l(mInputMutex);
    while (!mStartCapture) {
        res = mStartCaptureSignal.waitRelative(mInputMutex,
                kWaitDuration);
        if (res == TIMED_OUT) break;
    }
    if (mStartCapture) {
        mStartCapture = false;
        mBusy = true;
        return START;
    }
    return IDLE;
}
函數主要在輪訓mStartCapture的值,這個值是由CameraService端的拍照觸發線程來啟動的,代碼如下:
status_t CaptureSequencer::startCapture(int msgType) {
    ALOGV("%s", __FUNCTION__);
    ATRACE_CALL();
    Mutex::Autolock l(mInputMutex);
    if (mBusy) {
        ALOGE("%s: Already busy capturing!", __FUNCTION__);
        return INVALID_OPERATION;
    }
    if (!mStartCapture) {
        mMsgType = msgType;
        mStartCapture = true;
        mStartCaptureSignal.signal();//啟動CaptureSequencer
    }
    return OK;
}
對比CaptureSequencer Threadloop線程中,在阻塞式的等待mStartCapture = true,並在修改完mStartCapture 後向Threadloop發出signal。Threadloop線程被喚醒後,執行返回一個新的狀態機mCaptureState = START:
2.1 START狀態機
主要調用了updateCaptureRequest(l.mParameters, client)函數:
status_t CaptureSequencer::updateCaptureRequest(const Parameters ?ms,
        sp &client) {
    ATRACE_CALL();
    status_t res;
    if (mCaptureRequest.entryCount() == 0) {
        res = client->getCameraDevice()->createDefaultRequest(
                CAMERA2_TEMPLATE_STILL_CAPTURE,
                &mCaptureRequest);
        if (res != OK) {
            ALOGE("%s: Camera %d: Unable to create default still image request:"
                    " %s (%d)", __FUNCTION__, client->getCameraId(),
                    strerror(-res), res);
            return res;
        }
    }

    res = params.updateRequest(&mCaptureRequest);
    if (res != OK) {
        ALOGE("%s: Camera %d: Unable to update common entries of capture "
                "request: %s (%d)", __FUNCTION__, client->getCameraId(),
                strerror(-res), res);
        return res;
    }

    res = params.updateRequestJpeg(&mCaptureRequest);//更新JPEG需要的參數
    if (res != OK) {
        ALOGE("%s: Camera %d: Unable to update JPEG entries of capture "
                "request: %s (%d)", __FUNCTION__, client->getCameraId(),
                strerror(-res), res);
        return res;
    }

    return OK;
}
該函數和preview模式下的updatePreviewRequest很類似,這裡首先檢查mCaptureRequest是否是一個空的CameraMetadata,如果為空則由createDefaultRequest來請求HAL3來創建一個Request,其中相應的類型為CAMERA2_TEMPLATE_STILL_CAPTURE。隨後分別是使用當前模式下的配置參數來更新CameraMetadata mCaptureRequest中不同tag的參數值,便於傳遞給HAL3,這個過程是類似與以前Camera1中直接的setParamters操作string的過程。
2.2 STANDARD_START狀態manageStandardCapture
該狀態是啟動整個take picture的重點所在:
CaptureSequencer::CaptureState CaptureSequencer::manageStandardCapture(
        sp &client) {
    status_t res;
    ATRACE_CALL();
    SharedParameters::Lock l(client->getParameters());
    Vector outputStreams;
    uint8_t captureIntent = static_cast(ANDROID_CONTROL_CAPTURE_INTENT_STILL_CAPTURE);

    /**
     * Set up output streams in the request
     *  - preview
     *  - capture/jpeg
     *  - callback (if preview callbacks enabled)
     *  - recording (if recording enabled)
     */
    outputStreams.push(client->getPreviewStreamId());//preview Stream
    outputStreams.push(client->getCaptureStreamId());//capture Stream

    if (l.mParameters.previewCallbackFlags &
            CAMERA_FRAME_CALLBACK_FLAG_ENABLE_MASK) {
        outputStreams.push(client->getCallbackStreamId());//capture callback
    }

    if (l.mParameters.state == Parameters::VIDEO_SNAPSHOT) {
        outputStreams.push(client->getRecordingStreamId());
        captureIntent = static_cast(ANDROID_CONTROL_CAPTURE_INTENT_VIDEO_SNAPSHOT);
    }

    res = mCaptureRequest.update(ANDROID_REQUEST_OUTPUT_STREAMS,
            outputStreams);
    if (res == OK) {
        res = mCaptureRequest.update(ANDROID_REQUEST_ID,
                &mCaptureId, 1);//當前request對應的ID
    }
    if (res == OK) {
        res = mCaptureRequest.update(ANDROID_CONTROL_CAPTURE_INTENT,
                &captureIntent, 1);
    }
    if (res == OK) {
        res = mCaptureRequest.sort();
    }

    if (res != OK) {
        ALOGE("%s: Camera %d: Unable to set up still capture request: %s (%d)",
                __FUNCTION__, client->getCameraId(), strerror(-res), res);
        return DONE;
    }

    // Create a capture copy since CameraDeviceBase#capture takes ownership
    CameraMetadata captureCopy = mCaptureRequest;
    if (captureCopy.entryCount() == 0) {
        ALOGE("%s: Camera %d: Unable to copy capture request for HAL device",
                __FUNCTION__, client->getCameraId());
        return DONE;
    }

    /**
     * Clear the streaming request for still-capture pictures
     *   (as opposed to i.e. video snapshots)
     */
    if (l.mParameters.state == Parameters::STILL_CAPTURE) {
        // API definition of takePicture() - stop preview before taking pic
        res = client->stopStream();
        if (res != OK) {
            ALOGE("%s: Camera %d: Unable to stop preview for still capture: "
                    "%s (%d)",
                    __FUNCTION__, client->getCameraId(), strerror(-res), res);
            return DONE;
        }
    }
    // TODO: Capture should be atomic with setStreamingRequest here
    res = client->getCameraDevice()->capture(captureCopy);//啟動camera3device的capture,提交capture request
    if (res != OK) {
        ALOGE("%s: Camera %d: Unable to submit still image capture request: "
                "%s (%d)",
                __FUNCTION__, client->getCameraId(), strerror(-res), res);
        return DONE;
    }

    mTimeoutCount = kMaxTimeoutsForCaptureEnd;
    return STANDARD_CAPTURE_WAIT;
}

CaptureSequencer::CaptureState CaptureSequencer::manageStandardCaptureWait(
        sp &client) {
    status_t res;
    ATRACE_CALL();
    Mutex::Autolock l(mInputMutex);

    // Wait for new metadata result (mNewFrame)
    while (!mNewFrameReceived) {
        res = mNewFrameSignal.waitRelative(mInputMutex, kWaitDuration);//wait new 一幀metadata
        if (res == TIMED_OUT) {
            mTimeoutCount--;
            break;
        }
    }

    // Approximation of the shutter being closed
    // - TODO: use the hal3 exposure callback in Camera3Device instead
    if (mNewFrameReceived && !mShutterNotified) {
        SharedParameters::Lock l(client->getParameters());
        /* warning: this also locks a SharedCameraCallbacks */
        shutterNotifyLocked(l.mParameters, client, mMsgType);
        mShutterNotified = true;
    }

    // Wait until jpeg was captured by JpegProcessor
    while (mNewFrameReceived && !mNewCaptureReceived) {
        res = mNewCaptureSignal.waitRelative(mInputMutex, kWaitDuration);//等待JPEG數據
        if (res == TIMED_OUT) {
            mTimeoutCount--;
            break;
        }
    }
    if (mTimeoutCount <= 0) {
        ALOGW("Timed out waiting for capture to complete");
        return DONE;
    }
    if (mNewFrameReceived && mNewCaptureReceived) {//滿足mNewFrameReceived
        if (mNewFrameId != mCaptureId) {
            ALOGW("Mismatched capture frame IDs: Expected %d, got %d",
                    mCaptureId, mNewFrameId);
        }
        camera_metadata_entry_t entry;
        entry = mNewFrame.find(ANDROID_SENSOR_TIMESTAMP);
        if (entry.count == 0) {
            ALOGE("No timestamp field in capture frame!");
        } else if (entry.count == 1) {
            if (entry.data.i64[0] != mCaptureTimestamp) {
                ALOGW("Mismatched capture timestamps: Metadata frame %" PRId64 ","
                        " captured buffer %" PRId64,
                        entry.data.i64[0],
                        mCaptureTimestamp);
            }
        } else {
            ALOGE("Timestamp metadata is malformed!");
        }
        client->removeFrameListener(mCaptureId, mCaptureId + 1, this);

        mNewFrameReceived = false;
        mNewCaptureReceived = false;
        return DONE;
    }
    return STANDARD_CAPTURE_WAIT;
}
整個函數的處理可以分為以下幾個小點:
a:Vector
outputStreams.push(client->getPreviewStreamId());//preview Stream
outputStreams.push(client->getCaptureStreamId());//capture jpeg Stream
outputStreams.push(client->getCallbackStreamId());//capture callback
通過以上的操作,可以很清楚是看到,這裡集合了take picture所需要使用到的stream流,對應的模塊分別是:
streamProcessor、jpegProcessor、CallbackProcessor。
這個過程和Preview模式下是類似的,收集當前Camera2Client下的所有stream,並以stream的ID號作為區別。
b: 將當前操作所有的stream信息全部加入到CameraMetadata mCaptureRequest
res = mCaptureRequest.update(ANDROID_REQUEST_OUTPUT_STREAMS,
outputStreams);
if (res == OK) {
res = mCaptureRequest.update(ANDROID_REQUEST_ID,
&mCaptureId, 1);//當前request對應的ID
}
ANDROID_REQUEST_ID這項值表明,當前只存在3種Request類型:
預覽Request mPreviewRequest:        mPreviewRequestId(Camera2Client::kPreviewRequestIdStart),
拍照Request mCaptureRequest:mCaptureId(Camera2Client::kCaptureRequestIdStart),
錄像Request mRecordingRequest:        mRecordingRequestId(Camera2Client::kRecordingRequestIdStart),
c. 對於STILL_CAPTURE類型的picture
client->stopStream(),實現的本質是res = device->clearStreamingRequest(),mRequestThread->clearRepeatingRequests(lastFrameNumber);
該函數是將之前Preview模式下的建立的captureRequest作delete處理,之前在預覽模式下是將最終生產的capturelist加入到了一個mRepeatingRequests當中,這裡通過clear使之為empty,即不會再發送Request和HAL3進行數據的交互。
d.Camera3Device capture函數
首先關注capture函數傳入的參數為captureCopy,即CameraMetadata mCaptureRequest的一個copy值。
status_t Camera3Device::capture(CameraMetadata &request, int64_t* /*lastFrameNumber*/) {
    ATRACE_CALL();

    List requests;
    requests.push_back(request);//對於一個CameraMetadata轉為list
    return captureList(requests, /*lastFrameNumber*/NULL);
}
status_t Camera3Device::captureList(const List&requests, int64_t *lastFrameNumber) { ATRACE_CALL(); return submitRequestsHelper(requests, /*repeating*/false, lastFrameNumber);//非重復的,制定於拍照 }
capture函數由Camera3Device來響應處理,其傳入的mCaptureRequest轉變為一個list,再交由submitRequestsHelper來處理,對比之前Preview下的處理方式,其startstream入口為setStreamingRequest->setStreamingRequestList->submitRequestsHelper。
這也表明了最終CameraMetadata類型的Request都是由submitRequestsHelper來完成的,所以convertMetadataListToRequestListLocked這個將CameraMetadata轉換為List
status_t Camera3Device::RequestThread::queueRequestList(
        List > &requests,
        /*out*/
        int64_t *lastFrameNumber) {
    Mutex::Autolock l(mRequestLock);
    for (List >::iterator it = requests.begin(); it != requests.end();
            ++it) {
        mRequestQueue.push_back(*it);
    }......
    unpauseForNewRequests();

    return OK;
}
這裡直接是將CaptureRequest加入到RequestQueue這個隊列之中,區別於Preview模式是將captureRequest加入到一個mRepeatingRequests,重復的將其中的captureRequest加入到RequestQueue。
最簡單的理解是picture模式下是拍去幾幀的數據流即可,Preview模式下是實時的獲取幀,前者是幾次one snop,後者是連續continuous。
到這裡為止,可以說CaptureSequence已經完成了START狀態機的處理。
e. 從START到STANDARD_CAPTURE_WAIT
該狀態下對應的狀態機處理函數為manageStandardCaptureWait:
CaptureSequencer::CaptureState CaptureSequencer::manageStandardCaptureWait(
        sp &client) {
    status_t res;
    ATRACE_CALL();
    Mutex::Autolock l(mInputMutex);

    // Wait for new metadata result (mNewFrame)
    while (!mNewFrameReceived) {
        res = mNewFrameSignal.waitRelative(mInputMutex, kWaitDuration);//wait new 一幀metadata
        if (res == TIMED_OUT) {
            mTimeoutCount--;
            break;
        }
    }

    // Approximation of the shutter being closed
    // - TODO: use the hal3 exposure callback in Camera3Device instead
    if (mNewFrameReceived && !mShutterNotified) {
        SharedParameters::Lock l(client->getParameters());
        /* warning: this also locks a SharedCameraCallbacks */
        shutterNotifyLocked(l.mParameters, client, mMsgType);
        mShutterNotified = true;
    }

    // Wait until jpeg was captured by JpegProcessor
    while (mNewFrameReceived && !mNewCaptureReceived) {
        res = mNewCaptureSignal.waitRelative(mInputMutex, kWaitDuration);//等待JPEG數據
        if (res == TIMED_OUT) {
            mTimeoutCount--;
            break;
        }
    }
    if (mTimeoutCount <= 0) {
        ALOGW("Timed out waiting for capture to complete");
        return DONE;
    }
    if (mNewFrameReceived && mNewCaptureReceived) {//滿足mNewFrameReceived
        if (mNewFrameId != mCaptureId) {
            ALOGW("Mismatched capture frame IDs: Expected %d, got %d",
                    mCaptureId, mNewFrameId);
        }
        camera_metadata_entry_t entry;
        entry = mNewFrame.find(ANDROID_SENSOR_TIMESTAMP);
        if (entry.count == 0) {
            ALOGE("No timestamp field in capture frame!");
        } else if (entry.count == 1) {
            if (entry.data.i64[0] != mCaptureTimestamp) {
                ALOGW("Mismatched capture timestamps: Metadata frame %" PRId64 ","
                        " captured buffer %" PRId64,
                        entry.data.i64[0],
                        mCaptureTimestamp);
            }
        } else {
            ALOGE("Timestamp metadata is malformed!");
        }
        client->removeFrameListener(mCaptureId, mCaptureId + 1, this);

        mNewFrameReceived = false;
        mNewCaptureReceived = false;
        return DONE;
    }
    return STANDARD_CAPTURE_WAIT;
}
具體分析該函數可以知道其處於兩次wait休眠狀態,主要響應兩個條件等待信號mNewFrameSignal與mNewCaptureSignal,兩者者的等待周期為100ms。只有當mNewFrameReceived && mNewCaptureReceived同事滿足條件時,才算是Capture到一幀picture。
f . Done State狀態
這裡先假設已經完成了wait這個狀態,就會進入Done狀態的執行函數manageDone(),最重要的部分如下:
  if (mCaptureBuffer != 0 && res == OK) {
        ATRACE_ASYNC_END(Camera2Client::kTakepictureLabel, takePictureCounter);

        Camera2Client::SharedCameraCallbacks::Lock
            l(client->mSharedCameraCallbacks);
        ALOGV("%s: Sending still image to client", __FUNCTION__);
        if (l.mRemoteCallback != 0) {
            l.mRemoteCallback->dataCallback(CAMERA_MSG_COMPRESSED_IMAGE,
                    mCaptureBuffer, NULL);//回傳壓縮好的jpeg數據到上層
        } else {
            ALOGV("%s: No client!", __FUNCTION__);
        }
    }
    mCaptureBuffer.clear();
他將采集到的一幀jpeg壓縮格式的圖像,回傳到APP層,便於後期寫入到文件等。在以往Camera HAL1.0中這部分的數據回傳玩玩都是由HAL層來完成的,這也給編碼帶來復雜度以及效率低下等問題。Google在Camera3.0中很好的封裝了dataCallback以及notifyCallback的回調處理,將其轉到Camera2Client下不同模塊來做響應回調。
其中mCaptureBuffer是回傳回來的真實的jpeg格式的圖像數據,其本質是從stream中提取的一個buffer然後被copy到一個heap中,等待APP Callback完成後,就會釋放。
完成了Done狀態後,CaptureSequence又會再次進入到IDLE模式,等待下一次的take picture的處理。
3 picture模式下Camera3Device處理Request與result
對於picture模式下的Request處理,可以參考Preview模式下的RequestThread::threadLoop下的處理過程。這裡主要分析result的響應過程:
在前面已經提到CaptureSequence需要wait兩個signal,一般都是有其他模塊來觸發回調這個signal,我們先來定位這兩個signal發出的位置:
void CaptureSequencer::onResultAvailable(const CaptureResult &result) {
    ATRACE_CALL();
    ALOGV("%s: New result available.", __FUNCTION__);
    Mutex::Autolock l(mInputMutex);
    mNewFrameId = result.mResultExtras.requestId;//返回幀所屬的request id
    mNewFrame = result.mMetadata;
    if (!mNewFrameReceived) {
        mNewFrameReceived = true;
        mNewFrameSignal.signal();//buffer相應的result 信息,由FrameProcessor模塊來觸發listener
    }
}

void CaptureSequencer::onCaptureAvailable(nsecs_t timestamp,
        sp captureBuffer) {
    ATRACE_CALL();
    ALOGV("%s", __FUNCTION__);
    Mutex::Autolock l(mInputMutex);
    mCaptureTimestamp = timestamp;
    mCaptureBuffer = captureBuffer;
    if (!mNewCaptureReceived) {
        mNewCaptureReceived = true;
        mNewCaptureSignal.signal();//真實的一幀jpeg圖像
    }
}
那麼這兩個on回調函數是怎麼觸發的呢?下面來作具體的分析:
3.1.明確picture模式下,一次處理需要的stream數目
需要明確的是一次take picture需要的stream分別有JpegProcessor、CallbackProcessor、StreamingProcessor三種,第一個主要接收的是jpeg格式的幀圖像,第二個主要接收的是一幀的preview模式下回調到APP的視頻幀,而最後一個是直接獲取一幀視頻圖像後直接進行顯示用的視頻幀。
3.2.幀數據回調響應的由來processCaptureResult函數:
無論是哪一個模塊,數據回調響應最初的入口是HAL3的process_capture_result函數即processCaptureResult()函數,該函數的處理之所以復雜是因為HAL3.0中允許一次result回來的數據可以是不完整的,其中以3A相關的cameraMetadata的數據為主,這裡需要說明每一幀的result回來時camera3_capture_result都是含有一個camera_metadata_t的,包含著一幀圖像的各種信息tag字段,其中以3A信息為主。在processCaptureResult函數中由三個核心函數:
processPartial3AResult():處理回傳回來的部分cameraMetadata result數據;
returnOutputBuffers():返回這次result中各個stream對應的buffer數據;
sendCaptureResult():處理的是一次完整的cameraMetadata result數據;
3.3. FrameProcessor模塊的幀Result響應,以3A回調處理為主
processPartial3AResult()函數與sendCaptureResult()函數都是將3A的result結果發送給FrameProcessor去作處理的,因為無論是Request還是result都是必然帶有一個類似stream的cameraMetadata的,所以在這個模塊有別於其他模塊,故不需要單獨的stream流來交互數據的。
            if (isPartialResult) {
                // Fire off a 3A-only result if possible
                if (!request.partialResult.haveSent3A) {//返回的只是3A的數據
                    request.partialResult.haveSent3A =
                            processPartial3AResult(frameNumber,
                                    request.partialResult.collectedResult,
                                    request.resultExtras);// frame含有3A則notify 處理
                }
            }
processPartial3AResult是將當前幀收集到的partialResult進行處理,需要明確的是partialResult是指定幀framenum下返回的result最新組成的result:
其內部需要確保目前收集到的result需要至少含有如下的tag的值,才算一次3A數據可True:
 gotAllStates &= get3AResult(partial, ANDROID_CONTROL_AF_MODE,
        &afMode, frameNumber);

    gotAllStates &= get3AResult(partial, ANDROID_CONTROL_AWB_MODE,
        &awbMode, frameNumber);

    gotAllStates &= get3AResult(partial, ANDROID_CONTROL_AE_STATE,
        &aeState, frameNumber);

    gotAllStates &= get3AResult(partial, ANDROID_CONTROL_AF_STATE,
        &afState, frameNumber);

    gotAllStates &= get3AResult(partial, ANDROID_CONTROL_AWB_STATE,
        &awbState, frameNumber);                                                                                                                             if (!gotAllStates) return false;
只有這樣才滿足構建一個CaptureResult minResult的要求,上述過程表明對已有的Result需要AE、AF、AWB同時OK時才會構建一個CaptureResult。
void Camera3Device::sendCaptureResult(CameraMetadata &pendingMetadata,
        CaptureResultExtras &resultExtras,
        CameraMetadata &collectedPartialResult,
        uint32_t frameNumber) {
    if (pendingMetadata.isEmpty())
        return;

    Mutex::Autolock l(mOutputLock);

    // TODO: need to track errors for tighter bounds on expected frame number
    if (frameNumber < mNextResultFrameNumber) {
        SET_ERR("Out-of-order capture result metadata submitted! "
                "(got frame number %d, expecting %d)",
                frameNumber, mNextResultFrameNumber);
        return;
    }
    mNextResultFrameNumber = frameNumber + 1;//下一幀

    CaptureResult captureResult;
    captureResult.mResultExtras = resultExtras;
    captureResult.mMetadata = pendingMetadata;

    if (captureResult.mMetadata.update(ANDROID_REQUEST_FRAME_COUNT,
            (int32_t*)&frameNumber, 1) != OK) {
        SET_ERR("Failed to set frame# in metadata (%d)",
                frameNumber);
        return;
    } else {
        ALOGVV("%s: Camera %d: Set frame# in metadata (%d)",
                __FUNCTION__, mId, frameNumber);
    }

    // Append any previous partials to form a complete result
    if (mUsePartialResult && !collectedPartialResult.isEmpty()) {
        captureResult.mMetadata.append(collectedPartialResult);//
    }

    captureResult.mMetadata.sort();

    // Check that there's a timestamp in the result metadata
    camera_metadata_entry entry =
            captureResult.mMetadata.find(ANDROID_SENSOR_TIMESTAMP);
    if (entry.count == 0) {
        SET_ERR("No timestamp provided by HAL for frame %d!",
                frameNumber);
        return;
    }

    // Valid result, insert into queue
    List::iterator queuedResult =
            mResultQueue.insert(mResultQueue.end(), CaptureResult(captureResult));
    ALOGVV("%s: result requestId = %" PRId32 ", frameNumber = %" PRId64
           ", burstId = %" PRId32, __FUNCTION__,
           queuedResult->mResultExtras.requestId,
           queuedResult->mResultExtras.frameNumber,
           queuedResult->mResultExtras.burstId);

    mResultSignal.signal();//發送signal
}
該函數的主要工作是創建一個CaptureResult,可以看到對於之前幀回傳回來的部分result,需要在這裡進行組合成一幀完整的result。collectedPartialResult指的是當一次Request下發時,回傳的result可能是分幾次返回的,比如第一次的result只含有部分的信息,在第二次返回如果result已經被標記為完全上傳回到Threadloop中,那麼這裡就需要對前幾次的result進行組合,而前幾次的result都是保存在當前幀的Request的,整個Request以唯一的一個framenumber作為索引,確保返回的result組合後是對應的同一個Request。
個人理解這個partialResult的處理機制是每次返回的Result並不一定包含了當前frameNumber幀號所需要的tag信息,而且這個每次回傳的mNumPartialResults值是由HAL3.0層來決定的。在每次一的Result中,會收集
其中 isPartialResult = (result->partial_result < mNumPartialResults)決定了當前的Result是否還是一個處於partial Result的模式,是的話每次都進行collectResult,此外對於此模式下會收集3A的tag信息,調用processPartial3AResult來處理3A的值,而這個過程也是單列的處理。而一旦當前的Result返回處於非partial模式時,直接提取之前collect的Result並和當前的Result共同組成一個新的Capture Result。生成的CaptureResult會加入到mResultQueue隊列。
至此分析完了HAL3返回的Captrue Result的處理過程,最終mResultSignal.signal()喚醒相應的等待線程,而這個過程就是由FrameProcessor模塊來響應的。
FrameProcessorBase是一個FrameProcessor的基類,會啟動一個Threadloop:
bool FrameProcessorBase::threadLoop() {
    status_t res;

    sp device;
    {
        device = mDevice.promote();
        if (device == 0) return false;
    }

    res = device->waitForNextFrame(kWaitDuration);
    if (res == OK) {
        processNewFrames(device);// 3A相關的處理等待
    } else if (res != TIMED_OUT) {
        ALOGE("FrameProcessorBase: Error waiting for new "
                "frames: %s (%d)", strerror(-res), res);
    }

    return true;
}
調用camera3device的waitForNextFrame,等待周期為10ms.
status_t Camera3Device::waitForNextFrame(nsecs_t timeout) {
    status_t res;
    Mutex::Autolock l(mOutputLock);

    while (mResultQueue.empty()) {//capture result 結果非空則繼續執行
        res = mResultSignal.waitRelative(mOutputLock, timeout);
        if (res == TIMED_OUT) {
            return res;
        } else if (res != OK) {
            ALOGW("%s: Camera %d: No frame in %" PRId64 " ns: %s (%d)",
                    __FUNCTION__, mId, timeout, strerror(-res), res);
            return res;
        }
    }
    return OK;
}
在這裡一是看到了mResultQueue,二是看到了mResultSignal。對應於Camera3Device::sendCaptureResult()中的mOutputLock以及signal。
線程被喚醒後調用processNewFrames來處理當前幀
void FrameProcessorBase::processNewFrames(const spdevice->getNextResult(&result)是從mResultQueue提取一個可用的CaptureResult,提取完成後作erase的處理。再檢驗這個Result是否屬於一個固定的framenum,然後由processSingleFrame來完成一件事:&device) { status_t res; ATRACE_CALL(); CaptureResult result; ALOGV("%s: Camera %d: Process new frames", __FUNCTION__, device->getId()); while ( (res = device->getNextResult(&result)) == OK) { // TODO: instead of getting frame number from metadata, we should read // this from result.mResultExtras when CameraDeviceBase interface is fixed. camera_metadata_entry_t entry; entry = result.mMetadata.find(ANDROID_REQUEST_FRAME_COUNT); if (entry.count == 0) { ALOGE("%s: Camera %d: Error reading frame number", __FUNCTION__, device->getId()); break; } ATRACE_INT("cam2_frame", entry.data.i32[0]); if (!processSingleFrame(result, device)) {//單獨處理一幀 break; } if (!result.mMetadata.isEmpty()) { Mutex::Autolock al(mLastFrameMutex); mLastFrame.acquire(result.mMetadata); } } if (res != NOT_ENOUGH_DATA) { ALOGE("%s: Camera %d: Error getting next frame: %s (%d)", __FUNCTION__, device->getId(), strerror(-res), res); return; } return; }
bool FrameProcessor::processSingleFrame(CaptureResult &frame,
                                        const sp &device) {//處理幀


    sp client = mClient.promote();
    if (!client.get()) {
        return false;
    }


    bool isPartialResult = false;
    if (mUsePartialResult) {
        if (client->getCameraDeviceVersion() >= CAMERA_DEVICE_API_VERSION_3_2) {
            isPartialResult = frame.mResultExtras.partialResultCount < mNumPartialResults;
        } else {
            camera_metadata_entry_t entry;
            entry = frame.mMetadata.find(ANDROID_QUIRKS_PARTIAL_RESULT);
            if (entry.count > 0 &&
                    entry.data.u8[0] == ANDROID_QUIRKS_PARTIAL_RESULT_PARTIAL) {
                isPartialResult = true;
            }
        }
    }


    if (!isPartialResult && processFaceDetect(frame.mMetadata, client) != OK) {
        return false;
    }


    if (mSynthesize3ANotify) {
        process3aState(frame, client);
    }


    return FrameProcessorBase::processSingleFrame(frame, device);
}
bool FrameProcessorBase::processSingleFrame(CaptureResult &result,
                                            const sp &device) {
    ALOGV("%s: Camera %d: Process single frame (is empty? %d)",
          __FUNCTION__, device->getId(), result.mMetadata.isEmpty());
    return processListeners(result, device) == OK;//處理所有的listener
}
status_t FrameProcessorBase::processListeners(const CaptureResult &result,
        const sp &device) {
    ATRACE_CALL();

    camera_metadata_ro_entry_t entry;

    // Check if this result is partial.
    bool isPartialResult = false;
    if (device->getDeviceVersion() >= CAMERA_DEVICE_API_VERSION_3_2) {
        isPartialResult = result.mResultExtras.partialResultCount < mNumPartialResults;
    } else {
        entry = result.mMetadata.find(ANDROID_QUIRKS_PARTIAL_RESULT);
        if (entry.count != 0 &&
                entry.data.u8[0] == ANDROID_QUIRKS_PARTIAL_RESULT_PARTIAL) {
            ALOGV("%s: Camera %d: This is a partial result",
                    __FUNCTION__, device->getId());
            isPartialResult = true;
        }
    }

    // TODO: instead of getting requestID from CameraMetadata, we should get it
    // from CaptureResultExtras. This will require changing Camera2Device.
    // Currently Camera2Device uses MetadataQueue to store results, which does not
    // include CaptureResultExtras.
    entry = result.mMetadata.find(ANDROID_REQUEST_ID);
    if (entry.count == 0) {
        ALOGE("%s: Camera %d: Error reading frame id", __FUNCTION__, device->getId());
        return BAD_VALUE;
    }
    int32_t requestId = entry.data.i32[0];

    List > listeners;
    {
        Mutex::Autolock l(mInputMutex);

        List::iterator item = mRangeListeners.begin();
        // Don't deliver partial results to listeners that don't want them
        while (item != mRangeListeners.end()) {
            if (requestId >= item->minId && requestId < item->maxId &&
                    (!isPartialResult || item->sendPartials)) {
                sp listener = item->listener.promote();
                if (listener == 0) {
                    item = mRangeListeners.erase(item);
                    continue;
                } else {
                    listeners.push_back(listener);
                }
            }
            item++;
        }
    }
    ALOGV("%s: Camera %d: Got %zu range listeners out of %zu", __FUNCTION__,
          device->getId(), listeners.size(), mRangeListeners.size());

    List >::iterator item = listeners.begin();
    for (; item != listeners.end(); item++) {
        (*item)->onResultAvailable(result);//所有注冊的listener,告知有result返回
    }
    return OK;
}
這裡簡單的理解是在獲取一個正常的CaptureResult時,就需要將這個Result分發給哪些感興趣的模塊,而這個過程由一個FilteredListener來完成:
其他模塊如果想要listen FrameProcessor模塊,可以調用registerListener來注冊,保存在mRangeListeners之中,具體的接口如下:
status_t Camera2Client::registerFrameListener(int32_t minId, int32_t maxId,
        wp listener, bool sendPartials) {
    return mFrameProcessor->registerListener(minId, maxId, listener, sendPartials);
}
在這個對完整的Result的處理過程中,重點關注FrameProcessor下的3A回調與人臉檢測回調,3A中的AF回回傳AF的狀態信息以CAMERA_MSG_FOCUS的形式通過notifyCallback. FaceDetect會以camera_frame_metadata_t的形式將人臉檢測的定位的數據通過dataCallback回傳,數據類型為CAMERA_MSG_PREVIEW_FRAME。
其中CaptureSequencer::manageStandardStart()在處理時,調用了registerFrameListener完成了listen的注冊。
有了這些listener,在processListeners處理函數中,通過遍歷mRangeListeners,來確保當前的CaptureResult 中對象的Request id和注冊時的區間相匹配。在提取到適合處理當前Result的listener後,回調onResultAvailable()函數。
到這裡void CaptureSequencer::onResultAvailable()就會被覆蓋調用,經而我們定位到了mNewFrameReceived = Ture的回調過程。
3.4. 幀數據的回調:
上面重點是分析一個隊CameraMetadata Result結果的分析,看上去還沒有真正的視頻幀數據的出現。對於視頻流buffer的操作,上面提到了肯定是需要stream的,而不像FrameProcessor不需要建立stream來進行數據的傳輸。
對於數據的Callback處理,接口是returnOutputBuffers函數,該函數在preview模式下已經進行過分析,其重點就是將當前Result回來的buffer數據信息進行提取,然後分發給不同模塊所維護著的Camera3Stream去作處理,本質是將當前Result返回的camera3_stream_buffer提取buffer_handle後通過queue_buffer操作後,就交由對應的Consumer去作處理。
對於直接預覽的模塊StreamProcessor,其Consumer是直接的SurfaceFlinger用於實時顯示,CallbackProcessor是將CpuConsumer來將幀數據回傳給APP使用,這些過程和Preview模式下都是類似,也是takepicture模式下同樣需要處理的過程,而對於JpegProcessor而言,屬於Picture模式專屬,我們來看他接收到一幀HAL3 Jpeg Buffer的處理過程:
void JpegProcessor::onFrameAvailable(const BufferItem& /*item*/) {
    Mutex::Autolock l(mInputMutex);
    if (!mCaptureAvailable) {
        mCaptureAvailable = true;
        mCaptureAvailableSignal.signal();//采集到一幀jpeg圖像
    }
}
上述調用的過程可參看博文Android5.1中surface和CpuConsumer下生產者和消費者間的處理框架簡述來加深理解,作為take picture模式下獨有的模塊,對應的Threadloop線程獲得響應:
bool JpegProcessor::threadLoop() {
    status_t res;

    {
        Mutex::Autolock l(mInputMutex);
        while (!mCaptureAvailable) {
            res = mCaptureAvailableSignal.waitRelative(mInputMutex,
                    kWaitDuration);
            if (res == TIMED_OUT) return true;
        }
        mCaptureAvailable = false;
    }

    do {
        res = processNewCapture();//處理新的jpeg采集幀
    } while (res == OK);

    return true;
}
調用processNewCapture(),函數內部主要包括以下幾個方面:
mCaptureConsumer->lockNextBuffer(&imgBuffer);這是從CPUConsumer中獲取一個已經queuebuffer的buffer,lock過程最重要的是將這個buffer作mmap操作後映射到當前線程中。
然後通過這個虛擬地址將buffer地址copy到本進程的一個heap中,隨後將這個buffer進行ummap操作。
最後是調用如下代碼,去將本地的jpegbuffer傳輸給CaptureSequencer,所以可以說CaptureSequence雖然負責收集jpeg等數據,負責整個take picture的啟動與控制,但本質上jpeg等數據的真正提取都是交由jpegprocessor、zslprocessor等模塊來完成:
    sp sequencer = mSequencer.promote();
    if (sequencer != 0) {
        sequencer->onCaptureAvailable(imgBuffer.timestamp, captureBuffer);//通知capturesequence有jpeg buffer到了
    }
到這裡,就解決了CaptureSequeuer的wait狀態機中的另一個wait等待的signal。
至此為止onResultAvailable()與onCaptureAvailable()均完成了回調,前者主要是由FrameProcessor來觸發的,後者是有jpegProcessor來觸發的,前者是回傳的一幀jpeg圖像的附加信息如timestamp/3A等,而後者是回傳了一幀真正的jpeg圖像。
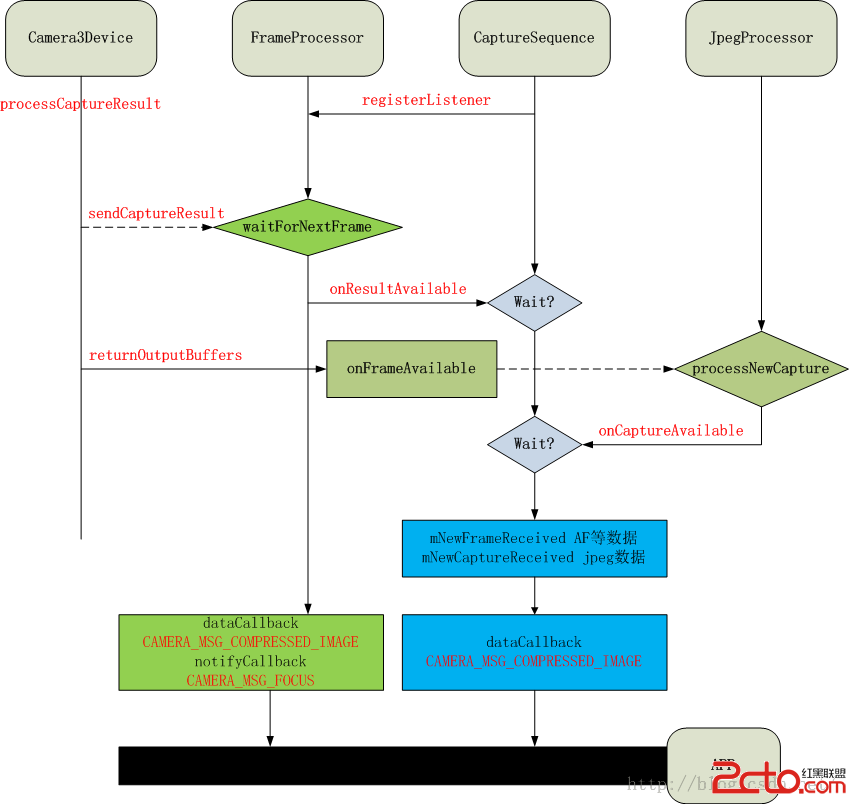
下面是我小節的takepicture模式下幾個模塊間數據交互的過程圖,本質是幾個線程間Threadloop的響應與處理過程。
可以看到jpeg模式下,每次課回傳給APP的數據包括原始的Callback數據流,jpegprocessor中的jpeg圖像流,以及其他比如AF的狀態,人臉識別後的人臉坐標原始信息camera_frame_metadata_t回傳給APP。
版權聲明:本文為博主原創文章,未經博主允許不得轉載。
 android錯誤之MediaPlayer用法的Media Player called in state *
用到Media Player,遇到幾個問題,記一下 用法就不說了,使用的時候最好參考一下mediaPlayer的這張圖 第一個錯誤是Medi
 Android使用GridLayout繪制自定義日歷控件
效果圖思路:就是先設置Gridlayout的行列數,然後往裡面放置一定數目的自定義日歷按鈕控件,最後實現日歷邏輯就可以了。步驟:第一步:自定義日歷控件(初步)第二步:實現
 Android輸入法框架分析(1)-三大組件
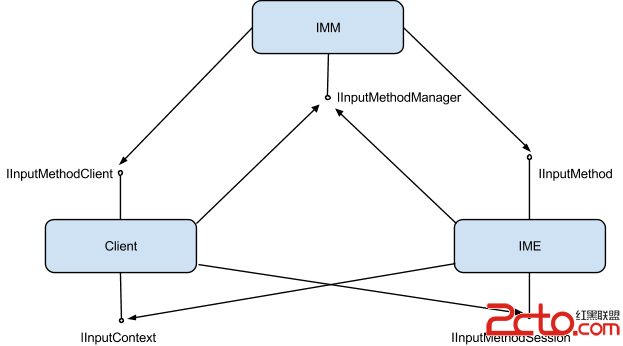
Android輸入法框架(Input Method Framework,IMF)是Android中非常重要的模塊,它分布於三個部分(確切的說,是三個進程), 包含編輯框
 小米2S技巧-小米2S兩種快捷截屏方法
小米手機如何快速截屏:在這裡總結了兩種小米手機快速截屏的方法,不知道或者要用的童鞋還不快點收藏起來試試看!1、下拉通知欄,點擊截屏,2秒後直接進入截屏截取當