編輯:關於Android編程
android加密算法很多:DES ,AES,3DES等等。詳情請google,baidu。
des的使用安全行很低,再次我們詳細了解下3DES.
3DES顧名思義,就是對des加密算法進行得改進,對每個數據進行了3次des加密,降低了破解的難度,從而提高數據的安全性。
首先寫一個utils工具,直接可以使用
import java.io.UnsupportedEncodingException;

import javax.crypto.Cipher;
import javax.crypto.SecretKey;
import javax.crypto.spec.SecretKeySpec;

/*
 如果我們要使用3DES加密,需要以下幾個步驟
 ①傳入共同約定的密鑰(keyBytes)以及算法(Algorithm),來構建SecretKey密鑰對象
 SecretKey deskey = new SecretKeySpec(keyBytes, Algorithm);
 ②根據算法實例化Cipher對象。它負責加密/解密
 Cipher c1 = Cipher.getInstance(Algorithm);
 ③傳入加密/解密模式以及SecretKey密鑰對象,實例化Cipher對象
 c1.init(Cipher.ENCRYPT_MODE, deskey);
 ④傳入字節數組,調用Cipher.doFinal()方法,實現加密/解密,並返回一個byte字節數組
 c1.doFinal(src);
 */
public class DES3Utils {
	// 定義加密算法
	private static final String Algorithm = DESede;
	// 加密密鑰
	private static final String PASSWORD_CRYPT_KEY = dlzh1991;

	// 加密 src為源數據的字節數組
	public static byte[] encryptMode(byte[] src) {

		try {// 生成密鑰
			SecretKey deskey = new SecretKeySpec(
					build3Deskey(PASSWORD_CRYPT_KEY), Algorithm);
			// 實例化cipher
			Cipher cipher = Cipher.getInstance(Algorithm);
			cipher.init(Cipher.ENCRYPT_MODE, deskey);
			return cipher.doFinal(src);
		} catch (Exception e) {
			e.printStackTrace();
		}
		return null;
	}

	// 解密函數
	public static byte[] decryptMode(byte[] src) {
		SecretKey deskey;
		try {
			deskey = new SecretKeySpec(build3Deskey(PASSWORD_CRYPT_KEY),
					Algorithm);
			Cipher cipher = Cipher.getInstance(Algorithm);
			cipher.init(Cipher.DECRYPT_MODE, deskey);
			return cipher.doFinal(src);
		} catch (Exception e) {
			e.printStackTrace();
		}

		return null;
	}

	// 根據字符串生成密鑰24位的字節數組
	public static byte[] build3Deskey(String keyStr) throws Exception {
		byte[] key = new byte[24];
		byte[] temp = keyStr.getBytes(UTF-8);
		if (key.length > temp.length) {
			System.arraycopy(temp, 0, key, 0, temp.length);

		} else {
			System.arraycopy(temp, 0, key, 0, key.length);

		}
		return key;
	}
}
然後我們寫一個test類使用utils進行加密解密STRING
package com.example.des;
public class DesTest {
//android數據加密和解密算法:DES 3DES AES
public static void main(String[] args) {
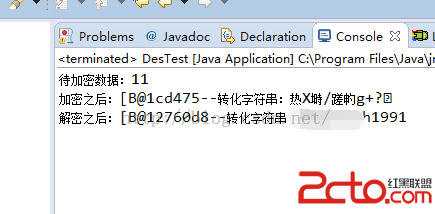
String msg = 杜立志dlzh1991;
System.out.println(待加密數據: + msg.length());
// 加密
byte[] secretArr = DES3Utils.encryptMode(msg.getBytes());
System.out.println(加密之後: + secretArr + --轉化字符串:
+ new String(secretArr));
// 解密
byte[] secreArr2 = DES3Utils.decryptMode(secretArr);
System.out.println(解密之後: + secreArr2 + --轉化字符串:
+ new String(secreArr2));
}
}
最近後台打印結果:
 Android項目編譯的時候出現:Caused by: java.lang.ClassNotFoundException: com.example.aaa.MainActivity
錯誤類型: 04-28 06:10:15.508: E/AndroidRuntime(849): Caused by: java.lang.ClassNotFoun
 android 自定義對話框
新建一個布局文件 my_dialog.xml 以下是strings.xml文件: demo091801 Sett
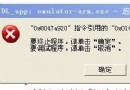 emulator-arm.exe應用程序錯誤 0x00473983指令引用的0x0000ffff
唉,這個問題困擾很久了,可能原因呢也是有很多種的,就個人遇到的問題,在這裡給大家分享下:運eclipse的時候,就是不能運行出android avd(虛擬機
 深入理解Android中的xmlns:tools屬性
前言安卓開發中,在寫布局代碼的時候,ide可以看到布局的預覽效果。但是有些效果則必須在運行之後才能看見,比如這種情況:TextView在xml中沒有設置任何字符,而是在a