編輯:關於Android編程
(本文講解了在Android中實現列表下拉刷新的動態效果的過程,文末附有源碼。)
2.自定義Android控件,重寫其ListView
3.ScrollListener滾動監聽
4.Adapter適配器的使用
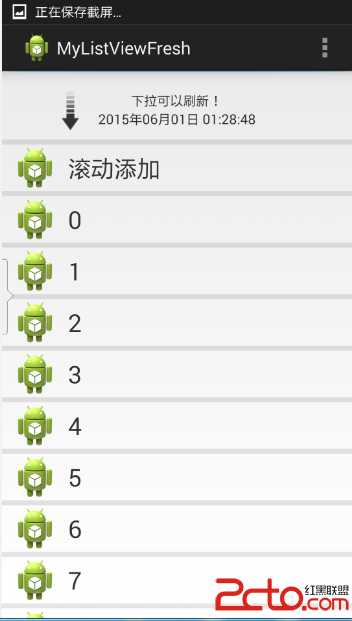
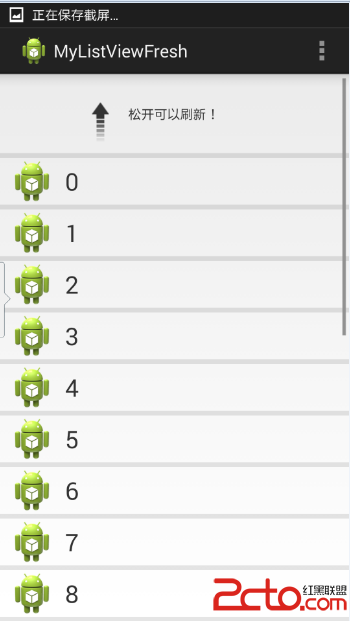
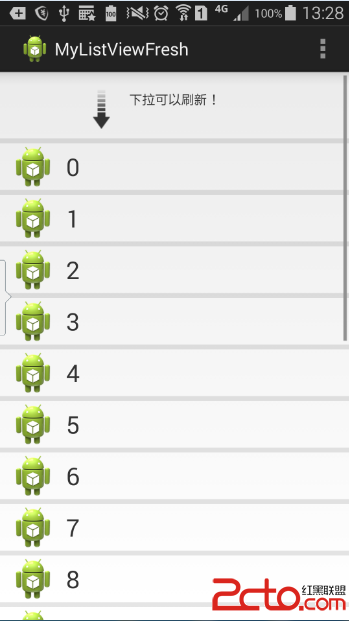
話不多說,先來看看效果圖:
接下來我們一步一步地實現以上的效果。
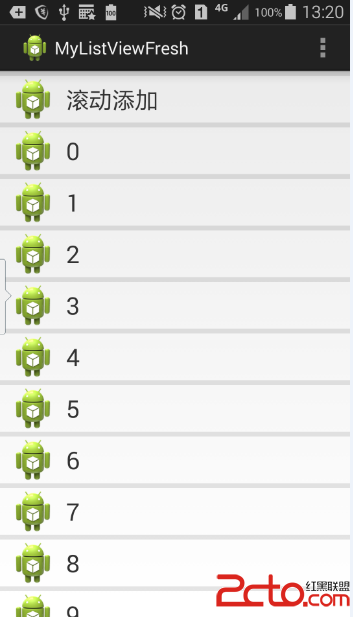
看一下這一步的效果圖:
首先,我們要實現的是帶下拉刷新效果的ListView。所以我們選擇自己重寫原生控件ListView。只需要寫一個類繼承它就可以了,先不添加任何的具體實現。
RefreshListView.java:
public class RefreshListView extends ListView {
	public RefreshListView(Context context) {
		super(context);
		// TODO Auto-generated constructor stub
	}

	public RefreshListView(Context context, AttributeSet attrs) {
		super(context, attrs);
		// TODO Auto-generated constructor stub
	}

	public RefreshListView(Context context, AttributeSet attrs, int defStyle) {
		super(context, attrs, defStyle);
		// TODO Auto-generated constructor stub
	}
}
listview_item.xml:
然後需要我們注意的是,既然我們自己定義了ListView,那我們主界面的布局也要響應地修改了:
activity_main.xml:
可以一眼看出我們修改了它的控件標簽,改為我們自己定義的類的完全路徑。
最後是主角MainActivity.java,裡面的一些代碼我詳細地給了注釋。這裡要注意的是適配器的使用。
public class MainActivity extends Activity {
	private RefreshListView listView;
	private SimpleAdapter simple_adapter;
	private List> list;

	@Override
	protected void onCreate(Bundle savedInstanceState) {
		super.onCreate(savedInstanceState);
		setContentView(R.layout.activity_main);
		listView = (RefreshListView) findViewById(R.id.listview);
		iniData();   //初始化數據,我們給它加20條Item
		// 設置SimpleAdapter監聽器
		/**
		 * SimpleAdapter的五個參數的含義:
		 * 第一個:context上下文
		 * 第二個:用於顯示的數據,map的list
		 * 第三個:Item的布局,即我們自定義的那個文件
		 * 第四個:與第二個參數緊密聯系,與第五個緊密聯系,是在map中的鍵值
		 * 第五個:我們看到是id(int類型)的數組,這個數組裡的東西是哪裡來的?是我們自己在布局文件中定義的,忘記的讀者可以回過頭去看一下
		 * 這幾個參數獨立開來可能不知道是干嗎的,但是我覺得聯合在一起就挺好理解了。
		 */
		simple_adapter = new SimpleAdapter(MainActivity.this, list,
				R.layout.listview_item, new String[] { "image", "text" },
				new int[] { R.id.image, R.id.text });
		//設置適配器
		listView.setAdapter(simple_adapter);

	}

	// 初始化SimpleAdapter數據集
	private List> iniData() {
		list = new ArrayList>();
		for (int i = 0; i < 20; i++) {
			Map map = new HashMap();
			//解釋下這裡的數據,key對應SimpleAdapter的第三個參數,必須都包含它們。值對應第五個參數,分別是圖片和文字
			map.put("text", i);
			map.put("image", R.drawable.ic_launcher);
			list.add(map);
		}

		return list;
	}

	@Override
	public boolean onCreateOptionsMenu(Menu menu) {
		// Inflate the menu; this adds items to the action bar if it is present.
		getMenuInflater().inflate(R.menu.main, menu);
		return true;
	}

}
到了這一步,應該能夠實現圖片+文字的listview了吧,喝口茶,我們繼續看下去。
這裡我們要說一下下拉刷新的實現思路了:
首先,我們平常用到的下拉刷新,都是在下拉後屏幕上方顯示出一些之前被隱藏的控件,類似下拉的箭頭、progress bar等等。
那我們可以直接把它們設置為不可見嗎?顯然是不可以的。因為這些空間的顯示與否,有一個漸變的過程,不是刷一下就出來的。
所以我們應該這樣做:
加入一個隱藏的布局,放在屏幕上方。根據下拉的范圍來顯示響應的控件。
這一步,我們要實現的是加入隱藏的布局,具體怎樣根據下拉的狀態來實時調整Header的顯示狀態,我們在下文細說。
我們為了需要隱藏的header再自定義個新的布局,header.xml:
這個布局中包含了提示語“下拉可以刷新”、最新更新時間、下拉箭頭的圖片(已經預先放在drawable文件夾中了,讀者可以自己找個圖片放進去,命名為pull_to_refresh_arrow.phg)、一個更新時才顯示的progressbar(現在是隱藏的)。
為了把這個布局加到我們定義的List,我們需要改寫之前自定義的RefreshLIstview控件:
public class RefreshListView extends ListView {
	View header;// 頂部布局文件;
	int headerHeight;// 頂部布局文件的高度;
	public RefreshListView(Context context) {
		super(context);
		// TODO Auto-generated constructor stub
		initView(context);
	}

	public RefreshListView(Context context, AttributeSet attrs) {
		super(context, attrs);
		// TODO Auto-generated constructor stub
		initView(context);
	}

	public RefreshListView(Context context, AttributeSet attrs, int defStyle) {
		super(context, attrs, defStyle);
		// TODO Auto-generated constructor stub
		initView(context);
	}

	/**
	 * 初始化界面,添加頂部布局文件到 listview
	 */
	private void initView(Context context) {
		LayoutInflater inflater = LayoutInflater.from(context);
		header = inflater.inflate(R.layout.header, null);
		measureView(header);
		headerHeight = header.getMeasuredHeight();
		Log.i("tag", "headerHeight = " + headerHeight);
		//topPadding(-headerHeight);   //這一行被我注釋了,如果你去除注釋,就可以顯示出來了
		this.addHeaderView(header);
	}

	/**
	 * 通知父布局,占用的寬,高;
	 */
	private void measureView(View view) {
		ViewGroup.LayoutParams p = view.getLayoutParams();
		if (p == null) {
			p = new ViewGroup.LayoutParams(ViewGroup.LayoutParams.MATCH_PARENT,
					ViewGroup.LayoutParams.WRAP_CONTENT);
		}
		int width = ViewGroup.getChildMeasureSpec(0, 0, p.width);
		int height;
		int tempHeight = p.height;
		if (tempHeight > 0) {
			height = MeasureSpec.makeMeasureSpec(tempHeight,
					MeasureSpec.EXACTLY);
		} else {
			height = MeasureSpec.makeMeasureSpec(0, MeasureSpec.UNSPECIFIED);
		}
		view.measure(width, height);
	}

	/**
	 * 設置header布局 上邊距;
	 */
	private void topPadding(int topPadding) {
		header.setPadding(header.getPaddingLeft(), topPadding,
				header.getPaddingRight(), header.getPaddingBottom());
		header.invalidate();
	}
}
如果去除注釋,header就被隱藏。
思路:
添加屏幕觸摸監聽和屏幕滾動監聽。
觸摸監聽尤其重要:
在觸摸時記錄下觸摸坐標的Y值即startY,然後在移動過程中監聽當前的Y值,根據兩者的插值判斷當前的移動距離,與一些臨界值做比較。
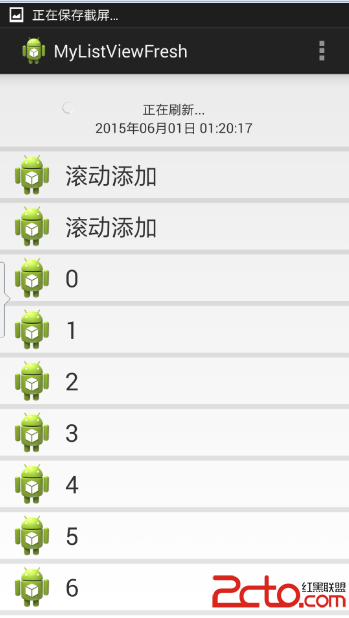
比較之後得出當前的狀態:提示下拉狀態、提示釋放狀態、刷新狀態。根據當前的狀態來刷新header布局的顯示情況。
滾動監聽的作用是判斷當前是否是列表的頂端(通過判斷當前可見的第一個item的position是否為0),以及在之後判斷屏幕的滾動狀態。
另外在自定義的Listview類中定義了一個接口,在mainactivity中實現這個接口,用來對數據進行刷新。我們在刷新的時候用了Handler延遲了兩秒,以清晰地看到刷新的效果。
修改後的MainActivity以及ListView:
ListView: (裡面很多注釋,自己看著應該很好理解)
public class RefreshListView extends ListView implements OnScrollListener {
	View header;// 頂部布局文件;
	int headerHeight;// 頂部布局文件的高度;
	int firstVisibleItem;// 當前第一個可見的item的位置;
	int scrollState;// listview 當前滾動狀態;
	boolean isRemark;// 標記,當前是在listview最頂端摁下的;
	int startY;// 摁下時的Y值;

	int state;// 當前的狀態;
	final int NONE = 0;// 正常狀態;
	final int PULL = 1;// 提示下拉狀態;
	final int RELEASE = 2;// 提示釋放狀態;
	final int REFRESHING = 3;// 刷新狀態;
	IRefreshListener iRefreshListener;//刷新數據的接口
	public RefreshListView(Context context) {
		super(context);
		// TODO Auto-generated constructor stub
		initView(context);
	}

	public RefreshListView(Context context, AttributeSet attrs) {
		super(context, attrs);
		// TODO Auto-generated constructor stub
		initView(context);
	}

	public RefreshListView(Context context, AttributeSet attrs, int defStyle) {
		super(context, attrs, defStyle);
		// TODO Auto-generated constructor stub
		initView(context);
	}

	/**
	 * 初始化界面,添加頂部布局文件到 listview
	 *
	 * @param context
	 */
	private void initView(Context context) {
		LayoutInflater inflater = LayoutInflater.from(context);
		header = inflater.inflate(R.layout.header, null);
		measureView(header);
		headerHeight = header.getMeasuredHeight();
		Log.i("tag", "headerHeight = " + headerHeight);
		topPadding(-headerHeight);
		this.addHeaderView(header);
		this.setOnScrollListener(this);
	}

	/**
	 * 通知父布局,占用的寬,高;
	 *
	 * @param view
	 */
	private void measureView(View view) {
		ViewGroup.LayoutParams p = view.getLayoutParams();
		if (p == null) {
			p = new ViewGroup.LayoutParams(ViewGroup.LayoutParams.MATCH_PARENT,
					ViewGroup.LayoutParams.WRAP_CONTENT);
		}
		int width = ViewGroup.getChildMeasureSpec(0, 0, p.width);
		int height;
		int tempHeight = p.height;
		if (tempHeight > 0) {
			height = MeasureSpec.makeMeasureSpec(tempHeight,
					MeasureSpec.EXACTLY);
		} else {
			height = MeasureSpec.makeMeasureSpec(0, MeasureSpec.UNSPECIFIED);
		}
		view.measure(width, height);
	}

	/**
	 * 設置header 布局 上邊距;
	 *
	 * @param topPadding
	 */
	private void topPadding(int topPadding) {
		header.setPadding(header.getPaddingLeft(), topPadding,
				header.getPaddingRight(), header.getPaddingBottom());
		header.invalidate();
	}

	@Override
	public void onScroll(AbsListView view, int firstVisibleItem,
			int visibleItemCount, int totalItemCount) {
		// TODO Auto-generated method stub
		this.firstVisibleItem = firstVisibleItem;
	}

	@Override
	public void onScrollStateChanged(AbsListView view, int scrollState) {
		// TODO Auto-generated method stub
		this.scrollState = scrollState;
	}

	/**
	 * 對屏幕觸摸的監控,
	 * 先判斷當前是否是在頂端。如果是在最頂端,記錄下你開始滑動的Y值
	 * 然後在滑動過程中(監聽到的是ACTION_MOVE),不斷地判斷當前滑動的范圍是否到達應該刷新的程度。
	 * (根據當前的Y-之前的startY的值 與我們的控件的高度之間關系來判斷)
	 * 然後在監聽到手指松開時,根據當前的狀態(我們在onmove()中計算的),做相應的操作。
	 */
	@Override
	public boolean onTouchEvent(MotionEvent ev) {
		// TODO Auto-generated method stub
		switch (ev.getAction()) {
		case MotionEvent.ACTION_DOWN:
			if (firstVisibleItem == 0) {
				isRemark = true;
				startY = (int) ev.getY();
			}
			break;

		case MotionEvent.ACTION_MOVE:
			onMove(ev);
			break;
		case MotionEvent.ACTION_UP:
			if (state == RELEASE) {
				//即提示松開刷新的狀態,一旦松開,進入到正在刷新;這時候就可以加載數據了!
				state = REFRESHING;
				// 加載最新數據;
				refreshViewByState();
				iRefreshListener.onRefresh();
			} else if (state == PULL) {
				//提示下拉狀態狀態,如果放掉的話,把一切還原,什麼都沒有做
				state = NONE;
				isRemark = false;
				refreshViewByState();
			}
			break;
		}
		return super.onTouchEvent(ev);
	}

	/**
	 * 判斷移動過程操作:
	 * 如果不是頂端,不需要做任何的操作
	 * 否則就獲取當前的Y值,與開始的Y值做比較。
	 * 判斷下拉的高度,與我們定義的一些臨界值做判斷(其實這個臨界值你可以自己定義)
	 *
	 * @param ev
	 */
	private void onMove(MotionEvent ev) {
		if (!isRemark) {
			return;
		}
		int tempY = (int) ev.getY();
		int space = tempY - startY;
		int topPadding = space - headerHeight;
		switch (state) {
		case NONE:
			if (space > 0) {
				state = PULL;  //正在下拉
				refreshViewByState();
			}
			break;
		case PULL:
			topPadding(topPadding);
			//如果大於一定高度,並且滾動狀態是正在滾動時,就到了松開可以刷新的狀態
			if (space > headerHeight + 30
					&& scrollState == SCROLL_STATE_TOUCH_SCROLL) {
				state = RELEASE;
				refreshViewByState();
			}
			break;
		case RELEASE:
			topPadding(topPadding);
			//在提示松開刷新時,如果你往上拖,距離小於一定高度時,提示下拉可以刷新
			if (space < headerHeight + 30) {
				state = PULL;
				refreshViewByState();
			}
			break;
		}
	}

	/**
	 * 根據當前狀態,改變界面顯示;
	 */
	private void refreshViewByState() {
		//如果要提高性能,這些應該在oncreate中寫,但是。。那裡面參數太多了,為了大家讀代碼更舒服,就寫在這裡了。
		TextView tip = (TextView) header.findViewById(R.id.tip);
		ImageView arrow = (ImageView) header.findViewById(R.id.arrow);
		ProgressBar progress = (ProgressBar) header.findViewById(R.id.progress);
		RotateAnimation anim = new RotateAnimation(0, 180,
				RotateAnimation.RELATIVE_TO_SELF, 0.5f,
				RotateAnimation.RELATIVE_TO_SELF, 0.5f);
		anim.setDuration(500);
		anim.setFillAfter(true);
		RotateAnimation anim1 = new RotateAnimation(180, 0,
				RotateAnimation.RELATIVE_TO_SELF, 0.5f,
				RotateAnimation.RELATIVE_TO_SELF, 0.5f);
		anim1.setDuration(500);
		anim1.setFillAfter(true);
		switch (state) {
		case NONE:     //正常狀態不顯示
			arrow.clearAnimation();
			topPadding(-headerHeight);
			break;

		case PULL:     //下拉狀態顯示箭頭,隱藏進度條,以下的狀態也類似。自己根據實際情況去修改。
			arrow.setVisibility(View.VISIBLE);
			progress.setVisibility(View.GONE);
			tip.setText("下拉可以刷新!");
			arrow.clearAnimation();
			arrow.setAnimation(anim1);
			break;
		case RELEASE:
			arrow.setVisibility(View.VISIBLE);
			progress.setVisibility(View.GONE);
			tip.setText("松開可以刷新!");
			arrow.clearAnimation();
			arrow.setAnimation(anim);
			break;
		case REFRESHING:
			topPadding(50);
			arrow.setVisibility(View.GONE);
			progress.setVisibility(View.VISIBLE);
			tip.setText("正在刷新...");
			arrow.clearAnimation();
			break;
		}
	}

	/**
	 * 獲取完數據之後
	 */
	public void refreshComplete() {
		state = NONE;
		isRemark = false;
		refreshViewByState();
		TextView lastupdatetime = (TextView) header
				.findViewById(R.id.lastupdate_time);
		SimpleDateFormat format = new SimpleDateFormat("yyyy年MM月dd日 hh:mm:ss");
		Date date = new Date(System.currentTimeMillis());
		String time = format.format(date);
		lastupdatetime.setText(time);
	}

	public void setInterface(IRefreshListener iRefreshListener){
		this.iRefreshListener = iRefreshListener;
	}

	/**
	 * 刷新數據接口
	 * @author Administrator
	 */
	public interface IRefreshListener{
		public void onRefresh();
	}
}
MainActivity: (添加了接口回調,即在listview中調用main的添加數據的方法)
public class MainActivity extends Activity  implements IRefreshListener {
	private RefreshListView listView;
	private SimpleAdapter simple_adapter;
	private List> list;

	@Override
	protected void onCreate(Bundle savedInstanceState) {
		super.onCreate(savedInstanceState);
		setContentView(R.layout.activity_main);
		listView = (RefreshListView) findViewById(R.id.listview);
		iniData();   //初始化數據,我們給它加20條Item
		// 設置SimpleAdapter監聽器
		/**
		 * SimpleAdapter的五個參數的含義:
		 * 第一個:context上下文
		 * 第二個:用於顯示的數據,map的list
		 * 第三個:Item的布局,即我們自定義的那個文件
		 * 第四個:與第二個參數緊密聯系,與第五個緊密聯系,是在map中的鍵值
		 * 第五個:我們看到是id(int類型)的數組,這個數組裡的東西是哪裡來的?是我們自己在布局文件中定義的,忘記的讀者可以回過頭去看一下
		 * 這幾個參數獨立開來可能不知道是干嗎的,但是我覺得聯合在一起就挺好理解了。
		 */
		simple_adapter = new SimpleAdapter(MainActivity.this, list,
				R.layout.listview_item, new String[] { "image", "text" },
				new int[] { R.id.image, R.id.text });
		//設置適配器
		listView.setAdapter(simple_adapter);
		//設置更新數據的接口
        listView.setInterface(this);
	}

	// 初始化SimpleAdapter數據集
	private List> iniData() {
		list = new ArrayList>();
		for (int i = 0; i < 20; i++) {
			Map map = new HashMap();
			//解釋下這裡的數據,key對應SimpleAdapter的第三個參數,必須都包含它們。值對應第五個參數,分別是圖片和文字
			map.put("text", i);
			map.put("image", R.drawable.ic_launcher);
			list.add(map);
		}

		return list;
	}

	@Override
	public boolean onCreateOptionsMenu(Menu menu) {
		// Inflate the menu; this adds items to the action bar if it is present.
		getMenuInflater().inflate(R.menu.main, menu);
		return true;
	}

	/**
	 * 接口回調,在RefreshListView中可以調用此方法進行數據添加。
	 */
	@Override
	public void onRefresh() {
		// TODO 自動生成的方法存根
		Handler handler = new Handler();
		handler.postDelayed(new Runnable() {
			@Override
			public void run() {
				// TODO Auto-generated method stub
				Map map = new HashMap();
				map.put("text", "滾動添加 ");
				map.put("image", R.drawable.ic_launcher);
				list.add(0, map);
				listView.setAdapter(simple_adapter);
				simple_adapter.notifyDataSetChanged();
				listView.refreshComplete();
			}
		}, 2000);
	}

}
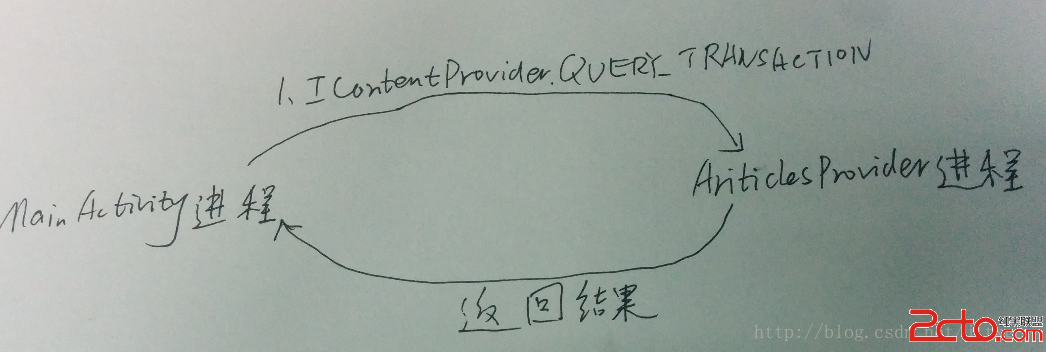 Android Content Provider在應用程序之間共享數據的原理分析
本文參考Android應用程序組件Content Provider在應用程序之間共享數據的原理分析http://blog.csdn.net/luoshengyang/ar
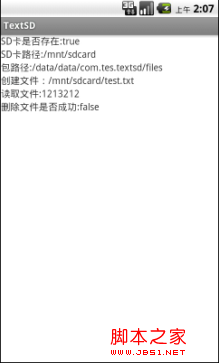 android 手機SD卡讀寫操作(以txt文本為例)實現步驟
1、首先對manifest注冊SD卡讀寫權限 要說明一下,我這裡沒有用MainActivity.class作為軟件入口 復制代碼 代碼如下: AndroidManifes
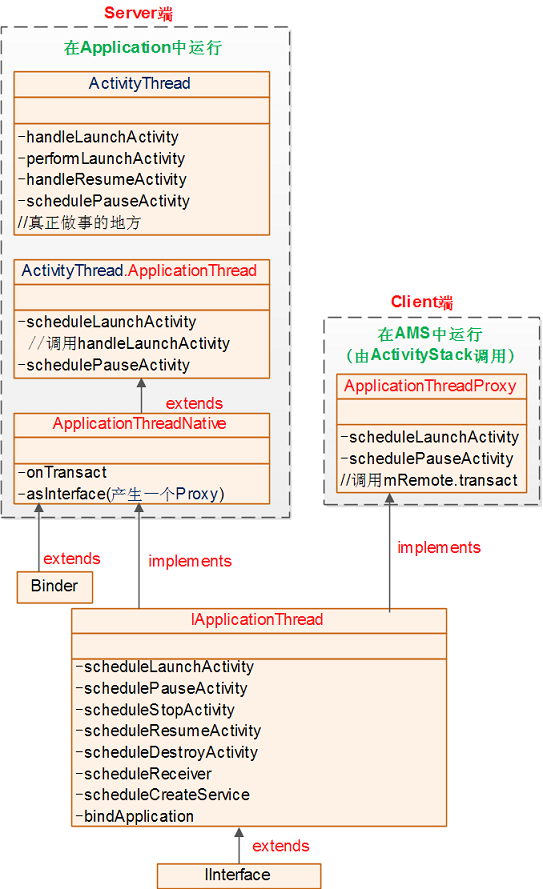 Android 6.0 應用啟動全流程源碼分析
今天是國慶,首先祝大家國慶快樂!漫漫國慶長假,然而我卻只能宅宿捨,但時間總不能這樣白白浪費了,這樣的時候,沒出去浪,那麼,就總結一下前段時間通過Android源碼分析了一
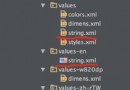 Android app應用多語言切換功能實現
本文實例為大家分享了Android app應用實現多語言切換功能,供大家參考,具體內容如下1.添加多語言文件 在不同的 value 文件夾下(例如 value 、valu