編輯:關於Android編程
通知的主要功能是提示功能。例如:短信、推送信息等等。
大體使用步驟:
1.獲取狀態通知欄管理
NotificationManager 是一個系統Service,所以必須通過 getSystemService(NOTIFICATION_SERVICE)方法來獲取。
notificationManager = (NotificationManager) this
				.getSystemService(NOTIFICATION_SERVICE);
2.實例化通知欄構造器NotificationCompat.Builder
3.設置NotificationCompat.Builder
4.設置PendingIntent
5.顯示
方法或參數介紹:
1.PendingIntent
PendingIntent.getBroadcast(context, requestCode, intent, flags)
PendingIntent.getActivities(context, requestCode, intents, flags)
PendingIntent.getService(context, requestCode, intent, flags)
中的flags屬性參數:
FLAG_ONE_SHOT 表示返回的PendingIntent僅能執行一次,執行完後自動取消
FLAG_NO_CREATE 表示如果描述的PendingIntent不存在,並不創建相應的PendingIntent,而是返回NULL
FLAG_CANCEL_CURRENT 表示相應的PendingIntent已經存在,則取消前者,然後創建新的PendingIntent
FLAG_UPDATE_CURRENT 表示更新的PendingIntent
2.notification.flags參數介紹
Notification.FLAG_SHOW_LIGHTS //三色燈提醒,在使用三色燈提醒時候必須加該標志符
Notification.FLAG_ONGOING_EVENT //發起正在運行事件(活動中)
Notification.FLAG_INSISTENT //讓聲音、振動無限循環,直到用戶響應 (取消或者打開)
Notification.FLAG_ONLY_ALERT_ONCE //發起Notification後,鈴聲和震動均只執行一次
Notification.FLAG_AUTO_CANCEL //用戶單擊通知後自動消失
Notification.FLAG_NO_CLEAR //只有全部清除時,Notification才會清除 ,不清楚該通知(QQ的通知無法清除,就是用的這個)
Notification.FLAG_FOREGROUND_SERVICE //表示正在運行的服務
使用方法:
在設置完屬性後,設置
Notification notification =builder.build();
notification.flags =Notification.FLAG_ONLY_ALERT_ONCE;
3.setVibrate(long[] pattern)
設置震動,需要權限.
4.builder.setOngoing( )
設置為ture,表示它為一個正在進行的通知。簡單的說,當為ture時,不可以被側滑消失。
***************************************************************************************
使用自定義Notification,就要使用RemoteViews。
***************************************************************************************
使用實例:
圖片:

實現代碼:
MainActivity.java
public class MainActivity extends Activity {
Button button, button2;
NotificationManager notificationManager;
public final static String NEWS_LISTEN = "broadcast";
// 用於自定義Notification,點擊事件的驗證
String remoteViewsText = "未點擊";
@Override
public void onCreate(Bundle savedInstanceState) {
super.onCreate(savedInstanceState);
setContentView(R.layout.activity_main);
notificationManager = (NotificationManager) this
.getSystemService(NOTIFICATION_SERVICE);
IntentFilter filter = new IntentFilter();
filter.addAction(NEWS_LISTEN);
this.registerReceiver(broadcastReceiver, filter);
}
public void click(View v) {
switch (v.getId()) {
case R.id.but:// 使用普通的Notification
Notification.Builder builder = new Notification.Builder(
MainActivity.this);
Intent intent = new Intent(MainActivity.this, SecondActivity.class);
PendingIntent pendingIntent = PendingIntent.getActivity(
MainActivity.this, 0, intent,
PendingIntent.FLAG_UPDATE_CURRENT);
builder.setContentIntent(pendingIntent);
builder.setSmallIcon(R.drawable.close);// 設置圖標
builder.setWhen(System.currentTimeMillis());// 設置通知來到的時間
// builder.setAutoCancel(true);
builder.setContentTitle("標題");// 設置通知的標題
builder.setContentText("內容");// 設置通知的內容
builder.setTicker("狀態欄上顯示");// 狀態欄上顯示
builder.setOngoing(true);
/*
* // 設置聲音(手機中的音頻文件) String path =
* Environment.getExternalStorageDirectory() .getAbsolutePath() +
* "/Music/a.mp3"; File file = new File(path);
* builder.setSound(Uri.fromFile(file));
*/
// 獲取Android多媒體庫內的鈴聲
builder.setSound(Uri.withAppendedPath(
Audio.Media.INTERNAL_CONTENT_URI, "5"));
// builder.setVibrate(new long[]{2000,1000,4000}); //需要真機測試
Notification notification = builder.build();
// notification.flags =Notification.FLAG_ONGOING_EVENT;
notificationManager.notify(0, notification);
break;
case R.id.but2:// 使用自定義的Notification
// 3.0之前不支持Button
MyNotification();
break;
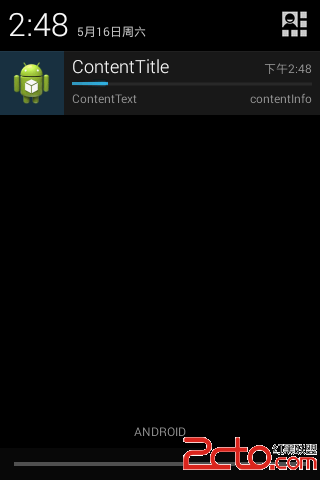
case R.id.but3:// 使用下載的Notification,在4.0以後才能使用
final Notification.Builder builder3 = new Notification.Builder(
MainActivity.this);
builder3.setSmallIcon(R.drawable.ic_launcher)
.setTicker("showProgressBar").setContentInfo("contentInfo")
.setOngoing(true).setContentTitle("ContentTitle")
.setContentText("ContentText");
// 模擬下載過程
new Thread(new Runnable() {
@Override
public void run() {
int progress = 0;
for (progress = 0; progress < 100; progress += 5) {
// 將setProgress的第三個參數設為true即可顯示為無明確進度的進度條樣式
builder3.setProgress(100, progress, false);
notificationManager.notify(0, builder3.build());
try {
Thread.sleep(1 * 1000);
} catch (InterruptedException e) {
System.out.println("sleep failure");
}
}
builder3.setContentTitle("Download complete")
.setProgress(0, 0, false).setOngoing(false);
notificationManager.notify(0, builder3.build());
}
}).start();
break;
case R.id.but4:// 大布局通知在4.1以後才能使用,BigTextStyle
Notification.BigTextStyle textStyle = new Notification.BigTextStyle();
textStyle.setBigContentTitle("大標題")
// 標題
.setSummaryText("SummaryText")
.bigText(
"Big Text!!!!!!!!!!!!!!!!!!!!!!!!!!!!"
+ "!!!!!!!!!!!"
+ "!!!!!!!!!!!!!!!!!!!!!!!!!!!!!!!!!!!!");// 內容
Notification.Builder builder2 = new Notification.Builder(
MainActivity.this);
builder2.setSmallIcon(R.drawable.icon);// 小圖標
// 大圖標
builder2.setLargeIcon(BitmapFactory.decodeResource(
this.getResources(), R.drawable.close));
builder2.setTicker("showBigView_Text")
.setContentInfo("contentInfo");
builder2.setStyle(textStyle);
builder2.setAutoCancel(true);
notificationManager.notify(0, builder2.build());
break;
case R.id.but5://大布局通知在4.1以後才能使用,大布局圖片
Notification.BigPictureStyle bigPictureStyle = new Notification.BigPictureStyle();
bigPictureStyle.bigPicture(BitmapFactory.decodeResource(getResources(), R.drawable.back));
Notification.Builder builder4 = new Notification.Builder(
MainActivity.this);
builder4.setSmallIcon(R.drawable.icon);// 小圖標
// 大圖標
builder4.setLargeIcon(BitmapFactory.decodeResource(
this.getResources(), R.drawable.close));
builder4.setTicker("showBigView_Picture")
.setContentInfo("contentInfo");
builder4.setStyle(bigPictureStyle);
builder4.setAutoCancel(true);
notificationManager.notify(0, builder4.build());
break;
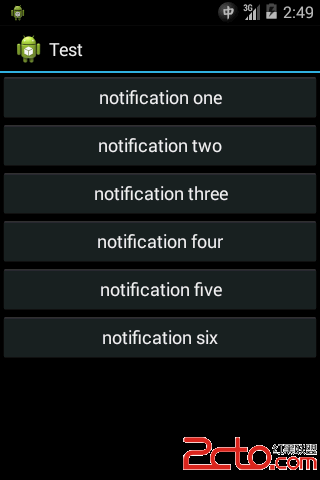
case R.id.but6://大布局通知在4.1以後才能使用,InboxStyle
Notification.InboxStyle inboxStyle = new Notification.InboxStyle();
inboxStyle.setBigContentTitle("InboxStyle");
inboxStyle.setSummaryText("Test");
for(int i =0 ;i<5;i++){
inboxStyle.addLine("new:"+i);
}
Notification.Builder builder5 = new Notification.Builder(
MainActivity.this);
builder5.setSmallIcon(R.drawable.icon);// 小圖標
// 大圖標
builder5.setLargeIcon(BitmapFactory.decodeResource(
this.getResources(), R.drawable.close));
builder5.setTicker("showBigView_InboxStyle")
.setContentInfo("contentInfo");
builder5.setStyle(inboxStyle);
builder5.setAutoCancel(true);
notificationManager.notify(0, builder5.build());
break;
}
}
@Override
protected void onDestroy() {
super.onDestroy();
// 取消廣播接收
this.unregisterReceiver(broadcastReceiver);
}
/**
* 自定義Notification
*/
public void MyNotification() {
RemoteViews remoteViews = new RemoteViews(getPackageName(),
R.layout.form);
remoteViews.setTextViewText(R.id.tv_form, remoteViewsText);
Intent intent2 = new Intent(MainActivity.NEWS_LISTEN);
// 使用廣播,所以INTENT必須用getBroadcast方法
PendingIntent pendingIntent2 = PendingIntent.getBroadcast(
MainActivity.this, 1, intent2,
PendingIntent.FLAG_UPDATE_CURRENT);
// 綁定
remoteViews.setOnClickPendingIntent(R.id.but_form, pendingIntent2);
Notification.Builder builderMain = new Notification.Builder(
MainActivity.this);
builderMain
.setContent(remoteViews)
.setSmallIcon(R.drawable.icon)
.setLargeIcon(
BitmapFactory.decodeResource(this.getResources(),
R.drawable.open)).setOngoing(true)
.setTicker("music is playing");
notificationManager.notify(0, builderMain.build());
}
// 廣播接收器(自定義Notification使用到)
BroadcastReceiver broadcastReceiver = new BroadcastReceiver() {
@Override
public void onReceive(Context c, Intent intent) {
if (intent.getAction().equals(NEWS_LISTEN)) {
remoteViewsText = "已點擊";
MyNotification();
}
}
};
}
activity_main.xml
form.xml(自定義通知的樣式)
SecondActivity.java 只是一個activity。
 Android學習筆記(十二)——使用意圖傳遞數據的幾種方式
使用意圖傳遞數據的幾種方式 點此獲取完整代碼 我們除了要從活動返回數據,也常常要傳遞數據給活動。對此我們可以使用Intent對象將這些數據傳遞給目標活動。
 Android 高仿微信語音聊天頁面高斯模糊(毛玻璃效果)
目前的應用市場上,使用毛玻璃效果的APP隨處可見,比如用過微信語音聊天的人可以發現,語音聊天頁面就使用了高斯模糊效果。先看下效果圖: 仔細觀察上圖,我們可以發現
 java/android 設計模式學習筆記(4)---抽象工廠模式
再來介紹一下抽象工廠模式(Abstact Factory Pattern),也是創建型模式之一。抽象工廠模式和工廠方法模式稍有區別。工廠方法模式中工廠類生產出來的產品都是
 Android自定義賬戶類型和同步適配器模式 Custom Account Type & SyncAdapter
自定義賬戶類型 Custom Account Type當有多個APP共用一個賬號系統的時候,在用戶的Android設備上創建一個自定義賬戶用以處理登錄認證會方便很多,比如