編輯:關於Android編程
總體上Music App分為UI界面、服務兩個模塊,其中關於音樂文件的播放都由服務負責,服務配合AIDL使用的,界面綁定服務後可以拿到服務裡所有參數及狀態進行UI刷新。
A. 界面模塊:
1、主界面MusicMainActivity:
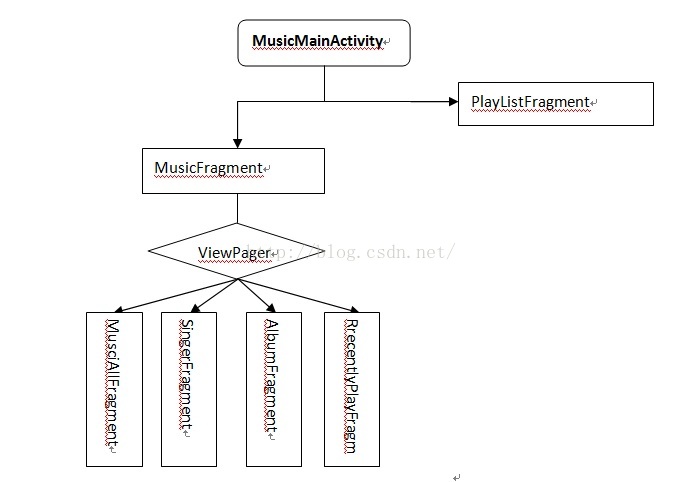
主界面主要負責分類顯示音樂文件,以及對音樂文件的各類操作。
MusciAllFragment:顯示所有單曲。

SingerFragment:根據歌手分類顯示。
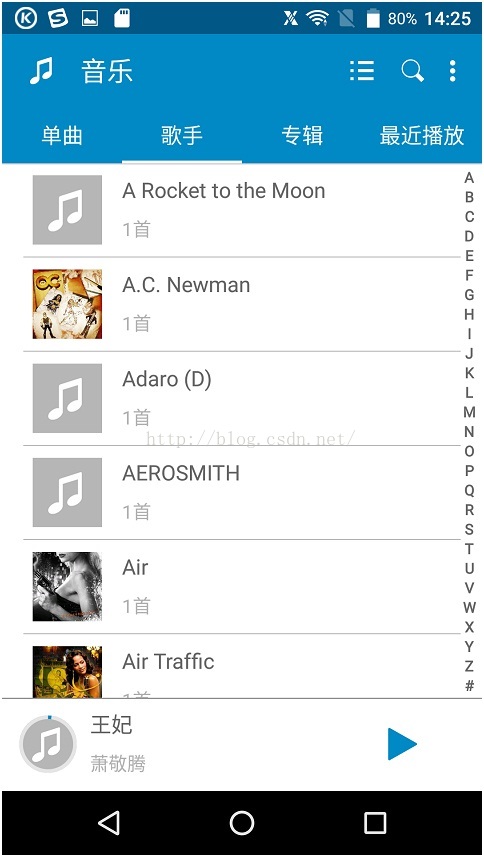
AlbumFragment:根據專輯分類顯示。
RrecentlyPlayFragment:顯示最近播放的歌曲
PlayListFragment:顯示用戶收藏、錄音以及自己創建的播放列表。
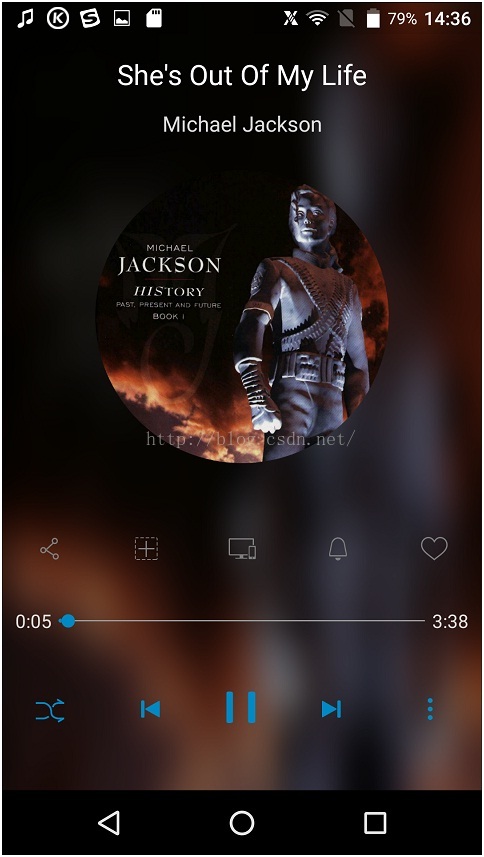
2、音樂播放界面MusicPlayingActivity
主要負責展示具體某一首歌曲的詳細信息以及播放操作等。
3、音樂搜索界面SearchMusicActivity
輸入內容後自動從本地的音樂文件的音樂名,專輯名,歌手名去匹配,匹配後顯示到搜索列表裡。
4、音樂列表界面MusicListActivity
負責顯示播放列表裡的歌曲,跟單曲差不多。
5、編輯界面EditMusicActivity
批量編輯音樂文件,包括刪除和批量添加到播放列表。
6、PlayingFromUriActivity
負責接收外來資源的播放界面,邏輯跟播放界面一樣。
B. 服務模塊:
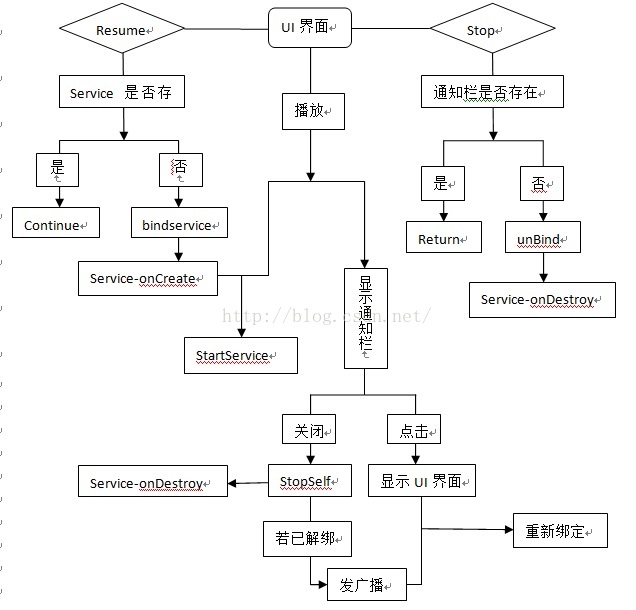
啟動主界面後綁定服務,所有界面在onResume裡根據服務是否存在判斷是否進行綁定,在onStop裡根據通知欄是否存在判斷是否進行解綁(因為很多時候寫在onDestroy裡執行不到解綁服務的,導致服務永生不死,不符合谷歌規范)。由於服務綁定的都是單個Activity,若結束當前綁定的Activity,服務則會自動解綁執行onUnbind方法。
為了讓服務能一直播放音樂…所以調用服務播放音樂時,就會調用startService為當前服務進行續命,並顯示通知欄。所以就算殺掉APP,服務也會繼續後台播放,若關閉通知欄則調用stopSelf殺掉服務。若此時點擊通知欄調出UI播放界面後(此時的服務是之前續命的服務,並沒有綁定任何Activity),再關閉通知欄,則會先stopSelf再發送一個廣播通知當前Activity進行重新綁定服務。
C. 具體實現:
進入界面後首先要做的就是掃描本地所有音樂文件:
String[] paths = new String[] {Environment.getExternalStoragePublicDirectory(

Environment.DIRECTORY_MUSIC).toString()};

// String[] paths = new

// String[]{Environment.getExternalStorageDirectory().toString()};

MediaScannerConnection.scanFile(c,paths, null, new OnScanCompletedListener() {

@Override

publicvoid onScanCompleted(String path, Uri uri) {

ObservableManager.getInstance().setData(Constants.DATA_CHANGE_DELETE_SONGS);

}

});
接著從媒體庫拿各個Fragment的數據,如單曲:
Stringwhere = MediaStore.Audio.Media.IS_MUSIC + "=1";

Cursor cursor = context.getContentResolver().query(MediaStore.Audio.Media.EXTERNAL_CONTENT_URI, null, where,

null, MediaStore.Audio.Media.DEFAULT_SORT_ORDER);
拿到Cursor後轉成你所需要的對象即可展示了:
Listinfos = new ArrayList();

if (cursor == null) {

return infos;

}

while (cursor.moveToNext()) {

MusicInfo info = new MusicInfo();

// 歌曲ID:MediaStore.Audio.Media._ID

long id;

if (type == Constants.TYPE_PLAYLIST) {

id = cursor.getLong(cursor.getColumnIndexOrThrow(MediaStore.Audio.Playlists.Members.AUDIO_ID));

} else {

id = cursor.getLong(cursor.getColumnIndexOrThrow(MediaStore.Audio.Media._ID));

}

String title, artist;

// 歌曲文件的路徑:MediaStore.Audio.Media.DATA

String url = cursor.getString(cursor.getColumnIndexOrThrow(MediaStore.Audio.Media.DATA));

String name = cursor.getString(cursor.getColumnIndexOrThrow(MediaStore.Audio.Media.DISPLAY_NAME));

// 歌曲的名稱:MediaStore.Audio.Media.TITLE

title = cursor.getString(cursor.getColumnIndexOrThrow(MediaStore.Audio.Media.TITLE));

// 歌曲的歌手名: MediaStore.Audio.Media.ARTIST

artist = cursor.getString(cursor.getColumnIndexOrThrow(MediaStore.Audio.Media.ARTIST));

String album = cursor.getString(cursor.getColumnIndexOrThrow(MediaStore.Audio.Media.ALBUM));

// 歌曲的總播放時長:MediaStore.Audio.Media.DURATION

long duration = cursor.getLong(cursor.getColumnIndexOrThrow(MediaStore.Audio.Media.DURATION));

// 歌曲文件的大小:MediaStore.Audio.Media.SIZE

long size = cursor.getLong(cursor.getColumnIndexOrThrow(MediaStore.Audio.Media.SIZE));

long artistsId = cursor.getInt(cursor.getColumnIndexOrThrow(MediaStore.Audio.Media.ARTIST_ID));

long albumId = cursor.getInt(cursor.getColumnIndexOrThrow(MediaStore.Audio.Media.ALBUM_ID));

String displayName = cursor.getString(cursor.getColumnIndexOrThrow(MediaStore.Audio.Media.DISPLAY_NAME));

info.setName(title);

info.setId(id);

info.setPath(url);

info.setArtists(artist);

info.setAlbum(album);

info.setArtistsId(artistsId);

info.setAlbumId(albumId);

info.setSize(size);

info.setDuration(duration);

info.setDisplayName(displayName);

String tag = PingYinUtil.chineneToSpell(title);

if (tag.length() < 1) {

cursor.close();

return infos;

}

char c = tag.toUpperCase().charAt(0);

if (!('A' <= c && c <= 'Z')) {

tag = "#";

}

info.setFirstLetter(String.valueOf(tag.charAt(0)).toUpperCase());

info.setPingYinName(tag);

infos.add(info);

}

cursor.close();
其他的就不一一列出來了。
數據UI都有了,接下來就要開始創建服務准備播放了,先在服務裡封裝好一個播放器並與AIDL關聯好:
private class MultiPlayer {

private MediaPlayer mCurrentMediaPlayer = new MediaPlayer();

private MediaPlayer mNextMediaPlayer;

private Handler mHandler;

private boolean mIsInitialized = false;

public MultiPlayer() {

mCurrentMediaPlayer.setWakeMode(MediaPlaybackService.this, PowerManager.PARTIAL_WAKE_LOCK);

}

public void setDataSource(String path) {

mIsInitialized = setDataSourceImpl(mCurrentMediaPlayer, path);

Log.i(TAG, "setDataSource() mIsInitialized :" + mIsInitialized);

if (mIsInitialized) {

setNextDataSource(null);

}

}

private boolean setDataSourceImpl(MediaPlayer player, String path) {

try {

Log.d(TAG, "setDataSourceImpl() player : " + player + ",path : " + path + ",cursor: " + mCursor);

if (mCursor == null) {

return false;

}

player.reset();

if (path.startsWith("content://")) {

player.setDataSource(MediaPlaybackService.this, Uri.parse(path));

} else {

player.setDataSource(path);

}

player.setAudioStreamType(AudioManager.STREAM_MUSIC);

player.prepare();

Log.i(TAG, "setDataSourceImpl() afterprepare()");

} catch (IOException ex) {

// TODO: notify the user why the file couldn't beopened

return false;

} catch (IllegalArgumentException ex) {

// TODO: notify the user why the file couldn't beopened

return false;

}

player.setOnCompletionListener(listener);

player.setOnErrorListener(errorListener);

player.setOnPreparedListener(new OnPreparedListener() {

@Override

public void onPrepared(MediaPlayer mp) {

// TODO Auto-generated method stub

// mp.start();

}

});

return true;

}

public void setNextDataSource(String path) {

Log.d(TAG, "setNextDataSource() enter path :" + path + ",mNextMediaPlayer : " + mNextMediaPlayer);

if (mNextMediaPlayer != null) {

mNextMediaPlayer.release();

mNextMediaPlayer = null;

mCurrentMediaPlayer.setNextMediaPlayer(null);

}

if (path == null) {

return;

}

mNextMediaPlayer = new MediaPlayer();

mNextMediaPlayer.setWakeMode(MediaPlaybackService.this, PowerManager.PARTIAL_WAKE_LOCK);

mNextMediaPlayer.setAudioSessionId(getAudioSessionId());

if (setDataSourceImpl(mNextMediaPlayer, path)) {

mCurrentMediaPlayer.setNextMediaPlayer(mNextMediaPlayer);

} else {

// failed to open next, we'll transitionthe old fashioned way,

// which will skip over the faulty file

mNextMediaPlayer.release();

mNextMediaPlayer = null;

}

}

public boolean isInitialized() {

return mIsInitialized;

}

public void start() {

MusicUtils.debugLog(new Exception("MultiPlayer.start called"));

mCurrentMediaPlayer.start();

}

public void stop() {

mCurrentMediaPlayer.reset();

mIsInitialized = false;

}

/**

*You CANNOT use this player anymore after calling release()

*/

public void release() {

stop();

mCurrentMediaPlayer.release();

}

public void pause() {

mCurrentMediaPlayer.pause();

}

public void setHandler(Handler handler) {

mHandler = handler;

}

MediaPlayer.OnCompletionListener listener = new MediaPlayer.OnCompletionListener() {

public void onCompletion(MediaPlayer mp) {

Log.d(TAG, "onCompletion : " + (mp == mCurrentMediaPlayer && mNextMediaPlayer != null)

+ ",mRepeatMode : " + mRepeatMode);

if (mRepeatMode != REPEAT_CURRENT && !mCurrentDataIsremove) {

// mCurrentMediaPlayer.release();

setNextTrack();

mCurrentMediaPlayer = mNextMediaPlayer;

mNextMediaPlayer = null;

mHandler.sendEmptyMessage(TRACK_WENT_TO_NEXT);

} else {

mWakeLock.acquire(30000);

mHandler.sendEmptyMessage(TRACK_ENDED);

mHandler.sendEmptyMessage(RELEASE_WAKELOCK);

}

}

};

MediaPlayer.OnErrorListener errorListener = new MediaPlayer.OnErrorListener() {

public boolean onError(MediaPlayer mp, int what, int extra) {

Log.e(TAG, "MediaPlayer.onError() what: " + what + "," + extra);

switch (what) {

case MediaPlayer.MEDIA_ERROR_SERVER_DIED:

return true;

case -38:

if (mPlayList != null && mPlayListLen <= 1) {

MediaPlaybackService.this.stop(true);

stopForeground(true);

}

break;

default:

playSongFail(mp);

break;

}

return true;

}

};
播放之前要先准備好待播放文件:
public boolean open(String path) {

Log.d(TAG, "open() path : " + path);

synchronized (this) {

if (path == null) {

return false;

}

// if mCursor is null, try to associatepath with a database cursor

if (mCursor == null) {

ContentResolver resolver = getContentResolver();

Uri uri;

String where;

String selectionArgs[];

if (path.startsWith("content://media/")) {

uri = Uri.parse(path);

where = null;

selectionArgs = null;

} else {

uri = MediaStore.Audio.Media.getContentUriForPath(path);

where = MediaStore.Audio.Media.DATA + "=?";

selectionArgs = new String[] { path };

}

try {

mCursor = resolver.query(uri, mCursorCols, where, selectionArgs, null);

if (mCursor != null) {

if (mCursor.getCount() == 0) {

mCursor.close();

mCursor = null;

} else {

mCursor.moveToNext();

ensurePlayListCapacity(1);

mPlayListLen = 1;

mPlayList[0] = mCursor.getLong(IDCOLIDX);

mPlayPos = 0;

}

}

} catch (UnsupportedOperationException ex) {

Log.d(TAG, "UnsupportedOperationException");

}

}

mFileToPlay = path;

mPlayer.setDataSource(mFileToPlay);

if (mPlayer.isInitialized()) {

mOpenFailedCounter = 0;

return true;

}

stop(true);

return false;

}

}
到這裡差不多就可以調用mPlayer.start()播放音樂了。
接著再說下Service的綁定跟解綁的事,服務若直接跟applicationContext綁定,你會發現你的服務就算執行onUnbind,但它還是沒死,所以,最好還是選擇跟Activity綁定:
@Override

protected void onResume() {

// TODOAuto-generated method stub

super.onResume();

if (MusicApplication.getmToken() == null && !(BaseActivity.this instanceof MusicMainActivity)) {

MusicApplication.setmToken(MusicUtils.bindToService(this, mServiceConnection));

} else {

new Handler().postDelayed(new Runnable() {

public void run() {

if (MusicApplication.getmToken() == null && !(BaseActivity.this instanceof MusicMainActivity)) {

MusicApplication.setmToken(MusicUtils.bindToService(BaseActivity.this, mServiceConnection));

}

}

}, 400);

}

}

@Override

protected void onStop() {

// TODOAuto-generated method stub

super.onStop();

if (!MusicApplication.isNotifacationExist()&& MusicUtils.sService != null

&& MusicUtils.isApplicationBroughtToBackground(getApplicationContext())){

MusicUtils.unbindFromService(MusicApplication.getmToken());

}

}
但這樣做的唯一缺點就是,只要綁定的Activity結束掉,服務就自動執行了onUnbind。所以只要一播放音樂你可以先彈出通知欄:
private void updateNotification(Context context, Bitmap bitmap) {

Log.d(TAG, "updateNotification");

MusicApplication.setNotifacationExist(true);

RemoteViews views = new RemoteViews(getPackageName(), R.layout.messagecenter_contralbar);

String trackinfo = getTrackName();

String artist = getArtistName();

if (artist == null || artist.equals(MediaStore.UNKNOWN_STRING)) {

artist = getString(R.string.unknown_artist_name);

}

trackinfo += " -" + artist;

views.setTextViewText(R.id.txt_trackinfo, trackinfo);

Intent intent;

PendingIntent pIntent;

intent = new Intent("com.android.music.PLAYBACK_VIEWER");

intent.setPackage(getPackageName());

pIntent = PendingIntent.getActivity(context, 0, intent, 0);

views.setOnClickPendingIntent(R.id.rl_newstatus, pIntent);

intent = new Intent(PREVIOUS_ACTION);

intent.setClass(context, MediaPlaybackService.class);

pIntent = PendingIntent.getService(context, 0, intent, 0);

views.setOnClickPendingIntent(R.id.btn_prev, pIntent);

intent = new Intent(NOTIFICATION_PAUSE_PLAY_ACTION);

intent.setClass(context, MediaPlaybackService.class);

pIntent = PendingIntent.getService(context, 0, intent, 0);

views.setOnClickPendingIntent(R.id.btn_pause, pIntent);

if (isPlaying()) {

views.setImageViewResource(R.id.btn_pause, R.drawable.music_message_stop);

} else {

views.setImageViewResource(R.id.btn_pause, R.drawable.music_message_play);

}

intent = new Intent(NEXT_ACTION);

intent.setClass(context, MediaPlaybackService.class);

pIntent = PendingIntent.getService(context, 0, intent, 0);

views.setOnClickPendingIntent(R.id.btn_next, pIntent);

intent = new Intent(NOTIFICATION_STOP_ACTION);

intent.setClass(context, MediaPlaybackService.class);

pIntent = PendingIntent.getService(context, 0, intent, 0);

views.setOnClickPendingIntent(R.id.btn_close, pIntent);

if (bitmap != null) {

views.setImageViewBitmap(R.id.iv_cover, bitmap);

}

Notification status = new Notification();

status.contentView = views;

status.flags |= Notification.FLAG_ONGOING_EVENT;

status.icon = R.drawable.icon_notify_musicplayer;

status.contentIntent = PendingIntent.getService(context, 0, intent, 0);

startForeground(PLAYBACKSERVICE_STATUS, status);

}
並且調用
startService(new Intent(this, MediaPlaybackService.class));為綁定的服務續命,這樣就算Activity掛掉後,服務照樣能繼續播放音樂,如果你想結束掉續命的服務,就只要調用MediaPlaybackService.this.stopSelf();就好了。這樣服務就不管怎麼樣都會執行onDestroy來釋放資源了。
D.總結
音樂的核心就在於服務,最近遇到的問題基本上都與服務有關。接手之前,服務是永遠存在的,這是不符合谷歌規范的,長時間空閒的服務將使所在進程一直處在B Services(oom_adj=8),進程不容易被殺掉、內存較難及時釋放。所以嘗試著改動。之前的是每個界面都去綁定,為了簡化邏輯及代碼,對整個服務進行了統一(如上圖)。該綁定的時候綁定,該解綁的時候解綁,改釋放的資源及時釋放。由於服務貫穿整個音樂,所以每次改動後必須每個邏輯都要測試一遍,否則就會出現很多BUG了。
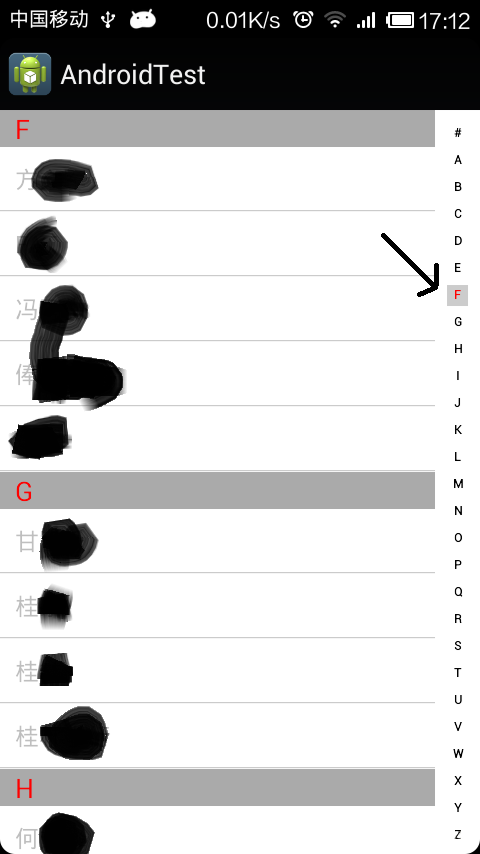 Android實現仿通訊錄側邊欄滑動SiderBar效果代碼
本文實例講述了Android實現仿通訊錄側邊欄滑動SiderBar效果代碼。分享給大家供大家參考,具體如下:之前看到某些應用的側邊欄做得不錯,想想自己也弄一個出來,現在分
 Android 源碼系列之(三)從安全的角度深入理解BroadcastReceiver(下)
在上一篇文章中我們結合實驗講解了有關使用BroadcastReceiver存在的安全性問題並且給出了相應的解決方案,最後一條的解決方案是采用官方v4包中的LocalBro
 Android Notification(通知)
通知基本用法通知的必要屬性一個通知必須包含以下三項屬性:小圖標,對應 setSmallIcon()通知標題,對應 setContentTitle()詳細信息,對應 set
 09_android入門_采用android-async-http開源項目的GET方式或POST方式實現登陸案例
根據08_android入門_android-async-http開源項目介紹及使用方法的介紹,我們通過最常見的登陸案例進行介紹android-async-http開源項