編輯:關於Android編程
我們知道當一個點擊事件產生後,它的傳遞過程遵循如下順序:
Activity——>Window——>View
即事件總是先傳遞給Activity,Activity再傳遞給Window,最後Window再傳遞給頂級View。頂級View接受事件後,就會按照事件分發機制去分發事件。
1、Activity對點擊事件的分發過程
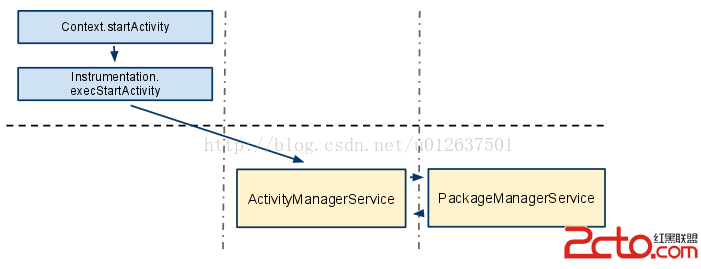
點擊事件用MotionEvent來表示,當一個點擊操作發生時,事件最先傳遞給當前的Activity,由Activity的dispatchTouchEvent方法來進行事件派發,具體的工作是由Activity內部的Window來完成的。window會將事件傳遞給decor view,decor view一般就是當前界面的底層容器(即setContentView所設置的View的父容器)通過Activity.getWindow.getDecorView()可以獲得。先從Activity的dispatchTouchEvent開始分析。
Activity#dispatchTouchEvent
    public boolean dispatchTouchEvent(MotionEvent ev) {
        if (ev.getAction() == MotionEvent.ACTION_DOWN) {
            onUserInteraction();
        }
        if (getWindow().superDispatchTouchEvent(ev)) {
            return true;
        }
        return onTouchEvent(ev);
    }
從上面的源碼可以看出,事件開始交給Activity所附屬的Window進行分發,如果返回true,整個事件循環就結束了,返回false意味著事件沒人處理。也就是說,當所有View的onTouchEvent方法都返回false時,那麼Activity的onTouchEvent方法會被調用。
2、Window點擊事件的分發過程
接下來看Window是如何將事件傳遞給ViewGroup的。通過源碼可以發現Window是個抽象類,而Window的superDispatchTouchEvent方法也是個抽象方法。因此需要找到Window的實現類才可以。
public abstract boolean superDispatchKeyEvent(KeyEvent event);其實Window的實現類是PhoneWindow,從Window類最上面的注釋可以看出來,如下所示,在第二段中,The only existing implementation of this abstract class isandroid.policy.PhoneWindow。
/**
 * Abstract base class for a top-level window look and behavior policy.  An
 * instance of this class should be used as the top-level view added to the
 * window manager. It provides standard UI policies such as a background, title
 * area, default key processing, etc.
 *
 *
The only existing implementation of this abstract class is * android.policy.PhoneWindow, which you should instantiate when needing a * Window. Eventually that class will be refactored and a factory method * added for creating Window instances without knowing about a particular * implementation. */
實際包名為package com.android.internal.policy.impl;其superDispatchKeyEvent方法源碼如下,
PhoneWindow#superDispatchKeyEvent
    @Override
    public boolean superDispatchKeyEvent(KeyEvent event) {
        return mDecor.superDispatchKeyEvent(event);
    }
private final class DecorView extends FrameLayout implements RootViewSurfaceTaker
// This is the top-level view of the window, containing the window decor.
    private DecorView mDecor;
我們知道,通過getWindow().getDecorView()返回的是一個DecorView,而我們通過setContentView設置的View是DecorView的子View,由於DecorView是繼承FramLayout而且是View的父元素,所以點擊事件一定會傳到View。至於怎麼傳遞的,這裡就不深究了。這裡所裡所說的View是通過setContentView設置的View。這個View是頂級View。根View是DecorView。
3、頂級View對點擊事件的分發過程
頂級View一般是一個ViewGroup,當點擊事件到大頂級ViewGroup後,頂級ViewGroup會調用自己的dispatchTouchEvent方法。一級一級往下分發。回顧上一篇博客(對於一個根ViewGroup來說,點擊事件產生後,首先會傳遞給它,這時它的dispaTouchEvent就會被調用,如果這個ViewGroup的onInterceptTouchEvent方法返回true就表示他要攔截當前事件,接著事件就會交給這個ViewGroup處理,即它的onTouchEvent就會被調用,如果這個ViewGroup的onInterceptTouchEvent方法返回false返回false就表示它不攔截這個事件,這時當前事件會繼續傳遞給它的子元素,接著子元素的dispaTouchEvent方法就會被調用,如此反復直到事件被最終處理。)
首先看ViewGroup對點擊事件的分發過程,其主要實現在ViewGroup的dispatchTouchEvent方法中,而這個方法比較長,所以分段說明。先看下面一段。很顯然,它描述的是當前View是否攔截點擊事情這個邏輯。
 	    // Check for interception.
            final boolean intercepted;
            if (actionMasked == MotionEvent.ACTION_DOWN
                    || mFirstTouchTarget != null) {
                final boolean disallowIntercept = (mGroupFlags & FLAG_DISALLOW_INTERCEPT) != 0;
                if (!disallowIntercept) {
                    intercepted = onInterceptTouchEvent(ev);
                    ev.setAction(action); // restore action in case it was changed
                } else {
                    intercepted = false;
                }
            } else {
                // There are no touch targets and this action is not an initial down
                // so this view group continues to intercept touches.
                intercepted = true;
            }
當然有一種特殊情況,即使事件已經被分發下去,在move核up事件,onInterceptTouchEvent還是會被調用,那就是FLAG_DISALLOW_INTERCEPT標志位。這個表示為是通過ViewGroup的requestDisallowInterceptTouchEvent這個方法來設置的。即使事件已經分發下去,子元素仍然可以調用父元素的requestDisallowInterceptTouchEvent方法來置位FLAG_DISALLOW_INTERCEPT標志位,從而從父元素判斷是否攔截事件。但是down事件除外。因為ViewGroup在分發事件時,如果是down事件就會重置FLAG_DISALLOW_INTERCEPT這個標志位,將導致子View中設置的這個標志位無效。而從上面的代碼,也說明了ViewGroup會根據down事件判斷是否攔截事件。
            // Handle an initial down.
            if (actionMasked == MotionEvent.ACTION_DOWN) {
                // Throw away all previous state when starting a new touch gesture.
                // The framework may have dropped the up or cancel event for the previous gesture
                // due to an app switch, ANR, or some other state change.
                cancelAndClearTouchTargets(ev);
                resetTouchState();
            }
		    final int childrenCount = mChildrenCount;
                    if (newTouchTarget == null && childrenCount != 0) {
                        final float x = ev.getX(actionIndex);
                        final float y = ev.getY(actionIndex);
                        // Find a child that can receive the event.
                        // Scan children from front to back.
                        final View[] children = mChildren;

                        final boolean customOrder = isChildrenDrawingOrderEnabled();
                        for (int i = childrenCount - 1; i >= 0; i--) {
                            final int childIndex = customOrder ?
                                    getChildDrawingOrder(childrenCount, i) : i;
                            final View child = children[childIndex];
                            if (!canViewReceivePointerEvents(child)
                                    || !isTransformedTouchPointInView(x, y, child, null)) {
                                continue;
                            }

                            newTouchTarget = getTouchTarget(child);
                            if (newTouchTarget != null) {
                                // Child is already receiving touch within its bounds.
                                // Give it the new pointer in addition to the ones it is handling.
                                newTouchTarget.pointerIdBits |= idBitsToAssign;
                                break;
                            }

                            resetCancelNextUpFlag(child);
                            if (dispatchTransformedTouchEvent(ev, false, child, idBitsToAssign)) {
                                // Child wants to receive touch within its bounds.
                                mLastTouchDownTime = ev.getDownTime();
                                mLastTouchDownIndex = childIndex;
                                mLastTouchDownX = ev.getX();
                                mLastTouchDownY = ev.getY();
                                newTouchTarget = addTouchTarget(child, idBitsToAssign);
                                alreadyDispatchedToNewTouchTarget = true;
                                break;
                            }
                        }
            if (child == null) {
                handled = super.dispatchTouchEvent(event);
            } else {
                handled = child.dispatchTouchEvent(event);
            }
如果子元素的dispatchTouchEvent返回true,表示子元素已經處理完事件,那麼mFirstTouchTarget就會被賦值同時跳出for循環,如下所示:
                                newTouchTarget = addTouchTarget(child, idBitsToAssign);
                                alreadyDispatchedToNewTouchTarget = true;
                                break;
mFirstTouchTarget的賦值在addTouchTarget內部完成,可以看出mFirstTouchTarget是一種單鏈表結構。這裡賦值那麼mFirstTouchTarget != null成立。
    private TouchTarget addTouchTarget(View child, int pointerIdBits) {
        TouchTarget target = TouchTarget.obtain(child, pointerIdBits);
        target.next = mFirstTouchTarget;
        mFirstTouchTarget = target;
        return target;
    }
1)ViewGroup沒有子元素
2)子元素處理了點擊事件,但是dispatchTouchEvent返回false
這是ViewGroup會自己處理點擊事件。
在ViewGroup的dispatchTouchEvent方法中,有下面一段代碼:
            // Dispatch to touch targets.
            if (mFirstTouchTarget == null) {
                // No touch targets so treat this as an ordinary view.
                handled = dispatchTransformedTouchEvent(ev, canceled, null,
                        TouchTarget.ALL_POINTER_IDS);
            }
            if (child == null) {
                handled = super.dispatchTouchEvent(event);
            } else {
                handled = child.dispatchTouchEvent(event);
            }
    public boolean dispatchTouchEvent(MotionEvent event) {
        if (mInputEventConsistencyVerifier != null) {
            mInputEventConsistencyVerifier.onTouchEvent(event, 0);
        }

        if (onFilterTouchEventForSecurity(event)) {
            //noinspection SimplifiableIfStatement
            ListenerInfo li = mListenerInfo;
            if (li != null && li.mOnTouchListener != null && (mViewFlags & ENABLED_MASK) == ENABLED
                    && li.mOnTouchListener.onTouch(this, event)) {
                return true;
            }

            if (onTouchEvent(event)) {
                return true;
            }
        }

        if (mInputEventConsistencyVerifier != null) {
            mInputEventConsistencyVerifier.onUnhandledEvent(event, 0);
        }
        return false;
    }
從上面的源碼可以看出View對點擊事件的處理過程,首先會判斷有沒有設置OnTouchListener,如果OnTouchListener中的onTouch方法返回true,那麼onTouchEvent方法就不會被調用,可以OnTouchListener的優先級要高於onTouchEvent,這樣做的好處是方便子啊外界處理點擊點擊事件。這也證明上一篇博客中的結論。
接著再分析onTouchEvent的實現,方法內容有點長,先看當View處於不可用狀態下點擊事件的處理過程。也就方法一開始。不可用狀態下還是消耗了點擊事件。
        if ((viewFlags & ENABLED_MASK) == DISABLED) {
            if (event.getAction() == MotionEvent.ACTION_UP && (mPrivateFlags & PFLAG_PRESSED) != 0) {
                setPressed(false);
            }
            // A disabled view that is clickable still consumes the touch
            // events, it just doesn't respond to them.
            return (((viewFlags & CLICKABLE) == CLICKABLE ||
                    (viewFlags & LONG_CLICKABLE) == LONG_CLICKABLE));
        }
下面看一下onTouchEvent對點擊事件的具體處理,如下所示。
if (((viewFlags & CLICKABLE) == CLICKABLE ||
                (viewFlags & LONG_CLICKABLE) == LONG_CLICKABLE)) {
            switch (event.getAction()) {
                case MotionEvent.ACTION_UP:
                    boolean prepressed = (mPrivateFlags & PFLAG_PREPRESSED) != 0;
                    if ((mPrivateFlags & PFLAG_PRESSED) != 0 || prepressed) {
                        // take focus if we don't have it already and we should in
                        // touch mode.
                        boolean focusTaken = false;
                        if (isFocusable() && isFocusableInTouchMode() && !isFocused()) {
                            focusTaken = requestFocus();
                        }

                        if (prepressed) {
                            // The button is being released before we actually
                            // showed it as pressed.  Make it show the pressed
                            // state now (before scheduling the click) to ensure
                            // the user sees it.
                            setPressed(true);
                       }

                        if (!mHasPerformedLongPress) {
                            // This is a tap, so remove the longpress check
                            removeLongPressCallback();

                            // Only perform take click actions if we were in the pressed state
                            if (!focusTaken) {
                                // Use a Runnable and post this rather than calling
                                // performClick directly. This lets other visual state
                                // of the view update before click actions start.
                                if (mPerformClick == null) {
                                    mPerformClick = new PerformClick();
                                }
                                if (!post(mPerformClick)) {
                                    performClick();
                                }
                            }
                        }

                        if (mUnsetPressedState == null) {
                            mUnsetPressedState = new UnsetPressedState();
                        }

                        if (prepressed) {
                            postDelayed(mUnsetPressedState,
                                    ViewConfiguration.getPressedStateDuration());
                        } else if (!post(mUnsetPressedState)) {
                            // If the post failed, unpress right now
                            mUnsetPressedState.run();
                        }
                        removeTapCallback();
                    }
                    break;

                case MotionEvent.ACTION_DOWN:
                    mHasPerformedLongPress = false;

                    if (performButtonActionOnTouchDown(event)) {
                        break;
                    }

                    // Walk up the hierarchy to determine if we're inside a scrolling container.
                    boolean isInScrollingContainer = isInScrollingContainer();

                    // For views inside a scrolling container, delay the pressed feedback for
                    // a short period in case this is a scroll.
                    if (isInScrollingContainer) {
                        mPrivateFlags |= PFLAG_PREPRESSED;
                        if (mPendingCheckForTap == null) {
                            mPendingCheckForTap = new CheckForTap();
                        }
                        postDelayed(mPendingCheckForTap, ViewConfiguration.getTapTimeout());
                    } else {
                        // Not inside a scrolling container, so show the feedback right away
                        setPressed(true);
                        checkForLongClick(0);
                    }
                    break;

                case MotionEvent.ACTION_CANCEL:
                    setPressed(false);
                    removeTapCallback();
                    removeLongPressCallback();
                    break;

                case MotionEvent.ACTION_MOVE:
                    final int x = (int) event.getX();
                    final int y = (int) event.getY();

                    // Be lenient about moving outside of buttons
                    if (!pointInView(x, y, mTouchSlop)) {
                        // Outside button
                        removeTapCallback();
                        if ((mPrivateFlags & PFLAG_PRESSED) != 0) {
                            // Remove any future long press/tap checks
                            removeLongPressCallback();

                            setPressed(false);
                        }
                    }
                    break;
            }
            return true;
        }

        return false;
    }
                                if (mPerformClick == null) {
                                    mPerformClick = new PerformClick();
                                }
                                if (!post(mPerformClick)) {
                                    performClick();
                                }
如果View設置OnClickListener,那麼performClick就會調用它的onClick方法。
    public boolean performClick() {
        sendAccessibilityEvent(AccessibilityEvent.TYPE_VIEW_CLICKED);

        ListenerInfo li = mListenerInfo;
        if (li != null && li.mOnClickListener != null) {
            playSoundEffect(SoundEffectConstants.CLICK);
            li.mOnClickListener.onClick(this);
            return true;
        }

        return false;
    }
View的LONG_CLICKABLE屬性默認為false,而CLICKABLE屬性默認為true,不過具體的View的CLICKABLE又不一定,確切來說是可點擊的View其CLICKABLE屬性true,比如Botton,不可點擊的View的CLICKABLE為false,比如TextView。。通過setClickable和setLongClickable可以設置這兩個屬性。另外setOnClickListener和setOnLongClickListener會自動將View的這兩個屬性設為true。這一點從源碼可以看出來。
    public void setOnClickListener(OnClickListener l) {
        if (!isClickable()) {
            setClickable(true);
        }
        getListenerInfo().mOnClickListener = l;
    }
    public void setOnLongClickListener(OnLongClickListener l) {
        if (!isLongClickable()) {
            setLongClickable(true);
        }
        getListenerInfo().mOnLongClickListener = l;
    }
Activity——>PhoneWindow——>DecorView——>ViewGroup——>View
 首頁-底部&頂部Tab導航(菜單欄)的實現:TabLayout+ViewPager+Fragment
前言Android開發中使用頂部 & 底部Tab導航欄的頻次非常高,主要的實現手段有以下:TabWidget 隱藏TabWidget,使用RadioGroup和R
 Android官方文檔之App Components(Fragments)
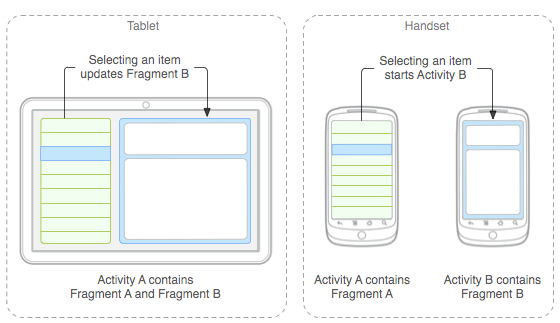
Fragment是Android API中的一個類,它代表Activity中的一部分界面;您可以在一個Activity界面中使用多個Fragment,或者在多個Activ
 夜神安卓模擬器怎麼設置定位 夜神模擬器虛擬定位設置方法
夜神安卓模擬器也是一款非常不錯的安卓模擬器,原生支持多開,這個功能對於許多游戲愛好者來說肯定是非常具有吸引力的,還有很多用戶喜歡開啟定位,下面下載吧小編就來
 自定義標簽布局(流布局)
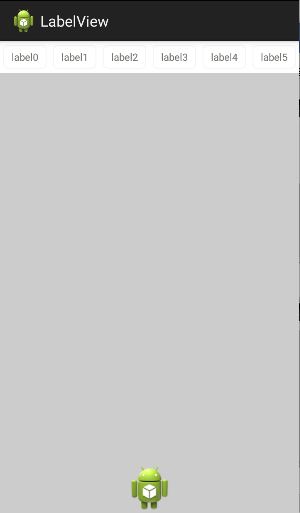
[TOC]剛好項目中要實現這個布局效果,做完後在這裡分享出來給大家學習~效果圖:實現的功能:1、單行多行切換顯示2、單選和取消選擇源碼/** * * @author j