編輯:關於Android編程
若把一些比較耗時的操作(如:下載)寫在Activity(主線程)裡,會導致Activity阻塞,長時間無響應,直至頁面假死(如果5秒鐘還沒有完成的話,會收到Android系統的一個錯誤提示 "強制關閉")。
因此,我們需要把這些耗時的操作放在單獨的子線程中操作,由Handler進行異步處理。
Handler 為Android操作系統中的線程通信工具,它主要由兩個作用:
(1) 安排消息或Runnable 在某個主線程中某個地方執行;
(2) 安排一個動作在另外的線程中執行。
每個Handler對象維護兩個隊列(FIFO),消息隊列和Runnable隊列, Handler可以通過這兩個隊列來分別完成:
(1) 發送、接受、處理消息——消息隊列;(2) 啟動、結束、休眠線程——Runnable隊列;
Handler的使用方法大體分為3個步驟:
1.創建Handler對象。
2.創建Runnable和消息。
3.調用post以及sendMessage方法將Runnable和消息添加到隊列。
三、Runnable隊列
1.java中的線程
在java中,線程的創建有兩種方法:繼承Thread類和實現Runnable接口。而這最重要的都是要復寫run方法來實現線程的功能。當線程的時間片到了,開始運行時,就執行run()函數,執行完畢,就進入死亡狀態。
2.關於Runnable隊列
(1)原理
Android的線程異步處理機制:Handler對象維護一個線程隊列,有新的Runnable送來(post())的時候,把它放在隊尾,而處理 Runnable的時候,從隊頭取出Runnable執行。當向隊列發送一個Runnable後,立即就返回,並不理會Runnable是否被執行,執行 是否成功等。而具體的執行則是當排隊排到該Runnable後系統拿來執行的。
(2)具體操作
向隊列添加線程:
handler.post(Runnable );將Runnable直接添加入隊列
handler.postDelayed(Runnable, long)延遲一定時間後,將Runnable添加入隊列
handler.postAtTime(Runnable,long)定時將Runnable添加入隊列
終止線程:
handler.removeCallbacks(thread);將Runnable從Runnable隊列中取出
(3)例子
【實驗1】
package com.example.testthread1;

import android.app.Activity;
import android.os.Bundle;
import android.os.Handler;
import android.util.Log;
import android.view.Menu;
import android.view.View;
import android.view.View.OnClickListener;
import android.widget.Button;
import android.widget.TextView;

public class MainActivity extends Activity {

	private final String TAG = "ThreadTest";
	private TextView text_view = null;
	private Button start = null;
	private Button end = null;

	// 使用handler時首先要創建一個handler
	Handler handler = new Handler();
	//runnable run()
	Runnable update_thread = new Runnable() {
		public void run() {
			text_view.append("\nUpdateThread...");
			// 延時10s後又將線程加入到線程隊列中
			handler.postDelayed(update_thread, 10000);
			Log.d(TAG, "Current Thread id:----------+>" + Thread.currentThread().getId());

		}
	};

	@Override
	public void onCreate(Bundle savedInstanceState) {
		super.onCreate(savedInstanceState);
		setContentView(R.layout.activity_main);
		Log.d(TAG, "Main Thread id:----------+>" + Thread.currentThread().getId());
		text_view = (TextView) findViewById(R.id.text_view);
		start = (Button) findViewById(R.id.start);
		start.setOnClickListener(new StartClickListener());
		end = (Button) findViewById(R.id.end);
		end.setOnClickListener(new EndClickListener());

	}

	private class StartClickListener implements OnClickListener {
		public void onClick(View v) {
			// handler post runnalbe
			handler.post(update_thread);
		}
	}

	private class EndClickListener implements OnClickListener {
		public void onClick(View v) {
			// 將接口從線程隊列中移除
			handler.removeCallbacks(update_thread);
		}

	}

	@Override
	public boolean onCreateOptionsMenu(Menu menu) {
		getMenuInflater().inflate(R.menu.main, menu);
		return true;
	}
}
實驗結果:
05-28 06:23:12.682: D/ThreadTest(1334): Main Thread id:----------+>1
05-28 06:23:17.911: D/ThreadTest(1334): Current Thread id:----------+>1
05-28 06:23:27.923: D/ThreadTest(1334): Current Thread id:----------+>1
分析:
這個程序看上去似乎實現了Handler的異步機制, handler.post(thread)似乎實現了新啟線程的作用,不過通過執行我們發現,兩個線程的ID相同!也就是說,實際上thread還是原來的主線程,由此可見,handler.post()方法並未真正新建線程,只是在原線程上執行而已。
【實驗2】
package com.example.testthread1;

import android.app.Activity;
import android.os.Bundle;
import android.os.Handler;
import android.util.Log;
import android.view.Menu;
import android.view.View;
import android.view.View.OnClickListener;
import android.widget.Button;
import android.widget.TextView;

public class MainActivity extends Activity {

	private final String TAG = "ThreadTest";
	private TextView text_view = null;
	private Button start = null;
	private Button end = null;

	// 使用handler時首先要創建一個handler
	Handler handler = new Handler();
	//runnable run()
	Runnable update_thread = new Runnable() {
		public void run() {
			text_view.append("\nUpdateThread...");
			// 延時10s後又將線程加入到線程隊列中
			handler.postDelayed(update_thread, 10000);
			Log.d(TAG, "Current Thread id:----------+>" + Thread.currentThread().getId());

		}
	};

	@Override
	public void onCreate(Bundle savedInstanceState) {
		super.onCreate(savedInstanceState);
		setContentView(R.layout.activity_main);
		Log.d(TAG, "Main Thread id:----------+>" + Thread.currentThread().getId());
		text_view = (TextView) findViewById(R.id.text_view);
		start = (Button) findViewById(R.id.start);
		start.setOnClickListener(new StartClickListener());
		end = (Button) findViewById(R.id.end);
		end.setOnClickListener(new EndClickListener());

	}

	private class StartClickListener implements OnClickListener {
		public void onClick(View v) {
			// handler post runnalbe
			//handler.post(update_thread);
			Thread t = new Thread(update_thread);
			t.start();
		}
	}

	private class EndClickListener implements OnClickListener {
		public void onClick(View v) {
			// 將接口從線程隊列中移除
			//handler.removeCallbacks(update_thread);
		}

	}

	@Override
	public boolean onCreateOptionsMenu(Menu menu) {
		getMenuInflater().inflate(R.menu.main, menu);
		return true;
	}
}
05-28 06:28:39.048: E/AndroidRuntime(1396): FATAL EXCEPTION: Thread-152
05-28 06:28:39.048: E/AndroidRuntime(1396): Process: com.example.testthread1, PID: 1396
05-28 06:28:39.048: E/AndroidRuntime(1396): android.view.ViewRootImpl$CalledFromWrongThreadException: Only the original thread that created a view hierarchy can touch its views.
分析:
CalledFromWrongThreadException錯誤。因為android的線程安全機制要求UI函數只能在UI線程中調用。
【實驗3】
package com.example.testthread2;

import android.app.Activity;
import android.os.Bundle;
import android.os.Handler;
import android.util.Log;
import android.view.Menu;
import android.view.MenuItem;

public class MainActivity extends Activity {

	private final String TAG = "Thread Handler";

	private Handler mhandler = new Handler();

	Runnable mRunnable = new Runnable() {
		@Override
		public void run() {
			Log.d(TAG,
					"Thread name is " + Thread.currentThread().getId() + "! id is " + Thread.currentThread().getName());
			try {
				Thread.sleep(10000);
			} catch (InterruptedException e) {
				// TODO Auto-generated catch block
				e.printStackTrace();
			}
		}
	};

	@Override
	protected void onCreate(Bundle savedInstanceState) {
		super.onCreate(savedInstanceState);
		setContentView(R.layout.activity_main);

		Log.d(TAG, "mian thread name is " + Thread.currentThread().getId() + "! id is "
				+ Thread.currentThread().getName());
		// 將Runnable直接添加入runnable隊列
		// mhandler.post(mRunnable);

		Thread t = new Thread(mRunnable);
		t.start();
	}

	@Override
	public boolean onCreateOptionsMenu(Menu menu) {
		// Inflate the menu; this adds items to the action bar if it is present.
		getMenuInflater().inflate(R.menu.main, menu);
		return true;
	}

	@Override
	public boolean onOptionsItemSelected(MenuItem item) {
		// Handle action bar item clicks here. The action bar will
		// automatically handle clicks on the Home/Up button, so long
		// as you specify a parent activity in AndroidManifest.xml.
		int id = item.getItemId();
		if (id == R.id.action_settings) {
			return true;
		}
		return super.onOptionsItemSelected(item);
	}
}
實驗結果:
05-28 02:12:10.809: D/Thread Handler(1518): mian thread name is 1! id is main
05-28 02:12:10.820: D/Thread Handler(1518): Thread name is 157! id is Thread-157
05-28 02:12:11.068: D/gralloc_goldfish(1518): Emulator without GPU emulation detected.
這個程序中,我們就沒有在其他線程中使用UI函數了。通過打印我們可以看到,兩個ID是不同的,新的線程啟動了!
【實驗4】
package com.example.testthread4;

import android.app.Activity;
import android.os.Bundle;
import android.os.Handler;
import android.util.Log;
import android.view.Menu;
import android.view.MenuItem;
import android.view.View;
import android.view.View.OnClickListener;
import android.widget.Button;
import android.widget.TextView;

public class MainActivity extends Activity {

	private final String TAG = "handler post";
	private TextView text_view = null;
	private Button start = null;
	private Button end = null;

	private Handler mhandler = new Handler();

	Runnable updateUI = new Runnable(){
		@Override
		public void run() {
			text_view.append("\nUpdateThread...");
			Log.d(TAG, "updateUI Thread id:----------+>" + Thread.currentThread().getId());
		}

	};

	Runnable thread1 = new Runnable() {
		@Override
		public void run() {
			//這裡添加耗時操作
			Log.d(TAG, "Current Thread1 id:----------+>" + Thread.currentThread().getId());
			mhandler.post(new Runnable() {
				public void run() {
					mhandler.postDelayed(updateUI, 5000);
				}
			});
		}
	};

	@Override
	protected void onCreate(Bundle savedInstanceState) {
		super.onCreate(savedInstanceState);
		setContentView(R.layout.activity_main);
		Log.d(TAG, "Main Thread id:----------+>" + Thread.currentThread().getId());
		text_view = (TextView) findViewById(R.id.text_view);
		start = (Button) findViewById(R.id.start);
		start.setOnClickListener(new StartClickListener());
		end = (Button) findViewById(R.id.end);
		end.setOnClickListener(new EndClickListener());
	}

	private class StartClickListener implements OnClickListener {
		public void onClick(View v) {
			// handler post runnalbe
			// mhandler.post(thread1);
			Thread t = new Thread(thread1);
			t.start();
		}
	}

	private class EndClickListener implements OnClickListener {
		public void onClick(View v) {
			// 將接口從線程隊列中移除
			 mhandler.removeCallbacks(thread1);
		}

	}

	@Override
	public boolean onCreateOptionsMenu(Menu menu) {
		// Inflate the menu; this adds items to the action bar if it is present.
		getMenuInflater().inflate(R.menu.main, menu);
		return true;
	}

	@Override
	public boolean onOptionsItemSelected(MenuItem item) {
		// Handle action bar item clicks here. The action bar will
		// automatically handle clicks on the Home/Up button, so long
		// as you specify a parent activity in AndroidManifest.xml.
		int id = item.getItemId();
		if (id == R.id.action_settings) {
			return true;
		}
		return super.onOptionsItemSelected(item);
	}
}
實驗結果:
05-28 09:19:14.932: D/handler post(1164): Main Thread id:----------+>1
05-28 09:19:15.198: D/gralloc_goldfish(1164): Emulator without GPU emulation detected.
05-28 09:19:20.874: D/handler post(1164): Current Thread1 id:----------+>137
05-28 09:19:26.010: D/handler post(1164): updateUI Thread id:----------+>1
分析:
這個程序裡,定義了兩個runnable,所以,應該有三個線程,但是可看到只有有兩個線程,原因是:一個線程將UI操作的函數post到UI線程裡去執行。
四.、消息隊列
1.消息對象
(1)Message對象
Message對象攜帶數據,通常它用arg1,arg2來傳遞消息,當然它還可以有obj參數,可以攜帶Bundle數據。它的特點是系統性能消耗非常少。
初始化: Message msg=handler.obtainMessage();
(2)Bundle對象
Bundle是Android提供的類,可以把它看做是特殊的Map,即鍵值對的包。而它特殊在鍵和值都必須要是基本數據類型或是基本數據類型的數組(Map的鍵值要求都是對象),特別的,鍵要求都是String類型。用Message來攜帶Bundle數據:
放入:msg.setData(Bundle bundle);
取出:msg.getData();
2.關於消息隊列
(1)原理
Android的消息異步處理機制:Handler對象維護一個消息隊列,有新的消息送來(sendMessage())的時候,把它放在隊尾,之後排隊 到處理該消息的時候,由主線程的Handler對象處理(handleMessage())。整個過程也是異步的,和Runnable隊列的原理相同。
(2)具體操作:
向隊列添加Runnable:handler.sendMessage(Message);
將消息發送到消息隊列msg.sendToTarget();
延遲一定時間後,將消息發送到消息隊列 handler.sendMessageDelayed(Message,long);
定時將消息發送到消息隊列 handler.sendMessageAtTime(Message,long)
處理消息:
消息的具體處理過程,需要在new Handler對象時使用匿名內部類重寫Handler的handleMessage(Message msg)方法。
3、例子——使用主線程的looper
package com.example.testthreadmessage;

import android.app.Activity;
import android.os.Bundle;
import android.os.Handler;
import android.os.Message;
import android.util.Log;
import android.view.Menu;
import android.view.MenuItem;
import android.view.View;
import android.view.View.OnClickListener;
import android.widget.Button;
import android.widget.ProgressBar;

public class MainActivity extends Activity {

	private Button mbutton = null;
	private ProgressBar mProgressBar = null;
	private final String TAG = "handleMessage";

	// 創建一個handler,內部完成處理消息方法
	Handler handlerProgressBar = new Handler() {
		@Override
		public void handleMessage(Message msg) {
			// 顯示進度條
			mProgressBar.setProgress(msg.arg1);
			// 重新把進程加入到進程隊列中
			handlerProgressBar.post(updateThread);
		}
	};

	Runnable updateThread = new Runnable() {
		int i = 0;

		public void run() {
			i += 10;
			// 首先獲得一個消息結構
			Message msg = handlerProgressBar.obtainMessage();
			// 給消息結構的arg1參數賦值
			msg.arg1 = i;
			// 延時1s,java中的try+catch用來排錯處理
			try {
				Thread.sleep(1000);
			} catch (InterruptedException e) {
				// TODO: handle exception
				e.printStackTrace();
			}
			// 把消息發送到消息隊列中

			handlerProgressBar.sendMessage(msg);
			if (i == 100)
				// 把線程從線程隊列中移除
				Log.d(TAG, "thread is " + Thread.currentThread().getName() + " " + Thread.currentThread().getId());
				handlerProgressBar.removeCallbacks(updateThread);
		}
	};

	@Override
	protected void onCreate(Bundle savedInstanceState) {
		super.onCreate(savedInstanceState);
		setContentView(R.layout.activity_main);

		mProgressBar = (ProgressBar) findViewById(R.id.progress_bar);
		mbutton = (Button) findViewById(R.id.start);

		mbutton.setOnClickListener(new StartOnClickListenr());
	}

	private class StartOnClickListenr implements OnClickListener {
		@Override
		public void onClick(View v) {
			// 讓進度條顯示出來
			mProgressBar.setVisibility(View.VISIBLE);
			// 將線程加入到handler的線程隊列中
			handlerProgressBar.post(updateThread);
			Log.d(TAG, "thread is " + Thread.currentThread().getName() + " " + Thread.currentThread().getId());
		}
	}

	@Override
	public boolean onCreateOptionsMenu(Menu menu) {
		// Inflate the menu; this adds items to the action bar if it is present.
		getMenuInflater().inflate(R.menu.main, menu);
		return true;
	}

	@Override
	public boolean onOptionsItemSelected(MenuItem item) {
		// Handle action bar item clicks here. The action bar will
		// automatically handle clicks on the Home/Up button, so long
		// as you specify a parent activity in AndroidManifest.xml.
		int id = item.getItemId();
		if (id == R.id.action_settings) {
			return true;
		}
		return super.onOptionsItemSelected(item);
	}
}
實驗結果:
05-28 05:48:38.041: D/handleMessage(1023): thread is main 1
05-28 05:48:50.620: D/handleMessage(1023): thread is main 1
05-28 05:49:24.961: I/Choreographer(1023): Skipped 113 frames! The application may be doing too much work on its main thread.
五、Looper
Looper類用來為線程開啟一個消息循環,作用是可以循環的從消息隊列讀取消息,所以Looper實際上就是消息隊列+消息循環的封裝。每個線程只能對應一個Looper,除主線程外,Android中的線程默認是沒有開啟Looper的。
通過Handler與Looper交互,Handler可以看做是Looper的接口,用來向指定的Looper發送消息以及定義處理方法。默認情況下Handler會與其所在線程的Looper綁定,即:
Handler handler=new Handler();等價於Handler handler=new Handler(Looper.myLooper());
Looper有兩個主要方法:
Looper.prepare();啟用Looper
Looper.loop(); 讓Looper開始工作,從消息隊列裡取消息,處理消息。
注意:寫在Looper.loop()之後的代碼不會被執行,這個函數內部應該是一個循環,當調用mHandler.getLooper().quit()後,loop才會中止,其後的代碼才能得以運行。
六、HandlerThread
通過HandlerThread 創建一個封裝好Looper的線程。
實驗:
package com.example.testthread3;

import android.app.Activity;
import android.os.Bundle;
import android.os.Handler;
import android.os.HandlerThread;
import android.os.Looper;
import android.os.Message;
import android.util.Log;
import android.view.Menu;
import android.view.MenuItem;

public class MainActivity extends Activity {

	private final String TAG = "HandlerThread ";

	class myHandler extends Handler {
		public myHandler() {
		}

		public myHandler(Looper looper) {
			super(looper);
		}

		@Override
		public void handleMessage(Message msg) {
			// TODO Auto-generated method stub
			Log.d(TAG, "Thread:" + Thread.currentThread().getId());
			// 將消息中的bundle數據取出來
			Bundle b = msg.getData();
			String whether = b.getString("whether");
			int temperature = b.getInt("temperature");
			Log.d(TAG, "whether= " + whether + " ,temperature= " + temperature);
		}
	}

	@Override
	protected void onCreate(Bundle savedInstanceState) {
		super.onCreate(savedInstanceState);
		setContentView(R.layout.activity_main);
		Log.d(TAG, "Thread:" + Thread.currentThread().getId());
		// 創建一個名叫handler_hread的HandlerThread 對象
		HandlerThread handlerThread = new HandlerThread("handler_hread");

		// 開啟handlerThread,在使用handlerThread.getLooper()之前必須先調用start方法,否則取出的是空
		handlerThread.start();

		// 將handler綁定在handlerThread的Looper上,即這個handler是運行在handlerThread線程中的
		myHandler handler = new myHandler(handlerThread.getLooper());

		Message msg = handler.obtainMessage();

		Bundle b = new Bundle();
		b.putString("whether", "晴天");
		b.putInt("temperature", 34);
		msg.setData(b);
		// 將msg發送到自己的handler中,這裡指的是my_handler,調用該handler的HandleMessage方法來處理該mug
		msg.sendToTarget();
	}

	@Override
	public boolean onCreateOptionsMenu(Menu menu) {
		// Inflate the menu; this adds items to the action bar if it is present.
		getMenuInflater().inflate(R.menu.main, menu);
		return true;
	}

	@Override
	public boolean onOptionsItemSelected(MenuItem item) {
		// Handle action bar item clicks here. The action bar will
		// automatically handle clicks on the Home/Up button, so long
		// as you specify a parent activity in AndroidManifest.xml.
		int id = item.getItemId();
		if (id == R.id.action_settings) {
			return true;
		}
		return super.onOptionsItemSelected(item);
	}
}
實驗結果:
05-28 05:59:27.201: D/HandlerThread(1390): Thread:1
05-28 05:59:27.317: D/HandlerThread(1390): Thread:152
05-28 05:59:27.318: D/HandlerThread(1390): whether= 晴天 ,temperature= 34
05-28 05:59:27.688: D/gralloc_goldfish(1390): Emulator without GPU emulation detected.
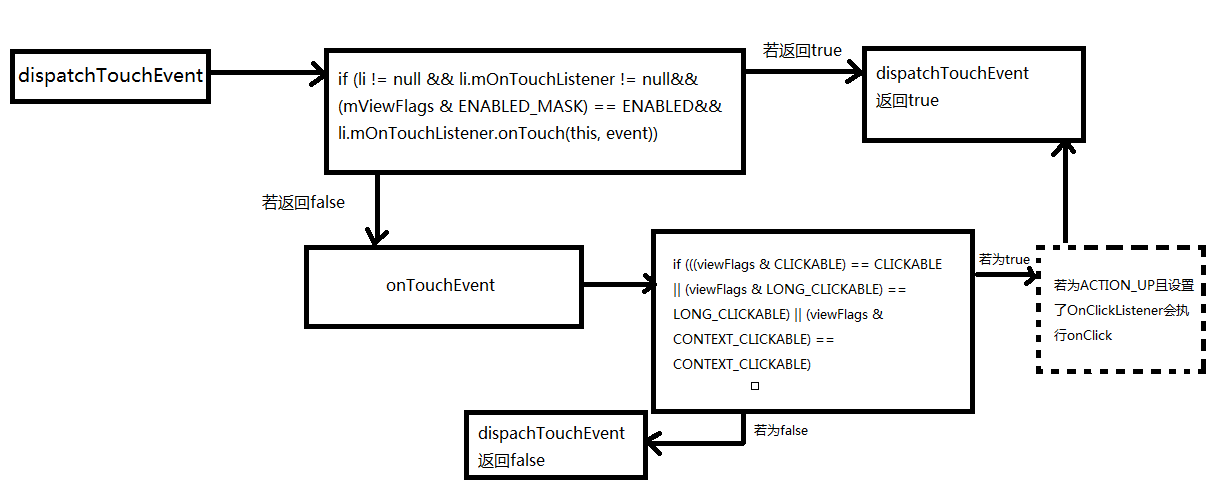 詳細分析Android中onTouch事件傳遞機制
onTach介紹ontach是Android系統中整個事件機制的基礎。Android中的其他事件,如onClick、onLongClick等都是以onTach為基礎的。o
 Android RecyclerView上拉加載更多功能回彈實現代碼
實現原理是使用RecyclerView的OnTouchListener方法監聽滑動 在adapter裡面增加兩項footview 其中date.size為顯示的加載條,可
 紅米pro和樂視2pro哪個好 樂視2pro和紅米pro對比
紅米pro於昨日剛剛與大家見面,對於這款售價為1499的高端紅米手機,很多人將它與樂視2pro進行對比,那麼到底紅米pro和樂視2pro哪個好呢?相信很多用
 Android百度地圖自定義公交路線導航
一、問題描述基於百度地圖實現檢索指定城市指定公交的交通路線圖,效果如圖所示二、通用組件Application類,主要創建並初始化BMapManagerpublic cla