編輯:關於Android編程
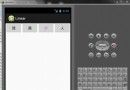
先看看效果圖:

開源項地址:https://github.com/chrisbanes/Android-PullToRefresh
下拉刷新這個功能我們都比較常見了,今天介紹的就是這個功能的實現。我將按照這個開源庫的范例來一點一點介紹,今天是介紹比較常見的PullToRefreshListView,是讓listView有下拉刷新功能。
1.下載項目包,將library包導入即可,其他的包暫時不用
2.分析源碼,看我們可以設置的有哪些
<?xml version="1.0" encoding="utf-8"?>
<resources>

 <declare-styleable name="PullToRefresh">

 <!-- A drawable to use as the background of the Refreshable View -->
 <!-- 設置刷新view的背景 -->
 <attr name="ptrRefreshableViewBackground" format="reference|color" />

 <!-- A drawable to use as the background of the Header and Footer Loading Views -->
 <!-- 設置頭部view的背景 -->
 <attr name="ptrHeaderBackground" format="reference|color" />

 <!-- Text Color of the Header and Footer Loading Views -->
 <!-- 設置頭部/底部文字的顏色 -->
 <attr name="ptrHeaderTextColor" format="reference|color" />

 <!-- Text Color of the Header and Footer Loading Views Sub Header -->
 <!-- 設置頭部/底部副標題的文字顏色 -->
 <attr name="ptrHeaderSubTextColor" format="reference|color" />

 <!-- Mode of Pull-to-Refresh that should be used -->
 <!-- 設置下拉刷新的模式,有多重方式可選。無刷新功能,從頂部刷新,從底部刷新,二者都有,只允許手動刷新 -->
 <attr name="ptrMode">
  <flag name="disabled" value="0x0" />
  <flag name="pullFromStart" value="0x1" />
  <flag name="pullFromEnd" value="0x2" />
  <flag name="both" value="0x3" />
  <flag name="manualOnly" value="0x4" />

  <!-- These last two are depreacted -->
  <!-- 這兩個屬性不推薦了,用上面的代替即可 -->
  <flag name="pullDownFromTop" value="0x1" />
  <flag name="pullUpFromBottom" value="0x2" />
 </attr>

 <!-- Whether the Indicator overlay(s) should be used -->
 <!-- 是否顯示指示箭頭 -->
 <attr name="ptrShowIndicator" format="reference|boolean" />

 <!-- Drawable to use as Loading Indicator. Changes both Header and Footer. -->
 <!-- 指示箭頭的圖片 -->
 <attr name="ptrDrawable" format="reference" />

 <!-- Drawable to use as Loading Indicator in the Header View. Overrides value set in ptrDrawable. -->
 <!-- 頂部指示箭頭的圖片,設置後會覆蓋ptrDrawable中頂部的設置 -->
 <attr name="ptrDrawableStart" format="reference" />

 <!-- Drawable to use as Loading Indicator in the Fooer View. Overrides value set in ptrDrawable. -->
 <!-- 底部指示箭頭的圖片,設置後會覆蓋ptrDrawable中底部的設置 -->
 <attr name="ptrDrawableEnd" format="reference" />

 <!-- Whether Android's built-in Over Scroll should be utilised for Pull-to-Refresh. -->
 <attr name="ptrOverScroll" format="reference|boolean" />

 <!-- Base text color, typeface, size, and style for Header and Footer Loading Views -->
 <!-- 設置文字的基本字體 -->
 <attr name="ptrHeaderTextAppearance" format="reference" />

 <!-- Base text color, typeface, size, and style for Header and Footer Loading Views Sub Header -->
 <!-- 設置副標題的基本字體 -->
 <attr name="ptrSubHeaderTextAppearance" format="reference" />

 <!-- Style of Animation should be used displayed when pulling. -->
 <!-- 設置下拉時標識圖的動畫,默認為rotate -->
 <attr name="ptrAnimationStyle">
  <flag name="rotate" value="0x0" />
  <flag name="flip" value="0x1" />
 </attr>

 <!-- Whether the user can scroll while the View is Refreshing -->
 <!-- 設置刷新時是否允許滾動,一般為true -->
 <attr name="ptrScrollingWhileRefreshingEnabled" format="reference|boolean" />

 <!--
  Whether PullToRefreshListView has it's extras enabled. This allows the user to be
  able to scroll while refreshing, and behaves better. It acheives this by adding
  Header and/or Footer Views to the ListView.
 -->
 <!-- 允許在listview中添加頭/尾視圖 -->
 <attr name="ptrListViewExtrasEnabled" format="reference|boolean" />

 <!--
  Whether the Drawable should be continually rotated as you pull. This only
  takes effect when using the 'Rotate' Animation Style.
 -->
 <!-- 當設置rotate時,可以用這個來設置刷新時旋轉的圖片 -->
 <attr name="ptrRotateDrawableWhilePulling" format="reference|boolean" />

 <!-- BELOW HERE ARE DEPRECEATED. DO NOT USE. -->
 <attr name="ptrAdapterViewBackground" format="reference|color" />
 <attr name="ptrDrawableTop" format="reference" />
 <attr name="ptrDrawableBottom" format="reference" />
 </declare-styleable>

</resources>
看到有這麼多可以設置的屬性,別以為真的就可以定制了。真正要定制還得到layout中改變刷新布局

3.開始用它建立自己的工程
設置布局文件
就是插入PullToRefreshListView
<RelativeLayout xmlns:android="http://schemas.android.com/apk/res/android"
 xmlns:tools="http://schemas.android.com/tools"
 android:layout_width="match_parent"
 android:layout_height="match_parent"
 tools:context="${relativePackage}.${activityClass}"
 android:background="#000000">

<!-- The PullToRefreshListView replaces a standard ListView widget. -->

 <com.handmark.pulltorefresh.library.PullToRefreshListView
 xmlns:ptr="http://schemas.android.com/apk/res-auto"
 android:id="@+id/pull_refresh_list"
 android:layout_width="fill_parent"
 android:layout_height="fill_parent"
 android:cacheColorHint="#000000"
 android:divider="#19000000"
 android:dividerHeight="4dp"
 android:fadingEdge="none"
 android:fastScrollEnabled="false"
 android:footerDividersEnabled="false"
 android:headerDividersEnabled="false"
 android:smoothScrollbar="true"
 ptr:ptrAnimation
 ptr:ptrHeaderTextColor="#ffffff"
 ptr:ptrHeaderSubTextColor="#00ffff"
 ptr:ptrHeaderBackground="@null"
 ptr:ptrDrawable="@drawable/ic_launcher"/>

</RelativeLayout>
開始編寫代碼
1.找到這個控件,並且設置監聽器
這裡面用到了一個日期的工具類,其實就是設置上次下拉的時間的。此外在下拉後會觸發一個異步任務
 /**
 * 設置下拉刷新的listview的動作
 */
 private void initPTRListView() {
 mPullRefreshListView = (PullToRefreshListView) findViewById(R.id.pull_refresh_list);
 //設置拉動監聽器
 mPullRefreshListView.setOnRefreshListener(new OnRefreshListener<ListView>() {

  @Override
  public void onRefresh(PullToRefreshBase<ListView> refreshView) {
  //設置下拉時顯示的日期和時間
  String label = DateUtils.formatDateTime(getApplicationContext(), System.currentTimeMillis(),
   DateUtils.FORMAT_SHOW_TIME | DateUtils.FORMAT_SHOW_DATE | DateUtils.FORMAT_ABBREV_ALL);

  // 更新顯示的label
  refreshView.getLoadingLayoutProxy().setLastUpdatedLabel(label);
  // 開始執行異步任務,傳入適配器來進行數據改變
  new GetDataTask(mPullRefreshListView, mAdapter,mListItems).execute();
  }
 });

 // 添加滑動到底部的監聽器
 mPullRefreshListView.setOnLastItemVisibleListener(new OnLastItemVisibleListener() {

  @Override
  public void onLastItemVisible() {
  Toast.makeText(getApplication(), "已經到底了", Toast.LENGTH_SHORT).show();
  }
 });

 //mPullRefreshListView.isScrollingWhileRefreshingEnabled();//看刷新時是否允許滑動
 //在刷新時允許繼續滑動
 mPullRefreshListView.setScrollingWhileRefreshingEnabled(true);
 //mPullRefreshListView.getMode();//得到模式
 //上下都可以刷新的模式。這裡有兩個選擇:Mode.PULL_FROM_START,Mode.BOTH,PULL_FROM_END
 mPullRefreshListView.setMode(Mode.BOTH);

 /**
  * 設置反饋音效
  */
 SoundPullEventListener<ListView> soundListener = new SoundPullEventListener<ListView>(this);
 soundListener.addSoundEvent(State.PULL_TO_REFRESH, R.raw.pull_event);
 soundListener.addSoundEvent(State.RESET, R.raw.reset_sound);
 soundListener.addSoundEvent(State.REFRESHING, R.raw.refreshing_sound);
 mPullRefreshListView.setOnPullEventListener(soundListener);
 }
2.從上面的那個控件中,得到它包含的listView,並且設置適配器
 //普通的listview對象
 private ListView actualListView;
 //添加一個鏈表數組,來存放string數組,這樣就可以動態增加string數組中的內容了
 private LinkedList<String> mListItems;
 //給listview添加一個普通的適配器
 private ArrayAdapter<String> mAdapter;
這裡用到了一個LinkedList的對象,這個是一個類似於ArrayList的鏈表數組,比較方便在開頭和末尾添加String
 /**
 * 設置listview的適配器
 */
 private void initListView() {
 //通過getRefreshableView()來得到一個listview對象
 actualListView = mPullRefreshListView.getRefreshableView();

 String []data = new String[] {"android","ios","wp","java","c++","c#"};
 mListItems = new LinkedList<String>();
 //把string數組中的string添加到鏈表中
 mListItems.addAll(Arrays.asList(data));

 mAdapter = new ArrayAdapter<>(getApplicationContext(),
  android.R.layout.simple_list_item_1, mListItems);
 actualListView.setAdapter(mAdapter);
 }
3.寫一個異步任務,來模仿從網絡加載數據
這裡要注意的是,加載完後要出發刷新完成和通知適配器改變的方法
package com.kale.ptrlistviewtest;

import java.util.LinkedList;

import android.os.AsyncTask;
import android.widget.ArrayAdapter;

import com.handmark.pulltorefresh.library.PullToRefreshListView;
import com.handmark.pulltorefresh.library.PullToRefreshBase.Mode;

/**
 * @author:Jack Tony
 * @tips :通過異步任務來加載網絡中的數據,進行更新
 * @date :2014-10-14
 */
public class GetDataTask extends AsyncTask<Void, Void, Void>{

 private PullToRefreshListView mPullRefreshListView;
 private ArrayAdapter<String> mAdapter;
 private LinkedList<String> mListItems;

 public GetDataTask(PullToRefreshListView listView,
  ArrayAdapter<String> adapter,LinkedList<String> listItems) {
 // TODO 自動生成的構造函數存根
 mPullRefreshListView = listView;
 mAdapter = adapter;
 mListItems = listItems;
 }

 @Override
 protected Void doInBackground(Void... params) {
 //模擬請求
 try {
  Thread.sleep(2000);
 } catch (InterruptedException e) {
 }
 return null;
 }

 @Override
 protected void onPostExecute(Void result) {
 // TODO 自動生成的方法存根
 super.onPostExecute(result);
 //得到當前的模式
 Mode mode = mPullRefreshListView.getCurrentMode();
 if(mode == Mode.PULL_FROM_START) {
  mListItems.addFirst("這是刷新出來的數據");
 }
 else {
  mListItems.addLast("這是刷新出來的數據");
 }
 // 通知數據改變了
 mAdapter.notifyDataSetChanged();
 // 加載完成後停止刷新
 mPullRefreshListView.onRefreshComplete();

 }


}
貼上acitivty中的全部代碼
MainActivity.java
package com.kale.ptrlistviewtest;

import java.util.Arrays;
import java.util.LinkedList;

import android.app.Activity;
import android.os.Bundle;
import android.text.format.DateUtils;
import android.widget.ArrayAdapter;
import android.widget.ListView;
import android.widget.Toast;

import com.handmark.pulltorefresh.library.PullToRefreshBase;
import com.handmark.pulltorefresh.library.PullToRefreshBase.Mode;
import com.handmark.pulltorefresh.library.PullToRefreshBase.OnLastItemVisibleListener;
import com.handmark.pulltorefresh.library.PullToRefreshBase.OnRefreshListener;
import com.handmark.pulltorefresh.library.PullToRefreshBase.State;
import com.handmark.pulltorefresh.library.PullToRefreshListView;
import com.handmark.pulltorefresh.library.extras.SoundPullEventListener;

public class MainActivity extends Activity {

 //一個可以下拉刷新的listView對象
 private PullToRefreshListView mPullRefreshListView;
 //普通的listview對象
 private ListView actualListView;
 //添加一個鏈表數組,來存放string數組,這樣就可以動態增加string數組中的內容了
 private LinkedList<String> mListItems;
 //給listview添加一個普通的適配器
 private ArrayAdapter<String> mAdapter;

 @Override
 protected void onCreate(Bundle savedInstanceState) {
 super.onCreate(savedInstanceState);
 setContentView(R.layout.activity_main);

 initView();

 //一打開應用就自動刷新,下面語句可以寫到刷新按鈕裡面
 mPullRefreshListView.setRefreshing(true);
 //new GetDataTask(mPullRefreshListView, mAdapter, mListItems).execute();
 //mPullRefreshListView.setRefreshing(false);

 }

 private void initView() {
 initPTRListView();
 initListView();
 }

 /**
 * 設置下拉刷新的listview的動作
 */
 private void initPTRListView() {
 mPullRefreshListView = (PullToRefreshListView) findViewById(R.id.pull_refresh_list);
 //設置拉動監聽器
 mPullRefreshListView.setOnRefreshListener(new OnRefreshListener<ListView>() {

  @Override
  public void onRefresh(PullToRefreshBase<ListView> refreshView) {
  //設置下拉時顯示的日期和時間
  String label = DateUtils.formatDateTime(getApplicationContext(), System.currentTimeMillis(),
   DateUtils.FORMAT_SHOW_TIME | DateUtils.FORMAT_SHOW_DATE | DateUtils.FORMAT_ABBREV_ALL);

  // 更新顯示的label
  refreshView.getLoadingLayoutProxy().setLastUpdatedLabel(label);
  // 開始執行異步任務,傳入適配器來進行數據改變
  new GetDataTask(mPullRefreshListView, mAdapter,mListItems).execute();
  }
 });

 // 添加滑動到底部的監聽器
 mPullRefreshListView.setOnLastItemVisibleListener(new OnLastItemVisibleListener() {

  @Override
  public void onLastItemVisible() {
  Toast.makeText(getApplication(), "已經到底了", Toast.LENGTH_SHORT).show();
  }
 });

 //mPullRefreshListView.isScrollingWhileRefreshingEnabled();//看刷新時是否允許滑動
 //在刷新時允許繼續滑動
 mPullRefreshListView.setScrollingWhileRefreshingEnabled(true);
 //mPullRefreshListView.getMode();//得到模式
 //上下都可以刷新的模式。這裡有兩個選擇:Mode.PULL_FROM_START,Mode.BOTH,PULL_FROM_END
 mPullRefreshListView.setMode(Mode.BOTH);

 /**
  * 設置反饋音效
  */
 SoundPullEventListener<ListView> soundListener = new SoundPullEventListener<ListView>(this);
 soundListener.addSoundEvent(State.PULL_TO_REFRESH, R.raw.pull_event);
 soundListener.addSoundEvent(State.RESET, R.raw.reset_sound);
 soundListener.addSoundEvent(State.REFRESHING, R.raw.refreshing_sound);
 mPullRefreshListView.setOnPullEventListener(soundListener);
 }

 /**
 * 設置listview的適配器
 */
 private void initListView() {
 //通過getRefreshableView()來得到一個listview對象
 actualListView = mPullRefreshListView.getRefreshableView();

 String []data = new String[] {"android","ios","wp","java","c++","c#"};
 mListItems = new LinkedList<String>();
 //把string數組中的string添加到鏈表中
 mListItems.addAll(Arrays.asList(data));

 mAdapter = new ArrayAdapter<>(getApplicationContext(),
  android.R.layout.simple_list_item_1, mListItems);
 actualListView.setAdapter(mAdapter);
 }
}
源碼下載:http://xiazai.jb51.net/201609/yuanma/AndroidListView(jb51.net).rar
以上就是本文的全部內容,希望對大家的學習有所幫助,也希望大家多多支持本站。
 Android實現圖片上傳功能
最近在開發中,涉及到用戶的意見反饋功能這一方面的開發,需要用戶輸入的文字或者提交的圖片,效果大概類似於微信朋友圈那樣的圖片選擇器,一開始自己找了個用universal-i
 打造浪漫的Android表白程序
幾年前,看到過有個牛人用HTML5繪制了浪漫的愛心表白動畫。發現原來程序員也是可以很浪……漫…..的(PS:剛過520,被妹子罵
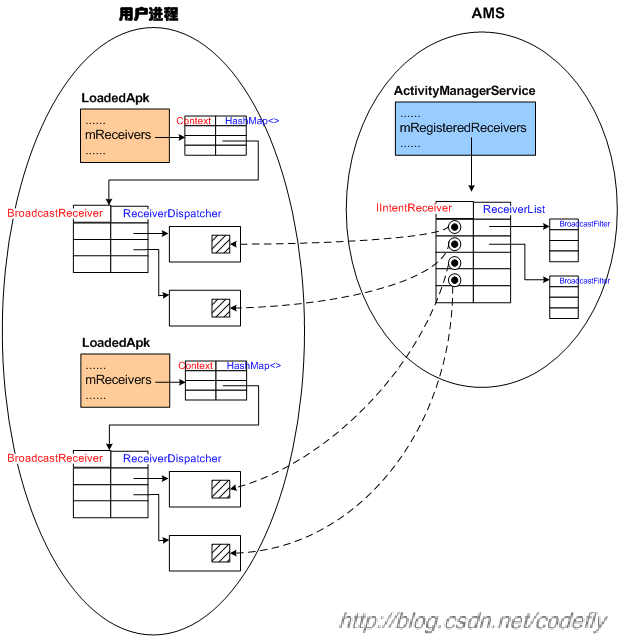 BroadcastReceiver探討之動態廣播注冊流程
相關在Android中,BroadcastReceiver是一套用來實現組件之間的通信機制,它是基於消息發布和訂閱機制,可以用在不同線程之間組件的通信,也可以跨進程進行組
 Android Handler 機制實現原理分析
handler在安卓開發中是必須掌握的技術,但是很多人都是停留在使用階段。使用起來很簡單,就兩個步驟,在主線程重寫handler的handleMessage( )方法,在