編輯:關於Android編程
綁定式Service在CS結構中扮演著Server的角色。綁定式Service允許其他組件(如Activity)綁定該Service、發送請求、接收響應、甚至IPC通信( interprocess communication)。綁定式Service通常服務於其他應用程序的組件、且沒有明確的後台的概念(does not run in the background indefinitely)。
本文將介紹bound Service的相關內容,包括其創建、與其他應用組件如何綁定 等。有關Service的基礎內容,您可以參考我翻譯的官方文檔:《Android官方文檔之Services》;如需訪問bound Service的官方原文,您可以點擊這個鏈接:《Bound Services》。
綁定式Service是一個繼承於Service的類。它可以與其他應用交互。為了實現綁定Service,您必須重寫onBind()方法。該方法返回一個IBinder接口,此接口是綁定式Service與其它應用組件交互的橋梁。
其它應用組件可調用bindService()方法綁定Service。該方法需要傳入的參數中包含一個實現了ServiceConnection接口的對象。該對象監控著組件與Service的綁定狀態(which monitors the connection with the service)。bindService()方法並不返回數據,而一旦系統創建了組件與Service的連接,ServiceConnection接口中的方法onServiceConnected()將被回調,此時實現了IBinder接口的對象將傳遞至組件中,這樣便實現了Service與綁定組件的通信(to deliver the IBinder that the client can use to communicate with the service)。
Service可同時與多個組件綁定。然而Service僅在綁定的第一個組件時回調onBind()方法以獲得IBinder接口對象,之後與該Service綁定的組件都傳遞的是同一個IBinder接口對象,而且並不再回調onBind()方法。
當Service與綁定它的最後一個組件解綁時,系統將該Service 銷毀(destroy),當然若Service還使用start方式啟動過(調用startService()方法啟動),則該Service並不會destroy。
創建bound Service時,最重要的就是實現onBind()回調方法中的返回接口IBinder,下面將介紹幾種不同實現IBinder接口的方式。
以下列舉了三種實現IBinder接口的方式:
繼承Binder類(Extending the Binder class):Binder是一個實現了IBinder接口的類。若Service只允許被本應用所在的進程訪問(這是大多數情況),您需要繼承Binder類,並將該對象作為onBind()方法的返回值。這樣,與Service綁定的組件就可以通過該返回對象訪問Binder的繼承類中的public方法、甚至是Service中的方法(to directly access public methods available in either the Binder implementation or even the Service)。
若在您的應用程序中,Service僅作為一個在後台工作的組件,那麼這種方式最好不過了。除非您需要Service進行跨進程通信。
IBinder進行跨進程通信,您應當為Service創建一個Messenger對象。這樣,Service可以定義一個Handler對象以接受不同類型的Message。Handler是Messenger的基礎,它可以在客戶端與IBinder共享(This Handler is the basis for a Messenger that can then share an IBinder with the client),並允許使用Message對象向Service端發送指令(allowing the client to send commands to the service using Message objects)。除此之外,亦可以在client端定義Messenger,這樣Service端可以回傳信息。
若您的Service僅是應用程序內部使用,並不需要跨進程通信,那麼可以繼承Binder類。這樣,與Service綁定的組件可以直接訪問Service中的public方法。
!請注意:這種繼承Binder類的方式僅適用於Service與綁定的組件處於同一應用程序或進程的情況,當然這也是最普遍的情況。舉例來說,在播放音樂應用程序中,可以使用這種方式將一個Activity與Service綁定,而Service用於在後台播放音樂。
創建方式:
在Service類中創建一個繼承於Binder的內部類。在Service類中定義public方法,以便client端可以訪問。在繼承於Binder的內部類中返回該Service實例。將該內部類實例作為onBind()返回參數。
在客戶端中的onServiceConnected()回調方法中接受Binder對象,並訪問Service中的public方法。
示例如下:
public class LocalService extends Service {
    // Binder given to clients
    private final IBinder mBinder = new LocalBinder();
    // Random number generator
    private final Random mGenerator = new Random();

    /**
     * Class used for the client Binder.  Because we know this service always
     * runs in the same process as its clients, we don't need to deal with IPC.
     */
    public class LocalBinder extends Binder {
        LocalService getService() {
            // Return this instance of LocalService so clients can call public methods
            return LocalService.this;
        }
    }

    @Override
    public IBinder onBind(Intent intent) {
        return mBinder;
    }

    /** method for clients */
    public int getRandomNumber() {
      return mGenerator.nextInt(100);
    }
}在上例中,LocalBinder提供了getService()方法以獲得LocalService實例。這樣,client端可以通過該實例訪問Service中pubic方法。比如,client端可以訪問LocalService中的public方法getRandomNumber(),如下所示:
public class BindingActivity extends Activity {
    LocalService mService;
    boolean mBound = false;

    @Override
    protected void onCreate(Bundle savedInstanceState) {
        super.onCreate(savedInstanceState);
        setContentView(R.layout.main);
    }

    @Override
    protected void onStart() {
        super.onStart();
        // Bind to LocalService
        Intent intent = new Intent(this, LocalService.class);
        bindService(intent, mConnection, Context.BIND_AUTO_CREATE);
    }

    @Override
    protected void onStop() {
        super.onStop();
        // Unbind from the service
        if (mBound) {
            unbindService(mConnection);
            mBound = false;
        }
    }

    /** Called when a button is clicked (the button in the layout file attaches to
      * this method with the android:onClick attribute) */
    public void onButtonClick(View v) {
        if (mBound) {
            // Call a method from the LocalService.
            // However, if this call were something that might hang, then this request should
            // occur in a separate thread to avoid slowing down the activity performance.
            int num = mService.getRandomNumber();
            Toast.makeText(this, "number: " + num, Toast.LENGTH_SHORT).show();
        }
    }

    /** Defines callbacks for service binding, passed to bindService() */
    private ServiceConnection mConnection = new ServiceConnection() {

        @Override
        public void onServiceConnected(ComponentName className,
                IBinder service) {
            // We've bound to LocalService, cast the IBinder and get LocalService instance
            LocalBinder binder = (LocalBinder) service;
            mService = binder.getService();
            mBound = true;
        }

        @Override
        public void onServiceDisconnected(ComponentName arg0) {
            mBound = false;
        }
    };
}首先,在Activity的onStart()回調方法中調用bindService()綁定LocalService,這時,LocalService中的onCreate()與onBind()依次回調;接著,ServiceConnection 中的onServiceConnected()方法回調,表示組件與Service已綁定,這時可以通過回傳給onServiceConnected()中的IBinder接口對象獲得LocalService實例,一旦獲得了該實例,便可以調用LocalService中的public方法,如getRandomNumber()方法。
!請注意:Service應在合適的時候與組件解除綁定,本例中應在onStop()中解除與Service的綁定。
當Service需要進行IPC通信時,應在Service中使用Messenger。使用Messenger的方式如下:
繼承Handler類,並實現回調方法handleMessage(),每當client端訪問Service中的方法時,handleMessage()都將回調(receives a callback for each call from a client)。
需在Service中創建一個Messenger對象,構造該對象需傳入一個Handler參數。
調用Messenger的getBinder()返回一個IBinder對象,將該對象作為onBind()回調方法的返回值。
client端通過onServiceConnected()回傳的IBinder參數,構造Messenger對象,並將Message信息傳入Messenger對象,發送給Service。
Service在Handler的handleMessage()方法中接收Message信息。
按照如此方式,client端並沒有顯式調用Service中的方法,而是傳遞了Message對象,並在Service的Handler中接收。
以下是Service端示例:
public class MessengerService extends Service {
    /** Command to the service to display a message */
    static final int MSG_SAY_HELLO = 1;

    /**
     * Handler of incoming messages from clients.
     */
    class IncomingHandler extends Handler {
        @Override
        public void handleMessage(Message msg) {
            switch (msg.what) {
                case MSG_SAY_HELLO:
                    Toast.makeText(getApplicationContext(), "hello!", Toast.LENGTH_SHORT).show();
                    break;
                default:
                    super.handleMessage(msg);
            }
        }
    }

    /**
     * Target we publish for clients to send messages to IncomingHandler.
     */
    final Messenger mMessenger = new Messenger(new IncomingHandler());

    /**
     * When binding to the service, we return an interface to our messenger
     * for sending messages to the service.
     */
    @Override
    public IBinder onBind(Intent intent) {
        Toast.makeText(getApplicationContext(), "binding", Toast.LENGTH_SHORT).show();
        return mMessenger.getBinder();
    }
}
以下是client端接收示例:
public class ActivityMessenger extends Activity {
    /** Messenger for communicating with the service. */
    Messenger mService = null;

    /** Flag indicating whether we have called bind on the service. */
    boolean mBound;

    /**
     * Class for interacting with the main interface of the service.
     */
    private ServiceConnection mConnection = new ServiceConnection() {
        public void onServiceConnected(ComponentName className, IBinder service) {
            // This is called when the connection with the service has been
            // established, giving us the object we can use to
            // interact with the service.  We are communicating with the
            // service using a Messenger, so here we get a client-side
            // representation of that from the raw IBinder object.
            mService = new Messenger(service);
            mBound = true;
        }

        public void onServiceDisconnected(ComponentName className) {
            // This is called when the connection with the service has been
            // unexpectedly disconnected -- that is, its process crashed.
            mService = null;
            mBound = false;
        }
    };

    public void sayHello(View v) {
        if (!mBound) return;
        // Create and send a message to the service, using a supported 'what' value
        Message msg = Message.obtain(null, MessengerService.MSG_SAY_HELLO, 0, 0);
        try {
            mService.send(msg);
        } catch (RemoteException e) {
            e.printStackTrace();
        }
    }

    @Override
    protected void onCreate(Bundle savedInstanceState) {
        super.onCreate(savedInstanceState);
        setContentView(R.layout.main);
    }

    @Override
    protected void onStart() {
        super.onStart();
        // Bind to the service
        bindService(new Intent(this, MessengerService.class), mConnection,
            Context.BIND_AUTO_CREATE);
    }

    @Override
    protected void onStop() {
        super.onStop();
        // Unbind from the service
        if (mBound) {
            unbindService(mConnection);
            mBound = false;
        }
    }
}本例中並未包含Service端向client端發送消息的邏輯,如需要Service答復client發送的消息,需在client端也創建一個Messenger對象,當onServiceConnected()方法被回調時,在send()方法中傳入replyTo參數。
綁定Service是一個異步過程(The binding is asynchronous):應用程序中的組件調用bindService()綁定一個Service,bindService()立即返回;接著系統回調Service的onBind()方法,而client並不會接收到IBinder參數,為了接收該參數,需要創建一個ServiceConnection實例,並將該實例傳入bindService()中,系統會將IBinder回傳至ServiceConnection的回調方法中(The ServiceConnection includes a callback method that the system calls to deliver the IBinder)。
!請注意:只有activities、services、content providers可以綁定Service, broadcast receiver不能綁定Service(you cannot bind to a service from a broadcast receiver)。
所以,綁定Service應按如下步驟:
實現ServiceConnection接口;
實現onServiceConnected()方法:當client與Service建立綁定時,系統回調該方法,並將onBind()返回的IBinder參數回傳至該方法中;
實現onServiceDisconnected()方法:當綁定的Service意外終止時( unexpectedly lost),系統回調該方法,如Service被進程kill或Service崩潰(crashed)。系統若回調unBindService()方法,將不會回調onServiceDisconnected()方法。
bindService(),並傳入ServiceConnection的實現類對象;
onServiceConnected()時,表示client與Service已綁定,此時可以訪問Service中的public方法。
系統回調unbindService(),解除綁定。
下面的代碼片段演示了如何綁定Service:
LocalService mService;
private ServiceConnection mConnection = new ServiceConnection() {
    // Called when the connection with the service is established
    public void onServiceConnected(ComponentName className, IBinder service) {
        // Because we have bound to an explicit
        // service that is running in our own process, we can
        // cast its IBinder to a concrete class and directly access it.
        LocalBinder binder = (LocalBinder) service;
        mService = binder.getService();
        mBound = true;
    }

    // Called when the connection with the service disconnects unexpectedly
    public void onServiceDisconnected(ComponentName className) {
        Log.e(TAG, "onServiceDisconnected");
        mBound = false;
    }
};
下面演示了啟動綁定的方式:
Intent intent = new Intent(this, LocalService.class);
bindService(intent, mConnection, Context.BIND_AUTO_CREATE);其中第三個參數表示綁定的模式,通常為BIND_AUTO_CREATE,表示當Service還尚未處於alive狀態時創建該Service。其它可用的參數為BIND_DEBUG_UNBIND、BIND_NOT_FOREGROUND,若不打算指定模式,可傳入0。
當連接錯誤時,系統會拋出DeadObjectException異常,這也是在client端調用Service中的方法時可能拋出的唯一異常(This is the only exception thrown by remote methods)。
binding 和 unbinding應成對出調用。
若當Activity在前台處於運行狀態時,需要與綁定的Service交互,那麼應在onStart()方法中bindService(),在onStop()中unbindService()。
若當Activity在後台處於stop狀態時,那麼應在onCreate()方法中bindService(),在onDestroy()中unbindService()。此時系統將更易kill該Service。
!請注意:請不要在onResume() 和 onPause()方法中綁定、解綁Service,因為這兩個生命周期回調方法經常被回調,頻繁的綁定與解綁會降低程序的執行效率。
當Service不再與任何Client綁定時,系統將回收該Service(除非Service也用Start方式啟動了(將回調onStartCommand()方法)),您無需手動管理一個純bound Service的生命周期(you don’t have to manage the lifecycle of your service if it’s purely a bound service),系統會自動管理。
無論Service綁定了多少個client,若您還回調了onStartCommand()方法,那麼必須顯式stop該Service,可以通過在Service中調用stopSelf()方法、或在其他組件中調用stopService()stop該Service。
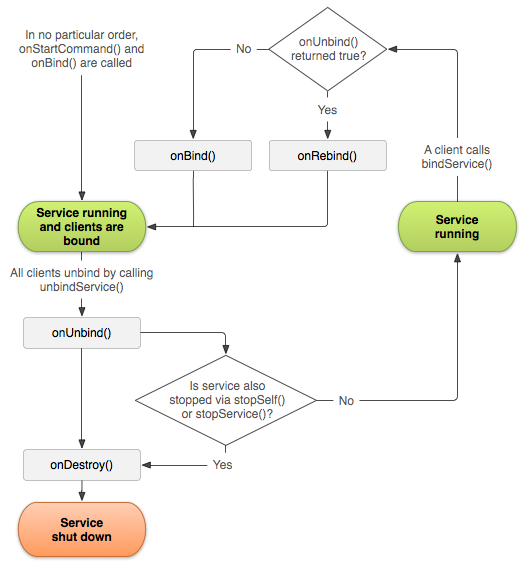
若通過兩種方式(start、bound)同時啟動了一個Service,那麼如果希望Service在下一次綁定該client時回調onRebind()方法,應在onUnbind()方法中返回true。按照這種方式,再次與該Service綁定的client仍可以在onServiceConnected()方法中接收到回傳的IBinder 參數。如下圖所示:
 Android DigitalClock組件用法實例
本文實例講述了Android DigitalClock組件用法。分享給大家供大家參考,具體如下:DigitalClock組件的使用很簡單,先看看效果圖:DigitalCl
 Android網絡框架Volley
Volley是Google I/O 2013推出的網絡通信庫,在volley推出之前我們一般會選擇比較成熟的第三方網絡通信庫,如:android-async-httpre
 HSDPA學習小結
1 HSDPA 簡介HSDPA中引入的HS-DSCH棄用了R99中的功率控制技術、軟切換技術和可變擴頻增益技術。同時引入了一系列關鍵技術:1) 更短的無線幀結構;(2ms
 Android實現帶附件的郵件發送功能
本文實例講解了基於基於JMail實現Android郵件發送功能,分享給大家供大家參考,具體內容如下在android上發送郵件方式:第一種:借助GMail APP客戶端,缺