編輯:關於Android編程
public class Activity extends ContextThemeWrapper
        implements LayoutInflater.Factory2,
        Window.Callback, KeyEvent.Callback,
        OnCreateContextMenuListener, ComponentCallbacks2,
        Window.OnWindowDismissedCallback {
      ……
    ……
    private Window mWindow;
    private WindowManager mWindowManager;
    ……

  /**
     * Retrieve the current {@link android.view.Window} for the activity.
     * This can be used to directly access parts of the Window API that
     * are not available through Activity/Screen.
     *
     * @return Window The current window, or null if the activity is not
     *         visual.
     */
    public Window getWindow() {
        return mWindow;
    }
    ……
    /**
     * Set the activity content from a layout resource.  The resource will be
     * inflated, adding all top-level views to the activity.
     *
     * @param layoutResID Resource ID to be inflated.
     *
     * @see #setContentView(android.view.View)
     * @see #setContentView(android.view.View, android.view.ViewGroup.LayoutParams)
     */
    public void setContentView(int layoutResID) {
        getWindow().setContentView(layoutResID);
        initWindowDecorActionBar();
    }

    /**
     * Set the activity content to an explicit view.  This view is placed
     * directly into the activity's view hierarchy.  It can itself be a complex
     * view hierarchy.  When calling this method, the layout parameters of the
     * specified view are ignored.  Both the width and the height of the view are
     * set by default to {@link ViewGroup.LayoutParams#MATCH_PARENT}. To use
     * your own layout parameters, invoke
     * {@link #setContentView(android.view.View,android.view.ViewGroup.LayoutParams)}
     * instead.
     *
     * @param view The desired content to display.
     *
     * @see #setContentView(int)
     * @see #setContentView(android.view.View, android.view.ViewGroup.LayoutParams)
     */
    public void setContentView(View view) {
        getWindow().setContentView(view);
        initWindowDecorActionBar();
    }
    final void attach(Context context, ActivityThread aThread,
            Instrumentation instr, IBinder token, int ident,
            Application application, Intent intent, ActivityInfo info,
            CharSequence title, Activity parent, String id,
            NonConfigurationInstances lastNonConfigurationInstances,
            Configuration config, IVoiceInteractor voiceInteractor) {
        attachBaseContext(context);
        mFragments.attachActivity(this, mContainer, null);
        mWindow = PolicyManager.makeNewWindow(this);

        ……
    }
……
}
PolicyManager的部分源碼:
public final class PolicyManager {
    ……
private static final IPolicy sPolicy;
    static {
        // Pull in the actual implementation of the policy at run-time
       ……
            sPolicy = (IPolicy)policyClass.newInstance();
      ……
    }
    // Cannot instantiate this class
    private PolicyManager() {}
    // The static methods to spawn new policy-specific objects
    public static Window makeNewWindow(Context context) {
        return sPolicy.makeNewWindow(context);
    }
    ……
}
Policy的部分源碼:
public class Policy implements IPolicy {
   ……
    public Window makeNewWindow(Context context) {
        return new PhoneWindow(context);
}
……
}
從給出的源碼我們可以看到,Activity內部含有一個Window類型的對象mWindow,當我們調用setContentView方法時,實際上是委托給了Window對象進行處理。Window本身是一個抽象類,它描述了android窗口的基本屬性和行為特征。在activity的attach方法中通過mWindow = PolicyManager.makeNewWindow(this)創建了Window對象。通過追蹤代碼可知, PolicyManager.makeNewWindow(this)實際上是調用Policy中的makeNewWindow方法,在此方法中創建了一個PhoneWindow對象。而PhoneWindow正是Window的子類。他們的關系圖如下: 繼續追蹤源碼,PhoneWindow對Window的抽象方法setContentView(int layoutResId)進行了實現,具體源碼如下:
@Override
    public void setContentView(int layoutResID) {
        // Note: FEATURE_CONTENT_TRANSITIONS may be set in the process of installing the window
        // decor, when theme attributes and the like are crystalized. Do not check the feature
        // before this happens.
        if (mContentParent == null) {
            installDecor();
        } else if (!hasFeature(FEATURE_CONTENT_TRANSITIONS)) {
            mContentParent.removeAllViews();
        }

        if (hasFeature(FEATURE_CONTENT_TRANSITIONS)) {
            final Scene newScene = Scene.getSceneForLayout(mContentParent, layoutResID,
                    getContext());
            transitionTo(newScene);
        } else {
            mLayoutInflater.inflate(layoutResID, mContentParent);
        }
        final Callback cb = getCallback();
        if (cb != null && !isDestroyed()) {
            cb.onContentChanged();
        }
    }
在這個方法中我們可以看到首先對mContentParent進行了判斷,如果為空的話則調用installDecor方法,通過hasFeature判斷window是否具備某些特征,如果窗口不含有FEATURE_CONTENT_TRANSITIONS特征,則清空mContentParent中的所有子元素,為後面加載布局文件到mContentParent中做好准備。通過後面的判斷,我們也可以看出無論走那個分支,其實都是對mContentParent布局內容做了更新。由此我們可以推斷出mContentParent其實就是我們自己的布局的存放容器,它在PhoneWindow中定義如下: // This is the view in which the window contents are placed. It is either // mDecor itself, or a child of mDecor where the contents go. private ViewGroup mContentParent; 那麼mContentParent是在哪裡被創建的呢,很顯然是在方法installDecor中,方法installDecor的關鍵代碼如下:
    private void installDecor() {
        if (mDecor == null) {
            mDecor = generateDecor();
           ……
        }
        if (mContentParent == null) {
mContentParent = generateLayout(mDecor);
            ……
       }
}
在這個方法中,我們可以看到,首先對mDecor進行判斷,如果為空在調用generateDecor方法生成mDecor對象,那麼mDecor對象是什麼呢?通過查看代碼,可以知道mDecor的類型為DecorView,此類型是定義在PhoneWindow中的一個內部類,它繼承了FrameLayout。緊接著判斷mContentParent是否為空,為空則調用generateLayout並通過傳入參數mDecor生成了mContentParent對象。在這個方法中通過應用的主題、窗口特征等來確定使用的布局資源並將使用的布局添加mDecor中,而這些布局中都會含有一個id為content的ViewGroup(FrameLayout),此ViewGroup正是mContentParent,方法關鍵代碼如下:
protected ViewGroup generateLayout(DecorView decor) {
        ……
        View in = mLayoutInflater.inflate(layoutResource, null);
        decor.addView(in, new ViewGroup.LayoutParams(MATCH_PARENT, MATCH_PARENT));
        mContentRoot = (ViewGroup) in;
        ViewGroup contentParent = (ViewGroup)findViewById(ID_ANDROID_CONTENT);
       ……
        return contentParent;
    }
 android仿新聞閱讀器菜單彈出效果實例(附源碼DEMO下載)
開發中碰到問題之後實現的,覺得可能有的開發者用的到或則希望獨立成一個小功能DEMO,所以就放出來這麼一個DEMO。原本覺得是最後完成後發網站客戶端的,可是這樣體現不出一個
 不怕應用名字亂 在手機端輕松給APK重命名
很多Android手機用戶都喜歡收集APK安裝包並保存在存儲卡內。可是,網上下載的APK大都以英文或亂碼命名,管理起來好不麻煩。那麼,無需借助PC,我們能否
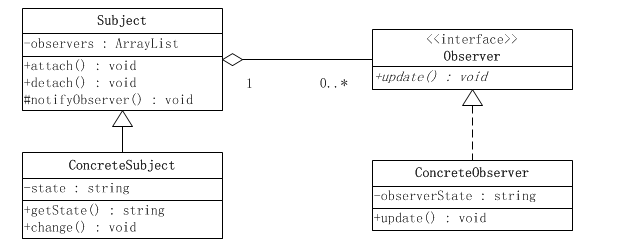 android適配器中的觀察者模式
1. 模式介紹模式的定義定義對象間一種一對多的依賴關系,使得每當一個對象改變狀態,則所有依賴於它的對象都會得到通知並被自動更新。模式的使用場景關聯行為場景。需要注意的是,
 Android ORM系列之GreenDao自定義類型轉換器與代碼混淆配置
有時候,我們的實體類中會有一些屬性,但是數據庫中沒有對應的類型,這個時候我們就需要自定義轉換器進行類型轉換。很常見的處理就是Date類型一般如果精度要求不高的話我們會轉換