編輯:關於Android編程
代碼參考:
 /**
     * 根據View(主要是ImageView)的寬和高來獲取圖片的縮略圖
     * @param path
     * @param viewWidth
     * @param viewHeight
     * @return
     */
    private Bitmap decodeThumbBitmapForFile(String path, int viewWidth, int viewHeight){
        BitmapFactory.Options options = new BitmapFactory.Options();
        //設置為true,表示解析Bitmap對象,該對象不占內存
        options.inJustDecodeBounds = true;
        BitmapFactory.decodeFile(path, options);
        //設置縮放比例
        options.inSampleSize = computeScale(options, viewWidth, viewHeight);

        //設置為false,解析Bitmap對象加入到內存中
        options.inJustDecodeBounds = false;

        return BitmapFactory.decodeFile(path, options);
    }


    /**
     * 根據View(主要是ImageView)的寬和高來計算Bitmap縮放比例。默認不縮放
     * @param options
     * @param width
     * @param height
     */
    private int computeScale(BitmapFactory.Options options, int viewWidth, int viewHeight){
        int inSampleSize = 1;
        if(viewWidth == 0 || viewHeight == 0){
            return inSampleSize;
        }
        int bitmapWidth = options.outWidth;
        int bitmapHeight = options.outHeight;

        //假如Bitmap的寬度或高度大於我們設定圖片的View的寬高,則計算縮放比例
        if(bitmapWidth > viewWidth || bitmapHeight > viewWidth){
            int widthScale = Math.round((float) bitmapWidth / (float) viewWidth);
            int heightScale = Math.round((float) bitmapHeight / (float) viewWidth);

            //為了保證圖片不縮放變形,我們取寬高比例最小的那個
            inSampleSize = widthScale < heightScale ? widthScale : heightScale;
        }
        return inSampleSize;
    }
另外可參照:
BitmapFactory.Options options = new BitmapFactory.Options();

       /**
        * 最關鍵在此,把options.inJustDecodeBounds = true;
        * 這裡再decodeFile(),返回的bitmap為空,但此時調用options.outHeight時,已經包含了圖片的高了
        */
       options.inJustDecodeBounds = true;
       Bitmap bitmap = BitmapFactory.decodeFile("/sdcard/test.jpg", options); // 此時返回的bitmap為null
       /**
        *options.outHeight為原始圖片的高
        */
       Log.e("Test", "Bitmap Height == " + options.outHeight);
下面是Android源碼中關於 inSampleSize的說明:
public int inSampleSize

Added in API level 1
If set to a value > 1, requests the decoder to subsample the original image, returning a smaller image to save memory. The sample size is the number of pixels in either dimension that correspond to a single pixel in the decoded bitmap. For example, inSampleSize == 4 returns an image that is 1/4 the width/height of the original, and 1/16 the number of pixels. Any value <= 1 is treated the same as 1. Note: the decoder uses a final value based on powers of 2, any other value will be rounded down to the nearest power of 2.
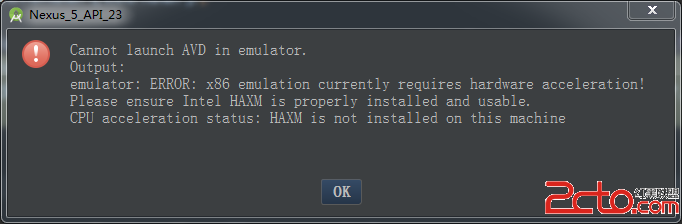 Android Studio創建AVD
Android Studio是專門為Android開發設計的IDE,比Eclipse開發Android更加方便、快捷。安裝Android Studio以後,想運行AVD,
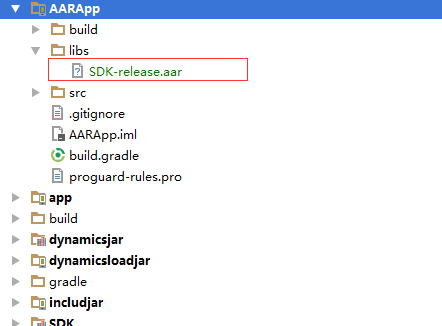 Android Studio添加aar
1、把aar復制到項目中的 libs 裡面 2、在module 裡面的build.gradle 的根目錄添加repositories{ flatDir {
 Android下常見終端模擬器和SSH客戶端感受及幾個Tips
之前用Linux Deploy 部署了Kali Linux 。讓我這陣子拿到平板有一半的時間是在用終端模擬器(Terminal Emulator)連接。安卓的終端模擬器,
 android JNI調用
Android jni開發資料--NDK環境搭建 android開發人員注意了 谷歌改良了ndk的開發流程,對於Windows環境下NDK的開發,如果