編輯:關於Android編程
一、
1、通過反射來獲取系統字體並替換
import java.lang.reflect.Field;
import android.content.Context;
import android.graphics.Typeface;

public final class FontsOverride {

    public static void setDefaultFont(Context context,
            String staticTypefaceFieldName, String fontAssetName) {
        final Typeface regular = Typeface.createFromAsset(context.getAssets(),
                fontAssetName);
        replaceFont(staticTypefaceFieldName, regular);
    }

    protected static void replaceFont(String staticTypefaceFieldName,
            final Typeface newTypeface) {
        try {
            final Field staticField = Typeface.class
                    .getDeclaredField(staticTypefaceFieldName);
            staticField.setAccessible(true);
            staticField.set(null, newTypeface);
        } catch (NoSuchFieldException e) {
            e.printStackTrace();
        } catch (IllegalAccessException e) {
            e.printStackTrace();
        }
    }
}public final class Application extends android.app.Application {
@Override
public void onCreate() {
super.onCreate();
FontsOverride.setDefaultFont(this, "DEFAULT", "MyFontAsset.ttf");
FontsOverride.setDefaultFont(this, "MONOSPACE", "MyFontAsset2.ttf");
FontsOverride.setDefaultFont(this, "SERIF", "MyFontAsset3.ttf");
FontsOverride.setDefaultFont(this, "SANS_SERIF", "MyFontAsset4.ttf");
}
}配置文件AndroidManifest.xml中修改(只限系統theme中已有字體)
/**
 * Recursively sets a {@link Typeface} to all
 * {@link TextView}s in a {@link ViewGroup}.
 */
public static final void setAppFont(ViewGroup mContainer, Typeface mFont, boolean reflect)
{
    if (mContainer == null || mFont == null) return;

    final int mCount = mContainer.getChildCount();

    // Loop through all of the children.
    for (int i = 0; i < mCount; ++i)
    {
        final View mChild = mContainer.getChildAt(i);
        if (mChild instanceof TextView)
        {
            // Set the font if it is a TextView.
            ((TextView) mChild).setTypeface(mFont);
        }
        else if (mChild instanceof ViewGroup)
        {
            // Recursively attempt another ViewGroup.
            setAppFont((ViewGroup) mChild, mFont);
        }
        else if (reflect)
        {
            try {
                Method mSetTypeface = mChild.getClass().getMethod("setTypeface", Typeface.class);
                mSetTypeface.invoke(mChild, mFont);
            } catch (Exception e) { /* Do something... */ }
        }
    }
}
final Typeface mFont = Typeface.createFromAsset(getAssets(), "fonts/MyFont.ttf"); final ViewGroup mContainer = (ViewGroup) findViewById( android.R.id.content).getRootView(); HomeActivity.setAppFont(mContainer, mFont);
public class CusFntTextView extends TextView {

public CusFntTextView(Context context, AttributeSet attrs, int defStyle) {
    super(context, attrs, defStyle);
    init();
}

public CusFntTextView(Context context, AttributeSet attrs) {
    super(context, attrs);
    init();
}

public CusFntTextView(Context context) {
    super(context);
    init();
}

private void init() {
    if (!isInEditMode()) {
        Typeface tf = Typeface.createFromAsset(getContext().getAssets(), "Futura.ttf");
        setTypeface(tf);
    }
} Android進階——Preference詳解之Preference系的基本應用(三)
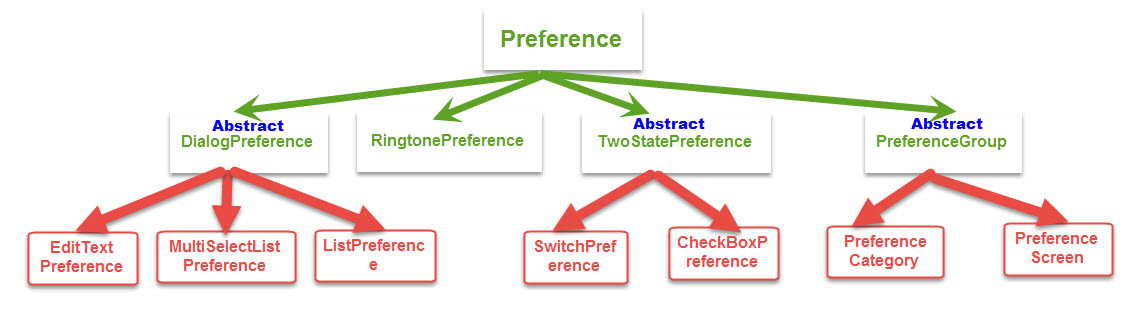
引言前面一篇文章介紹了二級Preference的使用和特點,接下來進入系統給我提供的底級Preference的使用CheckBox選擇項CheckBoxPreferenc
 如何將Android數據庫操作通用化(三)
概述 悠悠綠水傍林侵日落觀山四望回 幽林古寺孤明月冷井寒泉碧映台 鷗飛滿浦漁舟泛鶴伴閒亭仙客來 游徑踏花煙上走流溪遠棹一篷開 概述 一個不小心都寫了三篇了,也不知道大家
 Android 儀表盤View
導語這裡展示的View估計項目中多半是用不到的,只是用來加深理解的。文章末尾會有全部的代碼,如果想研究可以復制過去直接運行,不需要額外的資源。先看效果:這裡指針是通過手指
 Android實現帶列表的地圖POI周邊搜索功能
先看效果圖:(以公司附近的國貿為中心點)上面是地圖,下面是地理位置列表,有的只有地理位置列表(QQ動態的位置),這是個很常見的功能。它有個專門的叫法:POI周邊搜索。實現