編輯:關於Android編程
1、藍牙搜索的實現
利用藍牙的發現和完成動作動態注冊廣播接受者獲得藍牙設備。
第一步,獲得藍牙適配器
BluetoothAdapter mBtAdapter= BluetoothAdapter.getDefaultAdapter();
	// 判斷藍牙是否打開
				if (!mAdapter.isEnabled()) {
					mAdapter.enable();
  // Register for broadcasts when a device is discovered
        IntentFilter filter = new IntentFilter(BluetoothDevice.ACTION_FOUND);
        this.registerReceiver(mReceiver, filter);

        // Register for broadcasts when discovery has finished
        filter = new IntentFilter(BluetoothAdapter.ACTION_DISCOVERY_FINISHED);
this.registerReceiver(mReceiver, filter);filter.setPriority(Integer.MAX_VALUE);
 // The BroadcastReceiver that listens for discovered devices and
    // changes the title when discovery is finished
    private final BroadcastReceiver mReceiver = new BroadcastReceiver() {
        @Override
        public void onReceive(Context context, Intent intent) {
            String action = intent.getAction();

            // When discovery finds a device
            if (BluetoothDevice.ACTION_FOUND.equals(action)) {
                // Get the BluetoothDevice object from the Intent
                BluetoothDevice device = intent.getParcelableExtra(BluetoothDevice.EXTRA_DEVICE);
                // If it's already paired, skip it, because it's been listed already
                if (device.getBondState() != BluetoothDevice.BOND_BONDED) {
                    mNewDevicesArrayAdapter.add(device.getName() + "\n" + device.getAddress());
                }
            // When discovery is finished, change the Activity title
            } else if (BluetoothAdapter.ACTION_DISCOVERY_FINISHED.equals(action)) {
                setProgressBarIndeterminateVisibility(false);
                setTitle(R.string.select_device);
                if (mNewDevicesArrayAdapter.getCount() == 0) {
                    String noDevices = getResources().getText(R.string.none_found).toString();
                    mNewDevicesArrayAdapter.add(noDevices);
                }
            }
        }
};關鍵代碼如下:
/**
	 * 接收器 當搜索藍牙設備完成時調用
	 */
	private BroadcastReceiver _foundReceiver = new BroadcastReceiver() {
		public void onReceive(Context context, Intent intent) {

			BluetoothDevice device = intent
					.getParcelableExtra(BluetoothDevice.EXTRA_DEVICE);
			// 將結果添加到列表中
			_devices.add(device);
			DeviceInfo info = new DeviceInfo();
			info.setmDeviceName(device.getName());
			info.setmDeviceMacAddr(device.getAddress());
			infos.add(info);
			info = null;
			// 顯示列表
			showDevices();

		}
	};
	private BroadcastReceiver _discoveryReceiver = new BroadcastReceiver() {

		@Override
		public void onReceive(Context context, Intent intent) {
			// 卸載注冊的接收器
			unregisterReceiver(_foundReceiver);
			unregisterReceiver(this);
			_discoveryFinished = true;
		}
	};
這樣便完成藍牙的搜索了。
2、藍牙配對
藍牙要想通信目前是必須要先配對才能連接的。
藍牙配對的api是hide的。但是api19可以直接調用藍牙設備的配對方法。
所以配對都是利用反射的方法。這裡有一個強大的工具類可以直接拿來使用,如下:
public class ClsUtils {

	public ClsUtils() {
		// TODO Auto-generated constructor stub
	}
	 /**
     * 與設備配對 參考源碼:platform/packages/apps/Settings.git
     * /Settings/src/com/android/settings/bluetooth/CachedBluetoothDevice.java
     */
    static public boolean createBond(Class btClass, BluetoothDevice btDevice)
    throws Exception
    {

        Method createBondMethod = btClass.getMethod("createBond");
        Boolean returnValue = (Boolean) createBondMethod.invoke(btDevice);
        return returnValue.booleanValue();
    }

    /**
     * 與設備解除配對 參考源碼:platform/packages/apps/Settings.git
     * /Settings/src/com/android/settings/bluetooth/CachedBluetoothDevice.java
     */
    static public boolean removeBond(Class btClass, BluetoothDevice btDevice)
            throws Exception
    {
        Method removeBondMethod = btClass.getMethod("removeBond");
        Boolean returnValue = (Boolean) removeBondMethod.invoke(btDevice);
        return returnValue.booleanValue();
    }

    static public boolean setPin(Class btClass, BluetoothDevice btDevice,
            String str) throws Exception
    {
        try
        {
            Method removeBondMethod = btClass.getDeclaredMethod("setPin",
                    new Class[]
                    {byte[].class});
            Boolean returnValue = (Boolean) removeBondMethod.invoke(btDevice,
                    new Object[]
                    {str.getBytes()});
            Log.e("returnValue設置密碼", "" + returnValue.booleanValue());
            return returnValue.booleanValue();
        }
        catch (SecurityException e)
        {
            // throw new RuntimeException(e.getMessage());
            e.printStackTrace();
        }
        catch (IllegalArgumentException e)
        {
            // throw new RuntimeException(e.getMessage());
            e.printStackTrace();
        }
        catch (Exception e)
        {
            // TODO Auto-generated catch block
            e.printStackTrace();
        }
        return false;

    }

    // 取消用戶輸入
    static public boolean cancelPairingUserInput(Class btClass,
            BluetoothDevice device)

    throws Exception
    {
        Method createBondMethod = btClass.getMethod("cancelPairingUserInput");
        cancelBondProcess(btClass,device) ;
        Boolean returnValue = (Boolean) createBondMethod.invoke(device);
        Log.i("取消對話框","cancelPairingUserInput"+returnValue.booleanValue());
        return returnValue.booleanValue();
    }

    // 取消配對
    static public boolean cancelBondProcess(Class btClass,
            BluetoothDevice device)

    throws Exception
    {
        Method createBondMethod = btClass.getMethod("cancelBondProcess");
        Boolean returnValue = (Boolean) createBondMethod.invoke(device);
        return returnValue.booleanValue();
    }

    /**
     *
     * @param clsShow
     */
    static public void printAllInform(Class clsShow)
    {
        try
        {
            // 取得所有方法
            Method[] hideMethod = clsShow.getMethods();
            int i = 0;
            for (; i < hideMethod.length; i++)
            {
                Log.e("method name", hideMethod[i].getName() + ";and the i is:"
                        + i);
            }
            // 取得所有常量
            Field[] allFields = clsShow.getFields();
            for (i = 0; i < allFields.length; i++)
            {
                Log.e("Field name", allFields[i].getName());
            }
        }
        catch (SecurityException e)
        {
            // throw new RuntimeException(e.getMessage());
            e.printStackTrace();
        }
        catch (IllegalArgumentException e)
        {
            // throw new RuntimeException(e.getMessage());
            e.printStackTrace();
        }
        catch (Exception e)
        {
            // TODO Auto-generated catch block
            e.printStackTrace();
        }
    }


    static public boolean pair(String strAddr, String strPsw)
    {
        boolean result = false;
        BluetoothAdapter bluetoothAdapter = BluetoothAdapter
                .getDefaultAdapter();

        bluetoothAdapter.cancelDiscovery();

        if (!bluetoothAdapter.isEnabled())
        {
            bluetoothAdapter.enable();
        }


        BluetoothDevice device = bluetoothAdapter.getRemoteDevice(strAddr);

        if (device.getBondState() != BluetoothDevice.BOND_BONDED)
        {
            try
            {
                Log.d("mylog", "NOT BOND_BONDED");
                boolean flag1=ClsUtils.setPin(device.getClass(), device, strPsw); // 手機和藍牙采集器配對
                boolean flag2=ClsUtils.createBond(device.getClass(), device);
//                remoteDevice = device; // 配對完畢就把這個設備對象傳給全局的remoteDevice

                	 result = true;


            }
            catch (Exception e)
            {
                // TODO Auto-generated catch block

                Log.d("mylog", "setPiN failed!");
                e.printStackTrace();
            } //

        }
        else
        {
            Log.d("mylog", "HAS BOND_BONDED");
            try
            {
            	ClsUtils.removeBond(device.getClass(), device);
                //ClsUtils.createBond(device.getClass(), device);
               boolean flag1= ClsUtils.setPin(device.getClass(), device, strPsw); // 手機和藍牙采集器配對
                boolean flag2=ClsUtils.createBond(device.getClass(), device);
//                remoteDevice = device; // 如果綁定成功,就直接把這個設備對象傳給全局的remoteDevice

               	 result = true;


            }
            catch (Exception e)
            {
                // TODO Auto-generated catch block
                Log.d("mylog", "setPiN failed!");
                e.printStackTrace();
            }
        }
        return result;
    }

}flag3= ClsUtils.createBond(device.getClass(), device);
mReceiver=new ParingReceiver(device);
							 IntentFilter filter=new IntentFilter();
							 filter.addAction( BluetoothDevice.ACTION_PAIRING_REQUEST);
							 filter.setPriority(Integer.MAX_VALUE);
							 registerReceiver(mReceiver, filter);
private class ParingReceived extends BroadcastReceiver{

		@Override
		public void onReceive(Context context, Intent intent) {

				 BluetoothDevice btDevice=mAdapter.getRemoteDevice("EC:89:F5:98:46:f9");

					try {
						setPin(btDevice.getClass(),btDevice,"000000");
						cancelPairingUserInput(btDevice.getClass(), btDevice);

					} catch (Exception e) {
						// TODO Auto-generated catch block
						e.printStackTrace();
					}


		}
藍牙配對完成後就可以連接通信了。
3、藍牙通信
藍牙同時的本質是藍牙套接字,一個主動發起連接的的設備做客戶端,一個監聽連接的設備做服務端,類似sokcet網絡編程,利用多線程,讀取數據流就可完成藍牙通信。
如下是藍牙串口通信的關鍵代碼:
/**
	 * 建立連接並通信
	 *
	 * @param btDev
	 * @return
	 */
	private boolean connect(BluetoothDevice btDev) {
		boolean flag = false;
		try {
			/*if(btDev.fetchUuidsWithSdp()){
				btDev.getUuids();
			}*/


			//建立連接
			mSocket = btDev
					.createRfcommSocketToServiceRecord(UUID.fromString("00001101-0000-1000-8000-00805F9B34FB"));
			mSocket.connect();
			mOutputStream = mSocket.getOutputStream();
			mInputStream = mSocket.getInputStream();
			mOutputStream.write("StartOnNet\n".getBytes());


			mOutputStream.flush();
			flag = true;
		} catch (Exception e) {

}private class ServerThread implements Runnable {
private InputStream mInputStream;
private OutputStream mOutputStream;
public ServerThread() {
}
@Override
public void run() {
try {
while (true) {
mBluetoothServerSocket = mAdapter
.listenUsingRfcommWithServiceRecord(
"btspp",
UUID.fromString("00001101-0000-1000-8000-00805F9B34FB"));
Log.i("服務端線程運行", "藍牙服務端線程開始");
Log.i("服務端線程運行", "藍牙服務端線程阻塞中");
mBluetoothSocket = mBluetoothServerSocket.accept();
if (mBluetoothSocket != null) {
break;
}
}
Log.i("服務端線程運行", "藍牙服務端線程<<<<<<<<<<<<<");
mInputStream = mBluetoothSocket.getInputStream();
mOutputStream = mBluetoothSocket.getOutputStream();
byte[] data = getSocketResult(mInputStream);
String tempString = new String(data);
Log.i("藍牙服務端監聽str", tempString);
// 向客戶端發送數據
if (tempString.equals("StartOnNet\n")) {
mOutputStream.write("haha".getBytes());
mOutputStream.flush();
if(!isServiceRunning("com.yqq.endClient3.service.GpsInfoCollectionService",BluethoothServer.this)){
// 開啟GPS收集服務
gpsService= new Intent(BluethoothServer.this,
GpsInfoCollectionService.class);
Log.i("藍牙服務端監聽<<<<<<<<<<<<<<<<<<<<<<", "<<<<<<<<<<<<<<<<<");
startService(gpsService);
}
}
} catch (Exception e) {
// TODO: handle exception
} finally {
if (mInputStream != null) {
try {
mInputStream.close();
mInputStream = null;
} catch (IOException e) {
// TODO Auto-generated catch block
e.printStackTrace();
}
}
if (mInputStream != null) {
try {
mOutputStream.close();
mOutputStream = null;
} catch (IOException e) {
// TODO Auto-generated catch block
e.printStackTrace();
}
}
if (mBluetoothSocket != null) {
try {
mBluetoothSocket.close();
mBluetoothSocket = null;
} catch (IOException e) {
// TODO Auto-generated catch block
e.printStackTrace();
}
}
if (mBluetoothServerSocket != null) {
try {
mBluetoothServerSocket.close();
mBluetoothServerSocket = null;
Looper.prepare();
Message message = Message.obtain();
message.what = 0x123456;
mHandler.sendMessage(message);
Looper.loop();
} catch (IOException e) {
// TODO Auto-generated catch block
e.printStackTrace();
}
}
}
}
}
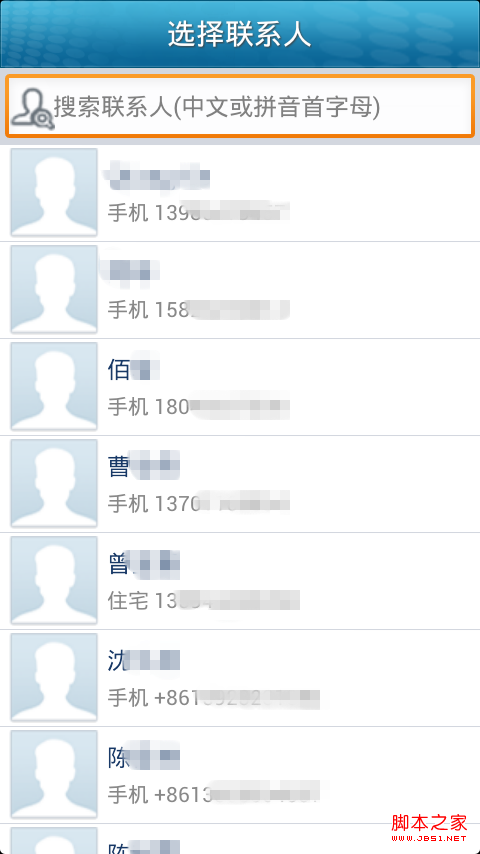 android 加載本地聯系人實現方法
首先先建布局文件,界面很簡單,就是一個搜索框和下面的聯系人列表: 復制代碼 代碼如下: <?xml version=1.0 encoding=utf-8
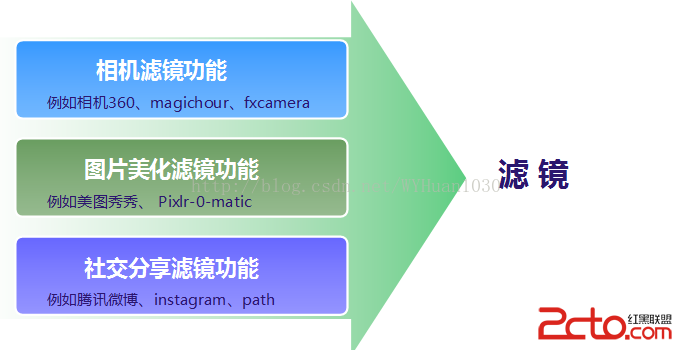 Android Camera 實時濾鏡(二)
一、Android平台濾鏡濾鏡這個功能在目前的市場上應用很廣泛,發展也非常快,總結起來,基本上有以下三種應用會包含濾鏡功能,都各有所長。 二、相機濾鏡介紹1、相
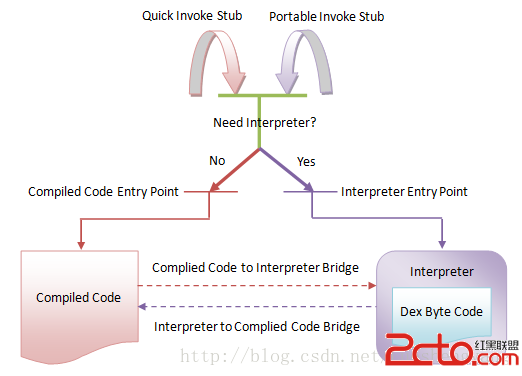 Android運行時ART執行類方法的過程分析
在前面一篇文章中,我們分析了ART運行時加載類以及查找其方法的過程。一旦找到了目標類方法,我們就可以獲得它的DEX字節碼或者本地機器指令,這樣就可以對它進行執行了。在AR
 Android插件實例——360 DroidPlugin詳解
在中國找到錢不難,但你的一個點子不意味著是一個創業。你談一個再好的想法,比如我今天談一個創意說,新浪為什麼不收購GOOGLE呢?這個創意很好。新浪一收購GOOGLE,是