編輯:關於Android編程
今天在項目中用到了android中常用的RadioGroup、RadioButton、Spinner、EditText等控件,在此介紹一下它們的用法,希望對需要的朋友有幫助。
一、RadioGroup和RadioButton的使用
RadioButton就是我們常見的單選按鈕,一個RadioGroup可以包含多個單選按鈕,但是每次只能選擇其中的一個值。
我們先看一下布局文件:
再來看一下RadioGroup的監聽器接口:RadioGroup.OnCheckedChangeListener
 public interface OnCheckedChangeListener {
        /**
         *
Called when the checked radio button has changed. When the * selection is cleared, checkedId is -1.
* * @param group the group in which the checked radio button has changed * @param checkedId the unique identifier of the newly checked radio button */ public void onCheckedChanged(RadioGroup group, int checkedId); } 我們需要實現RadioGroup.OnCheckedChangeListener接口,重寫onCheckedChanged(RadioGroup group, int checkedId)函數,參數group指定添加監聽器的RadioGroup,參數checkedId指定選中的RadioButton的ID。
二、Spinner的使用
Spinner是下拉列表選擇框,可以綁定數據源,數據源可以在程序中定義,也可以在values/strings中定義字符串數組,還可以在數據庫中查詢獲取。
布局很簡單,詳見後面的例子。
綁定數據源:
String[] intervalTime = getResources().getStringArray(R.array.intervalTime); ArrayAdapter設置監聽器接口:AdapterView.OnItemSelectedListeneradapter = new ArrayAdapter (this, android.R.layout.simple_spinner_item, intervalTime); bstIntervalSpinner.setAdapter(adapter);
public interface OnItemSelectedListener {
        /**
         *
Callback method to be invoked when an item in this view has been * selected. This callback is invoked only when the newly selected * position is different from the previously selected position or if * there was no selected item.
* * Impelmenters can call getItemAtPosition(position) if they need to access the * data associated with the selected item. * * @param parent The AdapterView where the selection happened * @param view The view within the AdapterView that was clicked * @param position The position of the view in the adapter * @param id The row id of the item that is selected */ void onItemSelected(AdapterViewparent, View view, int position, long id); /** * Callback method to be invoked when the selection disappears from this * view. The selection can disappear for instance when touch is activated * or when the adapter becomes empty. * * @param parent The AdapterView that now contains no selected item. */ void onNothingSelected(AdapterViewparent); } 我們需要實現AdapterView.OnItemSelectedListener接口,重寫onItemSelected(AdapterViewparent, View view, int position, long id)方法。
三、EditText的使用
EditText很常見,用來輸入文本,給它添加監聽器可以實時監測已經輸入的文本內容,包括查看是否有錯誤、輸入是否符合規范、長度是否超出了范圍。
添加監聽器:
powerEditText.addTextChangedListener(editTextListener);監聽器實現TextWatcher接口:
public interface TextWatcher extends NoCopySpan {
    /**
     * This method is called to notify you that, within s,
     * the count characters beginning at start
     * are about to be replaced by new text with length after.
     * It is an error to attempt to make changes to s from
     * this callback.
     */
    public void beforeTextChanged(CharSequence s, int start,
                                  int count, int after);
    /**
     * This method is called to notify you that, within s,
     * the count characters beginning at start
     * have just replaced old text that had length before.
     * It is an error to attempt to make changes to s from
     * this callback.
     */
    public void onTextChanged(CharSequence s, int start, int before, int count);

    /**
     * This method is called to notify you that, somewhere within
     * s, the text has been changed.
     * It is legitimate to make further changes to s from
     * this callback, but be careful not to get yourself into an infinite
     * loop, because any changes you make will cause this method to be
     * called again recursively.
     * (You are not told where the change took place because other
     * afterTextChanged() methods may already have made other changes
     * and invalidated the offsets.  But if you need to know here,
     * you can use {@link Spannable#setSpan} in {@link #onTextChanged}
     * to mark your place and then look up from here where the span
     * ended up.
     */
    public void afterTextChanged(Editable s);
}
我們可以根據需要重寫beforeTextChanged(CharSequence s, int start, int count, int after)、onTextChanged(CharSequence s, int start, int before, int count)、afterTextChanged(Editable s)這三個方法。
四、示例和源代碼
先上效果圖:
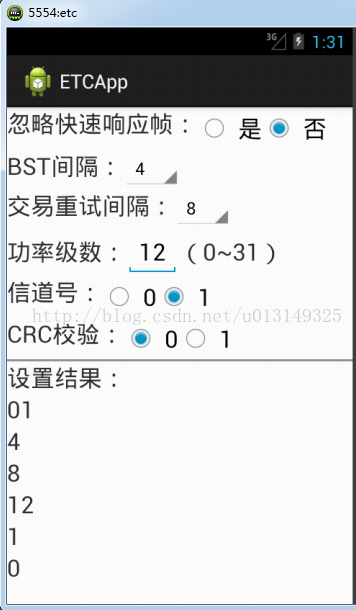
在上圖中,有3個RadioGroup、2個Spinner和1個EditText,由於程序中設置了監聽器,所以上面選項設置的值都會在分割線下面實時顯示出結果。
源代碼:
布局文件:
Java類文件:
package readAndWriteOBU;

import android.app.Activity;
import android.os.Bundle;
import android.text.Editable;
import android.text.TextWatcher;
import android.view.View;
import android.widget.AdapterView;
import android.widget.ArrayAdapter;
import android.widget.EditText;
import android.widget.RadioButton;
import android.widget.RadioGroup;
import android.widget.Spinner;
import android.widget.TextView;

import com.hustxks.etcapp.R;

public class InitActivity extends Activity{
	//忽略快速響應幀單選框
	private RadioGroup quickResponseRadioGroup;
	private RadioButton yesRadioButton;
	private RadioButton noRadioButton;

	//BST間隔下拉列表
	private Spinner bstIntervalSpinner;
    //交易重試間隔下拉列表
	private Spinner transIntervalSpinner;
	//功率級數編輯框
	private EditText powerEditText;

	//信道號單選框
	private RadioGroup channelNumRadioGroup;
	private RadioButton channelRadioButton1;
	private RadioButton channelRadioButton2;

	//CRC校驗單選框
	private RadioGroup crcCkeckRadioGroup;
	private RadioButton crcRadioButton1;
	private RadioButton crcRadioButton2;

	//是否忽略快速響應幀標志:00:忽略快速響應 01:完全透傳
	public static String ignoreQuickResFlag = 0;
	//BST間隔,單位ms,范圍1~10ms
	public static String bstInterval = 10;
	//交易重試間隔,單位ms,范圍1~10ms
	public static String transRetryInterval = 10;
	//功率級數,范圍0~31
	public static String power = 5;
	//信道號,取值0,1
	public static String channelID = 0;
	//CRC校驗標志位,取值0,1
	public static String crcCheckFlag = 0;

	private String[] intervalTime;

	//顯示設置結果文本框
	TextView resultTextView1;
	TextView resultTextView2;
	TextView resultTextView3;
	TextView resultTextView4;
	TextView resultTextView5;
	TextView resultTextView6;

	@Override
	public void onCreate(Bundle savedInstanceState) {
		super.onCreate(savedInstanceState);
		setContentView(R.layout.init_activity);
		initView();
		RadioGroupListener quickRadioGroupListener = new RadioGroupListener(quickResponseRadioGroup);
		RadioGroupListener channelRadioGroupListener = new RadioGroupListener(channelNumRadioGroup);
		RadioGroupListener crcRadioGroupListener = new RadioGroupListener(crcCkeckRadioGroup);
		EditTextListener editTextListener = new EditTextListener();

		quickResponseRadioGroup.setOnCheckedChangeListener(quickRadioGroupListener);
		channelNumRadioGroup.setOnCheckedChangeListener(channelRadioGroupListener);
		crcCkeckRadioGroup.setOnCheckedChangeListener(crcRadioGroupListener);
		powerEditText.addTextChangedListener(editTextListener);

		intervalTime = getResources().getStringArray(R.array.intervalTime);
		ArrayAdapter adapter = new ArrayAdapter(this, android.R.layout.simple_spinner_item, intervalTime);
		bstIntervalSpinner.setAdapter(adapter);
		transIntervalSpinner.setAdapter(adapter);
		SpinnerListener bstSpinnerListener = new SpinnerListener(bstIntervalSpinner);
		bstIntervalSpinner.setOnItemSelectedListener(bstSpinnerListener);
		SpinnerListener retrySpinnerListener = new SpinnerListener(transIntervalSpinner);
		transIntervalSpinner.setOnItemSelectedListener(retrySpinnerListener);
	}

	private void initView() {
		quickResponseRadioGroup = (RadioGroup)findViewById(R.id.quickResponseRG);
		yesRadioButton = (RadioButton)findViewById(R.id.yesRadioButton);
		noRadioButton = (RadioButton)findViewById(R.id.noRadioButton);

		bstIntervalSpinner = (Spinner)findViewById(R.id.BSTintervalSpinner);
		transIntervalSpinner = (Spinner)findViewById(R.id.transRetrySpinner);
		powerEditText = (EditText)findViewById(R.id.powerEditText);

		channelNumRadioGroup = (RadioGroup)findViewById(R.id.channelNumRG);
		channelRadioButton1 = (RadioButton)findViewById(R.id.channelRadioButton1);
		channelRadioButton2 = (RadioButton)findViewById(R.id.channelRadioButton2);

		crcCkeckRadioGroup = (RadioGroup)findViewById(R.id.crcCheckRG);
		crcRadioButton1 = (RadioButton)findViewById(R.id.crcRadioButton1);
		crcRadioButton2 = (RadioButton)findViewById(R.id.crcRadioButton2);

		resultTextView1 = (TextView)findViewById(R.id.result1);
		resultTextView2 = (TextView)findViewById(R.id.result2);
		resultTextView3 = (TextView)findViewById(R.id.result3);
		resultTextView4 = (TextView)findViewById(R.id.result4);
		resultTextView5 = (TextView)findViewById(R.id.result5);
		resultTextView6 = (TextView)findViewById(R.id.result6);
	}

	//監聽RadioGroup的類
	class RadioGroupListener implements RadioGroup.OnCheckedChangeListener {
		private RadioGroup myRadioGroup;
		public RadioGroupListener(RadioGroup radioGroup) {
			// TODO Auto-generated constructor stub
			this.myRadioGroup = radioGroup;
		}
		@Override
		public void onCheckedChanged(RadioGroup group, int checkedId) {
			// TODO Auto-generated method stub
			switch (myRadioGroup.getId()) {
			case R.id.quickResponseRG:
				if (checkedId == R.id.yesRadioButton) {
					ignoreQuickResFlag = 00;
				}
				else if (checkedId == R.id.noRadioButton) {
					ignoreQuickResFlag = 01;
				}
				resultTextView1.setText(ignoreQuickResFlag);
				break;
			case R.id.channelNumRG:
				if (checkedId == R.id.channelRadioButton1) {
					channelID = channelRadioButton1.getText().toString().trim();
				}
				else if (checkedId == R.id.channelRadioButton2) {
					channelID = channelRadioButton2.getText().toString().trim();
				}
				resultTextView5.setText(channelID);;
				break;
			case R.id.crcCheckRG:
				if (checkedId == R.id.crcRadioButton1) {
					crcCheckFlag = crcRadioButton1.getText().toString().trim();
				}
				else if (checkedId == R.id.crcRadioButton2) {
					crcCheckFlag = crcRadioButton2.getText().toString().trim();
				}
				resultTextView6.setText(crcCheckFlag);
				break;
			default:
				break;
			}
		}
	}

	//監聽EditText的類
	class EditTextListener implements TextWatcher {
		@Override
		public void beforeTextChanged(CharSequence s, int start,
                int count, int after) {

		}
		@Override
		public void onTextChanged(CharSequence s, int start, int before, int count) {

		}
		@Override
		public void afterTextChanged(Editable s) {
			power = powerEditText.getText().toString().trim();
			resultTextView4.setText(power);
		}
	}

	//監聽Spinner的類
	class SpinnerListener implements AdapterView.OnItemSelectedListener {
		private Spinner mySpinner;
		public SpinnerListener(Spinner spinner) {
			// TODO Auto-generated constructor stub
			this.mySpinner = spinner;
		}
		@Override
		public void onItemSelected(AdapterView parent, View view,
				int position, long id) {
			if (mySpinner.getId() == R.id.BSTintervalSpinner) {
				bstInterval = intervalTime[position];
				resultTextView2.setText(bstInterval);
			}
			else if (mySpinner.getId() == R.id.transRetrySpinner) {
				transRetryInterval = intervalTime[position];
				resultTextView3.setText(transRetryInterval);
			}
		}
		@Override
		public void onNothingSelected(AdapterView parent) {

		}
	}
}
 android JNI的.so庫調用
在一篇博客中看到一篇文章,感覺描述的還可以:在前面的博客中介紹的都是使用java開發Android應用,這篇博客將介紹java通過使用jni調用c語言做開發為了更加形象的
 華為麥芒5高配版怎麼樣 高配版和標配版有什麼區別
麥芒5的正面仍堅持了大黑邊的設計風格,真的很華為,那麼新款的華為麥芒5標配版和高配版有什麼區別呢?高配版如何?讓我們一起來看看吧!華為麥芒5標配版和高配版區
 Android工程師進階之路 :《Android開發進階:從小工到專家》上市啦!
封面 目錄1 目錄2 為什麼寫這本書寫這本書的念頭由來已久了。也許是從我打算寫《Android源碼設計模式解析與實戰》那時起就萌生了這個念頭,因
 React Native等比放大不丟失圖片
大家可以發現, 原生的Image控件無法實現等比放大後無丟失顯示。如: 有一張20x10的圖片, 要放入一個40x30的顯示區域內.1. cover模式(默認),圖片放大