編輯:關於Android編程
最近在看android關於定位的方式,查了很多資料,也做了相關實驗,在手機上做了測試,下面總結:
一共有三種定位方式,一種是GPS,一種是通過網絡的方式,一種則是在基於基站的方式,但是,不管哪種方式,都需要開啟網絡或者GPS
首先添加權限
http://blog.csdn.net/veloi/article/details/http://blog.csdn.net/veloi/article/details/
在COARSE_LOCATION是用於基站定位的時候用的,沒有這個權限,在獲取getCellLocation的時候報錯。
第一種方式通過JASON來實現,是通過基站方式的,引用文章地址:http://www.cnblogs.com/dartagnan/archive/2011/3/9.html,下載只是實現定位的代碼

/**
  * Google定位的實現.

  * Geolocation的詳細信息請參見:

  * http://code.google.com/apis/gears/geolocation_network_protocol.html" mce_href="http://blog.csdn.net/veloi/article/details/http://code.google.com/apis/gears/geolocation_network_protocol.html">
  * http://blog.csdn.net/veloi/article/details/http://code.google.com/apis/gears/geolocation_network_protocol.html
  */
public class LocationAct extends Activity {
     private TextView txtInfo;
     public void onCreate(Bundle savedInstanceState) {
         super.onCreate(savedInstanceState);
         setContentView(R.layout.main);
         Button btn = (Button) findViewById(R.id.btnStart);
         txtInfo = (TextView) findViewById(R.id.txtInfo);
         btn.setOnClickListener(new Button.OnClickListener() {
             public void onClick(View view) {
                 getLocation();
             }
         });
     }
     private void getLocation() {
         TelephonyManager tm = (TelephonyManager) getSystemService(Context.TELEPHONY_SERVICE);
         GsmCellLocation gsmCell = (GsmCellLocation) tm.getCellLocation();
         int cid = gsmCell.getCid();
         int lac = gsmCell.getLac();
         String netOperator = tm.getNetworkOperator();
         int mcc = Integer.valueOf(netOperator.substring(0, 3));
         int mnc = Integer.valueOf(netOperator.substring(3, 5));
         JSONObject holder = new JSONObject();
         JSONArray array = new JSONArray();
         JSONObject data = new JSONObject();
         try {
             holder.put("version", "1.1.0");
             holder.put("host", "maps.google.com");
             holder.put("address_language", "zh_CN");
             holder.put("request_address", true);
             holder.put("radio_type", "gsm");
             holder.put("carrier", "HTC");
             data.put("cell_id", cid);
             data.put("location_area_code", lac);
             data.put("mobile_countyr_code", mcc);
             data.put("mobile_network_code", mnc);
             array.put(data);
             holder.put("cell_towers", array);
         } catch (JSONException e) {
             e.printStackTrace();
         }
         DefaultHttpClient client = new DefaultHttpClient();
         HttpPost httpPost = new HttpPost("http://www.google.com/loc/json");
         StringEntity stringEntity = null;
         try {
             stringEntity = new StringEntity(holder.toString());
         } catch (UnsupportedEncodingException e) {
             e.printStackTrace();
         }
         httpPost.setEntity(stringEntity);
         HttpResponse httpResponse = null;
         try {
             httpResponse = client.execute(httpPost);
         } catch (ClientProtocolException e) {
             e.printStackTrace();
         } catch (IOException e) {
             e.printStackTrace();
         }
         HttpEntity httpEntity = httpResponse.getEntity();
         InputStream is = null;
         try {
             is = httpEntity.getContent();
         } catch (IllegalStateException e) {
             e.printStackTrace();
         } catch (IOException e) {
             // TODO Auto-generated catch block
             e.printStackTrace();
         }
         InputStreamReader isr = new InputStreamReader(is);
         BufferedReader reader = new BufferedReader(isr);
         StringBuffer stringBuffer = new StringBuffer();
         try {
             String result = "";
             while ((result = reader.readLine()) != null) {
                 stringBuffer.append(result);
             }
         } catch (IOException e) {
             e.printStackTrace();
         }
         txtInfo.setText(stringBuffer.toString());
     }
}
第二種通過嚴格的GPS來定位,引用文章地址:http://www.cnblogs.com/wisekingokok/archive/2011/09/06/2168479.html,這裡只引用代碼
public class MainActivity extends Activity {
     private LocationManager locationManager;
     private GpsStatus gpsstatus;
     @Override
     public void onCreate(Bundle savedInstanceState) {
        super.onCreate(savedInstanceState);
        setContentView(R.layout.main);

        //獲取到LocationManager對象
        locationManager = (LocationManager) getSystemService(LOCATION_SERVICE);

        //根據設置的Criteria對象,獲取最符合此標准的provider對象
        String currentProvider = locationManager.getProvider(LocationManager.GPS_PROVIDER).getName();

        //根據當前provider對象獲取最後一次位置信息
        Location currentLocation = locationManager.getLastKnownLocation(currentProvider);
        //如果位置信息為null,則請求更新位置信息
        if(currentLocation == null){
            locationManager.requestLocationUpdates(currentProvider, 0, 0, locationListener);
        }
        //增加GPS狀態監聽器
        locationManager.addGpsStatusListener(gpsListener);

        //直到獲得最後一次位置信息為止,如果未獲得最後一次位置信息,則顯示默認經緯度
        //每隔10秒獲取一次位置信息
        while(true){
            currentLocation = locationManager.getLastKnownLocation(currentProvider);
            if(currentLocation != null){
                Log.d("Location", "Latitude: " + currentLocation.getLatitude());
                Log.d("Location", "location: " + currentLocation.getLongitude());
                break;
            }else{
                Log.d("Location", "Latitude: " + 0);
                Log.d("Location", "location: " + 0);
            }
            try {
                Thread.sleep(10000);
            } catch (InterruptedException e) {
                 Log.e("Location", e.getMessage());
            }
        }
     }

     private GpsStatus.Listener gpsListener = new GpsStatus.Listener(){
         //GPS狀態發生變化時觸發
         @Override
         public void onGpsStatusChanged(int event) {
             //獲取當前狀態
             gpsstatus=locationManager.getGpsStatus(null);
             switch(event){
                 //第一次定位時的事件
                 case GpsStatus.GPS_EVENT_FIRST_FIX:
                     break;
                 //開始定位的事件
                 case GpsStatus.GPS_EVENT_STARTED:
                     break;
                 //發送GPS衛星狀態事件
                 case GpsStatus.GPS_EVENT_SATELLITE_STATUS:
                     Toast.makeText(MainActivity.this, "GPS_EVENT_SATELLITE_STATUS", Toast.LENGTH_SHORT).show();
                     Iterable allSatellites = gpsstatus.getSatellites();
                     Iterator it=allSatellites.iterator();
                     int count = 0;
                     while(it.hasNext())
                     {
                         count++;
                     }
                     Toast.makeText(MainActivity.this, "Satellite Count:" + count, Toast.LENGTH_SHORT).show();
                     break;
                 //停止定位事件
                 case GpsStatus.GPS_EVENT_STOPPED:
                     Log.d("Location", "GPS_EVENT_STOPPED");
                     break;
             }
         }
     };


     //創建位置監聽器
     private LocationListener locationListener = new LocationListener(){
         //位置發生改變時調用
         @Override
         public void onLocationChanged(Location location) {
             Log.d("Location", "onLocationChanged");
         }

         //provider失效時調用
         @Override
         public void onProviderDisabled(String provider) {
             Log.d("Location", "onProviderDisabled");
         }

         //provider啟用時調用
         @Override
         public void onProviderEnabled(String provider) {
             Log.d("Location", "onProviderEnabled");
         }

         //狀態改變時調用
         @Override
         public void onStatusChanged(String provider, int status, Bundle extras) {
             Log.d("Location", "onStatusChanged");
         }
     };
 }
第三種主要是通過網絡的方式來定位,引用文章地址:http://www.cnblogs.com/wisekingokok/archive/2011/09/05/2167755.html,這裡只寫代碼
package com.test;

 import java.io.IOException;
 import java.util.List;

 import android.app.Activity;
 import android.location.Address;
 import android.location.Criteria;
 import android.location.Geocoder;
 import android.location.Location;
 import android.location.LocationListener;
 import android.location.LocationManager;
 import android.os.Bundle;
 import android.util.Log;
 import android.widget.Toast;

 public class MainActivity extends Activity {
     @Override
     public void onCreate(Bundle savedInstanceState) {
        super.onCreate(savedInstanceState);
        setContentView(R.layout.main);

        //獲取到LocationManager對象
        LocationManager locationManager = (LocationManager) getSystemService(LOCATION_SERVICE);
        //創建一個Criteria對象
        Criteria criteria = new Criteria();
        //設置粗略精確度
        criteria.setAccuracy(Criteria.ACCURACY_COARSE);
        //設置是否需要返回海拔信息
        criteria.setAltitudeRequired(false);
        //設置是否需要返回方位信息
        criteria.setBearingRequired(false);
        //設置是否允許付費服務
        criteria.setCostAllowed(true);
        //設置電量消耗等級
        criteria.setPowerRequirement(Criteria.POWER_HIGH);
        //設置是否需要返回速度信息
        criteria.setSpeedRequired(false);

        //根據設置的Criteria對象,獲取最符合此標准的provider對象
        String currentProvider = locationManager.getBestProvider(criteria, true);
        Log.d("Location", "currentProvider: " + currentProvider);
        //根據當前provider對象獲取最後一次位置信息
        Location currentLocation = locationManager.getLastKnownLocation(currentProvider);
        //如果位置信息為null,則請求更新位置信息
        if(currentLocation == null){
            locationManager.requestLocationUpdates(currentProvider, 0, 0, locationListener);
        }
        //直到獲得最後一次位置信息為止,如果未獲得最後一次位置信息,則顯示默認經緯度
        //每隔10秒獲取一次位置信息
        while(true){
            currentLocation = locationManager.getLastKnownLocation(currentProvider);
            if(currentLocation != null){
                Log.d("Location", "Latitude: " + currentLocation.getLatitude());
                Log.d("Location", "location: " + currentLocation.getLongitude());
                break;
            }else{
                Log.d("Location", "Latitude: " + 0);
                Log.d("Location", "location: " + 0);
            }
            try {
                Thread.sleep(10000);
            } catch (InterruptedException e) {
                 Log.e("Location", e.getMessage());
            }
        }

        //解析地址並顯示
        Geocoder geoCoder = new Geocoder(this);
        try {
            int latitude = (int) currentLocation.getLatitude();
            int longitude = (int) currentLocation.getLongitude();
            List list = geoCoder.getFromLocation(latitude, longitude, 2);
            for(int i=0; i
 【我的Android進階之旅】Realm數據庫學習資料匯總(持續更新)
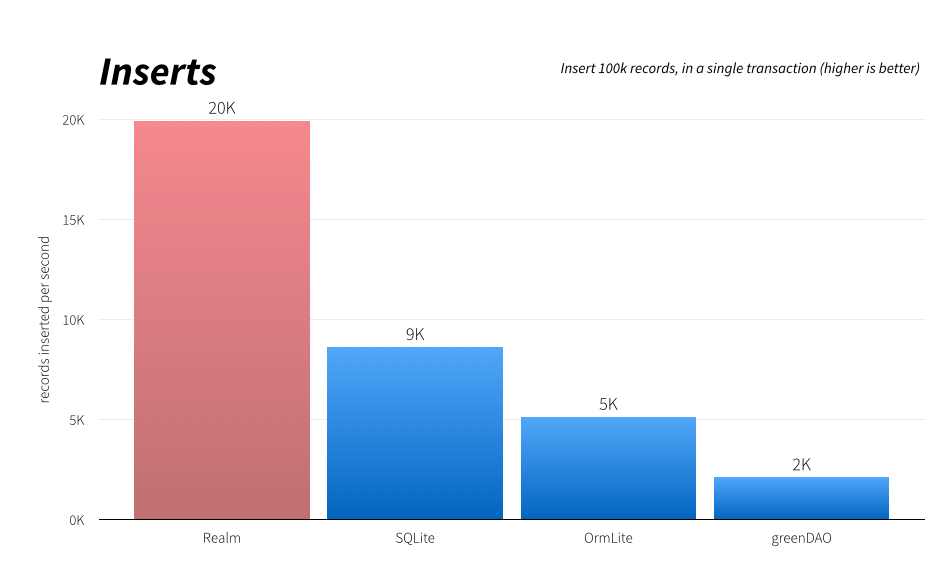
介紹realm是一個跨平台移動數據庫引擎,支持iOS、OS X(Objective-C和Swift)以及Android。2014年7月發布。由YCombinator孵化的
 Android 繼承DialogFragment彈出dialog對話框二
之前寫過一篇關於Android 繼承DialogFragment彈出dialog對話框一,這次是在上次的基礎上修改了一些東西,就是怎樣在DialogFragment中獲取
 Android實現自定義輪播圖片控件示例
要完成一個輪播圖片,首先想到的應該是使用ViewPager來實現。ViewPager已經有了滑動的功能,我們只要讓它自己滾動。再加上下方的小圓點就行了。所以我們本次的自定
 Android入門之Gallery+ImageSwitcher用法實例解析
繼上一篇介紹了如何使用Gallery控件之後,本文就來講一下Gallery 與ImageSwitcher的結合使用。本文所述實例代碼將實現一個簡單的浏覽圖片的功能。先貼出