編輯:關於Android編程
由於隨手拍項目想做成類似於美圖秀秀那種底部有一排Menu實現不同效果的功能,這裡先簡單介紹如何通過Menu實現打開相冊中的圖片、懷舊效果、浮雕效果、光照效果和素描效果.後面可能會講述如何通過PopupWindow實現自定義的Menu效果.
希望文章對大家有所幫助,如果有錯誤或不足之處請海涵~
@Override
public boolean onCreateOptionsMenu(Menu menu) { //創建Menu
	//自定義menu 添加圖標(使用自帶圖標)
	menu.add(Menu.NONE, Menu.FIRST + 1 , 1, 打開).
		setIcon(android.R.drawable.ic_menu_slideshow);
	menu.add(Menu.NONE, Menu.FIRST + 2 , 2, 懷舊).
		setIcon(android.R.drawable.ic_menu_edit);
	menu.add(Menu.NONE, Menu.FIRST + 3 , 3, 浮雕).
		setIcon(android.R.drawable.ic_menu_gallery);
	menu.add(Menu.NONE, Menu.FIRST + 4 , 4, 模糊).
		setIcon(android.R.drawable.ic_menu_crop);
	menu.add(Menu.NONE, Menu.FIRST + 5 , 5, 光照).
		setIcon(android.R.drawable.ic_menu_camera);
	menu.add(Menu.NONE, Menu.FIRST + 6  , 6, 銳化).
		setIcon(android.R.drawable.ic_menu_view);
    return true;
}
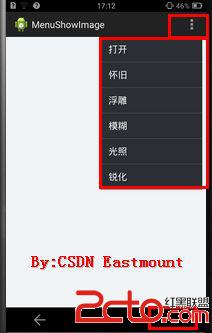
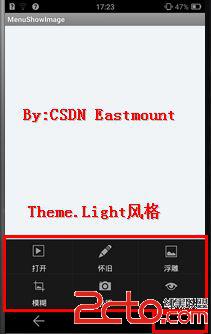
由於Android 4.0系統缺省UI風格有所變化,所以需要設置Activity的theme為Theme.Light.同時也可以在res/menu/main.xml設置菜單項.參考恺風博主關於Menu的介紹,非常不錯.http://blog.csdn.net/flowingflying/article/details/11967301
下圖是設置前面的顯示Menu不同效果,同時我調用的圖標都是Android自帶的圖片,用戶也可以自定義.(android默認圖標列表)
@Override
public boolean onOptionsItemSelected(MenuItem item) { //選擇Menu
	//選擇id 對應Menu.add的參數Menu.FIRST+i
    int id = item.getItemId();
    switch(id) {
    case Menu.FIRST+1:
    	Toast.makeText(this, 打開圖片, Toast.LENGTH_SHORT).show();
    	OpenImage();
    	break;
    case Menu.FIRST+2:
    	Toast.makeText(this, 圖片懷舊效果, Toast.LENGTH_SHORT).show();
    	OldRemeberImage();
    	break;
    case Menu.FIRST+3:
    	Toast.makeText(this, 圖片浮雕效果, Toast.LENGTH_SHORT).show();
    	ReliefImage();
    	break;
    case Menu.FIRST+4:
    	Toast.makeText(this, 圖片模糊效果, Toast.LENGTH_SHORT).show();
    	FuzzyImage();
    	break;
    case Menu.FIRST+5:
    	Toast.makeText(this, 圖片光照效果, Toast.LENGTH_SHORT).show();
    	SunshineImage();
    	break;
    case Menu.FIRST+6:
    	Toast.makeText(this, 圖片銳化效果, Toast.LENGTH_SHORT).show();
    	SharpenImage();
    	break;
    }

    return super.onOptionsItemSelected(item);
}
其中打開圖片函數實現方法如下,而上面的很多自定義函數都將在第三部分介紹,你此處可以注釋掉只驗證打開圖片.首先添加自定義變量和獲取ImageView布局.
//自定義變量
private ImageView imageShow;           //顯示圖片
private Bitmap bmp;                    //原始圖片
private final int IMAGE_OPEN = 0;      //打開圖片
@Override
protected void onCreate(Bundle savedInstanceState) {
    super.onCreate(savedInstanceState);
    setContentView(R.layout.activity_main);
    imageShow = (ImageView) findViewById(R.id.imageView1);
    if (savedInstanceState == null) {
        getFragmentManager().beginTransaction()
                .add(R.id.container, new PlaceholderFragment())
                .commit();
    }
}
然後通過自定義函數OpenImage打開函數,與前面文章介紹的方法一樣.
//自定義函數 打開圖片
public void OpenImage()
{
	Intent intent = new Intent(Intent.ACTION_PICK,
            android.provider.MediaStore.Images.Media.EXTERNAL_CONTENT_URI);
    startActivityForResult(intent, IMAGE_OPEN);
}
//顯示打開圖片
protected void onActivityResult(int requestCode, int resultCode, Intent data) {
    super.onActivityResult(requestCode, resultCode, data);
    if(resultCode==RESULT_OK && requestCode==IMAGE_OPEN) {
       Uri imageFileUri = data.getData();
       DisplayMetrics dm = new DisplayMetrics();
       getWindowManager().getDefaultDisplay().getMetrics(dm);
       int width = dm.widthPixels;    //手機屏幕水平分辨率
       int height = dm.heightPixels;  //手機屏幕垂直分辨率
       try {
           //載入圖片尺寸大小沒載入圖片本身 true
           BitmapFactory.Options bmpFactoryOptions = new BitmapFactory.Options();
           bmpFactoryOptions.inJustDecodeBounds = true;
           bmp = BitmapFactory.decodeStream(getContentResolver().openInputStream(imageFileUri), null, bmpFactoryOptions);
           int heightRatio = (int)Math.ceil(bmpFactoryOptions.outHeight/(float)height);
           int widthRatio = (int)Math.ceil(bmpFactoryOptions.outWidth/(float)width);
           //inSampleSize表示圖片占原圖比例 1表示原圖
           if(heightRatio>1&&widthRatio>1) {
               if(heightRatio>widthRatio) {
                   bmpFactoryOptions.inSampleSize = heightRatio;
               }
               else {
                   bmpFactoryOptions.inSampleSize = widthRatio;
               }
           }
           //圖像真正解碼 false
           bmpFactoryOptions.inJustDecodeBounds = false;
           bmp = BitmapFactory.decodeStream(getContentResolver().openInputStream(imageFileUri), null, bmpFactoryOptions);
           imageShow.setImageBitmap(bmp);
       }
       catch(FileNotFoundException e) {
           e.printStackTrace();
       }
   }  //end if
}
下面講講使用Options Menu的函數:
//圖片懷舊處理
private void OldRemeberImage()
{
	/*
	 * 懷舊處理算法即設置新的RGB
	 * R=0.393r+0.769g+0.189b
	 * G=0.349r+0.686g+0.168b
	 * B=0.272r+0.534g+0.131b
	 */
	int width = bmp.getWidth();
	int height = bmp.getHeight();
	Bitmap bitmap = Bitmap.createBitmap(width, height, Bitmap.Config.RGB_565);
	int pixColor = 0;
	int pixR = 0;
	int pixG = 0;
	int pixB = 0;
	int newR = 0;
	int newG = 0;
	int newB = 0;
	int[] pixels = new int[width * height];
	bmp.getPixels(pixels, 0, width, 0, 0, width, height);
	for (int i = 0; i < height; i++)
	{
		for (int k = 0; k < width; k++)
		{
			pixColor = pixels[width * i + k];
			pixR = Color.red(pixColor);
			pixG = Color.green(pixColor);
			pixB = Color.blue(pixColor);
			newR = (int) (0.393 * pixR + 0.769 * pixG + 0.189 * pixB);
			newG = (int) (0.349 * pixR + 0.686 * pixG + 0.168 * pixB);
			newB = (int) (0.272 * pixR + 0.534 * pixG + 0.131 * pixB);
			int newColor = Color.argb(255, newR > 255 ? 255 : newR, newG > 255 ? 255 : newG, newB > 255 ? 255 : newB);
			pixels[width * i + k] = newColor;
		}
	}
	bitmap.setPixels(pixels, 0, width, 0, 0, width, height);
	imageShow.setImageBitmap(bitmap);
}
顯示效果如下圖所示: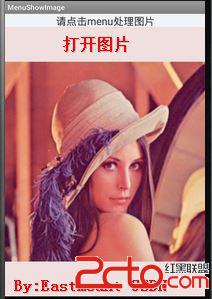

//圖片浮雕處理
//底片效果也非常簡單:將當前像素點的RGB值分別與255之差後的值作為當前點的RGB
//灰度圖像:通常使用的方法是gray=0.3*pixR+0.59*pixG+0.11*pixB
private void ReliefImage()
{
	/*
	 * 算法原理:(前一個像素點RGB-當前像素點RGB+127)作為當前像素點RGB值
	 * 在ABC中計算B點浮雕效果(RGB值在0~255)
	 * B.r = C.r - B.r + 127
	 * B.g = C.g - B.g + 127
	 * B.b = C.b - B.b + 127
	 */
	int width = bmp.getWidth();
	int height = bmp.getHeight();
	Bitmap bitmap = Bitmap.createBitmap(width, height, Bitmap.Config.RGB_565);
	int pixColor = 0;
	int pixR = 0;
	int pixG = 0;
	int pixB = 0;
	int newR = 0;
	int newG = 0;
	int newB = 0;
	int[] pixels = new int[width * height];
	bmp.getPixels(pixels, 0, width, 0, 0, width, height);
	for (int i = 1; i < height-1; i++)
	{
		for (int k = 1; k < width-1; k++)
		{
			//獲取前一個像素顏色
			pixColor = pixels[width * i + k];
			pixR = Color.red(pixColor);
			pixG = Color.green(pixColor);
			pixB = Color.blue(pixColor);
			//獲取當前像素
			pixColor = pixels[(width * i + k) + 1];
			newR = Color.red(pixColor) - pixR +127;
			newG = Color.green(pixColor) - pixG +127;
			newB = Color.blue(pixColor) - pixB +127;
			newR = Math.min(255, Math.max(0, newR));
			newG = Math.min(255, Math.max(0, newG));
			newB = Math.min(255, Math.max(0, newB));
			pixels[width * i + k] = Color.argb(255, newR, newG, newB);
		}
	}
	bitmap.setPixels(pixels, 0, width, 0, 0, width, height);
	imageShow.setImageBitmap(bitmap);
}
顯示效果如下圖所示: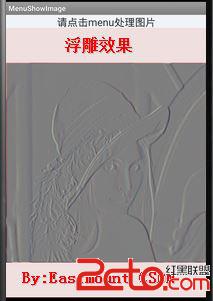
//圖像模糊處理
private void FuzzyImage()
{
	/*
	 * 算法原理:
	 * 簡單算法將像素周圍八個點包括自身共九個點RGB值分別相加後平均,當前像素點的RGB值
	 * 復雜算法采用高斯模糊
	 * 高斯矩陣 int[] gauss = new int[] { 1, 2, 1, 2, 4, 2, 1, 2, 1 };
	 * 將九個點的RGB值分別與高斯矩陣中的對應項相乘的和,再除以一個相應的值作為當前像素點的RGB
	 */
    int[] gauss = new int[] { 1, 2, 1, 2, 4, 2, 1, 2, 1 };  // 高斯矩陣
    int delta = 16; // 除以值 值越小圖片會越亮,越大則越暗
	int width = bmp.getWidth();
	int height = bmp.getHeight();
	Bitmap bitmap = Bitmap.createBitmap(width, height, Bitmap.Config.RGB_565);
	int pixColor = 0;
	int pixR = 0;
    int pixG = 0;
    int pixB = 0;
	int newR, newG, newB;
	int pos = 0;    //位置
	int[] pixels = new int[width * height];
    bmp.getPixels(pixels, 0, width, 0, 0, width, height);
	//循環賦值
	for (int i = 1; i < height-1; i++)
	{
		for (int k = 1; k < width-1; k++)
		{
			pos = 0;
			newR = 0;
            newG = 0;
            newB = 0;
			for (int m = -1; m <= 1; m++)  //寬不變
            {
                for (int n = -1; n <= 1; n++) //高先變
                {
                    pixColor = pixels[(i + m) * width + k + n];
                    pixR = Color.red(pixColor);
                    pixG = Color.green(pixColor);
                    pixB = Color.blue(pixColor);
                    //3*3像素相加
                    newR = newR + (int) (pixR * gauss[pos]);
                    newG = newG + (int) (pixG * gauss[pos]);
                    newB = newB + (int) (pixB * gauss[pos]);
                    pos++;
                }
            }
			newR /= delta;
            newG /= delta;
            newB /= delta;
            newR = Math.min(255, Math.max(0, newR));
            newG = Math.min(255, Math.max(0, newG));
            newB = Math.min(255, Math.max(0, newB));
            pixels[i * width + k] = Color.argb(255, newR, newG, newB);
		}
	}
	bitmap.setPixels(pixels, 0, width, 0, 0, width, height);
	imageShow.setImageBitmap(bitmap);
}
該圖顯示效果不是很理想,對高斯模糊理解還不夠,建議大家看我收藏合集裡面講述模糊的超鏈接.
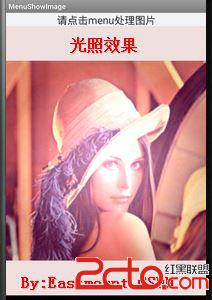
//圖片光照效果
private void SunshineImage()
{
	/*
	 * 算法原理:(前一個像素點RGB-當前像素點RGB+127)作為當前像素點RGB值
	 * 在ABC中計算B點浮雕效果(RGB值在0~255)
	 * B.r = C.r - B.r + 127
	 * B.g = C.g - B.g + 127
	 * B.b = C.b - B.b + 127
	 * 光照中心取長寬較小值為半徑,也可以自定義從左上角射過來
	 */
	int width = bmp.getWidth();
	int height = bmp.getHeight();
	Bitmap bitmap = Bitmap.createBitmap(width, height, Bitmap.Config.RGB_565);
	int pixColor = 0;
	int pixR = 0;
	int pixG = 0;
	int pixB = 0;
	int newR = 0;
	int newG = 0;
	int newB = 0;
	//圍繞圓形光照
	int centerX = width / 2;
	int centerY = height / 2;
	int radius = Math.min(centerX, centerY);
	float strength = 150F;  //光照強度100-150
	int[] pixels = new int[width * height];
	bmp.getPixels(pixels, 0, width, 0, 0, width, height);
	for (int i = 1; i < height-1; i++)
	{
		for (int k = 1; k < width-1; k++)
		{
			//獲取前一個像素顏色
			pixColor = pixels[width * i + k];
			pixR = Color.red(pixColor);
			pixG = Color.green(pixColor);
			pixB = Color.blue(pixColor);
			newR = pixR;
			newG = pixG;
			newB = pixB;
			//計算當前點到光照中心的距離,平面坐標系中兩點之間的距離
			int distance = (int) (Math.pow((centerY-i), 2) + Math.pow((centerX-k), 2));
			if(distance < radius*radius)
			{
				//按照距離大小計算增強的光照值
				int result = (int)(strength*( 1.0-Math.sqrt(distance) / radius ));
				newR = pixR + result;
				newG = newG + result;
				newB = pixB + result;
			}
			newR = Math.min(255, Math.max(0, newR));
			newG = Math.min(255, Math.max(0, newG));
			newB = Math.min(255, Math.max(0, newB));
			pixels[width * i + k] = Color.argb(255, newR, newG, newB);
		}
	}
	bitmap.setPixels(pixels, 0, width, 0, 0, width, height);
	imageShow.setImageBitmap(bitmap);
}
顯示效果如下圖所示 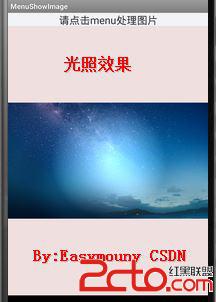
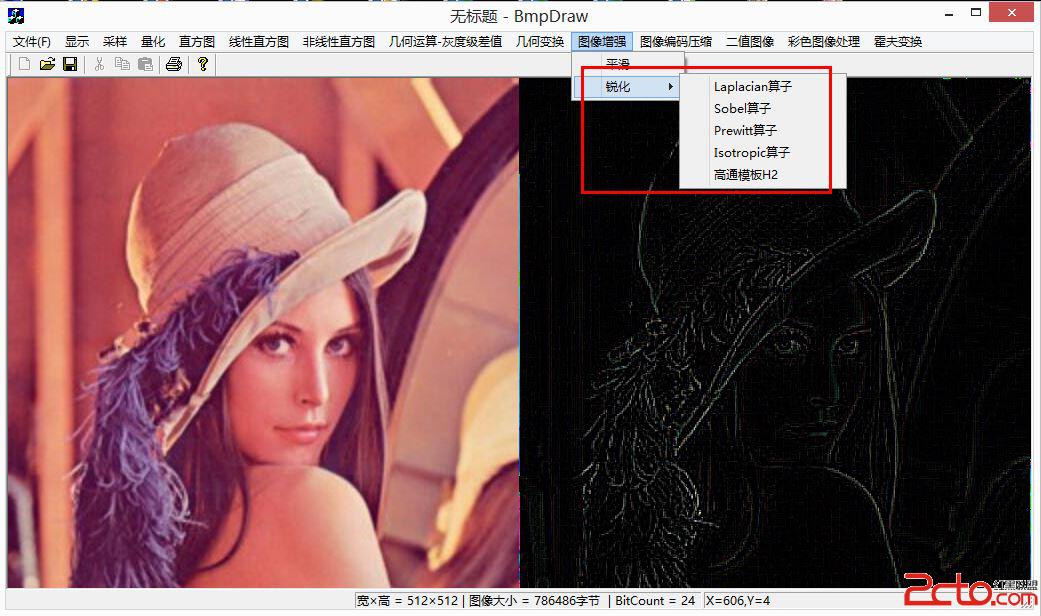
//圖像銳化處理 拉普拉斯算子處理
private void SharpenImage()
{
	/*
	 * 銳化基本思想是加強圖像中景物的邊緣和輪廓,使圖像變得清晰
	 * 而圖像平滑是使圖像中邊界和輪廓變得模糊
	 *
	 * 拉普拉斯算子圖像銳化
	 * 獲取周圍9個點的矩陣乘以模板9個的矩陣 卷積
	 */
	//拉普拉斯算子模板 { 0, -1, 0, -1, -5, -1, 0, -1, 0 } { -1, -1, -1, -1, 9, -1, -1, -1, -1 }
	int[] laplacian = new int[] {  -1, -1, -1, -1, 9, -1, -1, -1, -1 };
	int width = bmp.getWidth();
    int height = bmp.getHeight();
    Bitmap bitmap = Bitmap.createBitmap(width, height, Bitmap.Config.RGB_565);
    int pixR = 0;
    int pixG = 0;
    int pixB = 0;
    int pixColor = 0;
    int newR = 0;
    int newG = 0;
    int newB = 0;
    int idx = 0;
    float alpha = 0.3F;  //圖片透明度
    int[] pixels = new int[width * height];
    bmp.getPixels(pixels, 0, width, 0, 0, width, height);
    //圖像處理
    for (int i = 1; i < height - 1; i++)
    {
        for (int k = 1; k < width - 1; k++)
        {
        	idx = 0;
        	newR = 0;
            newG = 0;
            newB = 0;
            for (int n = -1; n <= 1; n++)   //取出圖像3*3領域像素
            {
                for (int m = -1; m <= 1; m++)  //n行數不變 m列變換
                {
                    pixColor = pixels[(i + n) * width + k + m];  //當前點(i,k)
                    pixR = Color.red(pixColor);
                    pixG = Color.green(pixColor);
                    pixB = Color.blue(pixColor);
                    //圖像像素與對應摸板相乘
                    newR = newR + (int) (pixR * laplacian[idx] * alpha);
                    newG = newG + (int) (pixG * laplacian[idx] * alpha);
                    newB = newB + (int) (pixB * laplacian[idx] * alpha);
                    idx++;
                }
            }
            newR = Math.min(255, Math.max(0, newR));
            newG = Math.min(255, Math.max(0, newG));
            newB = Math.min(255, Math.max(0, newB));
            //賦值
            pixels[i * width + k] = Color.argb(255, newR, newG, newB);
        }
    }
    bitmap.setPixels(pixels, 0, width, 0, 0, width, height);
    imageShow.setImageBitmap(bitmap);
}
作圖是其顯示效果,而右圖是我以前《數字圖像處理》課用C++寫的不同模版的銳化效果.
//圖片冰凍效果
private void IceImage()
{
	int width = bmp.getWidth();
	int height = bmp.getHeight();
	Bitmap bitmap = Bitmap.createBitmap(width, height, Bitmap.Config.RGB_565);
	int pixColor = 0;
	int pixR = 0;
	int pixG = 0;
	int pixB = 0;
	int newColor = 0;
	int newR = 0;
	int newG = 0;
	int newB =0;
	int[] pixels = new int[width * height];
	bmp.getPixels(pixels, 0, width, 0, 0, width, height);
	for (int i = 0; i < height; i++)
	{
		for (int k = 0; k < width; k++)
		{
			//獲取前一個像素顏色
			pixColor = pixels[width * i + k];
			pixR = Color.red(pixColor);
			pixG = Color.green(pixColor);
			pixB = Color.blue(pixColor);
			//紅色
			newColor = pixR - pixG - pixB;
			newColor = newColor * 3 / 2;
			if(newColor < 0) {
				newColor = -newColor;
			}
			if(newColor >255) {
				newColor = 255;
			}
			newR = newColor;
			//綠色
			newColor = pixG - pixB - pixR;
			newColor = newColor * 3 / 2;
			if(newColor < 0) {
				newColor = -newColor;
			}
			if(newColor >255) {
				newColor = 255;
			}
			newG = newColor;
			//藍色
			newColor = pixB - pixG - pixR;
			newColor = newColor * 3 / 2;
			if(newColor < 0) {
				newColor = -newColor;
			}
			if(newColor >255) {
				newColor = 255;
			}
			newB = newColor;
			pixels[width * i + k] = Color.argb(255, newR, newG, newB);
		}
	}
	bitmap.setPixels(pixels, 0, width, 0, 0, width, height);
	imageShow.setImageBitmap(bitmap);
}
下面這個代碼是CSDN的xu_fu博主的素描處理,對我軟件有用.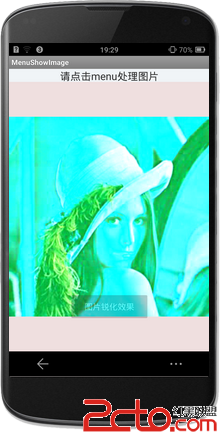
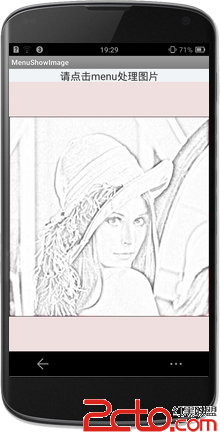
//素描效果
private void SuMiaoImage()
{
	//創建新Bitmap
	int width = bmp.getWidth();
    int height = bmp.getHeight();
    int[] pixels = new int[width * height];    //存儲變換圖像
    int[] linpix = new int[width * height];     //存儲灰度圖像
    Bitmap bitmap = Bitmap.createBitmap(width, height, Bitmap.Config.RGB_565);
    bmp.getPixels(pixels, 0, width, 0, 0, width, height);
    int pixColor = 0;
	int pixR = 0;
	int pixG = 0;
	int pixB = 0;
    int newR = 0;
    int newG = 0;
    int newB = 0;
    //灰度圖像
    for (int i = 1; i < width - 1; i++)
    {
        for (int j = 1; j < height - 1; j++)   //拉普拉斯算子模板 { 0, -1, 0, -1, -5, -1, 0, -1, 0
        {
        	//獲取前一個像素顏色
			pixColor = pixels[width * i + j];
			pixR = Color.red(pixColor);
			pixG = Color.green(pixColor);
			pixB = Color.blue(pixColor);
        	//灰度圖像
        	int gray=(int)(0.3*pixR+0.59*pixG+0.11*pixB);
        	linpix[width * i + j] = Color.argb(255, gray, gray, gray);
        	//圖像反向
        	gray=255-gray;
        	pixels[width * i + j] = Color.argb(255, gray, gray, gray);
        }
    }
    int radius = Math.min(width/2, height/2);
    int[] copixels = gaussBlur(pixels, width, height, 10, 10/3);   //高斯模糊 采用半徑10
    int[] result = colorDodge(linpix, copixels);   //素描圖像 顏色減淡
    bitmap.setPixels(result, 0, width, 0, 0, width, height);
    imageShow.setImageBitmap(bitmap);
}

//高斯模糊
public static int[] gaussBlur(int[] data, int width, int height, int radius,
        float sigma) {

    float pa = (float) (1 / (Math.sqrt(2 * Math.PI) * sigma));
    float pb = -1.0f / (2 * sigma * sigma);

    // generate the Gauss Matrix
    float[] gaussMatrix = new float[radius * 2 + 1];
    float gaussSum = 0f;
    for (int i = 0, x = -radius; x <= radius; ++x, ++i) {
        float g = (float) (pa * Math.exp(pb * x * x));
        gaussMatrix[i] = g;
        gaussSum += g;
    }

    for (int i = 0, length = gaussMatrix.length; i < length; ++i) {
        gaussMatrix[i] /= gaussSum;
    }

    // x direction
    for (int y = 0; y < height; ++y) {
        for (int x = 0; x < width; ++x) {
            float r = 0, g = 0, b = 0;
            gaussSum = 0;
            for (int j = -radius; j <= radius; ++j) {
                int k = x + j;
                if (k >= 0 && k < width) {
                    int index = y * width + k;
                    int color = data[index];
                    int cr = (color & 0x00ff0000) >> 16;
                    int cg = (color & 0x0000ff00) >> 8;
                    int cb = (color & 0x000000ff);

                    r += cr * gaussMatrix[j + radius];
                    g += cg * gaussMatrix[j + radius];
                    b += cb * gaussMatrix[j + radius];

                    gaussSum += gaussMatrix[j + radius];
                }
            }

            int index = y * width + x;
            int cr = (int) (r / gaussSum);
            int cg = (int) (g / gaussSum);
            int cb = (int) (b / gaussSum);

            data[index] = cr << 16 | cg << 8 | cb | 0xff000000;
        }
    }

    // y direction
    for (int x = 0; x < width; ++x) {
        for (int y = 0; y < height; ++y) {
            float r = 0, g = 0, b = 0;
            gaussSum = 0;
            for (int j = -radius; j <= radius; ++j) {
                int k = y + j;
                if (k >= 0 && k < height) {
                    int index = k * width + x;
                    int color = data[index];
                    int cr = (color & 0x00ff0000) >> 16;
                    int cg = (color & 0x0000ff00) >> 8;
                    int cb = (color & 0x000000ff);

                    r += cr * gaussMatrix[j + radius];
                    g += cg * gaussMatrix[j + radius];
                    b += cb * gaussMatrix[j + radius];

                    gaussSum += gaussMatrix[j + radius];
                }
            }

            int index = y * width + x;
            int cr = (int) (r / gaussSum);
            int cg = (int) (g / gaussSum);
            int cb = (int) (b / gaussSum);
            data[index] = cr << 16 | cg << 8 | cb | 0xff000000;
        }
    }

    return data;
}

//顏色減淡
public static int[] colorDodge(int[] baseColor, int[] mixColor) {

    for (int i = 0, length = baseColor.length; i < length; ++i) {
        int bColor = baseColor[i];
        int br = (bColor & 0x00ff0000) >> 16;
        int bg = (bColor & 0x0000ff00) >> 8;
        int bb = (bColor & 0x000000ff);

        int mColor = mixColor[i];
        int mr = (mColor & 0x00ff0000) >> 16;
        int mg = (mColor & 0x0000ff00) >> 8;
        int mb = (mColor & 0x000000ff);

        int nr = colorDodgeFormular(br, mr);
        int ng = colorDodgeFormular(bg, mg);
        int nb = colorDodgeFormular(bb, mb);

        baseColor[i] = nr << 16 | ng << 8 | nb | 0xff000000;
    }
    return baseColor;
}

private static int colorDodgeFormular(int base, int mix) {

    int result = base + (base * mix) / (255 - mix);
    result = result > 255 ? 255 : result;
    return result;

}
最後希望文章對大家有所幫助,感謝上面提到的作者,同時可能還有些如LOMO等效果可參考下面的文章,它是圖像處理的一個集合超鏈接.後面會寫PopupWindows實現美圖秀秀的效果和對人臉進行處理. Android中BroadcastReceiver(異步接收廣播Intent)的使用
Broadcast Receiver簡介 Broadcast Receiver是Android的五大組件之一,使用頻率也很高。 用於異步接收廣播Intent,廣播Inte
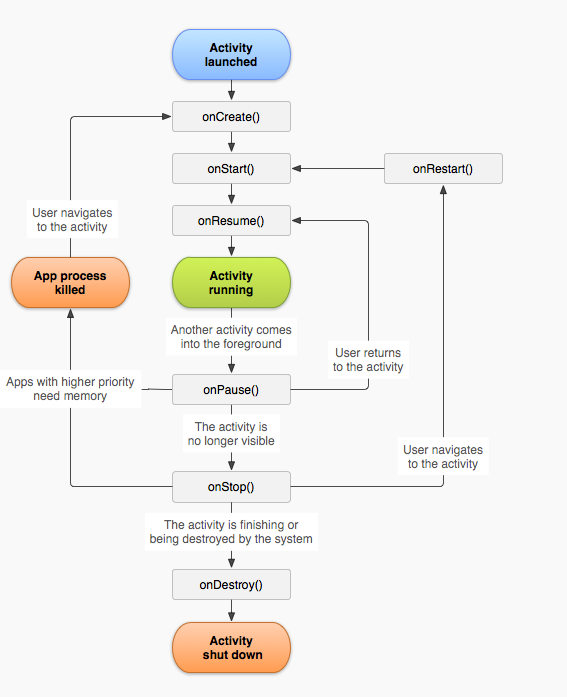 Activity數據保存探索
在開發中發現一個問題:當一個我通過Intent開啟一個前面已經打開的activty的界面時,新打開的activity的狀態會丟失。當時,當我直接按home減將acitvi
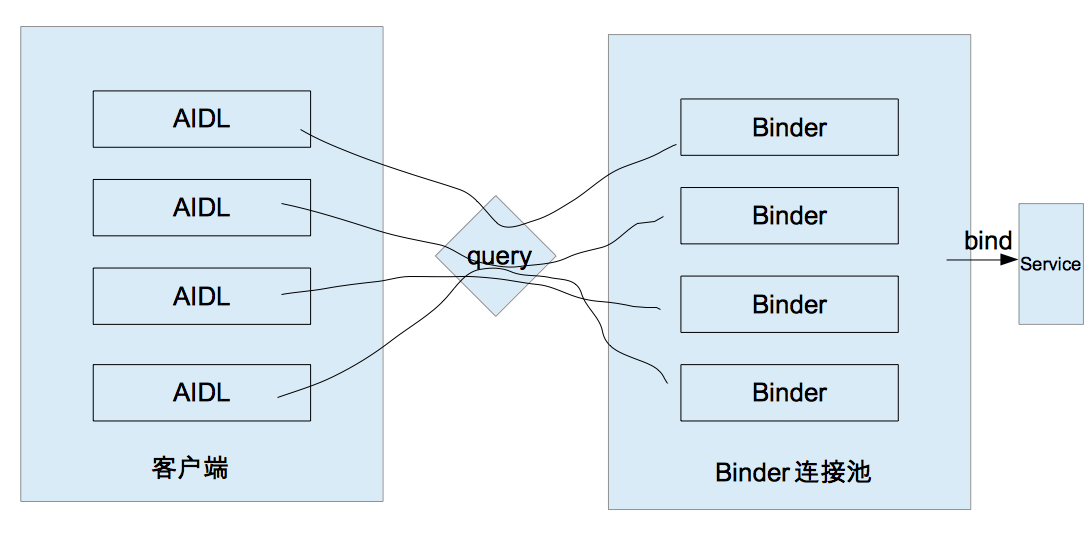 Android開發 二 IPC機制(下)
我們繼續來講IPC機制,在本篇中你將會學習到ContentProvider Socket Binder連接池一.使用ContentProvider ContentPro
 Android 4.4 Kitkat Phone工作流程淺析(八)__Phone狀態分析
前置文章: 《Android 4.4 Kitkat Phone工作流程淺析(一)__概要和學習計劃》 《Android 4.4 Kitkat Phone工作