編輯:關於Android編程
今天遇到一些關於在子線程中操作Handler的問題,感覺又要研究源代碼了,但是關於Handler的話,我之前研究過,可以參考這篇文章:http://blog.csdn.net/jiangwei0910410003/article/details/17021809。但是這篇文章沒有說的那麼深入了,所以這次就更深入的解讀一下。
Android中的應用程序都是通過消息驅動的,系統為每一個應用程序維護一個消息隊列(MessageQueue),應用程序的主線程不斷的從這個消息隊列中獲取消息(Looper),然後對這些消息進行處理(Handler),所以這裡有三個重要的角色:
*MessageQueue:存放消息(Message)的消息隊列
*Looper:輪循從消息隊列中取出消息然後分發
*Handler:發送消息和處理消息
他們三者的關系是:MessageQueue和Looper是一一對應的,一個Looper可以對應多個Handler。同時這裡還有一個角色就是線程Thread.後面在分析源碼的時候會說到這點,當然Thread和Looper的關系也是一一對應的。
下面就從源碼中分析一下流程吧(有時候看源碼真的能夠明白好多事~~)
首先來看一下MessageQueue類:
private native static long nativeInit();
private native static void nativeDestroy(long ptr);
private native static void nativePollOnce(long ptr, int timeoutMillis);
private native static void nativeWake(long ptr);
private native static boolean nativeIsIdling(long ptr);
這個類中主要就是這幾個本地方法,所以只要看懂這些本地方法的實現就可以了。
當然這些本地方法肯定是在MessageQueue中的上層方法中調用的:
*構造方法中調用nativeInit
*獲取消息方法next中調用nativePollOnce(其實相當於是處理消息)
*把消息加入到消息隊列中的enqueueMessage方法中調用了nativeWake(其實相當於發送消息)
下面來看一下這些本地方法(這裡主要是參考了老羅的文章:http://blog.csdn.net/luoshengyang/article/details/6817933)
它是在MessageQueue的構造方法中調用的
這個JNI方法定義在frameworks/base/core/jni/android_os_MessageQueue.cpp文件中:
static void android_os_MessageQueue_nativeInit(JNIEnv* env, jobject obj) {
    NativeMessageQueue* nativeMessageQueue = new NativeMessageQueue();
    if (! nativeMessageQueue) {
        jniThrowRuntimeException(env, "Unable to allocate native queue");
        return;
    }

    android_os_MessageQueue_setNativeMessageQueue(env, obj, nativeMessageQueue);
}在JNI中,也相應地創建了一個消息隊列NativeMessageQueue,NativeMessageQueue類也是定義在frameworks/base/core/jni/android_os_MessageQueue.cpp文件中,它的創建過程如下所示:NativeMessageQueue::NativeMessageQueue() {
mLooper = Looper::getForThread();
if (mLooper == NULL) {
mLooper = new Looper(false);
Looper::setForThread(mLooper);
}
}它主要就是在內部創建了一個Looper對象,注意,這個Looper對象是實現在JNI層的,它與上面Java層中的Looper是不一樣的,不過它們是對應的,下面我們進一步分析消息循環的過程的時候,讀者就會清楚地了解到它們之間的關系。這個Looper的創建過程也很重要,不過我們暫時放一放,先分析完android_os_MessageQueue_nativeInit函數的執行,它創建了本地消息隊列NativeMessageQueue對象之後,接著調用android_os_MessageQueue_setNativeMessageQueue函數來把這個消息隊列對象保存在前面我們在Java層中創建的MessageQueue對象的mPtr成員變量裡面:
static void android_os_MessageQueue_setNativeMessageQueue(JNIEnv* env, jobject messageQueueObj,
        NativeMessageQueue* nativeMessageQueue) {
    env->SetIntField(messageQueueObj, gMessageQueueClassInfo.mPtr,
             reinterpret_cast(nativeMessageQueue));
} 這裡傳進來的參數messageQueueObj即為我們前面在Java層創建的消息隊列對象,而gMessageQueueClassInfo.mPtr即表示在Java類MessageQueue中,其成員變量mPtr的偏移量,通過這個偏移量,就可以把這個本地消息隊列對象natvieMessageQueue保存在Java層創建的消息隊列對象的mPtr成員變量中,這是為了後續我們調用Java層的消息隊列對象的其它成員函數進入到JNI層時,能夠方便地找回它在JNI層所對應的消息隊列對象。我們再回到NativeMessageQueue的構造函數中,看看JNI層的Looper對象的創建過程,即看看它的構造函數是如何實現的,這個Looper類實現在frameworks/base/libs/utils/Looper.cpp文件中:
Looper::Looper(bool allowNonCallbacks) :
	mAllowNonCallbacks(allowNonCallbacks),
	mResponseIndex(0) {
	int wakeFds[2];
	int result = pipe(wakeFds);
	......

	mWakeReadPipeFd = wakeFds[0];
	mWakeWritePipeFd = wakeFds[1];

	......

#ifdef LOOPER_USES_EPOLL
	// Allocate the epoll instance and register the wake pipe.
	mEpollFd = epoll_create(EPOLL_SIZE_HINT);
	......

	struct epoll_event eventItem;
	memset(& eventItem, 0, sizeof(epoll_event)); // zero out unused members of data field union
	eventItem.events = EPOLLIN;
	eventItem.data.fd = mWakeReadPipeFd;
	result = epoll_ctl(mEpollFd, EPOLL_CTL_ADD, mWakeReadPipeFd, & eventItem);
	......
#else
	......
#endif

	......
}這個構造函數做的事情非常重要,它跟我們後面要介紹的應用程序主線程在消息隊列中沒有消息時要進入等待狀態以及當消息隊列有消息時要把應用程序主線程喚醒的這兩個知識點息息相關。它主要就是通過pipe系統調用來創建了一個管道了:int wakeFds[2]; int result = pipe(wakeFds); ...... mWakeReadPipeFd = wakeFds[0]; mWakeWritePipeFd = wakeFds[1];
要使用Linux系統的epoll機制,首先要通過epoll_create來創建一個epoll專用的文件描述符:
mEpollFd = epoll_create(EPOLL_SIZE_HINT);傳入的參數EPOLL_SIZE_HINT是在這個mEpollFd上能監控的最大文件描述符數。
接著還要通過epoll_ctl函數來告訴epoll要監控相應的文件描述符的什麼事件:
struct epoll_event eventItem;
memset(& eventItem, 0, sizeof(epoll_event)); // zero out unused members of data field union
eventItem.events = EPOLLIN;
eventItem.data.fd = mWakeReadPipeFd;
result = epoll_ctl(mEpollFd, EPOLL_CTL_ADD, mWakeReadPipeFd, & eventItem);
這裡就是告訴mEpollFd,它要監控mWakeReadPipeFd文件描述符的EPOLLIN事件,即當管道中有內容可讀時,就喚醒當前正在等待管道中的內容的線程。
A. 在Java層,創建了一個Looper對象,這個Looper對象是用來進入消息循環的,它的內部有一個消息隊列MessageQueue對象mQueue;
B. 在JNI層,創建了一個NativeMessageQueue對象,這個NativeMessageQueue對象保存在Java層的消息隊列對象mQueue的成員變量mPtr中;
C. 在C++層,創建了一個Looper對象,保存在JNI層的NativeMessageQueue對象的成員變量mLooper中,這個對象的作用是,當Java層的消息隊列中沒有消息時,就使Android應用程序主線程進入等待狀態,而當Java層的消息隊列中來了新的消息後,就喚醒Android應用程序的主線程來處理這個消息。
到這裡nativeInit方法就介紹完了,看來這個方法中做的事情還是很多的。
插播移到面試題:說說Handler機制的底層實現原理。
這個問題就是上面的解釋,使用Linux中的epoll機制進行消息處理的。
這個方法是在MessageQueue中的next方法中調用的,其實這個方法會在後面說到Looper類中被調用,主要是從MessageQueue中取出一個Message,然後進行處理。
final Message next() {
	int pendingIdleHandlerCount = -1; // -1 only during first iteration
	int nextPollTimeoutMillis = 0;

	for (;;) {
		if (nextPollTimeoutMillis != 0) {
			Binder.flushPendingCommands();
		}
		nativePollOnce(mPtr, nextPollTimeoutMillis);

		synchronized (this) {
			// Try to retrieve the next message.  Return if found.
			final long now = SystemClock.uptimeMillis();
			final Message msg = mMessages;
			if (msg != null) {
				final long when = msg.when;
				if (now >= when) {
					mBlocked = false;
					mMessages = msg.next;
					msg.next = null;
					if (Config.LOGV) Log.v("MessageQueue", "Returning message: " + msg);
					return msg;
				} else {
					nextPollTimeoutMillis = (int) Math.min(when - now, Integer.MAX_VALUE);
				}
			} else {
				nextPollTimeoutMillis = -1;
			}

			// If first time, then get the number of idlers to run.
			if (pendingIdleHandlerCount < 0) {
				pendingIdleHandlerCount = mIdleHandlers.size();
			}
			if (pendingIdleHandlerCount == 0) {
				// No idle handlers to run.  Loop and wait some more.
				mBlocked = true;
				continue;
			}

			if (mPendingIdleHandlers == null) {
				mPendingIdleHandlers = new IdleHandler[Math.max(pendingIdleHandlerCount, 4)];
			}
			mPendingIdleHandlers = mIdleHandlers.toArray(mPendingIdleHandlers);
		}

		// Run the idle handlers.
		// We only ever reach this code block during the first iteration.
		for (int i = 0; i < pendingIdleHandlerCount; i++) {
			final IdleHandler idler = mPendingIdleHandlers[i];
			mPendingIdleHandlers[i] = null; // release the reference to the handler

			boolean keep = false;
			try {
				keep = idler.queueIdle();
			} catch (Throwable t) {
				Log.wtf("MessageQueue", "IdleHandler threw exception", t);
			}

			if (!keep) {
				synchronized (this) {
					mIdleHandlers.remove(idler);
				}
			}
		}

		// Reset the idle handler count to 0 so we do not run them again.
		pendingIdleHandlerCount = 0;

		// While calling an idle handler, a new message could have been delivered
		// so go back and look again for a pending message without waiting.
		nextPollTimeoutMillis = 0;
	}
} 我們就要深入分析一下JNI方法nativePollOnce了,看看它是如何進入等待狀態的,這個函數定義在frameworks/base/core/jni/android_os_MessageQueue.cpp文件中:
static void android_os_MessageQueue_nativePollOnce(JNIEnv* env, jobject obj,
        jint ptr, jint timeoutMillis) {
    NativeMessageQueue* nativeMessageQueue = reinterpret_cast(ptr);
    nativeMessageQueue->pollOnce(timeoutMillis);
} 這個函數首先是通過傳進入的參數ptr取回前面在Java層創建MessageQueue對象時在JNI層創建的NatvieMessageQueue對象,然後調用它的pollOnce函數:void NativeMessageQueue::pollOnce(int timeoutMillis) {
mLooper->pollOnce(timeoutMillis);
}這裡將操作轉發給mLooper對象的pollOnce函數處理,這裡的mLooper對象是在C++層的對象,它也是在前面在JNI層創建的NatvieMessageQueue對象時創建的,它的pollOnce函數定義在frameworks/base/libs/utils/Looper.cpp文件中:int Looper::pollOnce(int timeoutMillis, int* outFd, int* outEvents, void** outData) {
int result = 0;
for (;;) {
......
if (result != 0) {
......
return result;
}
result = pollInner(timeoutMillis);
}
}為了方便討論,我們把這個函數的無關部分都去掉,它主要就是調用pollInner函數來進一步操作,如果pollInner返回值不等於0,這個函數就可以返回了。函數pollInner的定義如下:
int Looper::pollInner(int timeoutMillis) {
	......

	int result = ALOOPER_POLL_WAKE;

	......

#ifdef LOOPER_USES_EPOLL
	struct epoll_event eventItems[EPOLL_MAX_EVENTS];
	int eventCount = epoll_wait(mEpollFd, eventItems, EPOLL_MAX_EVENTS, timeoutMillis);
	bool acquiredLock = false;
#else
	......
#endif

	if (eventCount < 0) {
		if (errno == EINTR) {
			goto Done;
		}

		LOGW("Poll failed with an unexpected error, errno=%d", errno);
		result = ALOOPER_POLL_ERROR;
		goto Done;
	}

	if (eventCount == 0) {
		......
		result = ALOOPER_POLL_TIMEOUT;
		goto Done;
	}

	......

#ifdef LOOPER_USES_EPOLL
	for (int i = 0; i < eventCount; i++) {
		int fd = eventItems[i].data.fd;
		uint32_t epollEvents = eventItems[i].events;
		if (fd == mWakeReadPipeFd) {
			if (epollEvents & EPOLLIN) {
				awoken();
			} else {
				LOGW("Ignoring unexpected epoll events 0x%x on wake read pipe.", epollEvents);
			}
		} else {
			......
		}
	}
	if (acquiredLock) {
		mLock.unlock();
	}
Done: ;
#else
	......
#endif

	......

	return result;
}這裡,首先是調用epoll_wait函數來看看epoll專用文件描述符mEpollFd所監控的文件描述符是否有IO事件發生,它設置監控的超時時間為timeoutMillis:int eventCount = epoll_wait(mEpollFd, eventItems, EPOLL_MAX_EVENTS, timeoutMillis);回憶一下前面的Looper的構造函數,我們在裡面設置了要監控mWakeReadPipeFd文件描述符的EPOLLIN事件。 當mEpollFd所監控的文件描述符發生了要監控的IO事件後或者監控時間超時後,線程就從epoll_wait返回了,否則線程就會在epoll_wait函數中進入睡眠狀態了。返回後如果eventCount等於0,就說明是超時了:
if (eventCount == 0) {
    ......
    result = ALOOPER_POLL_TIMEOUT;
    goto Done;
}如果eventCount不等於0,就說明發生要監控的事件:for (int i = 0; i < eventCount; i++) {
int fd = eventItems[i].data.fd;
uint32_t epollEvents = eventItems[i].events;
if (fd == mWakeReadPipeFd) {
if (epollEvents & EPOLLIN) {
awoken();
} else {
LOGW("Ignoring unexpected epoll events 0x%x on wake read pipe.", epollEvents);
}
} else {
......
}
}這裡我們只關注mWakeReadPipeFd文件描述符上的事件,如果在mWakeReadPipeFd文件描述符上發生了EPOLLIN就說明應用程序中的消息隊列裡面有新的消息需要處理了,接下來它就會先調用awoken函數清空管道中把內容,以便下次再調用pollInner函數時,知道自從上次處理完消息隊列中的消息後,有沒有新的消息加進來。函數awoken的實現很簡單,它只是把管道中的內容都讀取出來:
void Looper::awoken() {
	......

	char buffer[16];
	ssize_t nRead;
	do {
		nRead = read(mWakeReadPipeFd, buffer, sizeof(buffer));
	} while ((nRead == -1 && errno == EINTR) || nRead == sizeof(buffer));
}因為當其它的線程向應用程序的消息隊列加入新的消息時,會向這個管道寫入新的內容來通知應用程序主線程有新的消息需要處理了,下面我們分析消息的發送的時候將會看到。這樣,消息的循環過程就分析完了,這部分邏輯還是比較復雜的,它利用Linux系統中的管道(pipe)進程間通信機制來實現消息的等待和處理,不過,了解了這部分內容之後,下面我們分析消息的發送和處理就簡單多了。
在enqueueMessage方法中調用的,這個方法會在後面說到的Handler類中發送消息時調用的
final boolean enqueueMessage(Message msg, long when) {
	......

	final boolean needWake;
	synchronized (this) {
		......

		msg.when = when;
		//Log.d("MessageQueue", "Enqueing: " + msg);
		Message p = mMessages;
		if (p == null || when == 0 || when < p.when) {
			msg.next = p;
			mMessages = msg;
			needWake = mBlocked; // new head, might need to wake up
		} else {
			Message prev = null;
			while (p != null && p.when <= when) {
				prev = p;
				p = p.next;
			}
			msg.next = prev.next;
			prev.next = msg;
			needWake = false; // still waiting on head, no need to wake up
		}

	}
	if (needWake) {
		nativeWake(mPtr);
	}
	return true;
} 把消息加入到消息隊列時,分兩種情況,一種當前消息隊列為空時,這時候應用程序的主線程一般就是處於空閒等待狀態了,這時候就要喚醒它,另一種情況是應用程序的消息隊列不為空,這時候就不需要喚醒應用程序的主線程了,因為這時候它一定是在忙著處於消息隊列中的消息,因此不會處於空閒等待的狀態。第一種情況比較簡單,只要把消息放在消息隊列頭就可以了:
msg.next = p;
mMessages = msg;
needWake = mBlocked; // new head, might need to wake up
第二種情況相對就比較復雜一些了,前面我們說過,當往消息隊列中發送消息時,是可以指定消息的處理時間的,而消息隊列中的消息,就是按照這個時間從小到大來排序的,因此,當把新的消息加入到消息隊列時,就要根據它的處理時間來找到合適的位置,然後再放進消息隊列中去:
Message prev = null;
while (p != null && p.when <= when) {
	prev = p;
	p = p.next;
}
msg.next = prev.next;
prev.next = msg;
needWake = false; // still waiting on head, no need to wake up把消息加入到消息隊列去後,如果應用程序的主線程正處於空閒等待狀態,就需要調用natvieWake函數來喚醒它了,這是一個JNI方法,定義在frameworks/base/core/jni/android_os_MessageQueue.cpp文件中:static void android_os_MessageQueue_nativeWake(JNIEnv* env, jobject obj, jint ptr) {
NativeMessageQueue* nativeMessageQueue = reinterpret_cast(ptr);
return nativeMessageQueue->wake();
} 這個JNI層的NativeMessageQueue對象我們在前面分析消息循環的時候創建好的,保存在Java層的MessageQueue對象的mPtr成員變量中,這裡把它取回來之後,就調用它的wake函數來喚醒應用程序的主線程,這個函數也是定義在frameworks/base/core/jni/android_os_MessageQueue.cpp文件中:void NativeMessageQueue::wake() {
mLooper->wake();
}這裡它又通過成員變量mLooper的wake函數來執行操作,這裡的mLooper成員變量是一個C++層實現的Looper對象,它定義在frameworks/base/libs/utils/Looper.cpp文件中:void Looper::wake() {
......
ssize_t nWrite;
do {
nWrite = write(mWakeWritePipeFd, "W", 1);
} while (nWrite == -1 && errno == EINTR);
.......
} 這個wake函數很簡單,只是通過打開文件描述符mWakeWritePipeFd往管道的寫入一個"W"字符串。其實,往管道寫入什麼內容並不重要,往管道寫入內容的目的是為了喚醒應用程序的主線程。前面我們在分析應用程序的消息循環時說到,當應用程序的消息隊列中沒有消息處理時,應用程序的主線程就會進入空閒等待狀態,而這個空閒等待狀態就是通過調用這個Looper類的pollInner函數來進入的,具體就是在pollInner函數中調用epoll_wait函數來等待管道中有內容可讀的。這時候既然管道中有內容可讀了,應用程序的主線程就會從這裡的Looper類的pollInner函數返回到JNI層的nativePollOnce函數,最後返回到Java層中的MessageQueue.next函數中去,這裡它就會發現消息隊列中有新的消息需要處理了,於就會處理這個消息。
static final ThreadLocal首先來看一下定義的類中定義的變量:sThreadLocal = new ThreadLocal (); private static Looper sMainLooper; // guarded by Looper.class final MessageQueue mQueue;
sTreadLocal是一個ThreadLocal類型,關於ThreadLocal類型就是為每一個線程保存一下他所擁有的變量,沒有任何玄乎的東西,具體可以查看一下他的源代碼,這裡就不做介紹了。
sMainLooper是一個Looper,從名字定義上來看,他應該和主線程相關聯的
mQueue是一個MessageQueue消息隊列,這個就是我們上面已經介紹了他的所有的知識
看一下他的構造方法:
private Looper(boolean quitAllowed) {
	mQueue = new MessageQueue(quitAllowed);
	mThread = Thread.currentThread();
}構造方法很簡單,就是初始化一下MessageQueue對象,並且獲取當前線程實例,這裡關於MessageQueue的對象的初始化,其實上面已經說得很詳細了,這裡面其實是做了很多事情的。這個構造方法其實我們可以認為是Looper和MessageQueue進行綁定,所以Looper和MessageQueue是一一對應的。在來看一下他的一個prepare方法
public static void prepare() {
	prepare(true);
}
為什麼要說這個方法呢?
因為這個方法我可以在特定場景下會用到,其實這個方法的作用就是將一個線程和Looper進行綁定。
當然這個方法我們如果想在一個線程中顯示Toast的話,會使用這個方法,或者我們可以看一下系統給我定義的HandlerThread類:@Override
public void run() {
mTid = Process.myTid();
Looper.prepare();
synchronized (this) {
mLooper = Looper.myLooper();
notifyAll();
}
Process.setThreadPriority(mPriority);
onLooperPrepared();
Looper.loop();
mTid = -1;
}這個就是HandlerThread方法中的run方法,可以看到調用了Looper.prepare()方法。這樣我們就可以在HandlerThread中顯示Toast了。當然這裡說的有點遠了,話題轉回來。繼續說prepare方法,他其實還調用了prepare(boolean...)方法:private static void prepare(boolean quitAllowed) {
if (sThreadLocal.get() != null) {
throw new RuntimeException("Only one Looper may be created per thread");
}
sThreadLocal.set(new Looper(quitAllowed));
}這裡我們看到了會初始化一個Looper對象然後將其放到ThreadLocal中,即和當前線程進行綁定。就是和當前線程一一對應了,這個就是我們之前也是說了,ThreadLocal的作用,他就是維護當前線程中所擁有的變量。繼續看還有一個重要的方法:loop()
/**
 * Run the message queue in this thread. Be sure to call
 * {@link #quit()} to end the loop.
 */
public static void loop() {
	final Looper me = myLooper();
	if (me == null) {
		throw new RuntimeException("No Looper; Looper.prepare() wasn't called on this thread.");
	}
	final MessageQueue queue = me.mQueue;

	// Make sure the identity of this thread is that of the local process,
	// and keep track of what that identity token actually is.
	Binder.clearCallingIdentity();
	final long ident = Binder.clearCallingIdentity();

	for (;;) {
		Message msg = queue.next(); // might block
		if (msg == null) {
			// No message indicates that the message queue is quitting.
			return;
		}

		// This must be in a local variable, in case a UI event sets the logger
		Printer logging = me.mLogging;
		if (logging != null) {
			logging.println(">>>>> Dispatching to " + msg.target + " " +
					msg.callback + ": " + msg.what);
		}

		msg.target.dispatchMessage(msg);

		if (logging != null) {
			logging.println("<<<<< Finished to " + msg.target + " " + msg.callback);
		}

		// Make sure that during the course of dispatching the
		// identity of the thread wasn't corrupted.
		final long newIdent = Binder.clearCallingIdentity();
		if (ident != newIdent) {
			Log.wtf(TAG, "Thread identity changed from 0x"
					+ Long.toHexString(ident) + " to 0x"
					+ Long.toHexString(newIdent) + " while dispatching to "
					+ msg.target.getClass().getName() + " "
					+ msg.callback + " what=" + msg.what);
		}

		msg.recycle();
	}
}我們可以從之前的HandlerThread的run方法中看到在最後還會調用一下loop方法。這裡有兩行代碼很重要:Message msg = queue.next(); // might block
msg.target.dispatchMessage(msg);第一行代碼是用來從消息隊列中取出消息的,這個用到了MessageQueue中的next方法,之前說過這個方法了。
第二行代碼就是將取出來的消息進行處理(這裡可以查看一下Message類他的target變量其實就是一個Handler)
所以我們這裡就可以看出來,Looper的loop方法就是開始從MessageQueue中去消息然後處理消息了的功能。
繼續:
public static Looper myLooper() {
	return sThreadLocal.get();
}這個方法就是獲取和當前線程綁定的Looper.在來看一下
public static void prepareMainLooper() {
	prepare(false);
	synchronized (Looper.class) {
		if (sMainLooper != null) {
			throw new IllegalStateException("The main Looper has already been prepared.");
		}
		sMainLooper = myLooper();
	}
}這個方法從他的字面意思上來看應該是將主線程綁定一個Looper,然後將這個Looper賦值給變量sMainLooper。這裡就得說到說到了。我們知道一般一個Android應用對應一個進程,在這個進程中可能會有多個線程,有一個線程很重要那就是主線程(或者就是我們經常說的UI線程,那麼這個線程到底是什麼呢?他是否和Looper進行綁定呢?),其實我們搜一下就知道這個UI線程就是ActivityThread,我們可以查看一下他的源代碼(frameworks/base/core/java/android/app/ActivityThread.java):
public final class ActivityThread {
	......

	public static final void main(String[] args) {
		......

		Looper.prepareMainLooper();

		......

		ActivityThread thread = new ActivityThread();
		thread.attach(false);

		......

		Looper.loop();

		......

		thread.detach();

		......
	}
}在他的main方法中,會調用Looper.prepareMainLooper()方法,將主線程和一個Looper進行綁定,也就是說主線程也是有一個Looper的,然後在調用Looper.loop()方法,開始消息處理,這裡我們就可以看到,Android中的應用的確基於消息處理機制的。繼續:
public static Looper getMainLooper() {
	synchronized (Looper.class) {
		return sMainLooper;
	}
}這個方法就是獲取主線程(UI線程)的Looper的,這個方法我們在後面舉例子中會用到。這樣我們就介紹完了Looper類,其實這個類中最主要的就是三個方法:
*構造方法:初始化MessageQueue對象,然後將這個MessageQueue和Looper進行綁定,即一一對應的
*prepare方法:初始化一個Looper對象,然後存入到ThreadLocal中,即將Looper和當前線成進行綁定,也是一一對應的
*loop方法:進入循環開始消息的處理,會調用MessageQueue的next方法
其他都是些輔助的方法,當然也是有很多用途的,比如我現在想判斷當前線程是不是主線程該怎麼做?
這裡我們就可以使用myLooper()方法獲取當前線程的Looper對象,然後在使用getMainLooper()方法獲取主線程的Looper對象,兩者就行比較就可以了,當然這裡myLooper()方法返回的值可能會為null,因為如果這個線程並沒有和Looper進行綁定(就是沒有調用prepare方法),那麼就是為null,但是getMainLooper()方法返回肯定不為null,因為主線程在初始化的時候就已經綁定了一個Looper。這個是系統執行的。
這個類我們之前解釋過了,其實他的作用就是用來發送消息和處理消息的,等我們分析完源碼之後會發現,其實這個步驟底層並不是他做的,而是MessageQueue對象和底層打交道,底層的Looper對象做的,這個如果還是不理解的話,可以在看看之前的內容。
首先還是來看一下他的構造方法:
他的構造方法很多,默認構造方法:
public Handler() {
	this(null, false);
}也是我們最經常用的一個方法,在追蹤看看他的有參構造方法:public Handler(Callback callback) {
this(callback, false);
}這個就是傳遞一個回調接口對象,這個我們後面會說到,繼續看看他的其他構造方法:public Handler(Callback callback, boolean async) {
if (FIND_POTENTIAL_LEAKS) {
final Class klass = getClass();
if ((klass.isAnonymousClass() || klass.isMemberClass() || klass.isLocalClass()) &&
(klass.getModifiers() & Modifier.STATIC) == 0) {
Log.w(TAG, "The following Handler class should be static or leaks might occur: " +
klass.getCanonicalName());
}
}
mLooper = Looper.myLooper();
if (mLooper == null) {
throw new RuntimeException(
"Can't create handler inside thread that has not called Looper.prepare()");
}
mQueue = mLooper.mQueue;
mCallback = callback;
mAsynchronous = async;
}終於看到點實貨了,這個構造方法有很多東西的,看到他會調用Looper.myLooper方法,獲取線程對應的Looper,如果這個線程返回的Looper為null,那麼會報一個異常,當然這個異常我們會經常見到,就是不能在一個沒有和Looper綁定的線程中定義一個Handler。然後獲取到一個Looper的消息隊列。
他還有一個構造方法:
public Handler(Looper looper) {
	this(looper, null, false);
}這個在初始化的時候會傳遞一個Looper進來,也就是說一個Handler只對應一個Looper,但是一個Looper可以有多個Handler,只要在這個綁定了Looper的線程中實例化多個Handler。但是我們一般在使用Handler的時候,都是使用它的無參構造方法,並且是在主線程中定義的,所以說這個Handler是和主線程對應的,當然我們可以在主線程中定義多個Handler都是可以的
插播一個面試題:一個線程可以對應多個Handler,又因為一個Looper對應一個MessageQueue,那麼多個Handler對應一個MessageQueue,問題來了,多個Handler在發送消息以及在處理消息的時候,為什麼能做到有條不紊,不會出錯呢?
其實這個答案我們可以在Looper中的loop方法中找到,之前在看這個方法的時候,看到他會取出消息然後處理,那時候代碼是這樣的:
msg.target.dispatchMessage(msg);當時說了,這個target成員變量就是一個Handler,也就是說其實消息隊列中的每個消息Message其實他會攜帶Handler的,這樣就知道這個信息是哪個Handler發送的,該又哪個Handler處理了。當然在發送消息的時候會把這個target賦值的,這個後面會看到。
回來繼續,主線程默認是綁定了一個Looper的,所以在主線程中定義Handler是沒有問題的,當然如果我們想在子線程中定義Handler的話,那麼就必須將當前線程綁定一個Looper,調用Looper.prepare()方法就可以了。
面試題問題:如果我現在在子線程中定義了一個Handler,但是我又不想讓這個線程綁定一個Looper(即不想額外的調用prepare方法),這時候我們就要用到Looper中的一個方法getMainLooper(),這個就是獲取主線程的Looper,然後在用Handler指定的構造方法實例化一下即可
Handler handler = new Handler(Looper.getMainLooper()){
		@Override
		public void dispatchMessage(Message msg){
			//handle message...
		}
}其實這樣定義之後我們會發現,雖然這個Handler是在子線程中定義的,但是他是和主線程對應的,這點一定要弄清楚。繼續看一下Handler的處理消息的方法dispatchMessage
public void dispatchMessage(Message msg) {
	if (msg.callback != null) {
		handleCallback(msg);
	} else {
		if (mCallback != null) {
			if (mCallback.handleMessage(msg)) {
				return;
			}
		}
		handleMessage(msg);
	}
}msg變量是一個Message類型的,他的結構很簡單,就是一種數據結構(內部實現了Parcelable接口),但是他不僅可以攜帶數據,還有一個成員變量就是callBack,但是我們查看他的源碼之後會發現這個變量的類型起始就是一個Runnable。同時他還會維護一個Handler作為他的target.所以Message的內部實現是很簡單的,這裡就沒有做源碼分析了。這裡會做判斷,如果callback不為null的話,就調用handleCallback方法:
private static void handleCallback(Message message) {
	message.callback.run();
}這個方法很簡單,就是執行Runnable中的run方法。如果callback不為null.在做一次判斷mCallback是否為null
這個mCallback變量其實就是個回調接口類型CallBack:
public interface Callback {
	public boolean handleMessage(Message msg);
}有一個回調方法handleMessage,這個變量的實例化,我們在前面介紹構造方法的時候看到,可以在那裡進行初始化,這樣我們在外部就可以實現handleMessage方法了,這個方法執行之後直接就return了,當時如果mCallback為null就執行handleMessage(msg)方法:public void handleMessage(Message msg) {
}好吧,其實他內部沒有任何邏輯,也就是說這個dispatchMessage方法其實很簡單的,同時我們也會記得,我們一般在使用Handler方法的時候都是自定義一個子類然後覆蓋這個方法的。所以說真正執行的是我們自己需要實現的dispatchMessage方法中邏輯代碼。我們在分析Looper代碼的時候也會發現在他的loop方法中調用了dispatchMessage方法就行處理消息的。總結一下dispatchMessage方法的執行流程:
1.首先判斷msg變量中的callback是否為null,如果不為null,就執行他的run方法(Runnable),然後結束,如果為null,轉入2
2.判斷mCallback變量是否為null,如果不為null,就調用他的handleMessage(...)回調方法,然後結束,如果為null,注入3
3.執行Handler本身的handleMessage(...)方法
所以我們如果想在在dispatchMessage方法中執行我們自己的邏輯有很多種方式:
1.直接定義子類覆蓋dispatchMessage方法
2.定義Handler的時候,傳入一個CallBack接口,外部實現他的handleMessage回調方法
3.在發送消息的時候,實例化Message的callback變量(Runnable),將代碼放到run方法中
4.直接重寫父類的handleMessage方法
下面繼續看一下sendMessage方法
public final boolean sendMessage(Message msg){
	return sendMessageDelayed(msg, 0);
}看一下sendMessageDelayed方法:public final boolean sendMessageDelayed(Message msg, long delayMillis){
if (delayMillis < 0) {
delayMillis = 0;
}
return sendMessageAtTime(msg, SystemClock.uptimeMillis() + delayMillis);
}就是多個一個判斷,延遲時間不能為負數的容錯機制再看一下sendMessageAtTime方法:
public boolean sendMessageAtTime(Message msg, long uptimeMillis) {
	MessageQueue queue = mQueue;
	if (queue == null) {
		RuntimeException e = new RuntimeException(
				this + " sendMessageAtTime() called with no mQueue");
		Log.w("Looper", e.getMessage(), e);
		return false;
	}
	return enqueueMessage(queue, msg, uptimeMillis);
}這個方法開始有點內容了,獲取到消息隊列在看一下enqueueMessage方法:
private boolean enqueueMessage(MessageQueue queue, Message msg, long uptimeMillis) {
	msg.target = this;
	if (mAsynchronous) {
		msg.setAsynchronous(true);
	}
	return queue.enqueueMessage(msg, uptimeMillis);
}
好吧,這裡才是重點,這裡有兩部分內容,第一部分是我們需要將當前的Handler對象賦值給Message中的target,就是每個消息必須
要有一個target,這樣就不會發生混亂了(上面講到的那個面試題中提到的知識就在這裡)
還有就是最終會調用消息隊列的enqueueMessage方法,這個在之前介紹MessageQueue類的時候已經說過了。
最後在看一個重要的方法:
public final boolean post(Runnable r){
	return  sendMessageDelayed(getPostMessage(r), 0);
}這個方法是發送一個Runnable任務,在看看getPostMessage方法:private static Message getPostMessage(Runnable r) {
Message m = Message.obtain();
m.callback = r;
return m;
}這個方法其實就將Runnable轉化成一個Message對象。但是post這個方法其實是非常重要的,後面會說到
到這裡把Handler就講解完了,那麼Handler,Looper,MessageQueue都講解完了,下面來總結一下吧,來張圖:
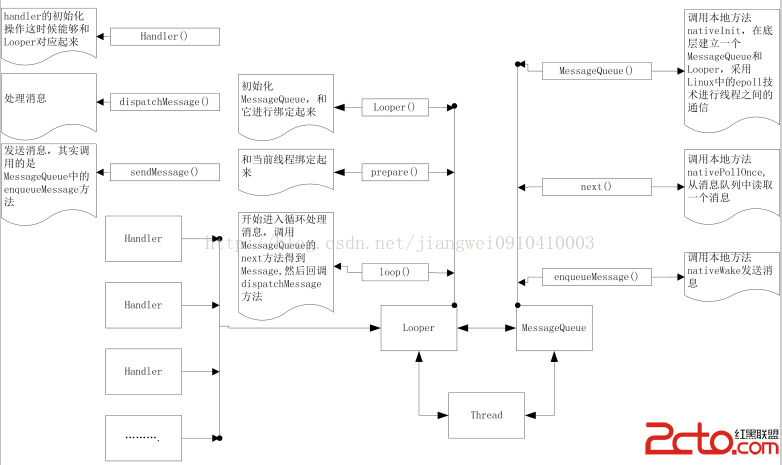
1.首先是Handler,Looper,MessageQueue,Thread之間的關系:
Looper和Message以及Thread他們三個之間是一一對應的關系,一個Looper對應多個Handler
2.在MessageQueue的構造方法中調用了nativeInit方法,這個方法在本地創建了Looper和MessageQueue對象,這個和Java中的Looper,MessageQueue是不一樣的,但是你可以把他們看成是一一對應。
我們在使用Handler的時候主要是因為主線程中不能做耗時的操作,而子線程中又不能刷新控件,所以會使用到Handler.
其實我們如果想在子線程中刷新View的話可以有很多種方式:
1.Handler機制通信(最基礎的)
2.Activity類中的runOnUiThread(...)方法
這個又得看源碼了:
public final void runOnUiThread(Runnable action) {
	if (Thread.currentThread() != mUiThread) {
		mHandler.post(action);
	} else {
		action.run();
	}
}擦,看完源碼我們懂了,其實他的內部實現還是用的Handler機制,發送一個Runnbale.3.View類中的postXXX方法
這個還得看源碼:
public boolean postDelayed(Runnable action, long delayMillis) {
	final AttachInfo attachInfo = mAttachInfo;
	if (attachInfo != null) {
		return attachInfo.mHandler.postDelayed(action, delayMillis);
	}
	// Assume that post will succeed later
	ViewRootImpl.getRunQueue().postDelayed(action, delayMillis);
	return true;
}如果AttachInfo!=null的話,看,還是用的Handler機制所以說,當我們在主線程中定義了控件,然後使用這些方法來刷新就是通過Handler來實現的。之前也是說對的,Android中的應用就是消息驅動的,後面在分析其他的源碼的時候還會發現到處都用到了Handler機制。所以說Handler機制是多麼的重要呀~~
(Ps:哎,終於寫完了,累死人了,之前解讀過一次Handler機制的源碼,但是那時候沒有這麼深入)
 android handler詳解
先看演示: 一個Handler允許你發送和處理消息(Message)以及與一個線程的消息隊列相關的Runnable對象。每個Handler實例都和單個線程以及該線程的消息
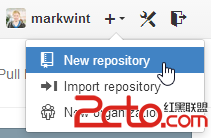 如何在Android Studio上使用Github
首先,登陸到Github上並創建一個新repository。在屏幕右上角,點擊“+”標記,並且選擇“New repository&rd
 Android 頂部切換實現(二)
上篇介紹了導航欄下的滑動切換實現,這次要介紹的是導航欄上的切換,在很多應用中經常見到,先看效果圖。當點擊導航條上的分類的時候,會根據選中的分類顯示下面的數據。先看布局文件
 Android強制彈出,隱藏輸入法.
當我們彈出一個Dialog時候,如果這個Dialog需要輸入數據,然後確定後又需要關閉輸入法,一般系統的hide,跟show方法總會有各種問題,最霸道的解決方法就是寫一個