編輯:關於Android編程
我們上一講,拋出來一個問題,就是當Activity的onCreateView的時候,是如何構造Fragment中的View參數。要回答這個問題我們先要了解Fragment的狀態,這是Fragment管理中非常重要的一環。我們先來看一下FragmentActivity提供的一些核心回調:
@Override
    protected void onCreate(Bundle savedInstanceState) {
        mFragments.attachActivity(this, mContainer, null);
        // Old versions of the platform didn't do this!
        if (getLayoutInflater().getFactory() == null) {
            getLayoutInflater().setFactory(this);
        }

        super.onCreate(savedInstanceState);
....
        mFragments.dispatchCreate();
    }
我們跟入mFragments.dispatchCreate方法中:
public void dispatchCreate() {
        mStateSaved = false;
        moveToState(Fragment.CREATED, false);
}在Fm裡面維護自己的一個狀態,當你導入一個Fragment的時候,Fm的目的,就是為了讓Fragment和自己的狀態基本保持一致.
void moveToState(int newState, int transit, int transitStyle, boolean always) {
        if (mActivity == null && newState != Fragment.INITIALIZING) {
            throw new IllegalStateException("No activity");
        }

        if (!always && mCurState == newState) {
            return;
        }
        mCurState = newState;
        if (mActive != null) {
            boolean loadersRunning = false;
            for (int i = 0; i < mActive.size(); i++) {
                Fragment f = mActive.get(i);
                if (f != null) {
                    moveToState(f, newState, transit, transitStyle, false);
                    if (f.mLoaderManager != null) {
                        loadersRunning |= f.mLoaderManager.hasRunningLoaders();
                    }
                }
            }

            ...
        }
}static final int INITIALIZING = 0; // Not yet created.
static final int CREATED = 1; // Created.
static final int ACTIVITY_CREATED = 2; // The activity has finished its creation.
static final int STOPPED = 3; // Fully created, not started.
static final int STARTED = 4; // Created and started, not resumed.
static final int RESUMED = 5; // Created started and resumed. if (f.mState < newState)
{
...
} else {
...
}if (f.mFromLayout) {
// For fragments that are part of the content view
// layout, we need to instantiate the view immediately
// and the inflater will take care of adding it.
f.mView = f.performCreateView(
f.getLayoutInflater(f.mSavedFragmentState), null,
f.mSavedFragmentState);
if (f.mView != null) {
f.mInnerView = f.mView;
f.mView = NoSaveStateFrameLayout.wrap(f.mView);
if (f.mHidden)
f.mView.setVisibility(View.GONE);
f.onViewCreated(f.mView, f.mSavedFragmentState);
} else {
f.mInnerView = null;
}
}View performCreateView(LayoutInflater inflater, ViewGroup container,
Bundle savedInstanceState) {
if (mChildFragmentManager != null) {
mChildFragmentManager.noteStateNotSaved();
}
return onCreateView(inflater, container, savedInstanceState);
} case Fragment.CREATED:
if (newState > Fragment.CREATED) {
if (!f.mFromLayout) {
ViewGroup container = null;
if (f.mContainerId != 0) {
container = (ViewGroup) mContainer
.findViewById(f.mContainerId);
if (container == null && !f.mRestored) {
throwException(new IllegalArgumentException(
"No view found for id 0x"
+ Integer
.toHexString(f.mContainerId)
+ " ("
+ f.getResources()
.getResourceName(
f.mContainerId)
+ ") for fragment " + f));
}
}
f.mContainer = container;
f.mView = f.performCreateView(
f.getLayoutInflater(f.mSavedFragmentState),
container, f.mSavedFragmentState);
if (f.mView != null) {
                            f.mInnerView = f.mView;
                            f.mView = NoSaveStateFrameLayout.wrap(f.mView);
                            if (container != null) {
                                Animation anim = loadAnimation(f, transit,
                                        true, transitionStyle);
                                if (anim != null) {
                                    f.mView.startAnimation(anim);
                                }
                                container.addView(f.mView);
                            }
                            if (f.mHidden)
                                f.mView.setVisibility(View.GONE);
                            f.onViewCreated(f.mView, f.mSavedFragmentState);
                        } else {
                            f.mInnerView = null;
                        }
}
f.performActivityCreated(f.mSavedFragmentState);
if (f.mView != null) {
f.restoreViewState(f.mSavedFragmentState);
}
f.mSavedFragmentState = null;
}我們看到實際上這段代碼是對FragmentManager狀態是Create以上狀態且Fragment的導入並不是采用layout.xml方式導入的處理。這是為什麼呢?因為在onCreate之後,基本上你的控件已經在Create狀態的時候生成的差不多了,你所要做的就是在生成的控件中找到Fragment對應的容器,然後裝入你的控件。同時,我們也看到了對Fragment的動畫處理:
if (f.mView != null) {
f.mInnerView = f.mView;
f.mView = NoSaveStateFrameLayout.wrap(f.mView);
if (container != null) {
Animation anim = loadAnimation(f, transit,
true, transitionStyle);
if (anim != null) {
f.mView.startAnimation(anim);
}
container.addView(f.mView);
}
if (f.mHidden)
f.mView.setVisibility(View.GONE);
f.onViewCreated(f.mView, f.mSavedFragmentState);
} else {
f.mInnerView = null;
}而這種動畫的處理和參數的配置,我們留到後面講到Fragment事務的時候再說。 android 百度地圖定位輔助教程
這裡使用講解的是androidStudio下開發android應用,實現百度地圖定位功能的輔助教程。登入百度地圖API官方網站http://lbsyun.baidu.co
 android開源系列:CircleImageView自定義圓形控件的使用
主要的類: package de.hdodenhof.circleimageview; import edu.njupt.zhb.main.
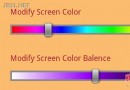 Android顏色編輯器的制作中遇到的問題分析
Android沒有自帶顏色編輯器,為了讓用戶直觀的選擇顏色,做了這麼一個控件,效果圖如下:上方顏色條為主顏色條,用戶可以選擇大致需要的顏色,下方是該顏色的平衡調節,可以調
 用Apktool獲取別人APP中的圖片及布局資源進行學習
當我們看到一款UI布局很漂亮的APP,想要了解別人是怎麼實現的時候,就可以通過Apktool工具來反編譯別人的apk,從而獲取圖片及布局資源來進行學習。 其實我們下載