編輯:關於Android編程
 public ImageView(Context context, AttributeSet attrs, int defStyle) {
        super(context, attrs, defStyle);
        initImageView();

        TypedArray a = context.obtainStyledAttributes(attrs,
                com.android.internal.R.styleable.ImageView, defStyle, 0);

        Drawable d = a.getDrawable(com.android.internal.R.styleable.ImageView_src);
        if (d != null) {
            setImageDrawable(d);
        }

        mBaselineAlignBottom = a.getBoolean(
                com.android.internal.R.styleable.ImageView_baselineAlignBottom, false);

        mBaseline = a.getDimensionPixelSize(
                com.android.internal.R.styleable.ImageView_baseline, -1);

        setAdjustViewBounds(
            a.getBoolean(com.android.internal.R.styleable.ImageView_adjustViewBounds,
            false));

        setMaxWidth(a.getDimensionPixelSize(
                com.android.internal.R.styleable.ImageView_maxWidth, Integer.MAX_VALUE));

        setMaxHeight(a.getDimensionPixelSize(
                com.android.internal.R.styleable.ImageView_maxHeight, Integer.MAX_VALUE));

        int index = a.getInt(com.android.internal.R.styleable.ImageView_scaleType, -1);
        if (index >= 0) {
            setScaleType(sScaleTypeArray[index]);
        }

        int tint = a.getInt(com.android.internal.R.styleable.ImageView_tint, 0);
        if (tint != 0) {
            setColorFilter(tint);
        }

        int alpha = a.getInt(com.android.internal.R.styleable.ImageView_drawableAlpha, 255);
        if (alpha != 255) {
            setAlpha(alpha);
        }

        mCropToPadding = a.getBoolean(
                com.android.internal.R.styleable.ImageView_cropToPadding, false);

        a.recycle();

        //need inflate syntax/reader for matrix
    }

    private void initImageView() {
        mMatrix     = new Matrix();
        mScaleType  = ScaleType.FIT_CENTER;
        mAdjustViewBoundsCompat = mContext.getApplicationInfo().targetSdkVersion <=
                Build.VERSION_CODES.JELLY_BEAN_MR1;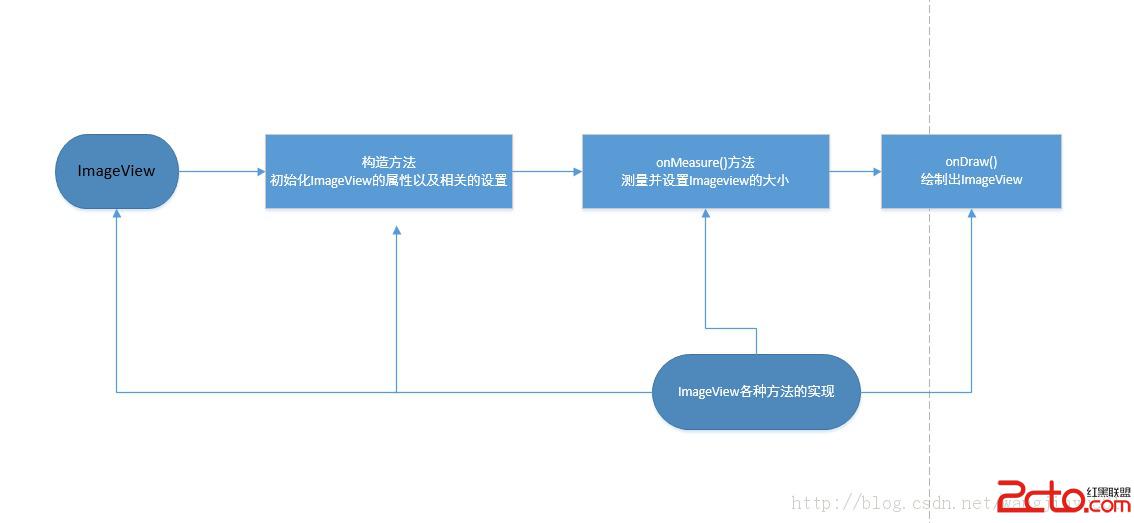
} 在構造方法中也是很常規的從attrs文件中讀取屬性值,並進行設置。也可以看到ImageView默認使用的ScaleType是FIT_CENTER。說到ScaleType,它是一個枚舉類型,用於設置,平常使用的ScaleType就是在這裡定義的。/**
* Options for scaling the bounds of an image to the bounds of this view.
*/
public enum ScaleType {
/**
* Scale using the image matrix when drawing. The image matrix can be set using
* {@link ImageView#setImageMatrix(Matrix)}. From XML, use this syntax:
* android:scaleType="matrix".
*/
MATRIX (0),
/**
* Scale the image using {@link Matrix.ScaleToFit#FILL}.
* From XML, use this syntax: android:scaleType="fitXY".
*/
FIT_XY (1),
/**
* Scale the image using {@link Matrix.ScaleToFit#START}.
* From XML, use this syntax: android:scaleType="fitStart".
*/
FIT_START (2),
/**
* Scale the image using {@link Matrix.ScaleToFit#CENTER}.
* From XML, use this syntax:
* android:scaleType="fitCenter".
*/
FIT_CENTER (3),
/**
* Scale the image using {@link Matrix.ScaleToFit#END}.
* From XML, use this syntax: android:scaleType="fitEnd".
*/
FIT_END (4),
/**
* Center the image in the view, but perform no scaling.
* From XML, use this syntax: android:scaleType="center".
*/
CENTER (5),
/**
* Scale the image uniformly (maintain the image's aspect ratio) so
* that both dimensions (width and height) of the image will be equal
* to or larger than the corresponding dimension of the view
* (minus padding). The image is then centered in the view.
* From XML, use this syntax: android:scaleType="centerCrop".
*/
CENTER_CROP (6),
/**
* Scale the image uniformly (maintain the image's aspect ratio) so
* that both dimensions (width and height) of the image will be equal
* to or less than the corresponding dimension of the view
* (minus padding). The image is then centered in the view.
* From XML, use this syntax: android:scaleType="centerInside".
*/
CENTER_INSIDE (7);
ScaleType(int ni) {
nativeInt = ni;
}
final int nativeInt;
} 功能是設置圖片的顯示位置和大小等方面。接著就是onMeasure()方法了,它用於設置ImageView的大小,我們在xml文件中設置ImageView的時候,如果指定了固定的寬高,那麼onMeasur()方法中測量的大小就是固定的寬高大小;如果是包裹內容,那麼就需要進一步的計算。@Override
protected void onMeasure(int widthMeasureSpec, int heightMeasureSpec) {
resolveUri();//獲取圖片Drawable
int w;
int h;
// Desired aspect ratio of the view's contents (not including padding)
float desiredAspect = 0.0f;
// We are allowed to change the view's width
boolean resizeWidth = false;
// We are allowed to change the view's height
boolean resizeHeight = false;
final int widthSpecMode = MeasureSpec.getMode(widthMeasureSpec);
final int heightSpecMode = MeasureSpec.getMode(heightMeasureSpec);
if (mDrawable == null) {
// If no drawable, its intrinsic size is 0.
mDrawableWidth = -1;
mDrawableHeight = -1;
w = h = 0;
} else {
w = mDrawableWidth;在updateDrawable(Drawable d)方法賦值的。
h = mDrawableHeight;
if (w <= 0) w = 1;
if (h <= 0) h = 1;
// We are supposed to adjust view bounds to match the aspect
// ratio of our drawable. See if that is possible.
if (mAdjustViewBounds) {
                resizeWidth = widthSpecMode != MeasureSpec.EXACTLY;
                resizeHeight = heightSpecMode != MeasureSpec.EXACTLY;

                desiredAspect = (float) w / (float) h;
            }
}
int pleft = mPaddingLeft;
int pright = mPaddingRight;
int ptop = mPaddingTop;
int pbottom = mPaddingBottom;
int widthSize;
int heightSize;
if (resizeWidth || resizeHeight) {
/* If we get here, it means we want to resize to match the
drawables aspect ratio, and we have the freedom to change at
least one dimension.
*/
// Get the max possible width given our constraints
widthSize = resolveAdjustedSize(w + pleft + pright, mMaxWidth, widthMeasureSpec);
// Get the max possible height given our constraints
heightSize = resolveAdjustedSize(h + ptop + pbottom, mMaxHeight, heightMeasureSpec);
if (desiredAspect != 0.0f) {
// See what our actual aspect ratio is
float actualAspect = (float)(widthSize - pleft - pright) /
(heightSize - ptop - pbottom);
if (Math.abs(actualAspect - desiredAspect) > 0.0000001) {
boolean done = false;
// Try adjusting width to be proportional to height
if (resizeWidth) {
int newWidth = (int)(desiredAspect * (heightSize - ptop - pbottom)) +
pleft + pright;
// Allow the width to outgrow its original estimate if height is fixed.
if (!resizeHeight && !mAdjustViewBoundsCompat) {
widthSize = resolveAdjustedSize(newWidth, mMaxWidth, widthMeasureSpec);
}
if (newWidth <= widthSize) {
widthSize = newWidth;
done = true;
}
}
// Try adjusting height to be proportional to width
if (!done && resizeHeight) {
int newHeight = (int)((widthSize - pleft - pright) / desiredAspect) +
ptop + pbottom;
// Allow the height to outgrow its original estimate if width is fixed.
if (!resizeWidth && !mAdjustViewBoundsCompat) {
heightSize = resolveAdjustedSize(newHeight, mMaxHeight,
heightMeasureSpec);
}
if (newHeight <= heightSize) {
heightSize = newHeight;
}
}
}
}
} else {
/* We are either don't want to preserve the drawables aspect ratio,
or we are not allowed to change view dimensions. Just measure in
the normal way.
*/
 w += pleft + pright;
            h += ptop + pbottom;
            w = Math.max(w, getSuggestedMinimumWidth());
            h = Math.max(h, getSuggestedMinimumHeight());
            widthSize = resolveSizeAndState(w, widthMeasureSpec, 0);
            heightSize = resolveSizeAndState(h, heightMeasureSpec, 0);
        }
        setMeasuredDimension(widthSize, heightSize);
} 在onMeasure方法中,首先調用了resolveUri()這個方法,目的就是為了確定Drawable。如果設置了drawableResource,那麼Drawable就是其值;如果沒有,那麼就從ContentResolver獲取一個Drawable。 private void resolveUri() {
if (mDrawable != null) {
return;
}
Resources rsrc = getResources();
if (rsrc == null) {
return;
}
Drawable d = null;
if (mResource != 0) {
try {
d = rsrc.getDrawable(mResource);
} catch (Exception e) {
Log.w("ImageView", "Unable to find resource: " + mResource, e);
// Don't try again.
mUri = null;
}
} else if (mUri != null) {
String scheme = mUri.getScheme();
if (ContentResolver.SCHEME_ANDROID_RESOURCE.equals(scheme)) {
try {
// Load drawable through Resources, to get the source density information
ContentResolver.OpenResourceIdResult r =
mContext.getContentResolver().getResourceId(mUri);
d = r.r.getDrawable(r.id);
} catch (Exception e) {
Log.w("ImageView", "Unable to open content: " + mUri, e);
}
} else if (ContentResolver.SCHEME_CONTENT.equals(scheme)
|| ContentResolver.SCHEME_FILE.equals(scheme)) {
InputStream stream = null;
try {
stream = mContext.getContentResolver().openInputStream(mUri);
d = Drawable.createFromStream(stream, null);
} catch (Exception e) {
Log.w("ImageView", "Unable to open content: " + mUri, e);
} finally {
if (stream != null) {
try {
stream.close();
} catch (IOException e) {
Log.w("ImageView", "Unable to close content: " + mUri, e);
}
}
}
} else {
d = Drawable.createFromPath(mUri.toString());
}
if (d == null) {
System.out.println("resolveUri failed on bad bitmap uri: " + mUri);
// Don't try again.
mUri = null;
}
} else {
return;
}
updateDrawable(d);
} 之後在resolveUri()這個方法的最後,調用了 updateDrawable(d)方法,這個方法代碼如下: private void updateDrawable(Drawable d) {
if (mDrawable != null) {
mDrawable.setCallback(null);
unscheduleDrawable(mDrawable);
}
mDrawable = d;
if (d != null) {
d.setCallback(this);
if (d.isStateful()) {
d.setState(getDrawableState());
}
d.setLevel(mLevel);
d.setLayoutDirection(getLayoutDirection());
d.setVisible(getVisibility() == VISIBLE, true);
mDrawableWidth = d.getIntrinsicWidth();
mDrawableHeight = d.getIntrinsicHeight();
applyColorMod();
configureBounds();
} else {
mDrawableWidth = mDrawableHeight = -1;
}
} 可以看到就是為了Drawable寬高賦值的。回過頭來繼續看,如果Drawable的寬高不為空的話就分別賦值給w和h;如果為空的話值為-1。然後是一個if判斷,mAdjustViewBounds作為判斷的變量,它是在setAdjustViewBounds方法中設置的,默認為false,所以必須設置為true,這個判斷才會執行。當然這個變量的值也可以在xml文件中設置(android:adjustViewBounds)。那這個方法是做什麼用的呢?設置View的最大高度,單獨使用無效,需要與setAdjustViewBounds一起使用。如果想設置圖片固定大小,又想保持圖片寬高比,需要如下設置:1) 設置setAdjustViewBounds為true;if (mAdjustViewBounds) {
resizeWidth = widthSpecMode != MeasureSpec.EXACTLY;
resizeHeight = heightSpecMode != MeasureSpec.EXACTLY;
desiredAspect = (float) w / (float) h;
} widthSpecMode如果不是指定大小的話,因為如果指定了固定大小就不需要重新設置大小了。然後接下來的判斷也是基於 resizeWidth和resizeHeight 的值,如果不為true的情況下,會執行如下代碼: w += pleft + pright;
h += ptop + pbottom;
w = Math.max(w, getSuggestedMinimumWidth());
h = Math.max(h, getSuggestedMinimumHeight());
widthSize = resolveSizeAndState(w, widthMeasureSpec, 0);
heightSize = resolveSizeAndState(h, heightMeasureSpec, 0);
}
setMeasuredDimension(widthSize, heightSize); 考慮了填充,最後設置ImageView的大小。 最後看一下onDraw()方法, @Override
protected void onDraw(Canvas canvas) {
super.onDraw(canvas);
if (mDrawable == null) {
return; // couldn't resolve the URI
}
if (mDrawableWidth == 0 || mDrawableHeight == 0) {
return; // nothing to draw (empty bounds)
}
if (mDrawMatrix == null && mPaddingTop == 0 && mPaddingLeft == 0) {
mDrawable.draw(canvas);
} else {
int saveCount = canvas.getSaveCount();
canvas.save();
if (mCropToPadding) {
final int scrollX = mScrollX;
final int scrollY = mScrollY;
canvas.clipRect(scrollX + mPaddingLeft, scrollY + mPaddingTop,
scrollX + mRight - mLeft - mPaddingRight,
scrollY + mBottom - mTop - mPaddingBottom);
}
canvas.translate(mPaddingLeft, mPaddingTop);
if (mDrawMatrix != null) {
canvas.concat(mDrawMatrix);
}
mDrawable.draw(canvas);
canvas.restoreToCount(saveCount);
}
} 在onDraw()方法中,實現方式比較簡單,如果mDrawMatrix為空,那麼就直接繪制出圖片;如果不為空,那麼還需要繪制矩陣。這就涉及到mDrawMatrix矩陣了,它是在哪賦值的呢,就是ScaleType。這個是在configureBounds()方法中設置的,private void configureBounds() {
if (mDrawable == null || !mHaveFrame) {
return;
}
int dwidth = mDrawableWidth;
int dheight = mDrawableHeight;
int vwidth = getWidth() - mPaddingLeft - mPaddingRight;
int vheight = getHeight() - mPaddingTop - mPaddingBottom;
boolean fits = (dwidth < 0 || vwidth == dwidth) &&
(dheight < 0 || vheight == dheight);
if (dwidth <= 0 || dheight <= 0 || ScaleType.FIT_XY == mScaleType) {
/* If the drawable has no intrinsic size, or we're told to
scaletofit, then we just fill our entire view.
*/
mDrawable.setBounds(0, 0, vwidth, vheight);
mDrawMatrix = null;
} else {
// We need to do the scaling ourself, so have the drawable
// use its native size.
mDrawable.setBounds(0, 0, dwidth, dheight);
if (ScaleType.MATRIX == mScaleType) {
// Use the specified matrix as-is.
if (mMatrix.isIdentity()) {
mDrawMatrix = null;
} else {
mDrawMatrix = mMatrix;
}
} else if (fits) {
// The bitmap fits exactly, no transform needed.
mDrawMatrix = null;
} else if (ScaleType.CENTER == mScaleType) {
// Center bitmap in view, no scaling.
mDrawMatrix = mMatrix;
mDrawMatrix.setTranslate((int) ((vwidth - dwidth) * 0.5f + 0.5f),
(int) ((vheight - dheight) * 0.5f + 0.5f));
} else if (ScaleType.CENTER_CROP == mScaleType) {
mDrawMatrix = mMatrix;
float scale;
float dx = 0, dy = 0;
if (dwidth * vheight > vwidth * dheight) {
scale = (float) vheight / (float) dheight;
dx = (vwidth - dwidth * scale) * 0.5f;
} else {
scale = (float) vwidth / (float) dwidth;
dy = (vheight - dheight * scale) * 0.5f;
}
mDrawMatrix.setScale(scale, scale);
mDrawMatrix.postTranslate((int) (dx + 0.5f), (int) (dy + 0.5f));
} else if (ScaleType.CENTER_INSIDE == mScaleType) {
mDrawMatrix = mMatrix;
float scale;
float dx;
float dy;
if (dwidth <= vwidth && dheight <= vheight) {
scale = 1.0f;
} else {
scale = Math.min((float) vwidth / (float) dwidth,
(float) vheight / (float) dheight);
}
dx = (int) ((vwidth - dwidth * scale) * 0.5f + 0.5f);
dy = (int) ((vheight - dheight * scale) * 0.5f + 0.5f);
mDrawMatrix.setScale(scale, scale);
mDrawMatrix.postTranslate(dx, dy);
} else {
// Generate the required transform.
mTempSrc.set(0, 0, dwidth, dheight);
mTempDst.set(0, 0, vwidth, vheight);
mDrawMatrix = mMatrix;
mDrawMatrix.setRectToRect(mTempSrc, mTempDst, scaleTypeToScaleToFit(mScaleType));
}
}
} 可以看到在if判斷中,對各個ScaleType的類型都進行了判斷,根據不同的ScaleType設置不同的矩陣mDrawMatrix。然後通過矩陣對圖像進行變換,從而顯示出不同的效果。 除了這一點經常使用到之外,還有就是如何設置圖片資源了,有以下幾個方法:setImageResource(int resId)、setImageURI(Uri uri)、setImageDrawable(Drawable drawable)、setImageBitmap(Bitmap bm)等,或者也可以在xml文件中設置。但是這樣直接使用會有一個隱形的弊端,如果顯示的圖片過多或者單張顯示的圖片像素過大,就容易出現OOM問題。因此就應該根據需求對圖片進行預處理,常用方法有以下幾種:1、縮放、邊界壓縮 在內存中加載圖片時直接在內存中做處理。關於圖片壓縮有很多方法,這裡只是列舉一個簡單的例子,實際使用價值不大,如有需求可以自行參考其他資料。 InputStream is = this.getResources().openRawResource(R.drawable.xx);
BitmapFactory.Options options=new BitmapFactory.Options();
options.inJustDecodeBounds = false;
options.inSampleSize = 10; //width,hight設為原來的十分一
Bitmap btp =BitmapFactory.decodeStream(is,null,options); 2、直接調用JNI 當使用像 imageView.setBackgroundResource,imageView.setImageResource, 或者 BitmapFactory.decodeResource 這樣的方法來設置一張大圖片的時候,這些函數在完成decode後,最終都是通過java層的createBitmap來完成的,需要消耗更多內存。 因此,改用先通過BitmapFactory.decodeStream方法,創建出一個bitmap,再將其設為ImageView的 source,decodeStream最大的秘密在於其直接調用JNI>>nativeDecodeAsset()來完成decode,無需再使用java層的createBitmap,從而節省了java層的空間。如果在讀取時加上圖片的Config參數,可以跟有效減少加載的內存,從而跟有效阻止拋out of Memory異常。 public static Bitmap readBitMap(Context context, int resId){
BitmapFactory.Options opt = new BitmapFactory.Options();
opt.inPreferredConfig = Bitmap.Config.RGB_565;
opt.inPurgeable = true;
opt.inInputShareable = true;
InputStream is = context.getResources().openRawResource(resId);
return BitmapFactory.decodeStream(is,null,opt);
}3、手動收回占用資源 雖然虛擬機會自動回收垃圾資源,但是有時候不是那麼及時,這時候可以手動回收。 if(!bmp.isRecycle() ){
bmp.recycle() //回收圖片所占的內存
system.gc() //提醒系統及時回收
} 4、優化Dalvik虛擬機的堆內存分配 使用 dalvik.system.VMRuntime類提供的setTargetHeapUtilization方法可以增強程序堆內存的處理效率。private final static float TARGET_HEAP_UTILIZATION = 0.75f;在程序onCreate時就可以調用
VMRuntime.getRuntime().setTargetHeapUtilization(TARGET_HEAP_UTILIZATION);即可。 除了 優化Dalvik虛擬機的堆內存分配 外,還可以強制定義自己軟件的對內存大小,使用Dalvik提供的 dalvik.system.VMRuntime類來設置最小堆內存為例:Dalvik.VMRuntime類,提供對虛擬機全局,Dalvik的特定功能的接口。Android為每個程序分配的內存可以通過Runtime類的 totalMemory() 、freeMemory() 兩個方法獲取VM的一些內存信息。
private final static int CWJ_HEAP_SIZE = 6* 1024* 1024 ;
VMRuntime.getRuntime().setMinimumHeapSize(CWJ_HEAP_SIZE); //設置最小heap內存為6MB大小。
下面講解一下如何自定義一個類繼承於ImageView。首先以CircleButton為例,這是github上一個項目,實現一個圓形有點擊效果的按鈕。如下:
 實現思路是這樣的,先畫兩個圓形圖案,一個是實心的圓,一個是圓環。圓環半徑小於實心圓半徑,這樣默認就看不到圓環,然後再畫出設置的圖片,覆蓋在二者之上。最後在按下的時候啟動一個屬性動畫,將圓環放大顯示,關於詳細的分析可以看android-circlebutton介紹 這篇文章。
 安卓動態調試七種武器之離別鉤 – Hooking(下)
0x00 序隨著移動安全越來越火,各種調試工具也都層出不窮,但因為環境和需求的不同,並沒有工具是萬能的。另外工具是死的,人是活的,如果能搞懂工具的原理再結合上自身的經驗,
 Android 設計模式之適配器模式
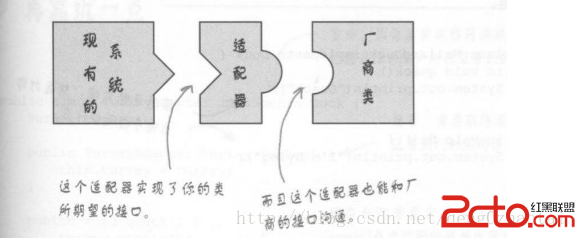
適配器模式的定義是:將一個類的接口,轉換成客戶期望的另一個接口,適配器讓原本接口不兼容的類可以作無間。看下以下兩張圖就更清楚了 適配器可以實現接口的解耦,如果過一段時
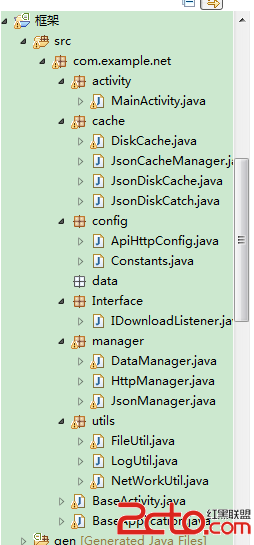 android 從零開始搭建框架系列(1)
工作幾年發現自己沒留下啥東西,天天開發開發,沒總結過。 這次想總結下。故而寫這個系列的博客。希望對廣大的開發者有所幫助。OK 首先先分析下 框架的作用,以及框架所應擁有的
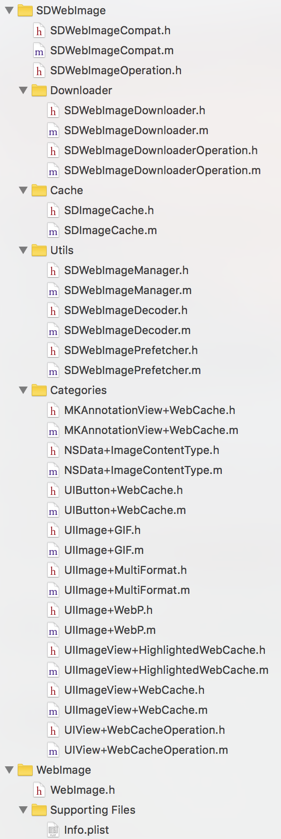 SDWebImage源代碼解析(一)SDImageCache
前言本文的中文注釋代碼demo更新在我的github上。SDWebImage是一個十分有名的Objective-C第三方開源框架,作用是: Asynchronous im