編輯:關於Android編程
簡介:
為什麼要用Fragment?使用Fragment可以在一個Activity中實現不同的界面。Fragment與Fragment之間的動畫切換,遠比Activity與Activity之間的動畫切換變化方式多。很多時候,我們通過使用一個Activity,切換多個Fragment。本次博客,主要列舉一下Fragment與它的Activity之間進行數據交換的方式。
1.Fragment中通過getActivity()然後進行強制轉化,調用Activity中的公有方法
((XXXXActivity)getActivity()).fun();
2.Activity在切換Fragment的時候,通過setArguments向Fragment傳遞參數,Fragment通過getArguments();獲得從activity中傳遞過來的值
3.Activity實現一個接口,Fragment在onAttach方法中,將該Activity轉化為該接口,在需要調用的時候回調。
注意:本Demo是通過FragmentManager來管理Fragment的,通過FragmentManager管理,我們創建Fragment和銷毀Fragment的時候,可以通過棧的方式:
a.FragmentTransaction的add方法,添加一個Fragment
b.FragmentTransaction的popBackStack()彈出該Fragment
演示實例:
fragment1.xml
/*
 * $filename: MyFragment.java,v $
 * $Date: 2014-5-16  $
 * Copyright (C) ZhengHaibo, Inc. All rights reserved.
 * This software is Made by Zhenghaibo.
 */
package com.example.testfragment;

import android.app.Activity;
import android.os.Bundle;
import android.support.v4.app.Fragment;
import android.view.LayoutInflater;
import android.view.View;
import android.view.View.OnClickListener;
import android.view.ViewGroup;
import android.widget.Button;

/*
 *@author: ZhengHaibo
 *web:     http://blog.csdn.net/nuptboyzhb
 *mail:    zhb931706659@126.com
 *2014-5-16  Nanjing,njupt,China
 */
public class MyFragment1 extends Fragment {

	FragmentCallBack fragmentCallBack = null;
	Button btn;
	@Override
	public View onCreateView(LayoutInflater inflater, ViewGroup container,
			Bundle savedInstanceState) {
		View rootView = inflater.inflate(R.layout.fragment1, container,
				false);
		btn = (Button)rootView.findViewById(R.id.btn);
		btn.setOnClickListener(new OnClickListener() {

			@Override
			public void onClick(View v) {
				// TODO Auto-generated method stub
				fragmentCallBack.callbackFun1(null);
			}
		});
		return rootView;
	}

	@Override
	public void onAttach(Activity activity) {
		// TODO Auto-generated method stub
		super.onAttach(activity);
		fragmentCallBack = (MainActivity)activity;
	}
}
/*
 * $filename: MyFragment.java,v $
 * $Date: 2014-5-16  $
 * Copyright (C) ZhengHaibo, Inc. All rights reserved.
 * This software is Made by Zhenghaibo.
 */
package com.example.testfragment;

import android.app.Activity;
import android.os.Bundle;
import android.support.v4.app.Fragment;
import android.view.LayoutInflater;
import android.view.View;
import android.view.View.OnClickListener;
import android.view.ViewGroup;
import android.widget.Button;
import android.widget.Toast;

/*
 *@author: ZhengHaibo
 *web:     http://blog.csdn.net/nuptboyzhb
 *mail:    zhb931706659@126.com
 *2014-5-16  Nanjing,njupt,China
 */
public class MyFragment2 extends Fragment {

	FragmentCallBack fragmentCallBack = null;
	Button btn1;
	Button btn2;
	@Override
	public View onCreateView(LayoutInflater inflater, ViewGroup container,
			Bundle savedInstanceState) {
		View rootView = inflater.inflate(R.layout.fragment2, container,
				false);
		Bundle data = getArguments();//獲得從activity中傳遞過來的值
		Toast.makeText(getActivity(), data.getString("TEXT"), Toast.LENGTH_SHORT).show();
		btn1 = (Button)rootView.findViewById(R.id.btn1);
		btn1.setOnClickListener(new OnClickListener() {

			@Override
			public void onClick(View v) {
				// 直接調用Activity中的方法
				((MainActivity)getActivity()).changeButtonColor();
			}
		});
		btn2 = (Button)rootView.findViewById(R.id.btn2);
		btn2.setOnClickListener(new OnClickListener() {

			@Override
			public void onClick(View v) {
				// 回調的方式
				fragmentCallBack.callbackFun2(null);
			}
		});
		return rootView;
	}

	@Override
	public void onAttach(Activity activity) {
		// TODO Auto-generated method stub
		super.onAttach(activity);
		fragmentCallBack = (MainActivity)activity;
	}
}
/*
 * $filename: FragmentCallBack.java,v $
 * $Date: 2014-5-16  $
 * Copyright (C) ZhengHaibo, Inc. All rights reserved.
 * This software is Made by Zhenghaibo.
 */
package com.example.testfragment;

import android.os.Bundle;

/*
 *@author: ZhengHaibo
 *web:     http://blog.csdn.net/nuptboyzhb
 *mail:    zhb931706659@126.com
 *2014-5-16  Nanjing,njupt,China
 */
public interface FragmentCallBack {
	public void callbackFun1(Bundle arg);

	public void callbackFun2(Bundle arg);
}
package com.example.testfragment;

import android.graphics.Color;
import android.os.Bundle;
import android.support.v4.app.Fragment;
import android.support.v4.app.FragmentManager;
import android.support.v4.app.FragmentTransaction;
import android.support.v7.app.ActionBarActivity;
import android.view.View;
import android.view.View.OnClickListener;
import android.widget.Button;

public class MainActivity extends ActionBarActivity implements FragmentCallBack{

	private Button btn;

	private MyFragment1 fragment1;
	private MyFragment2 fragment2;
	private FragmentManager fragmentManager;
	private Fragment currentFragment;
	@Override
	protected void onCreate(Bundle savedInstanceState) {
		super.onCreate(savedInstanceState);
		setContentView(R.layout.activity_main);
		fragmentManager = getSupportFragmentManager();

		FragmentTransaction fragmentTransaction = fragmentManager.beginTransaction();
		fragmentTransaction.setCustomAnimations(android.R.anim.fade_in, android.R.anim.fade_out);
		fragment1 = new MyFragment1();
		Bundle data = new Bundle();
		data.putString("TEXT", "這是Activiy通過Bundle傳遞過來的值");
		fragment1.setArguments(data);//通過Bundle向Activity中傳遞值
		fragmentTransaction.add(R.id.rl_container,fragment1);//將fragment1設置到布局上
		fragmentTransaction.addToBackStack(null);
		fragmentTransaction.commitAllowingStateLoss();
		currentFragment = fragment1;
		//初始化button控件
		btn = (Button)findViewById(R.id.btn);
		btn.setOnClickListener(new OnClickListener() {
			@Override
			public void onClick(View v) {
				if(currentFragment instanceof MyFragment1){
					switchFragment();
				}else{//當前是fragment2,因此,只需要將fragment2出棧即可變成fragment1
					fragmentManager.popBackStack();
					currentFragment = fragment1;
				}
			}
		});
	}
	/**
	 * 切換Fragment
	 */
	private void switchFragment(){
		if(null == fragment2){//可以避免切換的時候重復創建
			fragment2 = new MyFragment2();
		}
		Bundle data = new Bundle();
		data.putString("TEXT", "傳遞給fragment2");
		fragment2.setArguments(data);
		FragmentTransaction fragmentTransaction = fragmentManager.beginTransaction();
		fragmentTransaction.setCustomAnimations(android.R.anim.fade_in, android.R.anim.fade_out);
		fragmentTransaction.add(R.id.rl_container,fragment2);
		fragmentTransaction.addToBackStack(null);
		fragmentTransaction.commitAllowingStateLoss();
		currentFragment = fragment2;
	}

	public void changeButtonColor(){
		btn.setBackgroundColor(Color.RED);
	}

	@Override
	public void callbackFun1(Bundle arg) {
		// TODO Auto-generated method stub
		switchFragment();//通過回調方式切換
	}

	@Override
	public void callbackFun2(Bundle arg) {
		// TODO Auto-generated method stub
		changeButtonColor();//通過回調方式調用Activity中的方法
	}

}
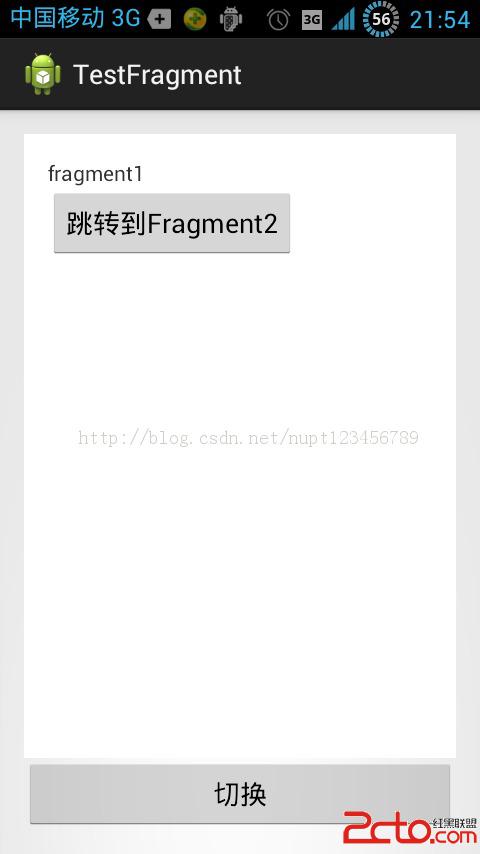
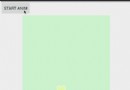
初始畫面
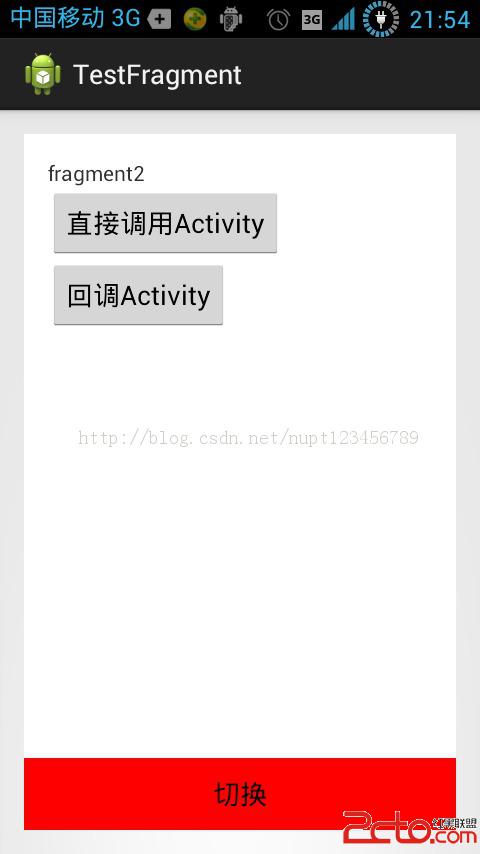
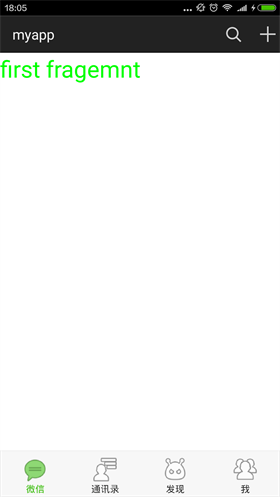
切換到第二個Fragment之後,通過Fragment2回調,改變按鈕背景後的截圖。
注意:
1.直接在Fragment中通過getActivity然後強轉Activity的方式調用Activity的方法,這個方式不推薦!因為這會使Fragment的適配性變差。
解決方法:在使用之前,使用instanceof 判斷一下Activity的類型
2.FragmentTransaction通過使用setCustomAnimations方法,可以為Fragment的切換增添各種不同的動畫。變化方式遠比Activity與Activity之間的切換動畫要多。
3.多個Fragment之間,可以通過Activity復用很多代碼,提高效率。
4.我們還可以通過ViewPager來管理Fragment,通過Adapter添加多個Fragment,然後通過setcurrentitem進行切換。我們同樣可以通過setArguments向Fragment傳遞數據。
 Android項目開發 教你實現Periscope點贊效果
現在視頻應用越來越火,Periscope火起來後,國內也出現了不少跟風者,界面幾乎跟Periscope一模一樣.Periscope確實不錯,點贊的效果也讓人眼前一亮,很漂
 仿微信6.x底部指示器漸變效果
首先上效果圖 大家微信都很熟悉了,這裡的效果就是仿照微信,在主界面左右滑動的時候,下面的導航圖標會產生漸變的效果,滑動是,之前圖標會慢慢變淡,當前的圖標會漸漸邊成選中的顏
 Android Studio 打印調試信息
之前開發單片機軟件還是上位機都習慣使用printf(),相信很多很會有和我一樣的習慣。開始學習安卓了,當然也很在意安卓的這個打印調試應該怎麼做呢?這裡使用的是日志記錄中添
 Android中實現可滑動的Tab的3種方式
1. 第一種,使用 TabHost + ViewPager 實現該方法會有一個Bug,當設置tabHost.setCurrentTab()為0時,ViewPager不顯示