編輯:關於Android編程
涉及的問題:
1.怎麼選取?
2.選到怎麼應用?
------
回答怎麼選取的問題:
通常有兩種常見的額方法:拍攝新照片和從已有的圖庫中選取圖片
1.1拍攝新照片調用相機,
 Intent openCameraIntent = new Intent(MediaStore.ACTION_IMAGE_CAPTURE);
openCameraIntent.putExtra(MediaStore.EXTRA_OUTPUT, mImageUri);
startActivityForResult(openCameraIntent, TAKE_NEW);
其中:
Uri mImageUri = Uri.fromFile(new File(Environment.getExternalStorageDirectory(), image.jpg));
為了避免OOM,采取壓縮bitmap的方式,在應用中設置一個大概的值,來作為壓縮的標准。
注意,由於使用了openCameraIntent.putExtra(MediaStore.EXTRA_OUTPUT, mImageUri); 在 onActivityResult
@Override
    protected void onActivityResult(int requestCode, int resultCode, Intent data) {
        int req = getResources().getDimensionPixelSize(R.dimen.record_event_image_size);
        switch (requestCode) {
            case TAKE_NEW:
                if (resultCode == RESULT_OK) {
                    File imageFile = new File(mImageUri.getPath());
                    File destFile = new File(Environment.getExternalStorageDirectory(),System.currentTimeMillis() + .jpg);
                    try {
                        FileUtils.copyFile(imageFile,destFile);
                    } catch (IOException e) {
                    }
                    addAddedImage(destFile,req);
                }
                break;
        }
    }
其中addAddedImage 是處理的過程,回答了怎麼使用的問題。
 private void addAddedImage(File selectedFile,int req){
        final BitmapFactory.Options options = new BitmapFactory.Options();
        Bitmap smallBitmap =  BitmapFactory.decodeFile(selectedFile.getAbsolutePath(),options);
        int inSampleSize = CommonTool.calculateInSampleSize(options, req, req);
        options.inSampleSize = inSampleSize;
        options.inJustDecodeBounds = false;
        smallBitmap = BitmapFactory.decodeFile(selectedFile.getAbsolutePath(),options);
        ResourceView view = new ResourceView(mContext);
        view.getImageView().setImageBitmap(smallBitmap);
        LinearLayout.LayoutParams params = new LinearLayout.LayoutParams(ViewGroup.LayoutParams.WRAP_CONTENT,ViewGroup.LayoutParams.WRAP_CONTENT);
        params.setMargins(10,10,10,10);
        mResourceView.addView(view,0,params);
    }
其中的提取是關鍵:
  public static int calculateInSampleSize(BitmapFactory.Options options,
                                            int reqWidth, int reqHeight) {
        // Raw height and width of image
        final int height = options.outHeight;
        final int width = options.outWidth;
        int inSampleSize = 1;

        if (height > reqHeight || width > reqWidth) {

            // Calculate ratios of height and width to requested height and
            // width
            final int heightRatio = Math.round((float) height
                    / (float) reqHeight);
            final int widthRatio = Math.round((float) width / (float) reqWidth);

            // Choose the smallest ratio as inSampleSize value, this will
            // guarantee
            // a final image with both dimensions larger than or equal to the
            // requested height and width.
            inSampleSize = heightRatio < widthRatio ? heightRatio : widthRatio;
        }

        return inSampleSize;
    }
上面是參考的,具體的出處現在急不得了。
這樣就完成了拍攝新照片並且使用的目的了。
1.2 從圖庫中選取照片
Intent openAlbumIntent = new Intent(Intent.ACTION_GET_CONTENT);
                        openAlbumIntent.setType(image/*);
                        startActivityForResult(openAlbumIntent, SELECT);
為了避免OOM,我們先將圖片的文件路徑給在找出來,然後使用上面提供的壓縮方式連進行提取一個縮略圖
方式如下:
Uri selectedImage = data.getData();
Toast.makeText(mContext, Selected: + selectedImage, Toast.LENGTH_LONG).show();
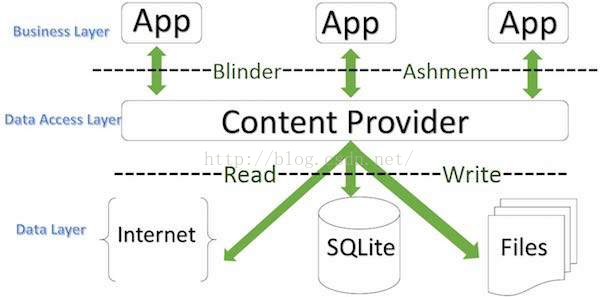
ContentResolver resolver = getContentResolver();
String[] filePathColumn = { MediaStore.Images.Media.DATA };
Cursor cursor = getContentResolver().query(selectedImage, filePathColumn, null, null, null);
cursor.moveToFirst();
int columnIndex = cursor.getColumnIndex(filePathColumn[0]);
String picturePath = cursor.getString(columnIndex);
cursor.close();
得到了絕對的路徑,處理方式就可以和上面的完全相同了。
--------------
總結:
選取圖片的總體思路是,既然是圖片,我們就認為它一定是存儲在一個圖片文件裡面的(沒有的話,我們可以強制的讓他存在),然後在從文件中加載到內存中進行展現。在展現的過程中我們遇到了OOM的問題,是由於圖片文件過大,導致內存吃緊,然後就考慮壓縮這個圖片(其實是只加載一部分,在圖片文件中圖片還是那個圖片,不增不減)。這樣選取系統的圖片的目的就達到了。
 微信網頁版怎麼看以前的聊天記錄 微信網頁版查看聊天記錄方法
微信網頁版怎麼看以前的聊天記錄?上班族寶寶們幾乎都會在網頁上進行微信聊天,微信網頁版比手機要方便得多,下文介紹微信網頁版查看聊天記錄方法,一起來和小編了解下
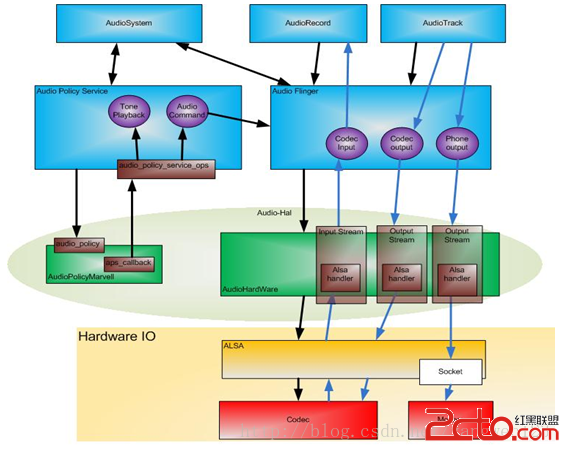 Android AudioPolicyService服務啟動過程
AudioPolicyService是策略的制定者,比如什麼時候打開音頻接口設備、某種Stream類型的音頻對應什麼設備等等。而AudioFlinger則是策略的執行者,
 Android自定義View實現驗證碼
本文章是基於鴻洋的Android 自定義View (一) 的一些擴展,以及對Android自定義View構造函數詳解裡面內容的一些轉載。首先我們定義一個declare-s
 Android基礎入門教程——8.3.1 三個繪圖工具類詳解
上兩小節我們學習了Drawable以及Bitmap,都是加載好圖片的,而本節我們要學習的繪圖相關的 一些API,他們分別是Canvas(畫布),Paint(