編輯:關於Android編程
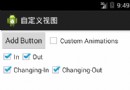
<RadioGroup android:layout_width="wrap_content"
            android:layout_height="wrap_content"
            android:orientation="vertical"
            android:id="@+id/radioGroup">
    <RadioButton android:layout_width="wrap_content"
                android:layout_height="wrap_content"
                android:id="@+id/radio1"
                android:text="@string/female"/>
    <RadioButton android:layout_width="wrap_content"
                android:layout_height="wrap_content"
                android:id="@+id/radio2"
                android:text="@string/male"/>
</RadioGroup>
<CheckBox android:id="@+id/singBox"
        android:layout_width="wrap_content"
        android:layout_height="wrap_content"
        android:text="@string/sing"/>
<CheckBox android:id="@+id/runBox"
        android:layout_width="wrap_content"
        android:layout_height="wrap_content"
        android:text="@string/run"/>
<CheckBox android:id="@+id/danceBox"
        android:layout_width="wrap_content"
        android:layout_height="wrap_content"
        android:text="@string/dance"/>
2.activity
package com.example.android1;

import android.app.Activity;
import android.content.Intent;
import android.os.Bundle;
import android.view.View;
import android.view.View.OnClickListener;
import android.widget.Button;
import android.widget.CheckBox;
import android.widget.CompoundButton;
import android.widget.LinearLayout;
import android.widget.RadioButton;
import android.widget.RadioGroup;
import android.widget.Toast;

public class LinearLayOut extends Activity
{
    private RadioGroup radioGroup;
    private RadioButton radio1,radio2;
    private CheckBox runBox,singBox,danceBox;
    @Override
    protected void onCreate(Bundle savedInstanceState)
    {
        super.onCreate(savedInstanceState);
        setContentView(R.layout.activity_main);
        Button button=(Button)findViewById(R.id.button);
        button.setOnClickListener(new MyButtonListener());//綁定監聽器
        radio1=(RadioButton)findViewById(R.id.radio1);
        radio2=(RadioButton)findViewById(R.id.radio2);
        radioGroup=(RadioGroup)findViewById(R.id.radioGroup);
        runBox=(CheckBox)findViewById(R.id.runBox);
        singBox=(CheckBox)findViewById(R.id.singBox);
        danceBox=(CheckBox)findViewById(R.id.danceBox);
        //單選按鈕監聽器
        radioGroup.setOnCheckedChangeListener(new RadioGroup.OnCheckedChangeListener()
        {

            @Override
            public void onCheckedChanged(RadioGroup group, int checkedId)
            {
                // TODO Auto-generated method stub
                if(radio1.getId()==checkedId)
                {
                    System.out.println("女");
//                  Toast.makeText(LinearLayout.class, "選擇了女", Toast.LENGTH_SHORT).show();
                    Toast.makeText(LinearLayOut.this, "選擇了女", Toast.LENGTH_SHORT).show();
                }
                else if(radio2.getId()==checkedId)
                {
                    System.out.println("男");
                }
            }
        });
        //復選框監聽器,每一個checkbox都需要一個
        runBox.setOnCheckedChangeListener(new CompoundButton.OnCheckedChangeListener()
        {

            @Override
            public void onCheckedChanged(CompoundButton buttonView, boolean isChecked)
            {
                if(isChecked)
                {
                    System.out.println("runBox is selected");
                }
                else
                {
                    System.out.println("runBox is unselected");
                }

            }
        });
        singBox.setOnCheckedChangeListener(new CompoundButton.OnCheckedChangeListener()
        {

            @Override
            public void onCheckedChanged(CompoundButton buttonView, boolean isChecked)
            {
                if(isChecked)
                {
                    System.out.println("singBox is selected");
                }
                else
                {
                    System.out.println("singBox is unselected");
                }

            }
        });
        danceBox.setOnCheckedChangeListener(new CompoundButton.OnCheckedChangeListener()
        {

            @Override
            public void onCheckedChanged(CompoundButton buttonView, boolean isChecked)
            {
                if(isChecked)
                {
                    System.out.println("danceBox is selected");
                }
                else
                {
                    System.out.println("danceBox is unselected");
                }

            }
        });
    }
    class MyButtonListener implements OnClickListener
    {

        @Override
        public void onClick(View v)
        {
            Intent intent=new Intent();
            intent.setClass(LinearLayOut.this, TableLayout.class);
            LinearLayOut.this.startActivity(intent);

        }
} }
 Android實現點擊Button產生水波紋效果
先上圖,看看接下來我要向大家介紹的是個什麼東西,如下圖: 接下來要介紹的就是如何實現上述圖中的波紋效果,這種效果如果大家沒有體驗過的話,可以看看百度手機衛士或者360手機
 Android ndk開發swig編譯jni接口
相信越來越多Android程序員需要用到Android ndk開發swig編譯jni接口,因為這設計到底層編程,如果開發的項目是有硬件產品的話,那更要熟悉這方面的編程。我
 Android4.4深入淺出之SurfaceFlinger總體結構
Android4.4 GUI系統框架之SurfaceFlinger 一. Android GUI框架: SurfaceFlinger:每當用戶程
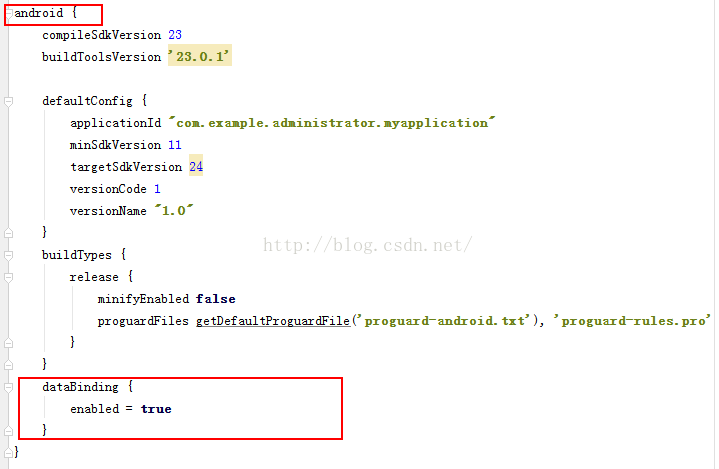 Android數據綁定框架DataBinding用法
一、數據綁定框架DataBinding介紹:Android的新框架DataBinding給我們帶來了很大的方便,以前可能需要在每個Activity裡寫很多的findVie