編輯:關於Android編程
package cn.com.remoteServiceClient;
import com.cn.aidl.IRemoteQuery;
import android.app.Activity;
import android.content.ComponentName;
import android.content.Intent;
import android.content.ServiceConnection;
import android.os.Bundle;
import android.os.IBinder;
import android.view.View;
import android.view.View.OnClickListener;
import android.widget.Button;
import android.widget.TextView;
//客戶端步驟:
//1 自定義ServiceConnection類實現ServiceConnection接口
//即RemoteQueryServiceConnection implements ServiceConnection
//重寫其方法public void onServiceConnected(ComponentName name, IBinder service)
//主要目的就是接受服務端傳過來的Binder對象,即方法的參數IBinder service.
//但是因為存在AIDL協議的轉換,所以IBinder service是一個代理對象,我們要強轉,將其轉換為接口類型對象.代碼如下:
//	public void onServiceConnected(ComponentName name, IBinder service) {
//		remoteQueryBinder=IRemoteQuery.Stub.asInterface(service);//強轉!!
//	}
//
//2 利用隱式意圖激活遠程服務
//
//3 利用remoteQueryBinder調用服務裡面的方法
//
//
//
//AIDL的客戶端的總結:
// (1) 采用的是隱式意圖去激活服務service,因為服務和客戶端不在同一個應用!
//    彼此看不見,所以是"隱"的,那麼就要采用隱式意圖去激活,所以在文件清單裡
//    聲明服務組件的時候,還要給其配置意圖過濾器!
// (2) 在onServiceConnected()方法裡接收服務端返回來的Binder對象時一定要注意!!!
//     這裡和本地服務的情況不一樣!!!因為存在AIDL協議的轉換,所以IBinder service是一個代理對象
//     我們要強轉將其轉換為接口類型對象remoteQueryBinder
//     即remoteQueryBinder=IRemoteQuery.Stub.asInterface(service);實現轉換
// (3) 核心總結:
//     現在把兩個例子都寫完了,再往回看,那麼可以發現其實本地服務和遠程服務
//     都在圍繞一個核心:得到一個Binder對象--->這個Binder對象有一個顯著的
//     特點:可以實現與服務的綁定,且可以完成一些業務
//
//     在本地服務裡面的實現是:Binder對象的類繼承自Binder且實現了業務的接口
//     那麼在接收此Binder對象的時候,當然可以用此接口來接收(父類引用指向子類對象嘛)
//
//     在遠程服務裡面實現是:我們要寫一個aidl文件.
//     然後由AIDL自動生成了一個很大的接口,在此接口中最核心是Stub類!它繼承自Binder而且
//     實現了我們定義的業務接口!所以返回來的Binder代理對象(注意是代理對象!)
//     既有"綁定"到服務的能力,也有完成業務方法的能力
//
//     所以在本地和遠程中我們都可以用業務接口來接受返回來的Binder對象或Binder代理對象
public class MainActivity extends Activity {
    TextView numberTextView;
    TextView resultTextView;
    Button button;
    RemoteQueryServiceConnection conn=new RemoteQueryServiceConnection();
    IRemoteQuery remoteQueryBinder;
    public void onCreate(Bundle savedInstanceState) {
        super.onCreate(savedInstanceState);
        setContentView(R.layout.main);
        numberTextView=(TextView) findViewById(R.id.number);
        resultTextView=(TextView) findViewById(R.id.result);
        button=(Button) findViewById(R.id.button);
        button.setOnClickListener(new ButtonOnClickListener());
        Intent service=new Intent();
        service.setAction("com.cn.remoteService.RemoteQueryService");
        bindService(service, conn, this.BIND_AUTO_CREATE);//綁定服務
    }

    private class ButtonOnClickListener implements OnClickListener{
		public void onClick(View v) {
			String number=numberTextView.getText().toString();
			String result;
			try {
				result = remoteQueryBinder.queryByNum(Integer.valueOf(number));
				resultTextView.setText(result);
			} catch (Exception e) {
				e.printStackTrace();
			}

		}
    }
    //接收綁定的服務和解除服務
    private final class RemoteQueryServiceConnection implements ServiceConnection{
		public void onServiceConnected(ComponentName name, IBinder service) {
			remoteQueryBinder=IRemoteQuery.Stub.asInterface(service);
		}
		public void onServiceDisconnected(ComponentName name) {
			remoteQueryBinder=null;
		}
    }

	protected void onDestroy() {
		unbindService(conn);
		super.onDestroy();
	}


}
<?xml version="1.0" encoding="utf-8"?>
<LinearLayout xmlns:android="http://schemas.android.com/apk/res/android"
    android:orientation="vertical"
    android:layout_width="fill_parent"
    android:layout_height="fill_parent"
    >
   <TextView
    android:layout_width="fill_parent"
    android:layout_height="wrap_content"
    android:text="@string/number"
    />
    <EditText
    android:layout_width="fill_parent"
    android:layout_height="wrap_content"
    android:id="@+id/number"
    />
    <Button
    android:layout_width="wrap_content"
    android:layout_height="wrap_content"
    android:text="@string/button"
    android:id="@+id/button"
    />
    <TextView
    android:layout_width="fill_parent"
    android:layout_height="wrap_content"
    android:id="@+id/result"
    />
</LinearLayout>
package com.cn.remoteService;
import com.cn.aidl.IRemoteQuery;
import android.app.Service;
import android.content.Intent;
import android.os.IBinder;
import android.os.RemoteException;
//服務端步驟:
//1 生成aidl文件
//建立一個接口,裡面可以有各種方法.
//將此接口稍作修改,讓"接口名"和"方法名"都沒有修飾(如public)!!代碼如下:
//interface IRemoteQuery {
//   String queryByNum(int number);
//}
// 然後找到這個被修改後接口的文件路徑,按照此路徑在硬盤上將其後綴改為.aidl
//這樣就生成了aidl文件.在此過程中注意:接口名和aidl文件名必須相同.

//2 刷新工程,系統會自動生成用於用於遠程通信的IRemoteQuery.java
// 分析此IRemoteQuery.java
//(1)IRemoteQuery.java內部實際是一個名叫IRemoteQuery的接口
//(2)該IRemoteQuery接口內部最重要的是一個Stub類(即IRemoteQuery.Stub),此類繼承自Binder類且實現了IRemoteQuery業務接口
// 所以該類的對象具有遠程訪問的能力
//
//3在客戶端建立一個包,包的名稱與aidl文件所在的包名一致!然後將服務端的aidl文件拷貝到此包下,然後刷新
//發現在客戶端的gen下生成了IRemoteQuery.java
//
//4 自定義遠程服務類(RemoteQueryService),其繼承自service
//
//5 在RemoteQueryService裡面寫一個內部類RemoteQueryBinder繼承自IRemoteQuery.Stub
//即RemoteQueryBinder extends IRemoteQuery.Stub
//6 重寫服務的public IBinder onBind(Intent intent)方法,返回一個Binder對象即RemoteQueryBinder類對象給客戶端
//
//
//關於AIDL的服務端的總結:
//(1) 自動生成的Stub是核心重點,從生成的代碼可以看出:它繼承自Binder而且實現了我們定義的業務接口
// 所以它既可以有綁定的能力也有調用業務的能力(這點和剛才寫的調用本地服務的例子有異曲同工之妙)
//(2) AIDL的定義和接口很類似,但是"接口名"和"方法名"都沒有修飾!!!!比如public
//(3) 在客戶端和服務端都要此包!!因為這相當於一個通信協議!!!雙方都必須遵守,所以一式兩份!!!
public class RemoteQueryService extends Service {
	@Override
	public IBinder onBind(Intent intent) {
		return remoteQueryBinder;
	}

	RemoteQueryBinder remoteQueryBinder=new RemoteQueryBinder();
	private String [] names=new String [] {"小明","小王","小楊","小李"};

	private final class RemoteQueryBinder extends IRemoteQuery.Stub{
		@Override
		public String queryByNum(int number) throws RemoteException {
			return query(number);
		}
	}

	public String query(int i){
		if(i>0&&i<5){
			return names[i-1];
		}
		return "查詢錯誤,請再次輸入";
	}

}
/*
 * This file is auto-generated.  DO NOT MODIFY.
 * Original file: D:\\workspace\\queryByRemoteService\\src\\com\\cn\\aidl\\IRemoteQuery.aidl
 */
package com.cn.aidl;
/**
 *注意:
 *此AIDL的定義和接口很類似,但是"接口名"和"方法名"都沒有修飾!!!!比如public
 */
public interface IRemoteQuery extends android.os.IInterface
{
/** Local-side IPC implementation stub class. */
public static abstract class Stub extends android.os.Binder implements com.cn.aidl.IRemoteQuery
{
private static final java.lang.String DESCRIPTOR = "com.cn.aidl.IRemoteQuery";
/** Construct the stub at attach it to the interface. */
public Stub()
{
this.attachInterface(this, DESCRIPTOR);
}
/**
 * Cast an IBinder object into an com.cn.aidl.IRemoteQuery interface,
 * generating a proxy if needed.
 */
public static com.cn.aidl.IRemoteQuery asInterface(android.os.IBinder obj)
{
if ((obj==null)) {
return null;
}
android.os.IInterface iin = obj.queryLocalInterface(DESCRIPTOR);
if (((iin!=null)&&(iin instanceof com.cn.aidl.IRemoteQuery))) {
return ((com.cn.aidl.IRemoteQuery)iin);
}
return new com.cn.aidl.IRemoteQuery.Stub.Proxy(obj);
}
@Override public android.os.IBinder asBinder()
{
return this;
}
@Override public boolean onTransact(int code, android.os.Parcel data, android.os.Parcel reply, int flags) throws android.os.RemoteException
{
switch (code)
{
case INTERFACE_TRANSACTION:
{
reply.writeString(DESCRIPTOR);
return true;
}
case TRANSACTION_queryByNum:
{
data.enforceInterface(DESCRIPTOR);
int _arg0;
_arg0 = data.readInt();
java.lang.String _result = this.queryByNum(_arg0);
reply.writeNoException();
reply.writeString(_result);
return true;
}
}
return super.onTransact(code, data, reply, flags);
}
private static class Proxy implements com.cn.aidl.IRemoteQuery
{
private android.os.IBinder mRemote;
Proxy(android.os.IBinder remote)
{
mRemote = remote;
}
@Override public android.os.IBinder asBinder()
{
return mRemote;
}
public java.lang.String getInterfaceDescriptor()
{
return DESCRIPTOR;
}
@Override public java.lang.String queryByNum(int number) throws android.os.RemoteException
{
android.os.Parcel _data = android.os.Parcel.obtain();
android.os.Parcel _reply = android.os.Parcel.obtain();
java.lang.String _result;
try {
_data.writeInterfaceToken(DESCRIPTOR);
_data.writeInt(number);
mRemote.transact(Stub.TRANSACTION_queryByNum, _data, _reply, 0);
_reply.readException();
_result = _reply.readString();
}
finally {
_reply.recycle();
_data.recycle();
}
return _result;
}
}
static final int TRANSACTION_queryByNum = (android.os.IBinder.FIRST_CALL_TRANSACTION + 0);
}
public java.lang.String queryByNum(int number) throws android.os.RemoteException;
}
 手把手教你做視頻播放器(五)
第7節 豎屏的播放界面播放視頻的功能放在一個單獨的Activity當中。我們將為它們設置橫豎屏兩種布局。在豎屏的時候,上半部分播放視頻,下半部分顯示視頻信息;
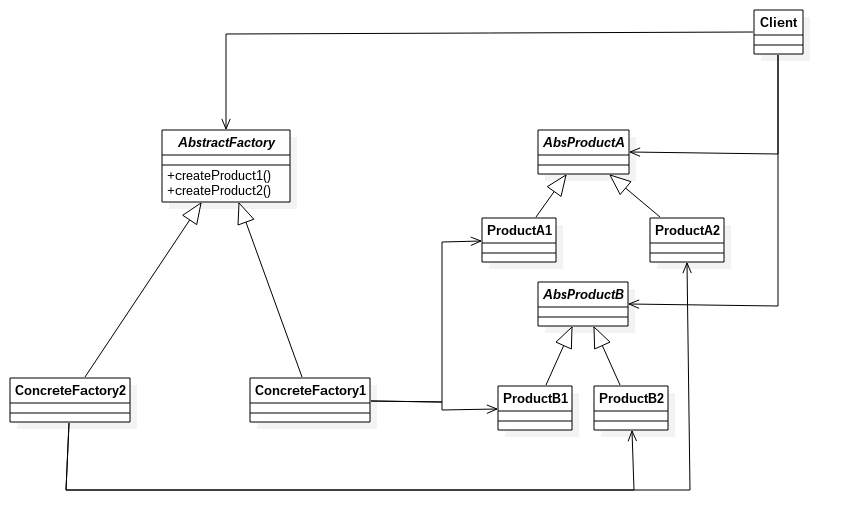 Android源碼中的抽象工廠---IPolicy
抽象工廠應用是很廣的,在Android源碼中,這個IPolicy就是一個簡單的抽象工廠模式。下面分析一下IPolicy及其實現,以及創建的相關對象(源碼基於5.0.0)。
 Android - 通過Intent啟動Activity
通過Intent啟動Activity 為了動態關聯Activity界面,使用Intent啟動,可以靈活綁定。 在Intent靜態
 我的Android進階之旅------)Android實現音樂示波器、均衡器、重低音和音場功能
本實例來自於《瘋狂Android講義》,要實現具體的功能,需要了解以下API: MediaPlayer 媒體播放器Visualizer 頻譜Equalizer 均衡器Ba