編輯:關於Android編程
本例子包含若干shader文件,在項目assests文件夾下
矩陣變換類
package test.com.opengles7_4;

import android.opengl.Matrix;

import java.nio.ByteBuffer;
import java.nio.ByteOrder;
import java.nio.FloatBuffer;
import java.util.Stack;

/**
 * Created by hbin on 2016/8/24.
 * 存儲系統矩陣狀態的類
 */
public class MatrixState {
    private static float[] mProjMatrix = new float[16];//4x4矩陣 投影用
    private static float[] mVMatrix = new float[16];//攝像機位置朝向9參數矩陣
    private static float[] currMatrix;//當前變換矩陣
    public static float[] lightLocationSun=new float[]{0,0,0};//太陽定位光光源位置
    public static FloatBuffer cameraFB;
    public static FloatBuffer lightPositionFBSun;


    public static Stack mStack=new Stack();//保護變換矩陣的棧

    public static void setInitStack()//獲取不變換初始矩陣
    {
        currMatrix=new float[16];
        Matrix.setRotateM(currMatrix, 0, 0, 1, 0, 0);
    }

    public static void pushMatrix()//保護變換矩陣
    {
        mStack.push(currMatrix.clone());
    }

    public static void popMatrix()//恢復變換矩陣
    {
        currMatrix=mStack.pop();
    }

    public static void translate(float x,float y,float z)//設置沿xyz軸移動
    {
        Matrix.translateM(currMatrix, 0, x, y, z);
    }

    public static void rotate(float angle,float x,float y,float z)//設置繞xyz軸移動
    {
        Matrix.rotateM(currMatrix,0,angle,x,y,z);
    }


    //設置攝像機
    public static void setCamera
    (
            float cx,	//攝像機位置x
            float cy,   //攝像機位置y
            float cz,   //攝像機位置z
            float tx,   //攝像機目標點x
            float ty,   //攝像機目標點y
            float tz,   //攝像機目標點z
            float upx,  //攝像機UP向量X分量
            float upy,  //攝像機UP向量Y分量
            float upz   //攝像機UP向量Z分量
    )
    {
        Matrix.setLookAtM
                (
                        mVMatrix,
                        0,
                        cx,
                        cy,
                        cz,
                        tx,
                        ty,
                        tz,
                        upx,
                        upy,
                        upz
                );

        float[] cameraLocation=new float[3];//攝像機位置
        cameraLocation[0]=cx;
        cameraLocation[1]=cy;
        cameraLocation[2]=cz;

        ByteBuffer llbb = ByteBuffer.allocateDirect(3*4);
        llbb.order(ByteOrder.nativeOrder());//設置字節順序
        cameraFB=llbb.asFloatBuffer();
        cameraFB.put(cameraLocation);
        cameraFB.position(0);
    }

    //設置透視投影參數
    public static void setProjectFrustum
    (
            float left,		//near面的left
            float right,    //near面的right
            float bottom,   //near面的bottom
            float top,      //near面的top
            float near,		//near面距離
            float far       //far面距離
    )
    {
        Matrix.frustumM(mProjMatrix, 0, left, right, bottom, top, near, far);
    }

    //設置正交投影參數
    public static void setProjectOrtho
    (
            float left,		//near面的left
            float right,    //near面的right
            float bottom,   //near面的bottom
            float top,      //near面的top
            float near,		//near面距離
            float far       //far面距離
    )
    {
        Matrix.orthoM(mProjMatrix, 0, left, right, bottom, top, near, far);
    }

    //獲取具體物體的總變換矩陣
    public static float[] getFinalMatrix()
    {
        float[] mMVPMatrix=new float[16];
        Matrix.multiplyMM(mMVPMatrix, 0, mVMatrix, 0, currMatrix, 0);
        Matrix.multiplyMM(mMVPMatrix, 0, mProjMatrix, 0, mMVPMatrix, 0);
        return mMVPMatrix;
    }

    //獲取具體物體的變換矩陣
    public static float[] getMMatrix()
    {
        return currMatrix;
    }

    //設置太陽光源位置的方法
    public static void setLightLocationSun(float x,float y,float z)
    {
        lightLocationSun[0]=x;
        lightLocationSun[1]=y;
        lightLocationSun[2]=z;
        ByteBuffer llbb = ByteBuffer.allocateDirect(3*4);
        llbb.order(ByteOrder.nativeOrder());//設置字節順序
        lightPositionFBSun=llbb.asFloatBuffer();
        lightPositionFBSun.put(lightLocationSun);
        lightPositionFBSun.position(0);
    }
}
星空繪制類
package test.com.opengles7_4;

import android.opengl.GLES20;

import java.nio.ByteBuffer;
import java.nio.ByteOrder;
import java.nio.FloatBuffer;

/**
 * Created by hbin on 2016/8/24.
 * 表示星空天球的類
 */
public class Celestial {
    final float UNIT_SIZE=10.0f;//天球半徑
    private FloatBuffer mVertexBuffer;//頂點坐標數據緩沖
    int vCount=0;//星星數量
    float yAngle;//天球繞Y軸旋轉的角度
    float scale;//星星尺寸
    String mVertexShader;//頂點著色器
    String mFragmentShader;//片元著色器
    int mProgram;//自定義渲染管線程序id
    int muMVPMatrixHandle;//總變換矩陣引用id
    int maPositionHandle; //頂點位置屬性引用id
    int uPointSizeHandle;//頂點尺寸參數引用

    public Celestial(float scale,float yAngle,int vCount,MySurfaceView mv){
        this.yAngle=yAngle;
        this.scale=scale;
        this.vCount=vCount;
        initVertexData();
        initShader(mv);
    }

    public void initVertexData(){
        //頂點坐標數據的初始化
        float vertices[]=new float[vCount*3];
        for(int i=0;i<vcount;i++){ 180="" 360="" 24.="" alvertix="new" anglespan="10f;//將球進行單位切分的角度" angletempjd="Math.PI*2*Math.random();" angletempwd="Math.PI*(Math.random()-0.5f);" arraylist="" by="" bytebuffer="" c="0;" created="" double="" final="" float="" floatbuffer="" gles20.glvertexattribpointer="" hangle="360;hAngle>0;hAngle=hAngle-angleSpan)//水平方向angleSpan度一份" hbin="" i="0;i<bh;i++)" id="" import="" int="" j="0;j<bw;j++)" llbb="ByteBuffer.allocateDirect(texCoor.length*4);" macamerahandle="GLES20.glGetUniformLocation(mProgram," manormalhandle="GLES20.glGetAttribLocation(mProgram," mapositionhandle="GLES20.glGetAttribLocation(mProgram," masunlightlocationhandle="GLES20.glGetUniformLocation(mProgram," matexcoorhandle="GLES20.glGetAttribLocation(mProgram," mfragmentshader="ShaderUtil.loadFromAssetsFile(" moon="" mprogram="ShaderUtil.createProgram(mVertexShader," mtexcoorbuffer="llbb.asFloatBuffer();" mummatrixhandle="GLES20.glGetUniformLocation(mProgram," mumvpmatrixhandle="GLES20.glGetUniformLocation(mProgram," mv="" mvertexbuffer="vbb.asFloatBuffer();//轉換為int型緩沖" mvertexshader="ShaderUtil.loadFromAssetsFile(" mysurfaceview="" new="" package="" param="" pre="" public="" result="new" return="" s="j*sizew;" shader="" sizeh="1.0f/bh;//行數" sizew="1.0f/bw;//列數" ss="=" string="" t="i*sizeh;" texcoor="generateTexCoor//獲取切分整圖的紋理數組" unit_size="0.5f;" upointsizehandle="GLES20.glGetUniformLocation(mProgram," vangle="90;vAngle>-90;vAngle=vAngle-angleSpan)//垂直方向angleSpan度一份" vbb="ByteBuffer.allocateDirect(vertices.length*4);" vcount="alVertix.size()/3;//頂點的數量為坐標值數量的1/3,因為一個頂點有3個坐標" void="" x1="(float)(xozLength*Math.cos(Math.toRadians(hAngle)));" x2="(float)(xozLength*Math.cos(Math.toRadians(hAngle)));" x3="(float)(xozLength*Math.cos(Math.toRadians(hAngle-angleSpan)));" x4="(float)(xozLength*Math.cos(Math.toRadians(hAngle-angleSpan)));" xozlength="r*UNIT_SIZE*Math.cos(Math.toRadians(vAngle));" y1="(float)(r*UNIT_SIZE*Math.sin(Math.toRadians(vAngle)));" y2="(float)(r*UNIT_SIZE*Math.sin(Math.toRadians(vAngle-angleSpan)));" y3="(float)(r*UNIT_SIZE*Math.sin(Math.toRadians(vAngle-angleSpan)));" y4="(float)(r*UNIT_SIZE*Math.sin(Math.toRadians(vAngle)));" z1="(float)(xozLength*Math.sin(Math.toRadians(hAngle)));" z2="(float)(xozLength*Math.sin(Math.toRadians(hAngle)));" z3="(float)(xozLength*Math.sin(Math.toRadians(hAngle-angleSpan)));" z4="(float)(xozLength*Math.sin(Math.toRadians(hAngle-angleSpan)));" data-cke-pa-on="">
地球繪制類
package test.com.opengles7_4;

import android.opengl.GLES20;

import java.nio.ByteBuffer;
import java.nio.ByteOrder;
import java.nio.FloatBuffer;
import java.util.ArrayList;

/**
 * Created by hbin on 2016/8/24.
 * 表示地球的類,采用多重紋理
 */
public class Earth {
    int mProgram;//自定義渲染管線程序id
    int muMVPMatrixHandle;//總變換矩陣引用id
    int muMMatrixHandle;//位置、旋轉變換矩陣
    int maCameraHandle; //攝像機位置屬性引用id
    int maPositionHandle; //頂點位置屬性引用id
    int maNormalHandle; //頂點法向量屬性引用id
    int maTexCoorHandle; //頂點紋理坐標屬性引用id
    int maSunLightLocationHandle;//光源位置屬性引用id
    int uDayTexHandle;//白天紋理屬性引用id
    int uNightTexHandle;//黑夜紋理屬性引用id
    String mVertexShader;//頂點著色器
    String mFragmentShader;//片元著色器
    FloatBuffer mVertexBuffer;//頂點坐標數據緩沖
    FloatBuffer   mTexCoorBuffer;//頂點紋理坐標數據緩沖
    int vCount=0;

    public Earth(MySurfaceView mv,float r){
        //初始化頂點坐標與著色數據
        initVertexData(r);
        //初始化著色器
        initShader(mv);
    }

    //初始化頂點坐標與紋理數據的方法
    public void initVertexData(float r){
        //頂點坐標數據的初始化================begin============================
        final float UNIT_SIZE=0.5f;
        ArrayList<float> alVertix=new ArrayList<float>();//存放頂點坐標的ArrayList
        final float angleSpan=10f;//將球進行單位切分的角度
        for(float vAngle=90;vAngle>-90;vAngle=vAngle-angleSpan){//垂直方向angleSpan度一份
            for(float hAngle=360;hAngle>0;hAngle=hAngle-angleSpan){//水平方向angleSpan度一份
                //縱向橫向各到一個角度後計算對應的此點在球面上的坐標
                double xozLength=r*UNIT_SIZE*Math.cos(Math.toRadians(vAngle));
                float x1=(float)(xozLength*Math.cos(Math.toRadians(hAngle)));
                float z1=(float)(xozLength*Math.sin(Math.toRadians(hAngle)));
                float y1=(float)(r*UNIT_SIZE*Math.sin(Math.toRadians(vAngle)));
                xozLength=r*UNIT_SIZE*Math.cos(Math.toRadians(vAngle-angleSpan));
                float x2=(float)(xozLength*Math.cos(Math.toRadians(hAngle)));
                float z2=(float)(xozLength*Math.sin(Math.toRadians(hAngle)));
                float y2=(float)(r*UNIT_SIZE*Math.sin(Math.toRadians(vAngle-angleSpan)));
                xozLength=r*UNIT_SIZE*Math.cos(Math.toRadians(vAngle-angleSpan));
                float x3=(float)(xozLength*Math.cos(Math.toRadians(hAngle-angleSpan)));
                float z3=(float)(xozLength*Math.sin(Math.toRadians(hAngle-angleSpan)));
                float y3=(float)(r*UNIT_SIZE*Math.sin(Math.toRadians(vAngle-angleSpan)));
                xozLength=r*UNIT_SIZE*Math.cos(Math.toRadians(vAngle));
                float x4=(float)(xozLength*Math.cos(Math.toRadians(hAngle-angleSpan)));
                float z4=(float)(xozLength*Math.sin(Math.toRadians(hAngle-angleSpan)));
                float y4=(float)(r*UNIT_SIZE*Math.sin(Math.toRadians(vAngle)));
                //構建第一三角形
                alVertix.add(x1);alVertix.add(y1);alVertix.add(z1);
                alVertix.add(x2);alVertix.add(y2);alVertix.add(z2);
                alVertix.add(x4);alVertix.add(y4);alVertix.add(z4);
                //構建第二三角形
                alVertix.add(x4);alVertix.add(y4);alVertix.add(z4);
                alVertix.add(x2);alVertix.add(y2);alVertix.add(z2);
                alVertix.add(x3);alVertix.add(y3);alVertix.add(z3);
            }}
        vCount=alVertix.size()/3;//頂點的數量為坐標值數量的1/3,因為一個頂點有3個坐標
        //將alVertix中的坐標值轉存到一個float數組中
        float vertices[]=new float[vCount*3];
        for(int i=0;i<alvertix.size();i++){ 180="" 360="" bytebuffer="" vbb="ByteBuffer.allocateDirect(vertices.length*4);" mvertexbuffer="vbb.asFloatBuffer();//轉換為int型緩沖" texcoor="generateTexCoor(//獲取切分整圖的紋理數組" llbb="ByteBuffer.allocateDirect(texCoor.length*4);" mtexcoorbuffer="llbb.asFloatBuffer();" public="" void="" mysurfaceview="" mvertexshader="ShaderUtil.loadFromAssetsFile(" ss="="" mfragmentshader="ShaderUtil.loadFromAssetsFile(" mprogram="ShaderUtil.createProgram(mVertexShader," id="" mapositionhandle="GLES20.glGetAttribLocation(mProgram," matexcoorhandle="GLES20.glGetAttribLocation(mProgram," manormalhandle="GLES20.glGetAttribLocation(mProgram," mumvpmatrixhandle="GLES20.glGetUniformLocation(mProgram," macamerahandle="GLES20.glGetUniformLocation(mProgram," masunlightlocationhandle="GLES20.glGetUniformLocation(mProgram," udaytexhandle="GLES20.glGetUniformLocation(mProgram," unighttexhandle="GLES20.glGetUniformLocation(mProgram," mummatrixhandle="GLES20.glGetUniformLocation(mProgram," int="" gles20.glvertexattribpointer="" result="new" float="" sizew="1.0f/bw;//列數" sizeh="1.0f/bh;//行數" c="0;" i="0;i<bh;i++){" j="0;j<bw;j++){" pre="" return="" s="j*sizew;" t="i*sizeh;">
surface繪制類
package test.com.opengles7_4;

import android.content.Context;
import android.graphics.Bitmap;
import android.graphics.BitmapFactory;
import android.opengl.GLES20;
import android.opengl.GLSurfaceView;
import android.opengl.GLUtils;
import android.view.MotionEvent;

import java.io.IOException;
import java.io.InputStream;

import javax.microedition.khronos.egl.EGLConfig;
import javax.microedition.khronos.opengles.GL10;

/**
 * Created by hbin on 2016/8/24.
 */
public class MySurfaceView extends GLSurfaceView {
    private final float TOUCH_SCALE_FACTOR = 180.0f/320;//角度縮放比例
    private SceneRenderer mRenderer;//場景渲染器

    private float mPreviousX;//上次的觸控位置X坐標
    private float mPreviousY;//上次的觸控位置Y坐標

    int textureIdEarth;//系統分配的地球紋理id
    int textureIdEarthNight;//系統分配的地球夜晚紋理id
    int textureIdMoon;//系統分配的月球紋理id

    float yAngle=0;//太陽燈光繞y軸旋轉的角度
    float xAngle=0;//攝像機繞X軸旋轉的角度

    float eAngle=0;//地球自轉角度
    float cAngle=0;//天球自轉的角度

    public MySurfaceView(Context context) {
        super(context);
        this.setEGLContextClientVersion(2); //設置使用OPENGL ES2.0
        mRenderer = new SceneRenderer();	//創建場景渲染器
        setRenderer(mRenderer);				//設置渲染器
        setRenderMode(GLSurfaceView.RENDERMODE_CONTINUOUSLY);//設置渲染模式為主動渲染
    }

    //觸摸事件回調方法
    @Override
    public boolean onTouchEvent(MotionEvent e) {
        float x = e.getX();
        float y = e.getY();
        switch (e.getAction()) {
            case MotionEvent.ACTION_MOVE:
                //觸控橫向位移太陽繞y軸旋轉
                float dx = x - mPreviousX;//計算觸控筆X位移
                yAngle += dx * TOUCH_SCALE_FACTOR;//設置太陽繞y軸旋轉的角度
                float sunx=(float)(Math.cos(Math.toRadians(yAngle))*100);
                float sunz=-(float)(Math.sin(Math.toRadians(yAngle))*100);
                MatrixState.setLightLocationSun(sunx,5,sunz);

                //觸控縱向位移攝像機繞x軸旋轉 -90~+90
                float dy = y - mPreviousY;//計算觸控筆Y位移
                xAngle += dy * TOUCH_SCALE_FACTOR;//設置太陽繞y軸旋轉的角度
                if(xAngle>90)
                {
                    xAngle=90;
                }
                else if(xAngle<-90)
                {
                    xAngle=-90;
                }
                float cy=(float) (7.2*Math.sin(Math.toRadians(xAngle)));
                float cz=(float) (7.2*Math.cos(Math.toRadians(xAngle)));
                float upy=(float) Math.cos(Math.toRadians(xAngle));
                float upz=-(float) Math.sin(Math.toRadians(xAngle));
                MatrixState.setCamera(0, cy, cz, 0, 0, 0, 0, upy, upz);
        }
        mPreviousX = x;//記錄觸控筆位置
        mPreviousY = y;
        return true;
    }

    private class SceneRenderer implements  GLSurfaceView.Renderer{

        Earth earth;//地球
        Moon moon;//月球
        Celestial cSmall;//小星星天球
        Celestial cBig;//大星星天球

        @Override
        public void onSurfaceCreated(GL10 gl, EGLConfig config) {
            //設置屏幕背景色RGBA
            GLES20.glClearColor(0.0f, 0.0f, 0.0f, 1.0f);
            //創建地球對象
            earth=new Earth(MySurfaceView.this,2.0f);
            //創建月球對象
            moon=new Moon(MySurfaceView.this,1.0f);
            //創建小星星天球對象
            cSmall=new Celestial(1,0,1000,MySurfaceView.this);
            //創建大星星天球對象
            cBig=new Celestial(2,0,500,MySurfaceView.this);
            //打開深度檢測
            GLES20.glEnable(GLES20.GL_DEPTH_TEST);
            //初始化變換矩陣
            MatrixState.setInitStack();
        }

        @Override
        public void onSurfaceChanged(GL10 gl, int width, int height) {
            //設置視窗大小及位置
            GLES20.glViewport(0, 0, width, height);
            //計算GLSurfaceView的寬高比
            Constant.ratio= (float) width / height;
            //調用此方法計算產生透視投影矩陣
            MatrixState.setProjectFrustum(-Constant.ratio, Constant.ratio, -1, 1, 4f, 100);
            //調用此方法產生攝像機9參數位置矩陣
            MatrixState.setCamera(0,0,7.2f,0f,0f,0f,0f,1.0f,0.0f);
            //打開背面剪裁
            GLES20.glEnable(GLES20.GL_CULL_FACE);
            //初始化紋理
            textureIdEarth=initTexture(R.mipmap.earth);
            textureIdEarthNight=initTexture(R.mipmap.earthn);
            textureIdMoon=initTexture(R.mipmap.moon);
            //設置太陽燈光的初始位置
            MatrixState.setLightLocationSun(100,5,0);

            //啟動一個線程定時旋轉地球、月球
            new Thread()
            {
                public void run()
                {
                    while(Constant.threadFlag)
                    {
                        //地球自轉角度
                        eAngle=(eAngle+2)%360;
                        //天球自轉角度
                        cAngle=(cAngle+0.2f)%360;
                        try {
                            Thread.sleep(100);
                        } catch (InterruptedException e) {
                            e.printStackTrace();
                        }
                    }
                }
            }.start();
        }

        @Override
        public void onDrawFrame(GL10 gl) {
            //清除深度緩沖與顏色緩沖
            GLES20.glClear( GLES20.GL_DEPTH_BUFFER_BIT | GLES20.GL_COLOR_BUFFER_BIT);

            //保護現場
            MatrixState.pushMatrix();
            //地球自轉
            MatrixState.rotate(eAngle, 0, 1, 0);
            //繪制紋理圓球
            earth.drawSelf(textureIdEarth,textureIdEarthNight);
            //推坐標系到月球位置
            MatrixState.translate(2f, 0, 0);
            //月球自轉
            MatrixState.rotate(eAngle, 0, 1, 0);
            //繪制月球
            moon.drawSelf(textureIdMoon);
            //恢復現場
            MatrixState.popMatrix();

            //保護現場
            MatrixState.pushMatrix();
            MatrixState.rotate(cAngle, 0, 1, 0);
            cSmall.drawSelf();
            cBig.drawSelf();
            //恢復現場
            MatrixState.popMatrix();
        }
    }

    public int initTexture(int drawableId)//textureId
    {
        //生成紋理ID
        int[] textures = new int[1];
        GLES20.glGenTextures
                (
                        1,          //產生的紋理id的數量
                        textures,   //紋理id的數組
                        0           //偏移量
                );
        int textureId=textures[0];
        GLES20.glBindTexture(GLES20.GL_TEXTURE_2D, textureId);
        GLES20.glTexParameterf(GLES20.GL_TEXTURE_2D, GLES20.GL_TEXTURE_MIN_FILTER,GLES20.GL_NEAREST);
        GLES20.glTexParameterf(GLES20.GL_TEXTURE_2D,GLES20.GL_TEXTURE_MAG_FILTER,GLES20.GL_LINEAR);
        GLES20.glTexParameterf(GLES20.GL_TEXTURE_2D, GLES20.GL_TEXTURE_WRAP_S,GLES20.GL_CLAMP_TO_EDGE);
        GLES20.glTexParameterf(GLES20.GL_TEXTURE_2D, GLES20.GL_TEXTURE_WRAP_T,GLES20.GL_CLAMP_TO_EDGE);

        //通過輸入流加載圖片===============begin===================
        InputStream is = this.getResources().openRawResource(drawableId);
        Bitmap bitmapTmp;
        try
        {
            bitmapTmp = BitmapFactory.decodeStream(is);
        }
        finally
        {
            try
            {
                is.close();
            }
            catch(IOException e)
            {
                e.printStackTrace();
            }
        }
        //通過輸入流加載圖片===============end=====================

        //實際加載紋理
        GLUtils.texImage2D
                (
                        GLES20.GL_TEXTURE_2D,   //紋理類型,在OpenGL ES中必須為GL10.GL_TEXTURE_2D
                        0,                      //紋理的層次,0表示基本圖像層,可以理解為直接貼圖
                        bitmapTmp,              //紋理圖像
                        0                      //紋理邊框尺寸
                );
        bitmapTmp.recycle(); 		  //紋理加載成功後釋放圖片

        return textureId;
    }
}
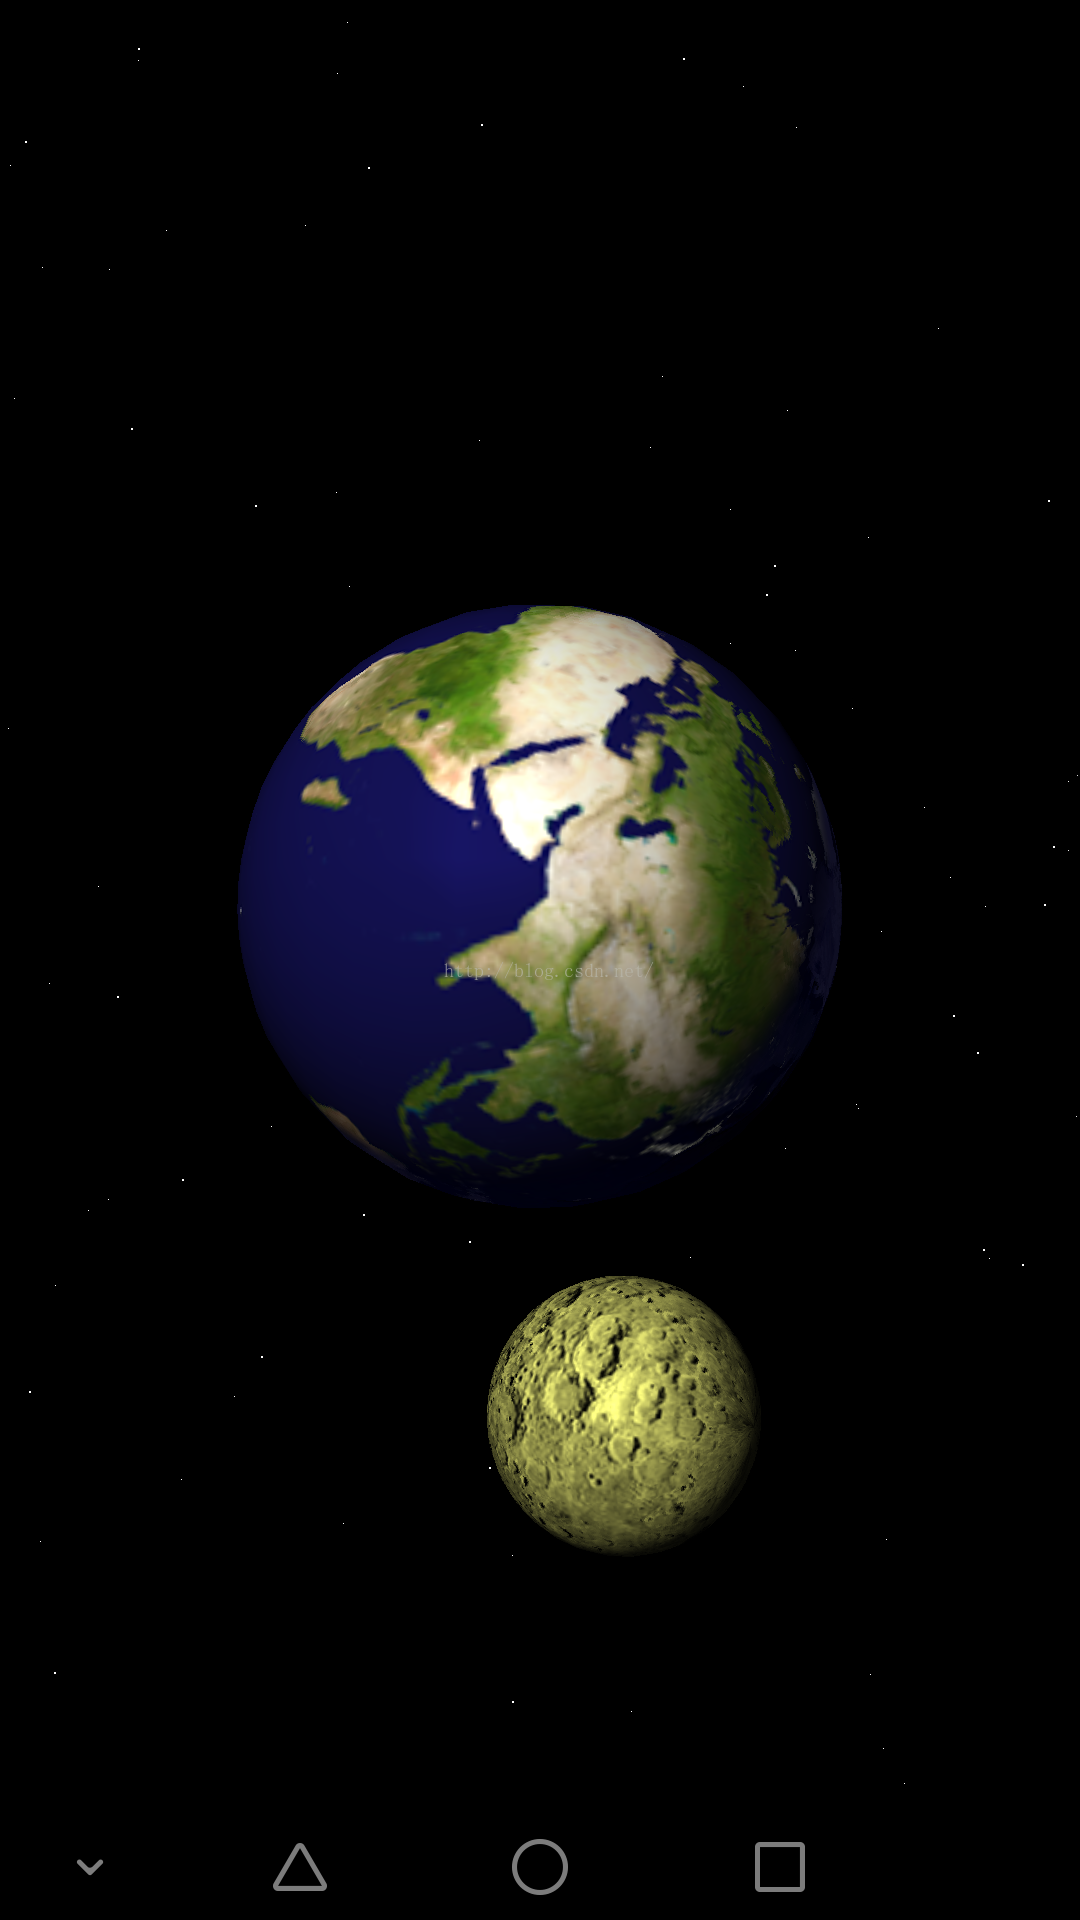
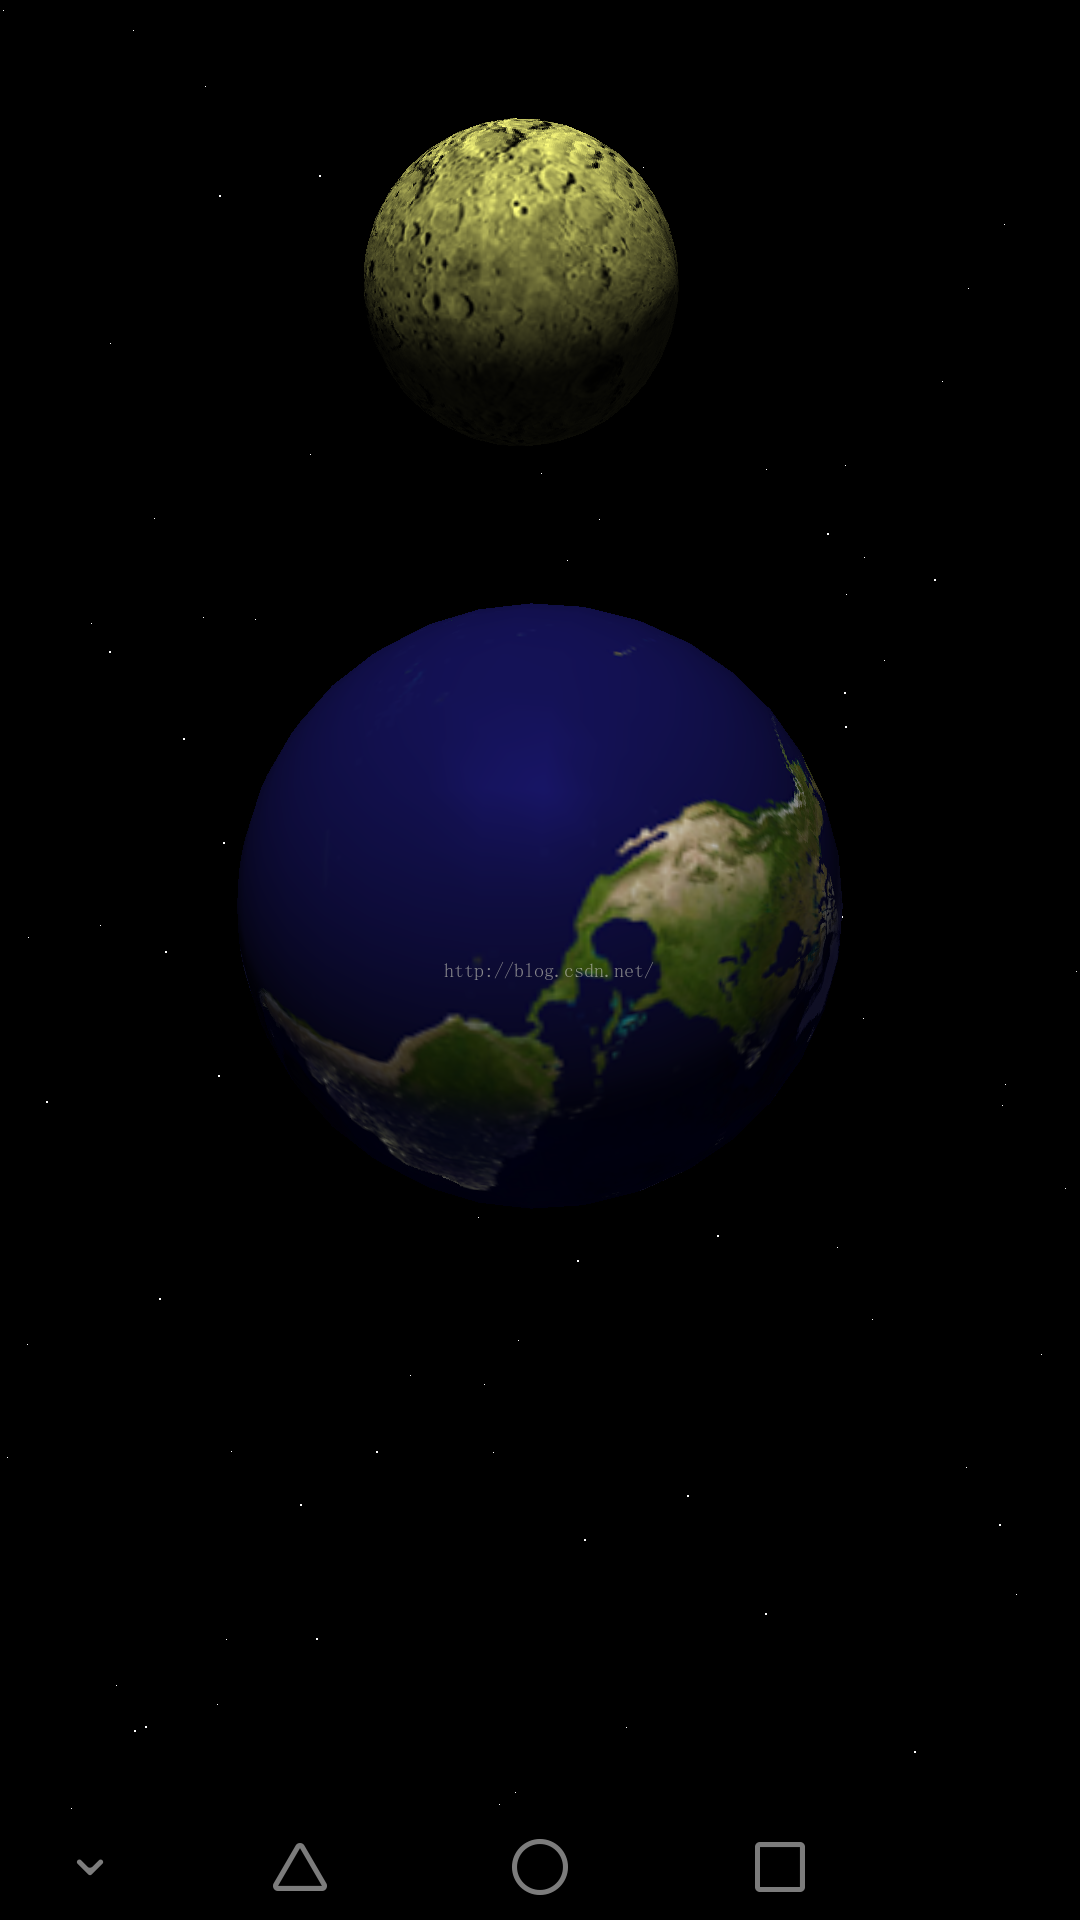
效果圖:

 Android網絡判斷知識小結
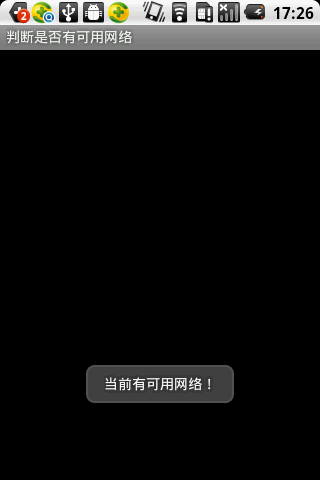
Android中判斷當前網絡是否可用 應用場景:實現判斷當前網絡是否可用當前有可用網絡,如下圖:當前沒有可用網絡,如下圖:實現步驟:1、獲取ConnectivityMan
 android銀聯支付
=============================== 准備 1,導入銀聯支付libs:UPPayAssistEx.jar;UPPayPluginEx.jar;
 android AChartEnginee講解之源碼框架解讀
從上周把android ACHartEnginee的源碼check out出來後就一直在看這個東西是如何使用的,以及底層是如何實現的,把最近一周對這個東西的了解先發上來,
 android 支付寶集成 使用常見錯誤
1:自己最近在做了支付,遇到了一下問題先總結如下 第一條: Android快捷支付SDK Demo resultStatus={4001};memo={參數錯誤};