編輯:關於Android編程
本文主要介紹三級緩存的原理解析與實現方式。以前一直覺得三級緩存圖片加載是一個很難理解的東西,但是自己看了一下午再試著寫了一遍之後感覺還是只要沉下心思考還時很容易熟悉掌握的。
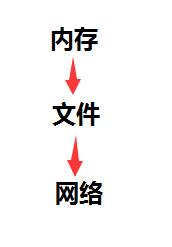
所謂三級緩存:首先是內存-文件(外存)-網絡三級緩存機制。
首先:
框架需要一個接入方法NGImageloadHelper.java:
/**
 * 圖片加載框架使用幫助類
 * Created by nangua on 2016/7/8.
 */
public class NGImageloadHelper {
    /**
     * 處理圖片
     * @param view
     * @param url
     */
    public static void displayImage(ImageView view,
                                    String url) {
        NGDownloadImage.getInstance().addTask(url,
                view);
        NGDownloadImage.getInstance().doTask();
    }
}
然後,使用具體的緩存實現類NGDownloadImage:
首先判斷傳入的url對應圖片是否在內外存中,如果不在,則添加進線程池的自定義任務隊列中,這裡傳入的任務是自定義的實現Callble接口的任務TaskWithResult,在帶回調參數的執行方法call中執行一個自定義的handler----TaskHandler,該TaskHandler的handlerMessage方法內部根據傳入的圖片類型判斷,執行相應的下載方法(通過HttpUrlConnection實現)並移除taskmap中對應的圖片任務。
/**
 * 圖片加載類
 * Created by nangua on 2016/7/8.
 */
public class NGDownloadImage {
    private ExecutorService executorService; //線程池服務
    private NGImageMemoryCache imageMemoryCache;
    private NGImageFileCache imageFileCache;
    private NGDownloadImageMode downloadImageMode; //圖片實例
    private Map taskMap;
    private static NGDownloadImage instance; //自身私有化實例
    private int POOL_SIZE = 5;//線程池自定義大小

    private NGDownloadImage() {
        final int cpuNums = Runtime.getRuntime().availableProcessors();//cpu數
        executorService = Executors.newFixedThreadPool(cpuNums * POOL_SIZE);
        imageMemoryCache = new NGImageMemoryCache();
        imageFileCache = new NGImageFileCache();
        downloadImageMode = new NGDownloadImageMode();
        taskMap = new HashMap<>();
    }

    //獲得唯一實例
    public static synchronized NGDownloadImage getInstance() {
        if (instance == null) {
            instance = new NGDownloadImage();
        }
        return instance;
    }

    /**
     * 添加任務
     *
     * @param url
     * @param img
     */
    public void addTask(String url, ImageView img) {
        addTask(null, url, img, null);
    }

    public void addTask(Object parent, String url, View img,
                        NGImageCallback callback) {
        if (img == null) {
            return;
        }

        if (TextUtils.isEmpty(url)) {
            return;
        }

        if (callback != null) {
            downloadImageMode = new NGDownloadImageMode();
            downloadImageMode.setCallback(callback);
            downloadImageMode.setParent(parent);
            downloadImageMode.setImgUrl(url);
            img.setTag(downloadImageMode);
        } else {
            img.setTag(url);
        }

        //生成Bitmap
        final Bitmap bitmap = imageMemoryCache.getBitmapFromCache(url);
        //如果緩存裡有
        if (bitmap != null) {
            //如果有實現的回調接口,則用回調接口加載圖片
            if (callback != null) {
                callback.imageLoaded(parent, img, bitmap, downloadImageMode);
            } else {
                //如果沒有,則直接設置該圖片為bitmap
                if (img instanceof ImageView)
                    ((ImageView) img).setImageBitmap(bitmap);
            }
        } else {
            //如果緩存沒有這個圖片
            if (taskMap != null) {
                //添加到任務集合裡去
                synchronized (taskMap) {
                    final String mapKey = Integer.toString(img.hashCode());
                    if (!taskMap.containsKey(mapKey)) {
                        taskMap.put(mapKey, img);
                    }
                }
            }
        }
    }

    public void doTask() {
        if (taskMap == null) {
            return;
        } else {
            synchronized (taskMap) {
                Collection collection = taskMap.values();
                for (View view : collection) {
                    if (view != null) {
                        Object object = view.getTag();
                        String url = "";
                        if (object instanceof NGDownloadImageMode) {
                            url = ((NGDownloadImageMode) object).getImgUrl();
                        } else {
                            url = (String) object;
                        }
                        if (!TextUtils.isEmpty(url)) {
                            loadImage(url, view);
                        }
                    }
                }
            }
        }
    }

    private void loadImage(final String url, final View img) {
        loadImage(url, img, null);
    }

    private void loadImage(final String url, final View img,
                           NGImageCallback callback) {
        executorService.submit(new TaskWithResult(new TaskHandler(url, img,
                callback), url));
    }

    private class TaskWithResult implements Callable {
        private String url;
        private Handler handler;

        public TaskWithResult(Handler handler, String url) {
            this.url = url;
            this.handler = handler;
        }

        @Override
        public String call() throws Exception {
            // TODO Auto-generated method stub
            final Message message = handler.obtainMessage(0, getBitmap(url));
            handler.sendMessage(message);
            return url;
        }
    }

    private class TaskHandler extends Handler {
        private String url;
        private View img;
        private NGImageCallback callback;

        public TaskHandler(String url, View img, NGImageCallback callback) {
            this.url = url;
            this.img = img;
            this.callback = callback;
        }

        @Override
        public void handleMessage(Message msg) {
            final Object object = img.getTag();

            if (object instanceof NGDownloadImageMode) {
                final NGDownloadImageMode imageMode = (NGDownloadImageMode) object;
                imageMode.getCallback().imageLoaded(imageMode.getParent(), img,
                        (Bitmap) msg.obj, imageMode);

                if (taskMap != null) {
                    taskMap.remove(Integer.toString(img.hashCode()));
                }
            } else if (object instanceof String) {
                if (callback != null) {
                    callback.imageLoaded(null, img, (Bitmap) msg.obj, url);
                } else {
                    if (object.equals(url) && msg.obj != null) {
                        final Bitmap bitmap = (Bitmap) msg.obj;
                        if (bitmap != null) {
                            if (img instanceof ImageView) {
                                ((ImageView) img).setImageBitmap(bitmap);
                            }
                        }
                    }
                }
                if (taskMap != null) {
                    taskMap.remove(Integer.toString(img.hashCode()));
                }
            }
        }
    }

    /**
     * @param url
     * @return Bitmap
     */
    public Bitmap getBitmap(String url) {
        Bitmap bitmap = imageMemoryCache.getBitmapFromCache(url);
        if (bitmap == null) {
            bitmap = imageFileCache.getImage(url);
            if (bitmap == null) {
                bitmap = getBitmapFromUrl(url);
                if (bitmap != null) {
                    imageMemoryCache.addBitmapToCache(url, bitmap);
                    imageFileCache.saveBmpToSd(url,bitmap);
                }
            } else {
                imageMemoryCache.addBitmapToCache(url, bitmap);
            }
        }
        return bitmap;
    }

    public static Bitmap getBitmapFromUrl(String path) {
        try {
            URL url = new URL(path);
            HttpURLConnection conn = (HttpURLConnection) url.openConnection();
            conn.setConnectTimeout(5000);
            conn.setRequestMethod("GET");
            if (conn.getResponseCode() == 200) {
                InputStream inputStream = conn.getInputStream();
                Bitmap bitmap = BitmapFactory.decodeStream(inputStream);
                return bitmap;
            }
        } catch (Exception e) {
            e.printStackTrace();
        }
        return null;
    }

    public interface NGImageCallback {
        public void imageLoaded(Object parent, View img, Bitmap imageBitmap,
                                NGDownloadImageMode callBackTag);

        public void imageLoaded(Object parent, View img, Bitmap imageBitmap,
                                String imageUrl);
    }
}
內存緩存實現:
通過強&軟引用配合使用實現內存緩存機制,強引用使用HashMap實現,軟引用使用線程安全的ConcurrentHashMap實現(實現原理是鎖分離技術,使用多個鎖來控制對hash表的不同部分的修改,內部使用段(Segment)來表示這些不同的部分,每個段是一個小的hashtable,可並發運行),淘汰算法如下:
    /**
     * 初始化
     * 淘汰最老的鍵
     */
    protected NGImageMemoryCache() {
        //使用LinkedHashMap保證有序讀取
        hashMap = new LinkedHashMap(MAX_CACHE_CAPACITY, 0.75f, true) {
            //移除hashmap中最老的鍵值
            @Override
            protected boolean removeEldestEntry(LinkedHashMap.Entry eldest) {
                if (size() > MAX_CACHE_CAPACITY) {
                    mSoftBitmapCache.put(eldest.getKey(), new SoftReference(eldest.getValue()));
                    return true; //返回true則移除最老的鍵值
                } else {
                    return false;
                }
            }
        };
    }
類似於LRU算法實現?(逃~)
其他增刪進入內存方法就不貼上來了~
外存緩存實現:
很簡單這裡就只講一下思路了,把圖片文件存儲到本地指定文件夾中,注意進行剩余容量判斷及時清除最老的圖片就行了。
********************************分隔線********************************************
近段時間換了一家公司實習,不過創業公司也有創業公司の可怕啊= =沒有下班の概念。。。希望能盡快參與到新項目開發,學到更多的東西。
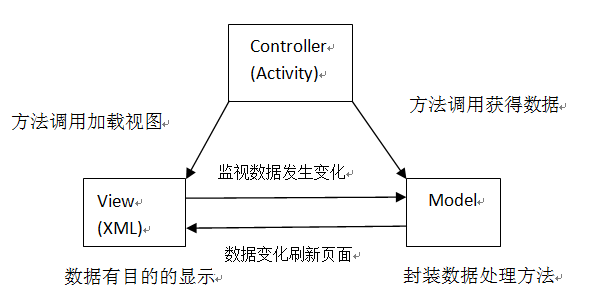 Android開發中的MVC設計模式淺析
Android開發中的MVC設計模式的理解1. Android系統中分層的理解: (1).在Android的軟件開發工作中,應用程序的開發人員主要是應用Android A
 Zxing圖片拉伸解決 Android 二維碼掃描
二維碼掃描 Android Zxing圖片拉伸解決 Zxing是google提供的二維碼掃描工程 默認是橫屏的 轉換成豎屏後圖片出現拉伸 這裡提供解決辦法: Zxi
 Android自定義水平和圓形的progressBar
雖然只是模仿,但我覺得這是學習自定義view的必經之路,所以還是把我所學到的東西拿出來與大家一起分享。先貼出一張progressBar的gif圖,其中有水平的進度條,和圓
 CoordinatorLayout的使用如此簡單(Android)
曾在網上找了一些關於CoordinatorLayout的教程,大部分文章都是把CoordinatorLayout、AppbarLayout、CollapsingToolb