編輯:關於android開發

首先 構造函數 測量... 這裡就一筆帶過了。
 public ErrorView(Context context) {
        this(context, null);
    }

    public ErrorView(Context context, AttributeSet attrs) {
        this(context, attrs, 0);
    }

    public ErrorView(Context context, AttributeSet attrs, int defStyleAttr) {
        super(context, attrs, defStyleAttr);
    }

    @Override
    protected void onMeasure(int widthMeasureSpec, int heightMeasureSpec) {
        int widthSize = MeasureSpec.getSize(widthMeasureSpec);
        int widthMode = MeasureSpec.getMode(widthMeasureSpec);
        int heightSize = MeasureSpec.getSize(heightMeasureSpec);
        int heightMode = MeasureSpec.getMode(heightMeasureSpec);
        if (widthMode == MeasureSpec.EXACTLY) {
            mWidth = widthSize;
        } else {
            mWidth = 200;
        }


        if (heightMode == MeasureSpec.EXACTLY) {
            mHeight = heightSize;
        } else {
            mHeight = 200;
        }
        setMeasuredDimension(mWidth, mHeight);
    }
如果你看不懂上面這些,翻翻我的這一篇博客,有一些補充的知識點。接下來draw,如果讓你繪制一個靜態的這個突然,你一定閉著眼也能畫出來。。那麼怎麼才能實現動態的效果呢。。
其實就是模仿手繪的過程,我們是一點一點畫出來的,一條線的逐漸延遲。 那我們就來模仿這個自然的過程。
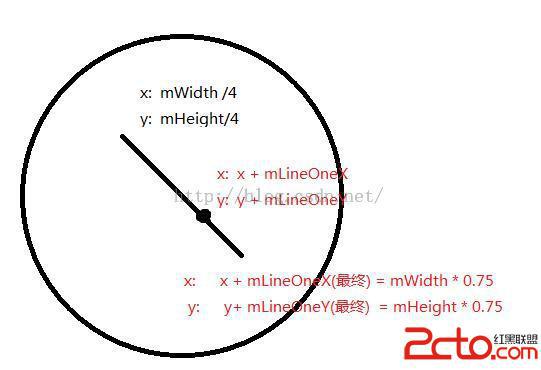
首先畫一個圓形。
Paint p = new Paint();
        p.setStrokeWidth(10);
        p.setAntiAlias(true);
        p.setColor(Color.RED);
        p.setStyle(Paint.Style.STROKE);
        RectF rectF = new RectF(0 + 10, 0 + 10, mWidth - 10, mHeight - 10);
        canvas.drawArc(rectF, 180, 360 * mProgress / 100, false, p);
        mProgress+=5;
接下來來繪制兩條線,這裡的坐標我直接取半徑的4分之一啦,唯一注意一點就是,只有在progress大於100的時候 我們才繪制兩條線,兩條線段也是根據一個變量自增的,原理同上。 這裡mLineOneX等參數均表示畫線的時候兩點的坐標。 當mLineOneX = mWidth * 0.5的時候 mWidth /4 + mLineOneX 就等於我們要畫線段的最終點。
if (mProgress > 100) {
            //畫左邊的線
            if (mLineOneX < mWidth * 0.5) {
                mLineOneX+=20;
                mLineOneY+=20;
            }
            canvas.drawLine(mWidth / 4, mHeight / 4, mWidth / 4 + mLineOneX, mHeight / 4 + mLineOneY, p);


            if (mLineOneX == mWidth * 0.5) {
                if (mLineTwoX < mWidth * 0.5) {
                    mLineTwoX+=20;
                    mLineTwoY+=20;
                }else {
                    //判斷全部繪制完成
                    isLineDrawDone = true;
                }
                canvas.drawLine(mWidth / 4, (float) (mHeight * 0.75), mWidth / 4 + mLineTwoX, (float) (mHeight * 0.75) - mLineTwoY, p);


            }


        }
之後 添加一個標記位 isLineDrawDone 判斷一下 如果沒有畫完 則 :
 if(isLineDrawDone){
            Log.e("wing","draw done");

        }else{

            postInvalidateDelayed(10);
        }
所以我們要寫一個接口,來回調onStop
public interface OnStopListener{
        void onStop(View v);
    }
把最後的繪制完成完善,繼續增加一個標志位,代表全部繪制完成
 if(isLineDrawDone){
            Log.e("wing","draw done");
            if(!isDrawDone) {
                if (mOnStopListener != null) {
                    mOnStopListener.onStop(this);
                }
                isDrawDone = true;
            }

        }else{

            postInvalidateDelayed(10);
        }
 public void reset() {
        mProgress = 0;
        mLineOneX = 0;
        mLineOneY = 0;
        mLineTwoX = 0;
        mLineTwoY = 0;
        isLineDrawDone = false;
        isDrawDone = false;
        invalidate();
    }
 public void setOnStopListener(OnStopListener onStopListener){
        mOnStopListener = onStopListener;
    }
最後 在Activity中 為這個View添加 震動效果
protected void onCreate(Bundle savedInstanceState) {
        super.onCreate(savedInstanceState);
        setContentView(R.layout.activity_main);
        mErrorView = (ErrorView) findViewById(R.id.errorView);

        mErrorView.setOnStopListener(new ErrorView.OnStopListener() {
            @Override
            public void onStop(View v) {
                ShakeAnimation sa = new ShakeAnimation();
                sa.setDuration(1000);
                v.startAnimation(sa);
            }
        });

        mErrorView.setOnClickListener(new View.OnClickListener() {
            @Override
            public void onClick(View v) {
                mErrorView.reset();
            }
        });
 春秋旅行安卓客戶端源碼項目,旅行安卓客戶端源碼
春秋旅行安卓客戶端源碼項目,旅行安卓客戶端源碼春秋旅行安卓客戶端源碼,這是一款高度模仿春秋旅行app開發的一款應用,通過抓包工具獲取到的接口,希望大家能夠喜歡,並且對大家
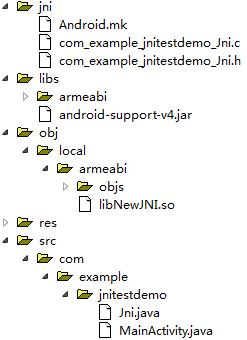 說明一下JNI 與AIDL,說明JNIAIDL
說明一下JNI 與AIDL,說明JNIAIDL代碼在評論中。 JNI: 為什麼需要JNI: 因為android是由【JAVA & C/C++】組成。Java運行在
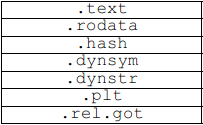 ELF Format 筆記(十四)—— 段內容,elfformat
ELF Format 筆記(十四)—— 段內容,elfformatilocker:關注 Android 安全(新手) QQ: 2597294287 一個段 (segmen
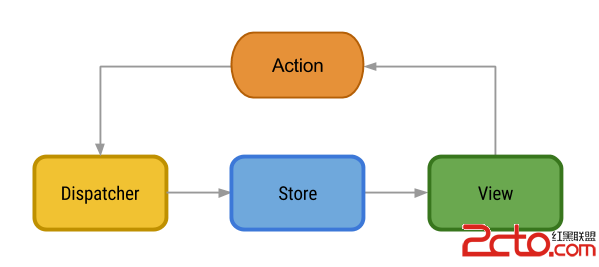 關於android架構的文章工程等
關於android架構的文章工程等 Flux Architecture https://github.com/lgvalle/android-flux-todo-app
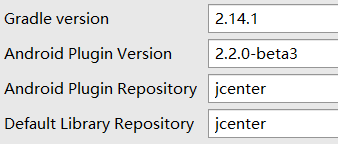 Failed to apply plugin [id 'com.android.application'] 和 Could not find com.android.tools.build:gradle:2.XX的最正確的解決方法,applyplugin
Failed to apply plugin [id 'com.