編輯:關於android開發
activity_main.xml:
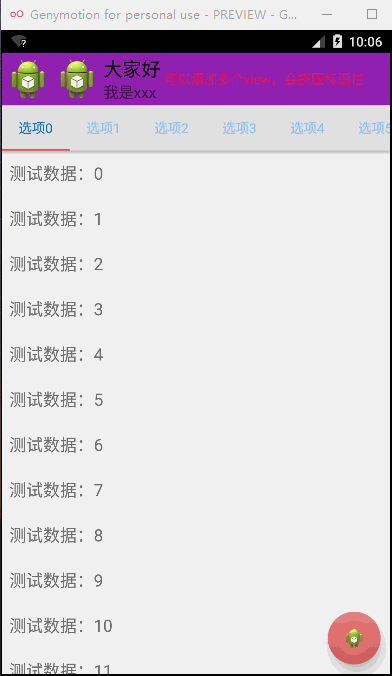
 1 <android.support.design.widget.CoordinatorLayout xmlns:android="http://schemas.android.com/apk/res/android"
 2     xmlns:tools="http://schemas.android.com/tools"
 3     xmlns:app="http://schemas.android.com/apk/res-auto"
 4     android:id="@+id/main_content"
 5     android:layout_width="match_parent"
 6     android:layout_height="match_parent"
 7     android:fitsSystemWindows="true" >
 8
 9     <android.support.design.widget.AppBarLayout
10         android:id="@+id/appbar"
11         android:layout_width="match_parent"
12         android:layout_height="wrap_content" >
13
14         <!-- app:layout_scrollFlags="scroll|enterAlways" -->
15         <!-- 這句話的作用:向上滑動的時候Toolbar消失,向下滑的時候ToolBar立即出現 -->
16         <!-- 如果沒有scroll的話向上滑動Toolbar不會消失 -->
17         <!-- 如果沒有enterAlways的話向下滑動Toolbar不會立即出現,會有短暫的延遲 -->
18
19
20         <!-- android:minHeight="?attr/actionBarSize"(默認為此) 設置Toolbar的NavigationIcon位置 -->
21
22         <android.support.v7.widget.Toolbar
23             android:id="@+id/toolBar"
24             android:layout_width="match_parent"
25             android:layout_height="wrap_content"
26             app:layout_scrollFlags="scroll|enterAlways"
27             android:background="#9C27B0"
28             android:minHeight="?attr/actionBarSize" >
29
30             <TextView
31                 android:layout_width="wrap_content"
32                 android:layout_height="wrap_content"
33                 android:text="可以添加多個view,會擠壓標題欄"
34                 android:textColor="#E91E63" />
35         </android.support.v7.widget.Toolbar>
36
37         <android.support.design.widget.TabLayout
38             android:id="@+id/tabLayout"
39             android:layout_width="match_parent"
40             android:layout_height="wrap_content"
41             android:background="#e0e0e0"
42             app:tabIndicatorColor="#ef5350"
43             app:tabSelectedTextColor="#1976d2"
44             app:tabTextColor="#90caf9" />
45     </android.support.design.widget.AppBarLayout>
46
47     <!-- app:layout_behavior="@string/appbar_scrolling_view_behavior"的作用是使上方兩個數據不被AppBarLayout遮蓋 -->
48
49     <android.support.v7.widget.RecyclerView
50         android:id="@+id/recyclerView"
51         android:layout_width="match_parent"
52         android:layout_height="match_parent"
53         app:layout_behavior="@string/appbar_scrolling_view_behavior" />
54
55     <android.support.design.widget.FloatingActionButton
56         android:layout_width="wrap_content"
57         android:layout_height="wrap_content"
58         android:layout_gravity="right|bottom"
59         android:layout_marginBottom="10dip"
60         android:layout_marginRight="10dip"
61         android:src="@drawable/ic_launcher"
62         app:backgroundTint="#e57373"
63         app:borderWidth="10dp"
64         app:elevation="10dip"
65         app:fabSize="normal"
66         app:pressedTranslationZ="10dp"
67         app:rippleColor="#c62828" />
68
69 </android.support.design.widget.CoordinatorLayout>
MainActivity.java:
 1 package com.example.testappbarlayout_zzw;
 2
 3
 4 import android.app.Activity;
 5 import android.content.Context;
 6 import android.os.Bundle;
 7 import android.support.design.widget.TabLayout;
 8 import android.support.v7.widget.LinearLayoutManager;
 9 import android.support.v7.widget.RecyclerView;
10 import android.support.v7.widget.RecyclerView.Adapter;
11 import android.support.v7.widget.Toolbar;
12 import android.support.v7.widget.RecyclerView.ViewHolder;
13 import android.view.LayoutInflater;
14 import android.view.View;
15 import android.view.ViewGroup;
16 import android.widget.LinearLayout;
17 import android.widget.TextView;
18
19
20 public class MainActivity extends Activity {
21
22     @Override
23     protected void onCreate(Bundle savedInstanceState) {
24         super.onCreate(savedInstanceState);
25         setContentView(R.layout.activity_main);
26
27         Toolbar mToolbar=(Toolbar) findViewById(R.id.toolBar);
28         mToolbar.setLogo(R.drawable.ic_launcher);
29         mToolbar.setNavigationIcon(R.drawable.ic_launcher);
30         mToolbar.setTitle("大家好");
31         mToolbar.setSubtitle("我是xxx");
32
33         TabLayout tabLayout = (TabLayout) findViewById(R.id.tabLayout);
34         for (int i = 0; i < 10; i++)
35             tabLayout.addTab(tabLayout.newTab().setText("選項" + i));
36         tabLayout.setTabMode(TabLayout.MODE_SCROLLABLE);
37
38         RecyclerView mRecyclerView=(RecyclerView) findViewById(R.id.recyclerView);
39         LinearLayoutManager mLayoutManager=new LinearLayoutManager(this);
40         mLayoutManager.setOrientation(LinearLayout.VERTICAL);
41         mRecyclerView.setLayoutManager(mLayoutManager);
42         MyRecyclerViewAdapter adapter=new MyRecyclerViewAdapter(this);
43         mRecyclerView.setAdapter(adapter);
44
45     }
46
47     private class MyViewHolder extends ViewHolder{
48
49         public TextView text;
50
51         public MyViewHolder(View itemView) {
52             super(itemView);
53             text=(TextView) itemView.findViewById(android.R.id.text1);
54         }
55     }
56
57     private class MyRecyclerViewAdapter extends Adapter<MyViewHolder>{
58
59         private LayoutInflater inflater;
60
61         public MyRecyclerViewAdapter(Context context) {
62             inflater=LayoutInflater.from(context);
63         }
64
65         @Override
66         public int getItemCount() {
67
68             return 100;
69         }
70
71         @Override
72         public void onBindViewHolder(MyViewHolder viewHolder, int position) {
73
74             viewHolder.text.setText("測試數據:"+position);
75         }
76
77         @Override
78         public MyViewHolder onCreateViewHolder(ViewGroup viewGroup, int arg1) {
79
80             View v=inflater.inflate(android.R.layout.simple_list_item_1,null);
81             MyViewHolder holder=new MyViewHolder(v);
82
83             return holder;
84         }
85
86     }
87
88 }
可能出現的相關問題解決:
使用android.support.v7.widget.RecyclerView出現 java.lang.reflect.InvocationTargetException:http://www.cnblogs.com/zzw1994/p/5004564.html
使用android.support.design出現java.lang.reflect.InvocationTargetException:http://www.cnblogs.com/zzw1994/p/5012467.html
 模擬QQ側滑控件 實現三種界面切換效果(知識點:回調機制,解析網絡json數據,fragment用法等)。,jsonfragment
模擬QQ側滑控件 實現三種界面切換效果(知識點:回調機制,解析網絡json數據,fragment用法等)。,jsonfragment需要用到的lib包 :解析json&n
 android下面res目錄,androidres目錄
android下面res目錄,androidres目錄1. 相關文件夾介紹 在Android項目文件夾裡面
 【ActionBar的使用】,【ActionBar使用】
【ActionBar的使用】,【ActionBar使用】在AS工程中使用ActionBar 簡單實用: 1、功能清單文件中指定主題標簽屬性Theme.Holo或其子類 &
 android:自定義HorizontalScrollView實現qq側滑菜單
android:自定義HorizontalScrollView實現qq側滑菜單 今天看了鴻洋_大神在慕課網講的qq5.0側滑菜單。學了不少的知識,同時也佩服鴻洋_大神