編輯:關於android開發
LostFindActivity.java
public class LostFindActivity extends Activity {
    private SharedPreferences mPrefs;

    private TextView tvSafePhone;
    private ImageView ivProtect;

    @Override
    protected void onCreate(Bundle savedInstanceState) {
        super.onCreate(savedInstanceState);

        mPrefs = getSharedPreferences("config", MODE_PRIVATE);

        boolean configed = mPrefs.getBoolean("configed", false);// 判斷是否進入過設置向導
        if (configed) {
            setContentView(R.layout.activity_lost_find);

            // 根據sp更新安全號碼
            tvSafePhone = (TextView) findViewById(R.id.tv_safe_phone);
            String phone = mPrefs.getString("safe_phone", "");
            tvSafePhone.setText(phone);

            // 根據sp更新保護鎖
            ivProtect = (ImageView) findViewById(R.id.iv_protect);
            boolean protect = mPrefs.getBoolean("protect", false);
            if (protect) {
                ivProtect.setImageResource(R.drawable.lock);
            } else {
                ivProtect.setImageResource(R.drawable.unlock);
            }

        } else {
            // 跳轉設置向導頁
            startActivity(new Intent(this, Setup1Activity.class));
            finish();
        }
    }

    /**
     * 重新進入設置向導
     *
     * @param view
     */
    public void reEnter(View view) {
        startActivity(new Intent(this, Setup1Activity.class));
        finish();
    }
}
activity_lost_find.xml
<?xml version="1.0" encoding="utf-8"?>
<LinearLayout xmlns:android="http://schemas.android.com/apk/res/android"
android:layout_width="match_parent"
android:layout_height="match_parent"
android:orientation="vertical" >
<TextView
style="@style/TitleStyle"
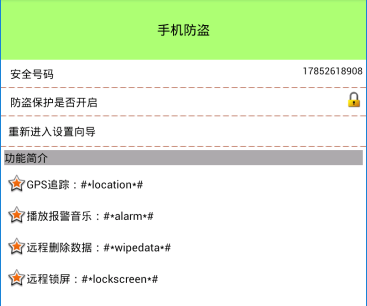
android:text="手機防盜" />
<RelativeLayout
android:layout_width="match_parent"
android:layout_height="wrap_content"
android:layout_margin="5dp"
android:gravity="center_vertical" >
<TextView
style="@style/ContentStyle"
android:text="安全號碼" />
<TextView
android:id="@+id/tv_safe_phone"
android:layout_width="wrap_content"
android:layout_height="wrap_content"
android:layout_alignParentRight="true"
android:layout_centerVertical="true"
android:textColor="@color/black"
android:textSize="16sp" />
</RelativeLayout>
<ImageView
android:layout_width="match_parent"
android:layout_height="wrap_content"
android:layout_gravity="center"
android:background="@drawable/listview_divider" />
<RelativeLayout
android:layout_width="match_parent"
android:layout_height="wrap_content"
android:layout_margin="5dp"
android:gravity="center_vertical" >
<TextView
style="@style/ContentStyle"
android:text="防盜保護是否開啟" />
<ImageView
android:id="@+id/iv_protect"
android:layout_width="30dp"
android:layout_height="30dp"
android:layout_alignParentRight="true"
android:layout_centerVertical="true"
android:src="@drawable/unlock" />
</RelativeLayout>
<ImageView
android:layout_width="match_parent"
android:layout_height="wrap_content"
android:layout_gravity="center"
android:background="@drawable/listview_divider" />
<TextView
android:layout_width="match_parent"
android:background="@drawable/shape_selector"
android:onClick="reEnter"
android:clickable="true"
style="@style/ContentStyle"
android:layout_margin="5dp"
android:text="重新進入設置向導" />
<ImageView
android:layout_width="match_parent"
android:layout_height="wrap_content"
android:layout_gravity="center"
android:background="@drawable/listview_divider" />
<TextView
android:layout_width="match_parent"
android:layout_height="wrap_content"
android:text="功能簡介"
android:layout_margin="5dp"
android:textColor="@color/black"
android:textSize="18sp"
android:background="#5000"
/>
<TextView
style="@style/ContentStyle"
android:drawableLeft="@android:drawable/star_big_on"
android:gravity="center"
android:text="GPS追蹤:#*location*#"
/>
<TextView
style="@style/ContentStyle"
android:drawableLeft="@android:drawable/star_big_on"
android:gravity="center"
android:text="播放報警音樂:#*alarm*#"
/>
<TextView
style="@style/ContentStyle"
android:drawableLeft="@android:drawable/star_big_on"
android:gravity="center"
android:text="遠程刪除數據:#*wipedata*#"
/>
<TextView
style="@style/ContentStyle"
android:drawableLeft="@android:drawable/star_big_on"
android:gravity="center"
android:text="遠程鎖屏:#*lockscreen*#"
/>
</LinearLayout>
shape_selector.xml
<?xml version="1.0" encoding="utf-8"?>
<selector xmlns:android="http://schemas.android.com/apk/res/android">

    <item android:drawable="@drawable/gradient_box" android:state_pressed="true"></item>

    <item android:drawable="@android:color/transparent"></item><!--默認  -->

</selector>
gradient_box.xml
<?xml version="1.0" encoding="utf-8"?>
<shape xmlns:android="http://schemas.android.com/apk/res/android"
    android:shape="rectangle" >//矩形
    <!-- 漸變顏色 -->
    <gradient
        android:angle="45"
        android:centerColor="#fff"
        android:endColor="#f00"
        android:startColor="#0f0" >
    </gradient>

    <padding
        android:bottom="7dp"
        android:left="7dp"
        android:right="7dp"
        android:top="7dp" >
    </padding>
    <!-- 角度 -->
    <corners android:radius="5dp" />

</shape>
下邊是設置向導:

BaseSetupActivity.java
//不需要在清單文件中注冊,因為不需要界面展示
public abstract class BaseSetupActivity extends Activity {

    private GestureDetector mDectector;
    public SharedPreferences mPref;

    @Override
    protected void onCreate(Bundle savedInstanceState) {
        super.onCreate(savedInstanceState);

        mPref = getSharedPreferences("config", MODE_PRIVATE);

        // 手勢識別器
        mDectector = new GestureDetector(this, new SimpleOnGestureListener() {

            /**
             * 監聽手勢滑動事件 e1表示滑動的起點,e2表示滑動終點 velocityX表示水平速度 velocityY表示垂直速度
             */
            @Override
            public boolean onFling(MotionEvent e1, MotionEvent e2,
                    float velocityX, float velocityY) {

                // 判斷縱向滑動幅度是否過大, 過大的話不允許切換界面
                if (Math.abs(e2.getRawY() - e1.getRawY()) > 100) {
                    Toast.makeText(BaseSetupActivity.this, "不能這樣劃哦!",
                            Toast.LENGTH_SHORT).show();
                    return true;
                }

                // 判斷滑動是否過慢
                if (Math.abs(velocityX) < 100) {
                    Toast.makeText(BaseSetupActivity.this, "滑動的太慢了!",
                            Toast.LENGTH_SHORT).show();
                    return true;
                }

                // 向右劃,上一頁
                if (e2.getRawX() - e1.getRawX() > 200) {
                    showPreviousPage();
                    return true;
                }

                // 向左劃, 下一頁
                if (e1.getRawX() - e2.getRawX() > 200) {
                    showNextPage();
                    return true;
                }

                return super.onFling(e1, e2, velocityX, velocityY);
            }
        });
    }

    /**
     * 展示下一頁, 子類必須實現
     */
    public abstract void showNextPage();

    /**
     * 展示上一頁, 子類必須實現
     */
    public abstract void showPreviousPage();//手勢識別和點擊按鈕都會進入這裡

    // 點擊下一頁按鈕
    public void next(View view) {
        showNextPage();
    }

    // 點擊上一頁按鈕
    public void previous(View view) {
        showPreviousPage();
    }

    @Override
    public boolean onTouchEvent(MotionEvent event) {
        mDectector.onTouchEvent(event);// 委托手勢識別器處理觸摸事件
        return super.onTouchEvent(event);
    }

}
Setup1Activity.java
public class Setup1Activity extends BaseSetupActivity {

    @Override
    protected void onCreate(Bundle savedInstanceState) {
        super.onCreate(savedInstanceState);
        setContentView(R.layout.activity_setup1);
    }

    @Override
    public void showNextPage() {
        startActivity(new Intent(this, Setup2Activity.class));
        finish();

        // 兩個界面切換的動畫
        overridePendingTransition(R.anim.trans_in, R.anim.trans_out);// 進入動畫和退出動畫
    }

    @Override
    public void showPreviousPage() {

    }
}
activity_setup1.xml
<?xml version="1.0" encoding="utf-8"?>
<LinearLayout xmlns:android="http://schemas.android.com/apk/res/android"
    android:layout_width="match_parent"
    android:layout_height="match_parent"
    android:orientation="vertical"
    >

    <TextView
        style="@style/TitleStyle"
        android:text="1.歡迎使用手機防盜" />

    <TextView
        style="@style/ContentStyle"
        android:text="您的手機防盜衛士:" />

    <TextView
        style="@style/ContentStyle"
        android:drawableLeft="@android:drawable/btn_star"
        android:gravity="center"
        android:text="SIM卡變更報警" />

    <TextView
        style="@style/ContentStyle"
        android:drawableLeft="@android:drawable/btn_star"
        android:gravity="center"
        android:text="GPS追蹤" />

    <TextView
        style="@style/ContentStyle"
        android:drawableLeft="@android:drawable/btn_star"
        android:gravity="center"
        android:text="遠程銷毀數據" />

    <TextView
        style="@style/ContentStyle"
        android:drawableLeft="@android:drawable/btn_star"
        android:gravity="center"
        android:text="遠程鎖屏" />
    <LinearLayout      //這是那四個 小點
        android:layout_width="match_parent"
        android:layout_height="wrap_content"
        android:orientation="horizontal"
        android:gravity="center"

        >
        <ImageView
            android:layout_width="wrap_content"
            android:layout_height="wrap_content"
            android:src="@android:drawable/presence_online"
            />
         <ImageView
            android:layout_width="wrap_content"
            android:layout_height="wrap_content"
            android:src="@android:drawable/presence_invisible"
            />
          <ImageView
            android:layout_width="wrap_content"
            android:layout_height="wrap_content"
            android:src="@android:drawable/presence_invisible"
            />
           <ImageView
            android:layout_width="wrap_content"
            android:layout_height="wrap_content"
            android:src="@android:drawable/presence_invisible"
            />
    </LinearLayout>
    <RelativeLayout
        android:layout_width="wrap_content"
        android:layout_height="0dp"
        android:layout_weight="1"
        >
        <ImageView
            android:id="@+id/iv1"
            android:layout_width="wrap_content"
            android:layout_height="wrap_content"
            android:layout_centerHorizontal="true"
            android:layout_centerVertical="true"
            android:src="@drawable/setup1"/>
        <Button
            style="@style/NextStyle"
            />
    </RelativeLayout>
</LinearLayout>
styles.xml
<resources>
    <style name="ContentStyle">
        <item name="android:layout_width">wrap_content</item>
        <item name="android:layout_height">wrap_content</item>

        <item name="android:textColor">@color/black</item>

        <item name="android:textSize">18sp</item>
        <item name="android:layout_margin">10dp</item>
    </style>

     <style name="NextStyle">
        <item name="android:layout_width">wrap_content</item>
        <item name="android:layout_height">wrap_content</item>
        <item name="android:layout_alignParentBottom">true</item>
        <item name="android:layout_alignParentRight">true</item>
        <item name="android:background">@drawable/btn_green_selector</item>
        <item name="android:drawableRight">@drawable/next</item>
        <item name="android:text">下一步</item>
        <item name = "android:onClick">next</item>
    </style>
    <style name="PreviousStyle">
        <item name="android:layout_width">wrap_content</item>
        <item name="android:layout_height">wrap_content</item>
        <item name="android:layout_alignParentBottom">true</item>
        <item name="android:layout_alignParentLeft">true</item>
        <item name="android:background">@drawable/btn_green_selector</item>  //將狀態選擇器設置給button
        <item name="android:drawableRight">@drawable/previous</item>
        <item name="android:text">上一步</item>
        <item name = "android:onClick">previous</item>
    </style>
</resources>
btn_green_selector.xml //狀態選擇器(selector)設置給view,點擊會有相應的效果
<?xml version="1.0" encoding="utf-8"?>
<selector xmlns:android="http://schemas.android.com/apk/res/android"   >
    <item android:drawable="@drawable/function_greenbutton_pressed" //.9.png
          android:state_pressed="true" //按下
        ></item>
    <item android:drawable="@drawable/function_greenbutton_pressed"//.9.png
          android:state_focused="true" //獲取焦點
        ></item>
    <item android:drawable="@drawable/btn_green_normal"></item> //默認
</selector>
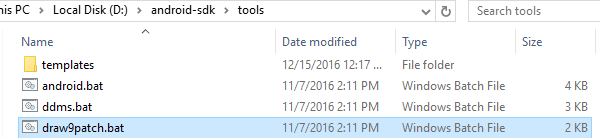
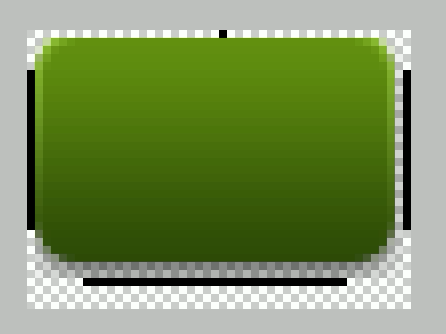
.9.png(9patch)圖片的制作:
通過黑色邊線來描述圖片的拉伸情況和填充文字的方式
上邊線-水平拉伸;左邊線-垂直拉伸;右邊線-垂直填充區域;下邊線-水平填充區域
Setup2Activity.java
public class Setup2Activity extends BaseSetupActivity {

    private SettingItemView sivSim;

    @Override
    protected void onCreate(Bundle savedInstanceState) {
        super.onCreate(savedInstanceState);
        setContentView(R.layout.activity_setup2);

        sivSim = (SettingItemView) findViewById(R.id.siv_sim);

        String sim = mPref.getString("sim", null);
        if (!TextUtils.isEmpty(sim)) {
            sivSim.setChecked(true);
        } else {
            sivSim.setChecked(false);
        }

        sivSim.setOnClickListener(new OnClickListener() {

            @Override
            public void onClick(View v) {
                if (sivSim.isChecked()) {
                    sivSim.setChecked(false);
                    mPref.edit().remove("sim").commit();// 刪除已綁定的sim卡
                } else {
                    sivSim.setChecked(true);
                    // 選中的話,保存sim卡信息
                    TelephonyManager tm = (TelephonyManager) getSystemService(TELEPHONY_SERVICE);
                    String simSerialNumber = tm.getSimSerialNumber();// 獲取sim卡序列號
                    System.out.println("sim卡序列號:" + simSerialNumber);

                    mPref.edit().putString("sim", simSerialNumber).commit();// 將sim卡序列號保存在sp中
                }
            }
        });
    }

    @Override
    public void showNextPage() {
        // 如果sim卡沒有綁定,就不允許進入下一個頁面
        String sim = mPref.getString("sim", null);
        if (TextUtils.isEmpty(sim)) {
            ToastUtils.showToast(this, "必須綁定sim卡!");
            return;
        }

        startActivity(new Intent(this, Setup3Activity.class));
        finish();

        // 兩個界面切換的動畫
        overridePendingTransition(R.anim.trans_in, R.anim.trans_out);// 進入動畫和退出動畫
    }

    @Override
    public void showPreviousPage() {
        startActivity(new Intent(this, Setup1Activity.class));
        finish();

        // 兩個界面切換的動畫
        overridePendingTransition(R.anim.trans_previous_in,
                R.anim.trans_previous_out);// 進入動畫和退出動畫
    }
}
BootCompleteReceiver.java
public class BootCompleteReceiver extends BroadcastReceiver {
    // 監聽手機開機啟動的廣播
        @Override
        public void onReceive(Context context, Intent intent) {
            SharedPreferences sp = context.getSharedPreferences("config",
                    Context.MODE_PRIVATE);
            boolean protect = sp.getBoolean("protect", false);
            // 只有在防盜保護開啟的前提下才進行sim卡判斷
            if (protect) {
                String sim = sp.getString("sim", null);// 獲取綁定的sim卡

                if (!TextUtils.isEmpty(sim)) {
                    // 獲取當前手機的sim卡
                    TelephonyManager tm = (TelephonyManager) context
                            .getSystemService(Context.TELEPHONY_SERVICE);
                    String currentSim = tm.getSimSerialNumber() + "111";// 拿到當前手機的sim卡

                    if (sim.equals(currentSim)) {
                        System.out.println("手機安全");
                    } else {
                        System.out.println("sim卡已經變化, 發送報警短信!!!");
                        String phone = sp.getString("safe_phone", "");// 讀取安全號碼

                        // 發送短信給安全號碼
                        SmsManager smsManager = SmsManager.getDefault();
                        smsManager.sendTextMessage(phone, null,
                                "sim card changed!", null, null);
                    }
                }
            }
        }

}
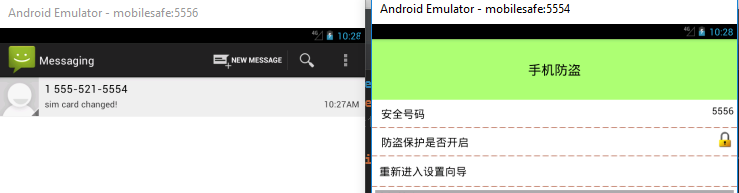
我們開啟5554和5556的模擬器,給5554安全號碼設置為5556,我們給5554的sim卡序列號變化,那麼開機重啟5554,開機啟動的廣播就會
檢測到sim卡變更,發送短信給5556,5556就會接收到5554發送來的短信。
SmsReceiver .java
//攔截短信
public class SmsReceiver extends BroadcastReceiver {
@Override
public void onReceive(Context context, Intent intent) {
Object[] objects = (Object[]) intent.getExtras().get("pdus");
for (Object object : objects) {// 短信最多140字節,
// 超出的話,會分為多條短信發送,所以是一個數組,因為我們的短信指令很短,所以for循環只執行一次
SmsMessage message = SmsMessage.createFromPdu((byte[]) object);
String originatingAddress = message.getOriginatingAddress();// 短信來源號碼
String messageBody = message.getMessageBody();// 短信內容
System.out.println(originatingAddress + ":" + messageBody);
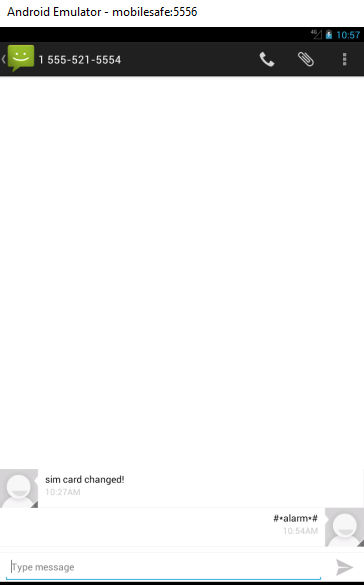
if ("#*alarm*#".equals(messageBody)) {
// 播放報警音樂, 即使手機調為靜音,也能播放音樂, 因為使用的是媒體聲音的通道,和鈴聲無關
MediaPlayer player = MediaPlayer.create(context, R.raw.ylzs);
player.setVolume(1f, 1f);
player.setLooping(true);
player.start();
abortBroadcast();// 中斷短信的傳遞, 從而系統短信app就收不到內容了
} else if ("#*location*#".equals(messageBody)) {
// 獲取經緯度坐標
context.startService(new Intent(context, LocationService.class));// 開啟定位服務
SharedPreferences sp = context.getSharedPreferences("config", Context.MODE_PRIVATE);
String location = sp.getString("location", "getting location...");
System.out.println("location:" + location);
abortBroadcast();// 中斷短信的傳遞, 從而系統短信app就收不到內容了
} else if ("#*wipedata*#".equals(messageBody)) {
System.out.println("遠程清除數據");
abortBroadcast();
} else if ("#*lockscreen*#".equals(messageBody)) {
System.out.println("遠程鎖屏");
abortBroadcast();
}
}
}
}
我們在5556的手機上發送短信,5554的手機就會播放R.raw.ylzs的音樂。
LocationService.java
/*
 * 獲取經緯度坐標的service
 */
public class LocationService extends Service {

    private LocationManager lm;
    private MyLocationListener listener;
    private SharedPreferences mPref;

    @Override
    public IBinder onBind(Intent intent) {
        return null;
    }

    @Override
    public void onCreate() {
        super.onCreate();

        mPref = getSharedPreferences("config", MODE_PRIVATE);

        lm = (LocationManager) getSystemService(LOCATION_SERVICE);
        // List<String> allProviders = lm.getAllProviders();// 獲取所有位置提供者
        // System.out.println(allProviders);

        Criteria criteria = new Criteria();
        criteria.setCostAllowed(true);// 是否允許付費,比如使用3g網絡定位
        criteria.setAccuracy(Criteria.ACCURACY_FINE);
        String bestProvider = lm.getBestProvider(criteria, true);// 獲取最佳位置提供者

        listener = new MyLocationListener();
        lm.requestLocationUpdates(bestProvider, 0, 0, listener);// 參1表示位置提供者,參2表示最短更新時間,參3表示最短更新距離
    }

    class MyLocationListener implements LocationListener {

        // 位置發生變化
        @Override
        public void onLocationChanged(Location location) {
            System.out.println("get location!");

            // 將獲取的經緯度保存在sp中
            mPref.edit().putString("location", "j:" + location.getLongitude() + "; w:" + location.getLatitude())
                    .commit();

            stopSelf();// 停掉service,這樣節電
        }

        // 位置提供者狀態發生變化
        @Override
        public void onStatusChanged(String provider, int status, Bundle extras) {
            System.out.println("onStatusChanged");
        }

        // 用戶打開gps
        @Override
        public void onProviderEnabled(String provider) {
            System.out.println("onProviderEnabled");
        }

        // 用戶關閉gps
        @Override
        public void onProviderDisabled(String provider) {
            System.out.println("onProviderDisabled");
        }

    }

    @Override
    public void onDestroy() {
        super.onDestroy();
        lm.removeUpdates(listener);// 當activity銷毀時,停止更新位置, 節省電量
    }

}
trans_in.xml
<?xml version="1.0" encoding="utf-8"?>
<translate xmlns:android="http://schemas.android.com/apk/res/android"
    android:duration="500"
    android:fromXDelta="100%p"
    android:toXDelta="0" >
 <!-- p是parent -->
</translate>
trans_out.xml
<?xml version="1.0" encoding="utf-8"?>
<translate
   xmlns:android="http://schemas.android.com/apk/res/android"
   android:duration="500"
   android:fromXDelta="0"
   android:toXDelta="-100%p"
    >
</translate>
trans_previous_in.xml
<?xml version="1.0" encoding="utf-8"?>
<translate
    xmlns:android="http://schemas.android.com/apk/res/android"
    android:duration="500"
    android:fromXDelta="-100%p"
    android:toXDelta="0"
    >
</translate>
trans_previous_out.xml
<?xml version="1.0" encoding="utf-8"?>
<translate xmlns:android="http://schemas.android.com/apk/res/android"
    android:duration="500"
    android:fromXDelta="0"
    android:toXDelta="100%p" >

</translate>
activity_setup2.xml
<?xml version="1.0" encoding="utf-8"?>
<LinearLayout xmlns:android="http://schemas.android.com/apk/res/android"
xmlns:mobilesafe="http://schemas.android.com/apk/res/com.mxn.mobilesafe"
android:layout_width="match_parent"
android:layout_height="match_parent"
android:orientation="vertical" >
<TextView
style="@style/TitleStyle"
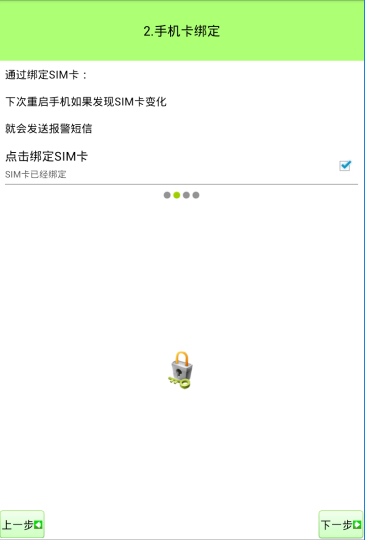
android:text="2.手機卡綁定"
/>
<TextView
style="@style/ContentStyle"
android:text="通過綁定SIM卡:"
/>
<TextView
style="@style/ContentStyle"
android:text="下次重啟手機如果發現SIM卡變化"
/>
<TextView
style="@style/ContentStyle"
android:text="就會發送報警短信"
/>
<com.mxn.mobilesafe.view.SettingItemView
android:id="@+id/siv_sim"
android:layout_width="match_parent"
android:layout_height="wrap_content"
mobilesafe:title="點擊綁定SIM卡"
mobilesafe:desc_on="SIM卡已經綁定"
mobilesafe:desc_off="SIM卡沒有綁定" >
</com.mxn.mobilesafe.view.SettingItemView>
<LinearLayout
android:layout_width="match_parent"
android:layout_height="wrap_content"
android:orientation="horizontal"
android:gravity="center"
>
<ImageView
android:layout_width="wrap_content"
android:layout_height="wrap_content"
android:src="@android:drawable/presence_invisible"
/>
<ImageView
android:layout_width="wrap_content"
android:layout_height="wrap_content"
android:src="@android:drawable/presence_online"
/>
<ImageView
android:layout_width="wrap_content"
android:layout_height="wrap_content"
android:src="@android:drawable/presence_invisible"
/>
<ImageView
android:layout_width="wrap_content"
android:layout_height="wrap_content"
android:src="@android:drawable/presence_invisible"
/>
</LinearLayout>
<RelativeLayout
android:layout_width="wrap_content"
android:layout_height="0dp"
android:layout_weight="1"
>
<ImageView
android:id="@+id/iv1"
android:layout_width="wrap_content"
android:layout_height="wrap_content"
android:layout_centerHorizontal="true"
android:layout_centerVertical="true"
android:src="@drawable/setup2"/>
<Button
style="@style/NextStyle"
/>
<Button
style="@style/PreviousStyle"/>
</RelativeLayout>
</LinearLayout>
Setup3Activity.java
public class Setup3Activity extends BaseSetupActivity {

    private EditText etPhone;

    @Override
    protected void onCreate(Bundle savedInstanceState) {
        super.onCreate(savedInstanceState);
        setContentView(R.layout.activity_setup3);

        etPhone = (EditText) findViewById(R.id.et_phone);

        String phone = mPref.getString("safe_phone", "");
        etPhone.setText(phone);
    }

    @Override
    public void showNextPage() {
        String phone = etPhone.getText().toString().trim();// 注意過濾空格

        if (TextUtils.isEmpty(phone)) {
            // Toast.makeText(this, "安全號碼不能為空!", Toast.LENGTH_SHORT).show();
            ToastUtils.showToast(this, "安全號碼不能為空!");
            return;
        }

        mPref.edit().putString("safe_phone", phone).commit();// 保存安全號碼

        startActivity(new Intent(this, Setup4Activity.class));
        finish();

        // 兩個界面切換的動畫
        overridePendingTransition(R.anim.trans_in, R.anim.trans_out);// 進入動畫和退出動畫
    }

    @Override
    public void showPreviousPage() {
        startActivity(new Intent(this, Setup2Activity.class));
        finish();

        // 兩個界面切換的動畫
        overridePendingTransition(R.anim.trans_previous_in,
                R.anim.trans_previous_out);// 進入動畫和退出動畫
    }

    /**
     * 選擇聯系人
     *
     * @param view
     */
    public void selectContact(View view) {
        Intent intent = new Intent(this, ContactActivity.class);//通訊錄
        startActivityForResult(intent, 1);//需要有返回值
    }

    @Override
    protected void onActivityResult(int requestCode, int resultCode, Intent data) {
        // System.out.println("resultCode:" + resultCode);
        // System.out.println("requestCode:" + requestCode);

        if (resultCode == Activity.RESULT_OK) {
            String phone = data.getStringExtra("phone");
            phone = phone.replaceAll("-", "").replaceAll(" ", "");// 替換-和空格

            etPhone.setText(phone);// 把電話號碼設置給輸入框
        }

        super.onActivityResult(requestCode, resultCode, data);
    }
}
ToastUtils.java
public class ToastUtils {

    public static void showToast(Context ctx,String text){
        Toast.makeText(ctx, text, Toast.LENGTH_SHORT).show();
    }

}
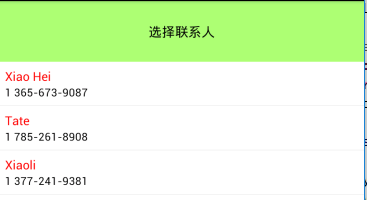
ContactActivity.java 通訊錄
public class ContactActivity extends Activity {
    private ListView lvList;
    private ArrayList<HashMap<String, String>> readContact;

    @Override
    protected void onCreate(Bundle savedInstanceState) {
        // TODO Auto-generated method stub
        super.onCreate(savedInstanceState);
        setContentView(R.layout.activity_contact);

        lvList = (ListView) findViewById(R.id.lv_list);

        readContact = readContact();
        // System.out.println(readContact);
        lvList.setAdapter(new SimpleAdapter(this, readContact, R.layout.contact_list_item,
                new String[] { "name", "phone" }, new int[] { R.id.tv_name, R.id.tv_phone }));


        //給listview設置監聽
        lvList.setOnItemClickListener(new OnItemClickListener() {

            @Override
            public void onItemClick(AdapterView<?> parent, View view, int position, long id) {
                String phone = readContact.get(position).get("phone");// 讀取當前item的電話號碼
                Intent intent = new Intent();
                intent.putExtra("phone", phone);
                setResult(Activity.RESULT_OK, intent);// 將數據放在intent中返回給上一個頁面

                finish();
            }
        });
    }

    private ArrayList<HashMap<String, String>> readContact() {
        // 首先,從raw_contacts中讀取聯系人的id("contact_id")
        // 其次, 根據contact_id從data表中查詢出相應的電話號碼和聯系人名稱
        // 然後,根據mimetype來區分哪個是聯系人,哪個是電話號碼
        Uri rawContactsUri = Uri.parse("content://com.android.contacts/raw_contacts");
        Uri dataUri = Uri.parse("content://com.android.contacts/data");

        ArrayList<HashMap<String, String>> list = new ArrayList<HashMap<String, String>>();

        // 從raw_contacts中讀取聯系人的id("contact_id")
        //ContentProvider
        Cursor rawContactsCursor = getContentResolver().query(rawContactsUri, new String[] { "contact_id" }, null, null,
                null);
        if (rawContactsCursor != null) {
            while (rawContactsCursor.moveToNext()) {
                String contactId = rawContactsCursor.getString(0);
                // System.out.println(contactId);

                // 根據contact_id從data表中查詢出相應的電話號碼和聯系人名稱, 實際上查詢的是視圖view_data
                Cursor dataCursor = getContentResolver().query(dataUri, new String[] { "data1", "mimetype" },
                        "contact_id=?", new String[] { contactId }, null);

                if (dataCursor != null) {
                    HashMap<String, String> map = new HashMap<String, String>();
                    while (dataCursor.moveToNext()) {
                        String data1 = dataCursor.getString(0);
                        String mimetype = dataCursor.getString(1);
                        // System.out.println(contactId + ";" + data1 + ";"
                        // + mimetype);
                        if ("vnd.android.cursor.item/phone_v2".equals(mimetype)) {
                            map.put("phone", data1);
                        } else if ("vnd.android.cursor.item/name".equals(mimetype)) {
                            map.put("name", data1);
                        }
                    }

                    list.add(map);
                    dataCursor.close();
                }
            }

            rawContactsCursor.close();
        }

        return list;
    }

}
activity_setup3.xml
<?xml version="1.0" encoding="utf-8"?>
<LinearLayout xmlns:android="http://schemas.android.com/apk/res/android"
android:layout_width="match_parent"
android:layout_height="match_parent"
android:orientation="vertical" >
<TextView
style="@style/TitleStyle"
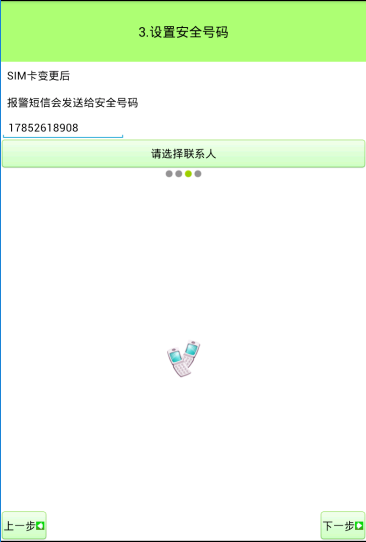
android:text="3.設置安全號碼"
/>
<TextView
style="@style/ContentStyle"
android:text="SIM卡變更後"/>
<TextView
style="@style/ContentStyle"
android:text="報警短信會發送給安全號碼"/>
<EditText
android:layout_width="wrap_content"
android:layout_height="wrap_content"
android:hint="請輸入或選擇安全號碼"
android:id="@+id/et_phone"
/>
<Button
android:layout_width="match_parent"
android:layout_height="wrap_content"
android:gravity="center"
android:text="請選擇聯系人"
android:onClick="selectContact"
android:background="@drawable/btn_light_green_selector" //狀態選擇器
/>
<LinearLayout
android:layout_width="match_parent"
android:layout_height="wrap_content"
android:orientation="horizontal"
android:gravity="center"
>
<ImageView
android:layout_width="wrap_content"
android:layout_height="wrap_content"
android:src="@android:drawable/presence_invisible"
/>
<ImageView
android:layout_width="wrap_content"
android:layout_height="wrap_content"
android:src="@android:drawable/presence_invisible"
/>
<ImageView
android:layout_width="wrap_content"
android:layout_height="wrap_content"
android:src="@android:drawable/presence_online"
/>
<ImageView
android:layout_width="wrap_content"
android:layout_height="wrap_content"
android:src="@android:drawable/presence_invisible"
/>
</LinearLayout>
<RelativeLayout
android:layout_width="wrap_content"
android:layout_height="0dp"
android:layout_weight="1"
>
<ImageView
android:id="@+id/iv1"
android:layout_width="wrap_content"
android:layout_height="wrap_content"
android:layout_centerHorizontal="true"
android:layout_centerVertical="true"
android:src="@drawable/setup3"/>
<Button
style="@style/NextStyle"
/>
<Button
style="@style/PreviousStyle"/>
</RelativeLayout>
</LinearLayout>
Setup4Activity.java
public class Setup4Activity extends BaseSetupActivity {

    private CheckBox cbProtect;

    @Override
    protected void onCreate(Bundle savedInstanceState) {
        super.onCreate(savedInstanceState);
        setContentView(R.layout.activity_setup4);

        cbProtect = (CheckBox) findViewById(R.id.cb_protect);

        boolean protect = mPref.getBoolean("protect", false);

        // 根據sp保存的狀態,更新checkbox
        if (protect) {
            cbProtect.setText("防盜保護已經開啟");
            cbProtect.setChecked(true);
        } else {
            cbProtect.setText("防盜保護沒有開啟");
            cbProtect.setChecked(false);
        }

        // 當checkbox發生變化時,回調此方法
        cbProtect.setOnCheckedChangeListener(new OnCheckedChangeListener() {

            @Override
            public void onCheckedChanged(CompoundButton buttonView,
                    boolean isChecked) {
                if (isChecked) {
                    cbProtect.setText("防盜保護已經開啟");
                    mPref.edit().putBoolean("protect", true).commit();
                } else {
                    cbProtect.setText("防盜保護沒有開啟");
                    mPref.edit().putBoolean("protect", false).commit();
                }
            }
        });
    }

    @Override
    public void showNextPage() {
        startActivity(new Intent(this, LostFindActivity.class));
        finish();

        // 兩個界面切換的動畫
        overridePendingTransition(R.anim.trans_in, R.anim.trans_out);// 進入動畫和退出動畫

        mPref.edit().putBoolean("configed", true).commit();// 更新sp,表示已經展示過設置向導了,下次進來就不展示啦
    }

    @Override
    public void showPreviousPage() {
        startActivity(new Intent(this, Setup3Activity.class));
        finish();

        // 兩個界面切換的動畫
        overridePendingTransition(R.anim.trans_previous_in,
                R.anim.trans_previous_out);// 進入動畫和退出動畫
    }
}
activity_setup4.xml
<?xml version="1.0" encoding="utf-8"?>
<LinearLayout xmlns:android="http://schemas.android.com/apk/res/android"
android:layout_width="match_parent"
android:layout_height="match_parent"
android:orientation="vertical" >
<TextView
style="@style/TitleStyle"
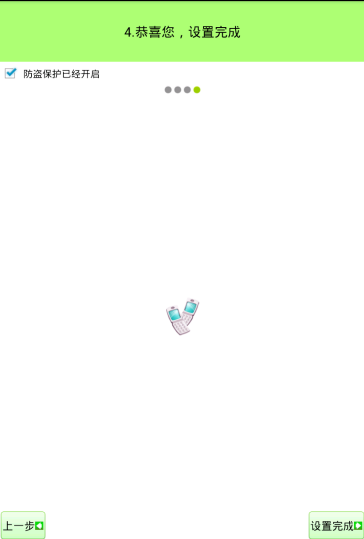
android:text="4.恭喜您,設置完成"
/>
<CheckBox
android:id="@+id/cb_protect"
android:layout_width="wrap_content"
android:layout_height="wrap_content"
android:text="防盜保護沒有開啟"
/>
<LinearLayout
android:layout_width="match_parent"
android:layout_height="wrap_content"
android:orientation="horizontal"
android:gravity="center"
>
<ImageView
android:layout_width="wrap_content"
android:layout_height="wrap_content"
android:src="@android:drawable/presence_invisible"
/>
<ImageView
android:layout_width="wrap_content"
android:layout_height="wrap_content"
android:src="@android:drawable/presence_invisible"
/>
<ImageView
android:layout_width="wrap_content"
android:layout_height="wrap_content"
android:src="@android:drawable/presence_invisible"
/>
<ImageView
android:layout_width="wrap_content"
android:layout_height="wrap_content"
android:src="@android:drawable/presence_online"
/>
</LinearLayout>
<RelativeLayout
android:layout_width="wrap_content"
android:layout_height="0dp"
android:layout_weight="1"
>
<ImageView
android:id="@+id/iv1"
android:layout_width="wrap_content"
android:layout_height="wrap_content"
android:layout_centerHorizontal="true"
android:layout_centerVertical="true"
android:src="@drawable/setup3"/>
<Button
style="@style/NextStyle"
android:text="設置完成"
/>
<Button
style="@style/PreviousStyle"
/>
</RelativeLayout>
</LinearLayout>
SharePreferences存儲在config.xml裡面的內容:
<?xml version='1.0' encoding='utf-8' standalone='yes' ?>
<map>
<string name="sim">89014103211118510720</string>
<string name="safe_phone">17852618908</string>
<boolean name="configed" value="true" />
<boolean name="is_show_system" value="true" />
<boolean name="protect" value="true" />
<string name="password">c4</string>
</map>
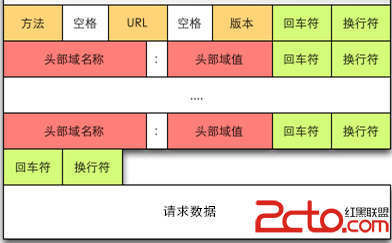 Android網絡編程(一)HTTP協議原理
Android網絡編程(一)HTTP協議原理 前言 這篇文章是這個系列的開篇,作為移動開發者,開發的應用不免會對網絡進行訪問,雖然現在已經有很多的開源庫幫助我們可以輕而易
 懸浮對話框的實現,懸浮對話框實現
懸浮對話框的實現,懸浮對話框實現直接上代碼: private void setDialog(){ View view = getLayoutIn
 Android用TabLayout實現類似網易選項卡動態滑動效果
Android用TabLayout實現類似網易選項卡動態滑動效果 此前我們用HorizontalScrollView也實現了類似網易選項卡動態滑動效果,詳見 Androi
 android ToolBar與DrawerLayout筆記,toolbardrawerlayout
android ToolBar與DrawerLayout筆記,toolbardrawerlayout通過Android Studio 生成的Nagvition Drawe