編輯:關於android開發
 )
)
之前關於Android中Fragment的概念以及創建方式,我專門寫了一篇博文《Android中Fragment的兩種創建方式》,就如何創建Fragment混合布局做了詳細的分析,今天就來詳細說道說道Fragment與宿主Activity之間是如何實現數據交互的。
我們可以這樣理解,宿主Activity中的Fragment之間要實現信息交互,就必須通過宿主Activity,Fragment之間是不可能直接實現信息交互的。
Fragment與Fragment或者說與Activity(將部分Fragment包含的的布局直接部署在Activity中)的數據交互我個人總結了兩種實現方式:
在開始兩種實現方式之前,先向大家介紹並演示其中一些個性化參數不同設置後的效果,之前向大家介紹過要管理宿主Activity中的Fragment,必須得到FragmentManager(碎片管理),而FragmentManager要實現對Fragment的增刪改換等操作(事務),則必須啟用FragmentTransaction,這裡主要向大家演示添加FragmentTransaction.addToBackStack方法前後以及在未給Fragment設置BackGround的情況下使用FragmentTransaction.add與replace的不同效果,更加詳細的方法介紹以及用法請大家參照API詳細了解。
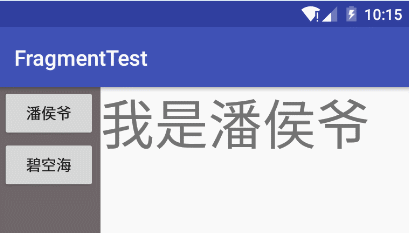
貌似看不出差別,其實在按回退鍵時,這個是根據打開的順序,逐個退出
不同的實現效果大家都看到了,我們開始演示實現代碼:
我們使用的是Android中Fragment的兩種創建方式中(通過java代碼將fragment添加到宿主Activity中)的布局文件,布局文件代碼請參考http://www.cnblogs.com/panhouye/p/6185093.html
 1 import android.app.Fragment;
 2 import android.os.Bundle;
 3 import android.view.LayoutInflater;
 4 import android.view.View;
 5 import android.view.ViewGroup;
 6 import android.widget.TextView;
 7 /**
 8  * Created by panchengjia on 2016/12/18.
 9  */
10 public class RightFragment extends Fragment {
11     public RightFragment() {
12     }
13     /*Fragment的傳參方式(通過Bundle對象來傳遞)
14         *采用這種傳參方式可以保證用戶在橫豎屏切換時所
15         * 傳遞的參數不會丟失
16          */
17     public static RightFragment getInstance(String data){
18         RightFragment rightFragment = new RightFragment();
19         Bundle bundle = new Bundle();
20         //將需要傳遞的字符串以鍵值對的形式傳入bundle
21         bundle.putString("data",data);
22         rightFragment.setArguments(bundle);
23         return rightFragment;
24     }
25     @Override
26     public void onCreate(Bundle savedInstanceState) {
27         super.onCreate(savedInstanceState);
28     }
29     @Override
30     public View onCreateView(LayoutInflater inflater, ViewGroup container, Bundle savedInstanceState) {
31         View view =inflater.inflate(R.layout.right_layout,container,false);
32         TextView tv = (TextView) view.findViewById(R.id.tv);
33         String data = getArguments().getString("data");
34         tv.setText(data);
35         return view;
36     }
37     @Override
38     public void onPause() {
39         super.onPause();
40     }
41 }
 1 import android.app.FragmentManager;
 2 import android.app.FragmentTransaction;
 3 import android.support.v7.app.AppCompatActivity;
 4 import android.os.Bundle;
 5 import android.view.View;
 6 import android.widget.Button;
 7 public class Main3Activity extends AppCompatActivity {
 8     FragmentManager fragmentManager;
 9     FragmentTransaction fragmentTransaction;
10     LeftFragment leftFragment;
11     Button panhouye,bikonghai;//聲明leftfragment中的按鈕
12     @Override
13     protected void onCreate(Bundle savedInstanceState) {
14         super.onCreate(savedInstanceState);
15         setContentView(R.layout.activity_main2);
16         //獲取fragmentManager
17         fragmentManager=getFragmentManager();
18         //通過findFragmentById找到leftFragment
19         leftFragment = (LeftFragment) fragmentManager.findFragmentById(R.id.left);
20         //找到對應的導航按鈕並設置點擊事件
21         panhouye = (Button) leftFragment.getView().findViewById(R.id.panhouye);
22         bikonghai = (Button) leftFragment.getView().findViewById(R.id.bikonghai);
23         panhouye.setOnClickListener(new View.OnClickListener() {
24             @Override
25             public void onClick(View v) {
26                 //調用方法修改rightfragment中的文本內容
27                 switchButton("我是潘侯爺");
28             }
29         });
30         bikonghai.setOnClickListener(new View.OnClickListener() {
31             @Override
32             public void onClick(View v) {
33                 switchButton("我是碧空海");
34             }
35         });
36         //設置打開Activity後rightfragment中默認的文本內容
37         switchButton("我是潘侯爺");
38     }
39     //定義方法填充Activity右側的fragment,並通過傳參修改文本內容
40     public void switchButton(String data){
41         fragmentManager=getFragmentManager();
42        fragmentTransaction=fragmentManager.beginTransaction();
43         //通過調用RightFragment中的getInstance方法傳修改文本
44         RightFragment rightFragment =RightFragment.getInstance(data);
45         //此時使用add方法會造成右側fragment中文本重疊(未設置BackGround時)
46         fragmentTransaction.replace(R.id.right,rightFragment);
47         fragmentTransaction.commit();
48     }
49 }
本次演示通過點擊左側Fragment中的按鈕點擊觸發與右側Fragment的數據交互,所以需在本類中添加回調接口用於在宿主Activity中回調修改右側文本的方法。
 1 import android.app.Fragment;
 2 import android.os.Bundle;
 3 import android.view.LayoutInflater;
 4 import android.view.View;
 5 import android.view.ViewGroup;
 6 import android.widget.Button;
 7 /**
 8  * Created by panchengjia on 2016/12/18.
 9  */
10 public class LeftFragment extends Fragment implements View.OnClickListener{
11     //聲明內部定義的回調接口
12     CallBackListener callBackListener;
13     //聲明布局中事件觸發按鈕
14     Button panhouye,bikonghai;
15     @Override
16     public void onCreate(Bundle savedInstanceState) {
17         super.onCreate(savedInstanceState);
18         //通過getActivity()獲取用於回調修改文本方法的接口
19         callBackListener= (CallBackListener) getActivity();
20     }
21     @Override
22     public View onCreateView(LayoutInflater inflater, ViewGroup container, Bundle savedInstanceState) {
23         View view =inflater.inflate(R.layout.left_layout,container,false);
24         panhouye = (Button) view.findViewById(R.id.panhouye);
25         bikonghai= (Button) view.findViewById(R.id.bikonghai);
26         panhouye.setOnClickListener(this);//為按鈕設置監聽事件
27         bikonghai.setOnClickListener(this);
28         return view;
29     }
30     @Override
31     public void onPause() {
32         super.onPause();
33     }
34
35     @Override
36     public void onClick(View v) {
37       switch (v.getId()){
38           case R.id.panhouye:
39               callBackListener.setText("我是潘侯爺");
40               break;
41           case R.id.bikonghai:
42               callBackListener.setText("我是碧空海");
43               break;
44       }
45     }
46     //設置用於修改文本的回調接口
47     public static interface CallBackListener{
48         public void setText(String data);
49     }
50 }
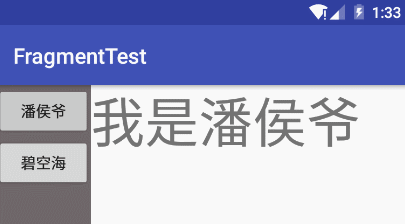
本次演示右側為文本顯示fragment,也是點擊左側的按鈕後,通過改變文本的形式體現點擊事件的處理,所以必須在本Fragment類中添加文本修改的方法。
 1 import android.app.Fragment;
 2 import android.os.Bundle;
 3 import android.support.annotation.Nullable;
 4 import android.view.LayoutInflater;
 5 import android.view.View;
 6 import android.view.ViewGroup;
 7 import android.widget.TextView;
 8 /**
 9  * Created by panchengjia on 2016/12/18.
10  */
11 public class RightFragment extends Fragment {
12     //聲明fragment中的TextView,用於建立修改文本的方法
13     private TextView tv;
14     @Override
15     public void onCreate(Bundle savedInstanceState) {
16         super.onCreate(savedInstanceState);
17     }
18     @Override
19     public void onPause() {
20         super.onPause();
21     }
22     @Nullable
23     @Override
24     public View onCreateView(LayoutInflater inflater, ViewGroup container, Bundle savedInstanceState) {
25         View view =inflater.inflate(R.layout.right_layout,container,false);
26         tv = (TextView) view.findViewById(R.id.tv);
27         return view;
28     }
29     //在這裡設置修改自身文本的方法
30     public void  setFragmentText(String data){
31         tv.setText(data);
32     }
33 }
 1 import android.app.FragmentManager;
 2 import android.app.FragmentTransaction;
 3 import android.support.v7.app.AppCompatActivity;
 4 import android.os.Bundle;
 5 public class MainActivity extends AppCompatActivity implements LeftFragment.CallBackListener{
 6     FragmentManager fragmentManager;
 7     FragmentTransaction fragmentTransaction;
 8     /*leftfragment已經在主布局文件中聲明,
 9     *這裡僅需要通過代碼聲明部署rightFragment
10      */
11     RightFragment rightFragment;
12     @Override
13     protected void onCreate(Bundle savedInstanceState) {
14         super.onCreate(savedInstanceState);
15         setContentView(R.layout.activity_main);
16         //初始化主布局(主要目的是為主布局填充fragments)
17         initActivity();
18     }
19     private void initActivity() {
20         fragmentManager = getFragmentManager();
21         fragmentTransaction = fragmentManager.beginTransaction();
22         rightFragment = new RightFragment();
23         fragmentTransaction.add(R.id.right,rightFragment);
24         fragmentTransaction.commit();
25     }
26     //接口實現方法,用於回調RightFragment類中定義的修改文本的方法
27     @Override
28     public void setText(String data) {
29         rightFragment.setFragmentText(data);
30     }
31 }
本次演示接口回調的實現方式看起來比使用bundle傳參的代碼量大了一些,但在實際開發中,我們面臨的Fragment不僅僅是眼前的這兩個,而使用接口回調實現交互數據的方法能更好的實現重用Fragment UI組件,從根本上解決的大量代碼重用的問題,建議大家熟練掌握接口回調來實現數據交互。
 android 特殊用戶通知用法匯總--Notification源碼分析
android 特殊用戶通知用法匯總--Notification源碼分析 一直用的android手機,用過這麼多的app,平時也會遇到有趣的通知提醒,在這裡先總結
 通過百度地圖API顯示當前位置在地圖上(圖標顯示)--第三方開源--百度地圖(二),api當前位置
通過百度地圖API顯示當前位置在地圖上(圖標顯示)--第三方開源--百度地圖(二),api當前位置1.下載百度地圖的demo,下載地址:http://lbsyun.bai
 Android中使用Notification實現進度通知欄(示例三),notification進度條
Android中使用Notification實現進度通知欄(示例三),notification進度條我們在使用APP的過程中,軟件會偶爾提示我們進行版本更新,我們點擊確認
 Activity之概覽屏幕(Overview Screen),activityoverview
Activity之概覽屏幕(Overview Screen),activityoverview概覽屏幕 概覽屏幕(也稱為最新動態屏幕、最近任務列表或最近使用的應用)是