編輯:關於android開發
首先看效果圖:
Bundle類用作攜帶數據,它類似於Map,用於存放key-value名值對形式的值。相對於Map,它提供了各種常用類型的putXxx()/getXxx()方法,如:putString()/getString()和putInt()/getInt(),putXxx()用於往Bundle對象放入數據,getXxx()方法用於從Bundle對象裡獲取數據。Bundle的內部實際上是使用了HashMap<String, Object>類型的變量來存放putXxx()方法放入的值。簡單地說,Bundle就是一個封裝好的包,專門用於導入Intent傳值的包。
第一種寫法,用於批量添加數據到Intent:
Intentintent = new Intent();
Bundle bundle = new Bundle();//該類用作攜帶數據
bundle.putString("name","Alice");
intent.putExtras(bundle);//為意圖追加額外的數據,意圖原來已經具有的數據不會丟失,但key同名的數據會被替換
第二種寫法:這種寫法的作用等價於上面的寫法,只不過這種寫法是把數據一個個地添加進Intent,這種寫法使用起來比較方便,而且只需要編寫少量的代碼。
Intent intent = new Intent();
intent.putExtra("name","XXX");
那麼,這兩種方法有什麼區別呢?
完全沒有區別。當你調用putExtras()方法時,所傳入的Bundle會被轉化為Intent的鍵值(別忘了Intent也以鍵值模式轉載數據)。
那麼,現在看看如何將Intent和Bundle取出來。
方法很簡單,直接使用this.getIntent()就可以得到傳來的Intent,然後在這個Intent的基礎上調用getExtras()就可以得到Bundle。然後這個Bundle你想要什麼得到什麼就get什麼。
比如String str=bundle.getString("USERNAME"); 就是得到鍵為“USERNAME”的字符串,int num=bundle.getInt("Number");就是得到鍵為“Number”的整型。
android中的組件間傳遞的對象一般實現Parcelable接口,當然也可以使用java的Serializable接口,前者是android專門設計的,效率更高,下面我們就來實現一個Parcelabel。
1. 創建一個類實現Parcelable接口,具體實現如下:
public class ParcelableData implements Parcelable{

    private String name;

    private int age;

    public ParcelableData(){

        name = "guest";

        age = 20;

    }

    public ParcelableData(Parcel in){

        //順序要和writeToParcel寫的順序一樣

        name = in.readString();

        age = in.readInt();

    }

    public String getName(){

        return name;

    }

    public void setName(String name){

        this.name = name;

    }


    public int getAge(){

        return age;

    }

    public void setAge(int age) {

        this.age = age;

    }

    @Override

    public int describeContents() {

        // TODO Auto-generated method stub

        return 0;

    }

    @Override

    public void writeToParcel(Parcel dest, int flags) {

        // TODO Auto-generated method stub

        dest.writeString(name);

        dest.writeInt(age);

    }

    public static final Parcelable.Creator<ParcelableData> CREATOR = new Parcelable.Creator<ParcelableData>() {

        public ParcelableData createFromParcel(Parcel in) {

            return new ParcelableData(in);

        }

        public ParcelableData[] newArray(int size) {

            return new ParcelableData[size];

        }

    };

}
2. 通過下面的方法發送對象。Bundle類也實現了Parcelable接口,一般在android中我們是通過Bundle來封裝數據並進行傳送的。
Intent intent = new Intent();

intent.setClass(this, SubActivity.class);

// 直接添加

//intent.putExtra("MyData", new ParcelableData());


// 通過Bundle

Bundle bundle = new Bundle();

bundle.putString("MyString", "test bundle");

bundle.putParcelable("MyData", new ParcelableData());

intent.putExtras(bundle);

startActivity(intent);
3. 下面的接收對象的方法。
//ParcelableData parcelableData = getIntent().getParcelableExtra("MyData");

Bundle bundle = getIntent().getExtras();

ParcelableData parcelableData = bundle.getParcelable("MyData");

String testBundleString = bundle.getString("MyString");

Log.v("string=", testBundleString);

Log.v("name=", parcelableData.getName());

Log.v("age=", ""+parcelableData.getAge());
activity代碼:
package mm.shandong.com.testbundle;

import android.content.Intent;
import android.support.v7.app.AppCompatActivity;
import android.os.Bundle;
import android.text.TextUtils;
import android.view.Menu;
import android.view.MenuItem;
import android.view.View;
import android.widget.EditText;
import android.widget.Toast;


import java.util.ArrayList;

import mm.shandong.com.testbundle.entity.Person;

public class TestBundleActivity extends AppCompatActivity {
    EditText editText1;
    EditText editText2;

    @Override
    protected void onCreate(Bundle savedInstanceState) {
        super.onCreate(savedInstanceState);
        setContentView(R.layout.activity_test_bundle);
        editText1 = (EditText) findViewById(R.id.editText1);
        editText2 = (EditText) findViewById(R.id.editText2);
    }
   ///提交選擇的地區,並把地區傳遞給TestBundleActivity3
    public void submitRegion(View view) {
        EditText editTextRegion = (EditText) findViewById(R.id.editTextRegion);
        Intent intent = new Intent(this, TestBundleActivity3.class);
        String region = editTextRegion.getText().toString();
        if (!TextUtils.isEmpty(region)) {
            intent.putExtra("region", region);
            startActivity(intent);
        } else {
            Toast.makeText(this, "地區不能是空值", Toast.LENGTH_SHORT).show();
        }
    }
    ///把需要計算的兩個值都是Integer類型,傳入到TestBundleActivity1
    public void calculte(View view) {
        Intent intent = new Intent(this, TestBundleActivity1.class);
        Bundle bundle = new Bundle();
        String first = editText1.getText().toString();
        String second = editText2.getText().toString();
        if (!TextUtils.isEmpty(first) && !TextUtils.isEmpty(second)) {
            bundle.putInt("first", Integer.parseInt(first));
            bundle.putInt("second", Integer.parseInt(second));
            intent.putExtras(bundle);
            startActivity(intent);
        } else {
            Toast.makeText(this, "數值不能是空", Toast.LENGTH_SHORT).show();
        }
    }
    ///傳遞Serializable對象到TestBundleActivity2
    public void login(View view) {
        EditText editTextName = (EditText) findViewById(R.id.editTextName);
        EditText editTextCode = (EditText) findViewById(R.id.editTextCode);
        Intent intent = new Intent(this, TestBundleActivity2.class);
        Bundle bundle = new Bundle();
        String name = editTextName.getText().toString();
        String code = editTextCode.getText().toString();
        if (!TextUtils.isEmpty(name) && !TextUtils.isEmpty(code)) {
            Person person = new Person();
            person.setName(name);
            person.setCode(code);
            bundle.putSerializable("person", person);
            intent.putExtras(bundle);
            startActivity(intent);
        } else {
            Toast.makeText(this, "姓名編號不能是空", Toast.LENGTH_SHORT).show();
        }
    }

}
最後,以上例子都來源與安卓無憂,請去應用寶或者豌豆莢下載:http://android.myapp.com/myapp/detail.htm?apkName=com.shandong.mm.androidstudy,源碼例子文檔一網打盡。
 手機產品設計之用戶引導,手機產品設計引導
手機產品設計之用戶引導,手機產品設計引導在手機產品的設計過程中,由於手機界面的承載能力有限,產品功能的不斷膨脹,必須要在用戶打開應用之後告知他某些新奇的功能,引導他完成某
 【原創+譯文】官方文檔中聲明的如何創建抽屜導航欄(Navigation Drawer),navigationdrawer
【原創+譯文】官方文檔中聲明的如何創建抽屜導航欄(Navigation Drawer),navigationdrawer如需轉載請注明出處:http://www.cnbl
 自用工程教程(一)建立開發環境與HelloWorld,自用helloworld
自用工程教程(一)建立開發環境與HelloWorld,自用helloworld從今天開始,我們將在老師的帶領下嘗試做一個Android平台移動端實現捕獲網絡數據包功能的A
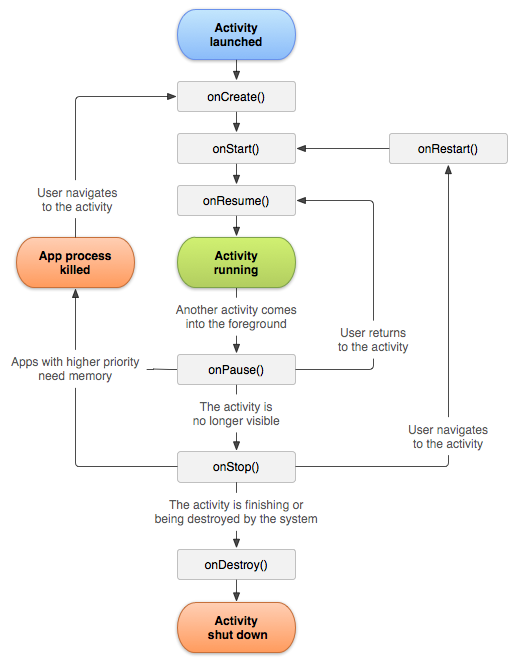 Android 四大組件之Activity(續2),androidactivity
Android 四大組件之Activity(續2),androidactivity1.生命周期 關於生命周期,在詳細講解下: 上圖是從android官網獲取的生命周期。