編輯:關於android開發
本文主要講述了Android 實現圖片畫畫板
設計項目布局:
<RelativeLayout xmlns:android="http://schemas.android.com/apk/res/android"
    xmlns:tools="http://schemas.android.com/tools"
    android:layout_width="match_parent"
    android:layout_height="match_parent"
    android:paddingBottom="@dimen/activity_vertical_margin"
    android:paddingLeft="@dimen/activity_horizontal_margin"
    android:paddingRight="@dimen/activity_horizontal_margin"
    android:paddingTop="@dimen/activity_vertical_margin"
    tools:context=".MainActivity" >

    <ImageView
        android:layout_above="@+id/bt"
        android:id="@+id/iv"
        android:layout_width="fill_parent"
        android:layout_height="fill_parent" />

    <Button
        android:id="@+id/bt"
        android:layout_width="fill_parent"
        android:layout_height="wrap_content"
        android:layout_alignParentBottom="true"
        android:onClick="save"
        android:text="保存圖片" />

</RelativeLayout>
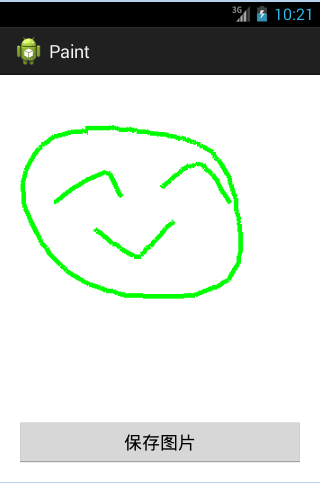
首先實現畫圖功能:
public class MainActivity extends Activity {
    private ImageView iv;
    private Bitmap baseBitmap;
    private Canvas canvas;
    private Paint paint;

    @Override
    protected void onCreate(Bundle savedInstanceState) {
        super.onCreate(savedInstanceState);
        setContentView(R.layout.activity_main);
        iv = (ImageView) findViewById(R.id.iv);
        paint = new Paint();
        paint.setStrokeWidth(5);
        paint.setColor(Color.GREEN);

        // 創建一個可以被修改的bitmap
        baseBitmap = Bitmap.createBitmap(320, 360,
                Bitmap.Config.ARGB_8888);
        System.out.println("圖寬度:"+iv.getWidth());
        System.out.println("圖高度:"+iv.getHeight());
        canvas = new Canvas(baseBitmap);
        canvas.drawColor(Color.WHITE);

        // 知道用戶手指在屏幕上移動的軌跡
        iv.setOnTouchListener(new OnTouchListener() {
            // 設置手指開始的坐標
            int startX;
            int startY;

            @Override
            public boolean onTouch(View v, MotionEvent event) {

                switch (event.getAction()) {
                case MotionEvent.ACTION_DOWN: // 手指第一次接觸屏幕
                    startX = (int) event.getX();
                    startY = (int) event.getY();
                    break;
                case MotionEvent.ACTION_MOVE:// 手指在屏幕上滑動
                    int newX = (int) event.getX();
                    int newY = (int) event.getY();

                    canvas.drawLine(startX, startY, newX, newY, paint);
                    // 重新更新畫筆的開始位置
                    startX = (int) event.getX();
                    startY = (int) event.getY();
                    iv.setImageBitmap(baseBitmap);
                    break;
                case MotionEvent.ACTION_UP: // 手指離開屏幕
                    break;

                default:
                    break;
                }
                return true;
            }
        });
    }

    public void save(View view) {

    }

}
接下來完成保存圖片的功能:
    public void save(View view) {
        try {
            File file = new File(Environment.getExternalStorageDirectory(),
                    System.currentTimeMillis() + ".jpg");
            FileOutputStream stream = new FileOutputStream(file);
            baseBitmap.compress(CompressFormat.JPEG, 100, stream);
            stream.close();
            Toast.makeText(this, "保存圖片成功", 1).show();

            //模擬一個消息通知系統sd卡被重新掛載了
            Intent intent = new Intent();
            intent.setAction(intent.ACTION_MEDIA_MOUNTED);
            intent.setData(Uri.fromFile(Environment
                    .getExternalStorageDirectory()));
            sendBroadcast(intent);

        } catch (Exception e) {
            Toast.makeText(this, "保存圖片失敗", 1).show();
            e.printStackTrace();
        }

    }
 《Android源碼設計模式解析與實戰》讀書筆記(二十一)
《Android源碼設計模式解析與實戰》讀書筆記(二十一) 第二十一章、裝飾模式 裝飾模式也稱為包裝模式,是結構型設計模式之一。裝飾模式是一種用於替代繼承技術的一種方
 安卓高手之路之java層Binder,安卓binder
安卓高手之路之java層Binder,安卓binder很多人一提到Binder就說代理模式,人雲亦雲的多,能理解精髓的少。 本篇文章就從設計角度分析一下java
 Android中的LinearLayout布局,linearlayout垂直布局
Android中的LinearLayout布局,linearlayout垂直布局LinearLayout : 線性布局
 android 打開各種文件(setDataAndType)
android 打開各種文件(setDataAndType) Java代碼 /** * 打開文件 * @param file */ private
 android入門系列- TextView EditText Button ImageView 的簡單應用,textviewedittext
android入門系列- TextView EditText Butto