編輯:關於android開發
引言
Service 服務是 Android 系統最常用的四大部件之一,Android 支持 Service 服務的原因主要目的有兩個,一是簡化後台任務的實現,二是實現在同一台設備當中跨進程的遠程信息通信。
Service 服務主要分為 Local Service 本地服務與 Remote Service 遠程服務兩種,本地服務只支持同一進程內的應用程序進行訪問,遠程服務可通過AIDL(Android Interface Definition Language)技術支持跨進程訪問。服務可以通過Context.startService()和Context.bindService()進行啟動,一般Local Service本地服務可使用其中一種方法啟動,但Remote Service遠程服務只能使用Context.bindService()啟動,而兩種調用方式在使用場景與活動流程中都存在差異。還有通過多線程技術處理 Service 服務的延時操作等技術,下文將針對Android 系統的 Service 服務的一系列操作進行深入探討。
目錄
一、Service 服務的概念與說明
二、Service 服務的生命周期
三、Local Service 的應用原理與開發實例
四、通過多線程方式處理 Service 服務的延時性操作
五、淺談 Remote Service 遠程服務原理
一、Android Service的概念與說明
1.1 Service 服務的定義
Android Service 是 Android 平台最常用的部件之一,其概念與 Windows Service 類似,熟悉Windows開發的朋友應該對此概念會有所了解。當 Android 系統需要對現有的程序數據進行監聽,或者對現有 Actitvity 提供數據服務支撐時,就會使用到 Android Service 。例如:對用戶地理位置的檢測,對SD卡定時掃描,對當地氣候的定期檢測都會使用到 Service 服務,Service 一般都是運行於後台,不需要用戶界面支撐。Service 服務不會自動創建線程,如果開發人員沒有為Service服務添加異步操作,那Service服務將運行於主線程當中。
1.2 Service 服務的類型
1.2.1 按照 Service 的生命周期模型一共分為兩種類型
第一類是直接通過Context.startService()啟動,通過Context.stopService() 結束Service,其特點在於調用簡單,方便控制。缺點在於一旦啟動了 Service 服務,除了再次調用或結束服務外就再無法對服務內部狀態進行操控,缺乏靈活性。
第二類是通過Context.bindService()啟動,通過Context.unbindService() 結束,相對其特點在運用靈活,可以通過 IBinder 接口中獲取 Service 的句柄,對 Service 狀態進行檢測。
從 Android 系統設計的架構上看,startService() 是用於啟動本地服務,bindService() 更多是用於對遠程服務進行綁定。當然,也可以結合兩者進行混合式應用,先通過startService()啟動服務,然後通過 bindService() 、unbindService()方法進行多次綁定,以獲取 Service 服務在不同狀態下的信息,最後通過stopService()方法結束Service運行,在下面文章裡將舉例一一說明。
1.2.2 按照 Service 的寄存方式分為兩種類型
本地服務 (Local Service) 寄存於當前的進程當中,當前進程結束後 Service 也會隨之結束,Service 可以隨時與 Activity 等多個部件進行信息交換。Service服務不會自動啟動線程,如果沒有人工調用多線程方式進行啟動,Service將寄存於主線程當中。
遠程服務 (Remote Service ) 獨立寄存於另一進程中, 通過 AIDL (Android Interface Definition Language)接口定義語言,實現Android設備上的兩個進程間通信(IPC)。AIDL 的 IPC 機制是基於 RPC (Remote Proceduce Call) 遠程過程調用協議建立的,用於約束兩個進程間的通訊規則,供編譯器生成代碼。進程之間的通信信息,首先會被轉換成AIDL協議消息,然後發送給對方,對方收到AIDL協議消息後再轉換成相應的對象,其使用方法在下文將會詳細說明。
回到目錄
二、Android Service 的生命周期
2.1 Service 服務的常用方法
表2.1
由於手機的RAM、內部資源有限,所以很多Service都會因為資源不足而被Kill掉,這時候返回值就決定了Service被Kill後的處理方式,一般 int onStartCommand(intent,flags,startId)的返回值分為以下幾種:
START_STICKY
如果service進程被kill掉,系統會嘗試重新創建Service,如果在此期間沒有任何啟動命令被傳遞到Service,那麼參數intent將為null。
START_NOT_STICKY
使用這個返回值時,如果在執行完onStartCommand()後,服務被異常kill掉,系統不會自動重啟該服務。
START_REDELIVER_INTENT
使用這個返回值時,如果在執行完onStartCommand()後,服務被異常kill掉,系統會自動重啟該服務,並將intent的值傳入。
而輸入參數flags正是代表此次onStartCommand()方法的啟動方式,正常啟動時,flags默認為0,被kill後重新啟動,參數分為以下兩種:
START_FLAG_RETRY
代表service被kill後重新啟動,由於上次返回值為START_STICKY,所以參數 intent 為null
START_FLAG_REDELIVERY
代表service被kill後重新啟動,由於上次返回值為START_REDELIVER_INTENT,所以帶輸入參數intent
2.2 Service 的運作流程
上文曾經提到 Service 的啟動方法有Context.startService(intent),Context.bindService(intent,serviceConnection,int) 兩種,下面詳細介紹一下它們工作流程。
當系統調用Context.startService()方法時,先會觸發Service的onCreate()方法,這一般用於對Service的運行條件作初始化處理,且在Service的生命周期內只會被觸發一次。然後系統將觸發Service的onStartCommand()方法,用戶每次調用startService()方法,都會觸發onStartCommand()方法。之後,Service 除非在資源不足的情況下被系統 kill 掉,否則Service不會自動結束,直至系統調用Context.stopService()方法時,Service 才會結束。在Service結束時將自動啟動onDestory()方法對運轉中的Service作最後處理。
注意:即使系統多次調用 startService()或 bindService()方法, onCreate() 方法只會在第一次調用時被觸發。同理 onDestory () 方法也只會在服務完結時被觸發,其原理可看第2.1節該方法的詳細說明。
當系統調用Context.bindService()方法時,也會觸發Service的onCreate()方法對Service對象的運行條件作初始化處理,然後觸發Service 的 onBind ()方法對服務進行綁定,成功獲取Service的句柄後,系統就會通過用戶自定義的serviceConnection對象onServiceConnected(ComponentName name, IBinder service)方法,對 Service 對象作出處理。最後當系統調用Context.unbindService()結束服務時,就會激發Service的onDestory()方法對運轉中的 Service 作最後的處理。
注意:系統調用 Context.bindService()方法,完成 Service.onBind() 綁定後就會觸發 serviceConnection對象的 onServiceConnected()方法,但只要系統未使用 Context.unbindService()方法對 service 服務進行解綁,即使多次調用 bindService(),系統也只會在第一次綁定時調用 onBind() 和 onServiceConnected方()法一次。這正是 startService()與 bindService()方法其中的區別,單從字面上理解 startService () 啟動服務是可以多次執行,所以多次調用 startService()方法都會觸發 onStartCommand()事件,而 bindService() 是綁定服務,所以只要服務已經被綁定,在未解綁時也不會多次執行onServiceConnected()綁定後的操作,這也是兩者在使用場景上的區別所在。
Service 生命周期 圖2.2
Service 的運轉流程就先介紹到這裡,具體的使用方法將在下面的章節中詳細介紹。
回到目錄
三、Local Service 應用原理與開發實例
3.1 通過 Context.startService 啟動 Service 服務
首先建立MyService繼承Service,實現onCreate()、onDestory()、onStartCommand()、onStart()等幾個方法,使用日志記錄其運作信息。在Activity中通過Intent綁定Service服務,通過Context.startService()啟動服務,通過Context.stopService()結束服務。
 1 public class MainActivity extends Activity {
 2
 3     @Override
 4     protected void onCreate(Bundle savedInstanceState) {
 5         super.onCreate(savedInstanceState);
 6         setContentView(R.layout.activity_main);
 7     }
 8
 9     public void btnStart_onclick(View view){
10         //通過Intent綁定MyService,加入輸入參數
11         Intent intent=new Intent(MainActivity.this,MyService.class);
12         intent.putExtra("Name", "Leslie");
13         Log.i(Context.ACTIVITY_SERVICE, "----------onClick startService-----------");
14         //啟動MyService
15         startService(intent);
16     }
17
18     public void btnStop_onclick(View view){
19         Intent intent=new Intent(MainActivity.this,MyService.class);
20         Log.i(Context.ACTIVITY_SERVICE, "----------onClick stopService------------");
21         //停止MyService
22         stopService(intent);
23     }
24 }
25
26 public class MyService extends Service{
27
28     @Override
29     public void onCreate(){
30         Log.i(Context.ACTIVITY_SERVICE,"Service onCreate");
31         super.onCreate();
33     }
34
35     @Override
36     public void onDestroy() {
37         Log.i(Context.ACTIVITY_SERVICE, "Service onDestroy");
38         super.onDestroy();
39     }
40
41     @Override
42     public void onStart(Intent intent, int startId){
43         Log.i(Context.ACTIVITY_SERVICE,"Service onStart");
44         super.onStart(intent, startId);
45     }
46
47     @Override
48     public int onStartCommand(Intent intent, int flags, int startId) {
49         Log.i(Context.ACTIVITY_SERVICE, "Service onStartCommand");
50         String name=intent.getStringExtra("Name");
51         Log.i(Context.ACTIVITY_SERVICE,"His name is "+name);
52         return super.onStartCommand(intent, flags, startId);
53     }
54 }
AndroidManifest.xml 文件綁定
 1         <activity
 2             android:name=".MainActivity"
 3             android:label="@string/title_activity_main" >
 4             <intent-filter>
 5                 <action android:name="android.intent.action.MAIN" />
 6                 <category android:name="android.intent.category.LAUNCHER" />
 7             </intent-filter>
 8         </activity>
 9         <service
10             android:name="android.services.MyService"
11             android:enabled="true">
12         </service>
Service 配置說明:
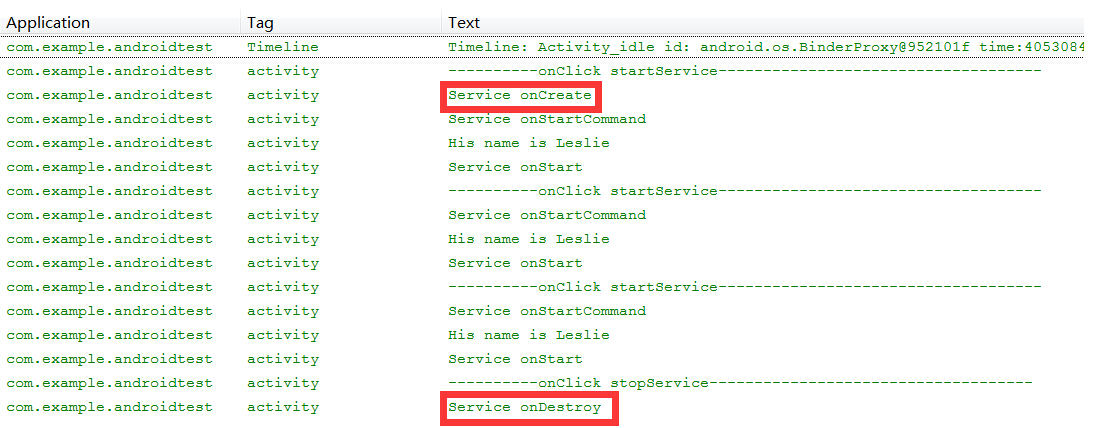
查看處理結果可清楚看到,多次調用startService()後,使用stopService()結束Service服務,onCreate()、onDestory()只會在Service啟動和結束時被調用一次。只有Service中的onStartCommand()方法會被多次調用。而Android 2.0以下舊版的方法onStart()會在onStartCommand()調用過程中被激發。
3.2 通過Context.bindService啟動Service服務
在介紹Context.bindService()前,先講解一下與此相關的常用類 Binder、ServiceConnection,首先 IBinder 是 Binder 遠程對象的基本接口,是為高性能而設計的輕量級遠程調用機制的核心部分。這個接口定義了與遠程對象交互的協議,但它不僅用於遠程調用,也用於進程內調用。系統可以通過它以獲取Service的句柄,在此先簡單介紹它的基本用法,在下面關於Remote Service遠程服務對象時再詳細講述IBinder的主體功能。ServiceConnection主要用於通過Binder綁定Service句柄後,對Service對象進行處理,它主要有兩個方法void onServiceConnected(ComponentName name, IBinder service)和void onServiceDisconnected(ComponentName name)。在Context.bindService()完成綁定後,系統就會調用 onServiceConnected() 方法,用戶可以通過 IBinder 參數獲取Service句柄,對Service進行處理。而 onServiceDisconnected() 方法一般不會被調用,只有Service被綁定後,由於內存不足等問題被意外 kill 時才會被調用。下面舉個例子說明一下bindService()的用法。
 1 public class MainActivity extends Activity {
 2     private MyServiceConnection serviceConnection;
 3
 4     @Override
 5     protected void onCreate(Bundle savedInstanceState) {
 6         super.onCreate(savedInstanceState);
 7         setContentView(R.layout.activity_main);
 8
 9         serviceConnection=new MyServiceConnection();
10     }
11
12     public void btnBind_onclick(View view){
13         //綁定 MyService
14         Intent intent=new Intent(this,MyService.class);
15
16         Log.i(Context.ACTIVITY_SERVICE, "----------onClick bindService-----------");
17         //通過bindService(intent,serviceConnection,int)方式啟動Service
18         bindService(intent,this.serviceConnection,Context.BIND_AUTO_CREATE);
19     }
20
21     public void btnUnbind_onclick(View view){
22         Log.i(Context.ACTIVITY_SERVICE, "----------onClick unbindService----------");
23         unbindService(serviceConnection);
24     }
25 }
26
27 public class MyService extends Service{
28     private MyBinder myBinder;
29
30     @Override
31     public IBinder onBind(Intent intent) {
32         Log.i(Context.ACTIVITY_SERVICE,"Service onBind");
33         return this.myBinder;
34     }
35
36     @Override
37     public boolean onUnbind(Intent intent){
38         Log.i(Context.ACTIVITY_SERVICE,"Service onUnbind");
39         return super.onUnbind(intent);
40     }
41
42     @Override
43     public void onCreate(){
44         super.onCreate();
45         Log.i(Context.ACTIVITY_SERVICE,"Service onCreate");
46         myBinder=new MyBinder();
47     }
48
49     @Override
50     public void onDestroy() {
51         Log.i(Context.ACTIVITY_SERVICE, "Service onDestroy");
52         super.onDestroy();
53     }
54
55     public String getDate(){
56         Calendar calendar = Calendar.getInstance();
57         return calendar.getTime().toString();
58     }
59
60     public class MyBinder extends Binder {
61         public MyService getService(){
62             return MyService.this;
63         }
64     }
65 }
66
67 public class MyServiceConnection implements ServiceConnection{
68
69     @Override
70     public void onServiceConnected(ComponentName name, IBinder service){
71         Log.i(Context.ACTIVITY_SERVICE, "Service Connected");
72         String data=null;
73         //通過IBinder獲取Service句柄
74         MyService.MyBinder myBinder=(MyService.MyBinder)service;
75         MyService myService=myBinder.getService();
76         data=myService.getDate();
77
78         Log.i(Context.ACTIVITY_SERVICE,data);
79     }
80
81     @Override
82     public void onServiceDisconnected(ComponentName name) {
83         Log.i(Context.ACTIVITY_SERVICE, "Service Disconnected");
84     }
85 }
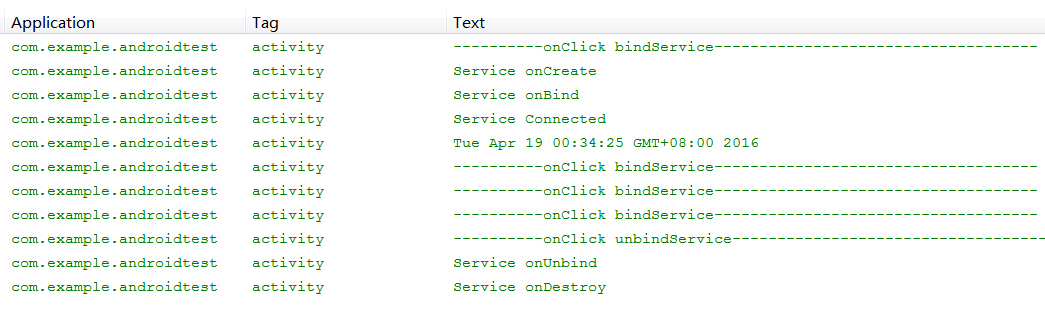
在運行時多次點擊按鈕激發btnBind_onclick(View view)方法後再使用btnUnbind_onclick(View view)結束服務,請留意處理結果。當系統調用Context .bindService()後,Service將跟隨onCreate()、onBind()、onUnbind()、onDestory()的流程走下去。在成功完成onBind()綁定後,就會激發ServiceConnection對象的onServiceConnected()方法,在此用戶可對Service進行處理。記得第2.2節所提過的問題,即使多次調用Context.bindService()方法,只要沒有調用unbindService()結束綁定,系統只會在第一次調用時激發Service.onBind()和onServiceConnected()方法,這點從運行結果中可得到證實。
注意:調用 Context .bindService() 啟動 Service 後 ,只能調用 unbindService() 一次,如重復多次調用此方法系統將會拋出錯誤異常。所以最簡單的處理方式是設置一個靜態變量 boolean connected,在調用 unbindService() 前先作出判斷
 1 public class MainActivity extends Activity {
 2     private MyServiceConnection serviceConnection;
 3     private static boolean connected;
 4
 5     @Override
 6     protected void onCreate(Bundle savedInstanceState) {
 7         super.onCreate(savedInstanceState);
 8         setContentView(R.layout.activity_main);
 9
10         serviceConnection=new MyServiceConnection();
11     }
12
13     public void btnBind_onclick(View view){
14         connected=true;
15         //綁定 MyService
16         Intent intent=new Intent(this,MyService.class);
17
18         Log.i(Context.ACTIVITY_SERVICE, "----------onClick bindService-----------");
19         //通過bindService(intent,serviceConnection,int)方式啟動Service
20         bindService(intent,this.serviceConnection,Context.BIND_AUTO_CREATE);
21     }
22
23     public void btnUnbind_onclick(View view){
24         Log.i(Context.ACTIVITY_SERVICE, "----------onClick unbindService----------");
25         if(connected){
26             unbindService(serviceConnection);
27             connected=false;
28         }
29     }
30 }
3.3 Service 服務的綜合運用
在前兩節只是從初級階段介紹了Service服務的使用原理,無論是使用startService()或者bindService()啟動服務,Service服務的運行都是階段性,當使用stopService()、unbindService()後,Service服務就會結束。然而從現實應用層面上看,Service 服務很多時候是長駐後台的,它會記錄程序運行的流程,當今的狀態等重要信息。此時,更多的使用方式就是結合startService()、bindService()兩種方式調用Service服務,startService()負責管理Service服務的啟動,輸入初始化參數,bindService()負責定時對Service服務進行檢測。而且流程是有規律性,以startService()啟動服務後,每使用bindService()綁定服務,就通過serviceConnection對服務進行檢測,然後以unbindService()結束綁定。注意,此時服務並未結束,而是長期運行於後台,直到系統以stopService()方法結束服務後,Service才會最終完結。
  1 public class MainActivity extends Activity {
  2     private MyServiceConnection serviceConnection;
  3
  4     @Override
  5     protected void onCreate(Bundle savedInstanceState) {
  6         super.onCreate(savedInstanceState);
  7         setContentView(R.layout.activity_main);
  8
  9         serviceConnection=new MyServiceConnection();
 10     }
 11
 12     public void btnBind_onclick(View view){
 13         //綁定 MyService
 14         Intent intent=new Intent(this,MyService.class);
 15
 16         Log.i(Context.ACTIVITY_SERVICE, "----------onClick bindService-----------");
 17         //通過bindService(intent,serviceConnection,int)方式啟動Service
 18         bindService(intent,this.serviceConnection,Context.BIND_AUTO_CREATE);
 19     }
 20
 21     public void btnUnbind_onclick(View view){
 22         Log.i(Context.ACTIVITY_SERVICE, "----------onClick unbindService----------");
 23         unbindService(serviceConnection);
 24     }
 25
 26     public void btnStart_onclick(View view){
 27         //通過Intent綁定MyService,加入初始參數
 28         Intent intent=new Intent(MainActivity.this,MyService.class);
 29         intent.putExtra("param",0.88);
 30         Log.i(Context.ACTIVITY_SERVICE, "----------onClick startService-----------");
 31         //啟動MyService
 32         startService(intent);
 33     }
 34
 35     public void btnStop_onclick(View view){
 36         Intent intent=new Intent(MainActivity.this,MyService.class);
 37         Log.i(Context.ACTIVITY_SERVICE, "----------onClick stopService------------");
 38         //停止MyService
 39         stopService(intent);
 40     }
 41 }
 42
 43 public class MyService extends Service{
 44     private MyBinder myBinder;
 45     private double param;
 46
 47     @Override
 48     public void onStart(Intent intent, int startId){
 49         Log.i(Context.ACTIVITY_SERVICE,"Service onStart");
 50         super.onStart(intent, startId);
 51     }
 52
 53     @Override
 54     public int onStartCommand(Intent intent, int flags, int startId) {
 55         Log.i(Context.ACTIVITY_SERVICE, "Service onStartCommand");
 56         //獲取Context.startService設置的param初始值
 57         this.param=intent.getDoubleExtra("param",1.0);
 58         return super.onStartCommand(intent, flags, startId);
 59     }
 60
 61     @Override
 62     public IBinder onBind(Intent intent) {
 63         Log.i(Context.ACTIVITY_SERVICE,"Service onBind");
 64         return this.myBinder;
 65     }
 66
 67     @Override
 68     public boolean onUnbind(Intent intent){
 69         Log.i(Context.ACTIVITY_SERVICE,"Service onUnbind");
 70         return super.onUnbind(intent);
 71     }
 72
 73     @Override
 74     public void onCreate(){
 75         super.onCreate();
 76         Log.i(Context.ACTIVITY_SERVICE,"Service onCreate");
 77         myBinder=new MyBinder();
 78     }
 79
 80     @Override
 81     public void onDestroy() {
 82         Log.i(Context.ACTIVITY_SERVICE, "Service onDestroy");
 83         super.onDestroy();
 84     }
 85
 86     //獲取處理後的值
 87     public double getValue(int value){
 88         return value*param;
 89     }
 90
 91     public class MyBinder extends Binder {
 92         public MyService getService(){
 93             return MyService.this;
 94         }
 95     }
 96 }
 97
 98 public class MyServiceConnection implements ServiceConnection{
 99
100     @Override
101     public void onServiceConnected(ComponentName name, IBinder service){
102         Log.i(Context.ACTIVITY_SERVICE, "Service Connected");
103         //通過IBinder獲取Service句柄
104         MyService.MyBinder myBinder=(MyService.MyBinder)service;
105         MyService myService=myBinder.getService();
106         //生成隨機數輸入
107         Random random=new Random();
108         double value=myService.getValue(random.nextInt(10)*1000);
109         //顯示計算結果
110         Log.i(Context.ACTIVITY_SERVICE,String.valueOf(value));
111     }
112
113     @Override
114     public void onServiceDisconnected(ComponentName name) {
115         Log.i(Context.ACTIVITY_SERVICE, "Service Disconnected");
116     }
117 }
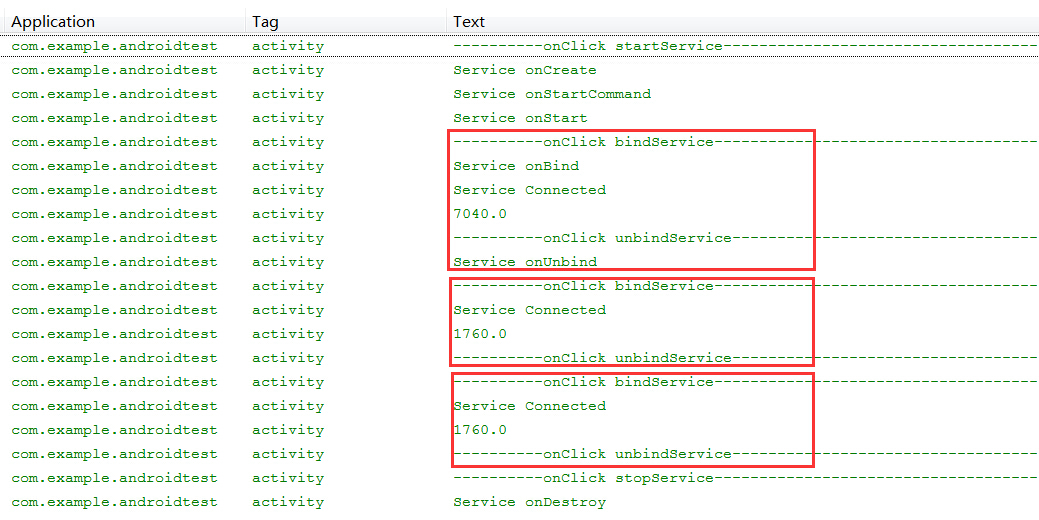
通過startService() 啟動服務後,多次使用bindService()綁定服務,unbindService()解除綁定,最後通過stopService()結束服務後,可以看到下面的結果
這時候 Service 的onBind()方法和onUnbind()方法只在第一個bindService流程中觸發,其後多次調用bindService(),此事件都不會被觸發,而只會觸發onServiceConnected()事件。這是因為在默認情況下,系統在綁定時會先搜索IBinder接口,如果Service已經綁定了Binder對象,系統就會直接跳過onBind()方法。
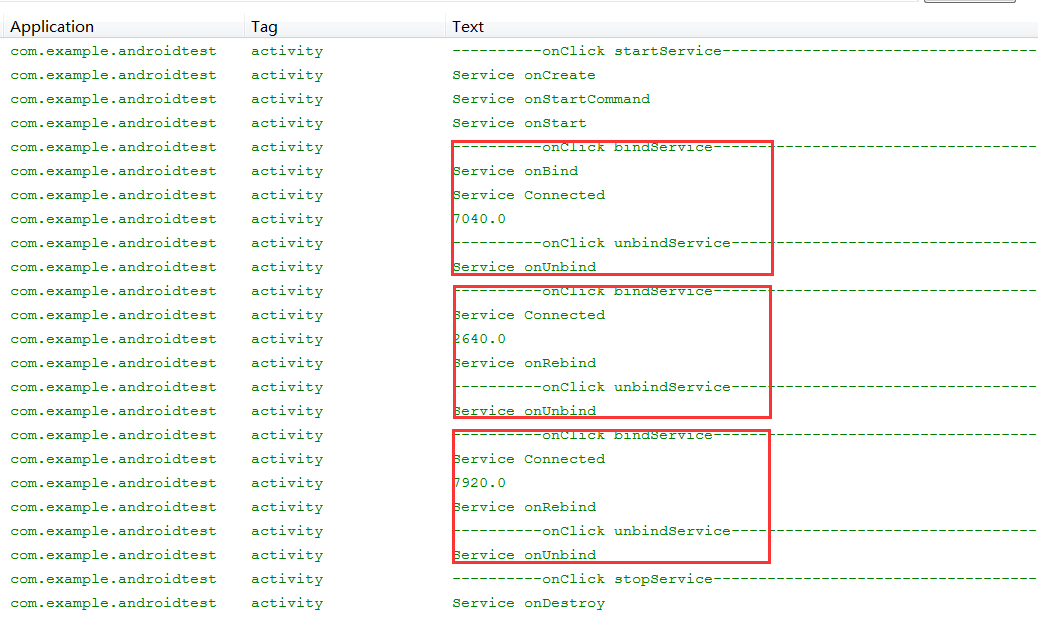
既然 onBind(),onUnbind()方法只會在第一次啟動綁定時被調用,如果在多次綁定時需要有不同的處理方式又該如何,還好Android為大家預備了一個備用方法void onRebind(intent),Service服務中 boolean onUnbind(intent)的默認返回值為false,只要將此方法的返回值修改為true,則系統在第二次調用Context.bindService()開始,就會激活Service.onRebind(intent)方法。在此對上面的方法作出少量修改,就會看到下面的處理結果。
 1 public class MyService extends Service{
 2     ...........
 3     @Override
 4     public void onRebind(Intent intent){
 5         Log.i(Context.ACTIVITY_SERVICE,"Service onRebind");
 6         super.onRebind(intent);
 7     }
 8
 9     @Override
10     public boolean onUnbind(Intent intent){
11         Log.i(Context.ACTIVITY_SERVICE,"Service onUnbind");
12         //將返回值設置為true
13         return true;
14     }
15     ...........
16     ...........
17 }
運行結果
注意:此使用方法只適用 startService()、bindServcie()同時被調用的情況下,如果只調用其中一個方法,無論onUnbind()返回值為何值都無法觸發onRebind()方法
回到目錄
四、通過多線程方式處理 Service 的延時性操作
4.1 以 Runnable接口實現 Service 多線程操作
由於Android 系統的資源有限,而且對屏幕顯示,事件發應,用戶體現都有較高的要求,所以在CPU、RAM、GPU、GPU都有獨立的運行機制。當主線程中存在大文件讀取、圖片批量處理、網絡連接超時等操作時,一旦時間超過5秒,Android 系統就會出現 “設置運行緩慢” 的提示,Logcat日志上也會顯示 “The application may be doing too much work on its main thread” 等提示。在開發Service服務時,若存在此類操作時,開發人員就應該嘗試使用多線程方式進行開發,避免主線程被長時間占用。下文將以簡單的 Runnable 接口方式實現多線程作為例子。
 1 public class MainActivity extends Activity {
 2
 3     @Override
 4     protected void onCreate(Bundle savedInstanceState) {
 5         super.onCreate(savedInstanceState);
 6         setContentView(R.layout.activity_main);
 7     }
 8
 9     public void btnStart_onclick(View view){
10         Intent intent=new Intent(MainActivity.this,MyService.class);
11         Log.i(Context.ACTIVITY_SERVICE, "----------onClick startService-----------------");
12         startService(intent);
13     }
14
15     public void btnStop_onclick(View view){
16         Intent intent=new Intent(MainActivity.this,MyService.class);
17         Log.i(Context.ACTIVITY_SERVICE, "----------onClick stopService------------------");
18         stopService(intent);
19     }
20 }
21
22 public class MyService extends Service{
23
24     @Override
25     public void onCreate(){
26         Log.i(Context.ACTIVITY_SERVICE,"Service onCreate");
27         super.onCreate();
28     }
29
30     @Override
31     public int onStartCommand(Intent intent, int flags, int startId) {
32         Log.i(Context.ACTIVITY_SERVICE, "Service onStartCommand");
33         Log.i(Context.ACTIVITY_SERVICE,"Main thread id is "+Thread.currentThread().getId());
34         //以異步方式進行模擬操作
35         Thread background=new Thread(new AsyncRunnable());
36         background.start();
37         return super.onStartCommand(intent, flags, startId);
38     }
39
40     @Override
41     public void onDestroy() {
42         Log.i(Context.ACTIVITY_SERVICE, "Service onDestroy");
43         super.onDestroy();
44     }
45 }
46
47 public class AsyncRunnable implements Runnable {
48
49     @Override
50     public void run() {
51         try {
52             Log.i(Context.ACTIVITY_SERVICE,"Async thread id is "+Thread.currentThread().getId());
53             //虛擬操作
54             for(int n=0;n<8;n++){
55                Thread.sleep(1000);
56                Log.i(Context.ACTIVITY_SERVICE,"****Do Work****");
57             }
58         } catch (InterruptedException e) {
59             // TODO 自動生成的 catch 塊
60             e.printStackTrace();
61         }
62     }
63 }
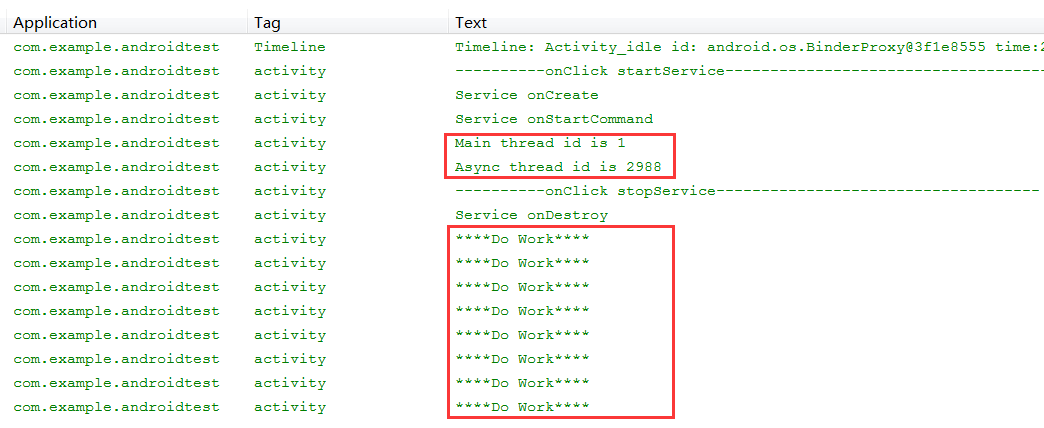
請留意運行結果,主線程與onStartCommand()方法內部操作存在於不同的線程當中完成
4.2 IntentService 服務簡介
在Service服務中出現延時性操作是普遍遇到的情況,有見及此 Android 系統早為開發人員提供了一個Service的子類IntentService,當IntentService執行 startService()方法時,系統將使用一個循環程序將該服務加入到一個子線程隊列當中,以便執行服務當中的操作。下面為大家提供 IntentService的源代碼,讓各位更好的理解IntentService的運行方式。
 1 public abstract class IntentService extends Service {
 2     private volatile Looper mServiceLooper;
 3     private volatile ServiceHandler mServiceHandler;
 4     private String mName;
 5     private boolean mRedelivery;
 6
 7     private final class ServiceHandler extends Handler {
 8         public ServiceHandler(Looper looper) {
 9             super(looper);
10         }
11
12         @Override
13         public void handleMessage(Message msg) {
14             onHandleIntent((Intent)msg.obj);
15             stopSelf(msg.arg1);
16         }
17     }
18
19     public IntentService(String name) {
20         super();
21         mName = name;
22     }
23
24     public void setIntentRedelivery(boolean enabled) {
25         mRedelivery = enabled;
26     }
27
28     @Override
29     public void onCreate() {
30         super.onCreate();
31         HandlerThread thread = new HandlerThread("IntentService[" + mName + "]");
32         thread.start();
33
34         mServiceLooper = thread.getLooper();
35         mServiceHandler = new ServiceHandler(mServiceLooper);
36     }
37
38     @Override
39     public void onStart(Intent intent, int startId) {
40         Message msg = mServiceHandler.obtainMessage();
41         msg.arg1 = startId;
42         msg.obj = intent;
43         mServiceHandler.sendMessage(msg);
44     }
45
46     @Override
47     public int onStartCommand(Intent intent, int flags, int startId) {
48         onStart(intent, startId);
49         return mRedelivery ? START_REDELIVER_INTENT : START_NOT_STICKY;
50     }
51
52     @Override
53     public void onDestroy() {
54         mServiceLooper.quit();
55     }
56
57     @Override
58     public IBinder onBind(Intent intent) {
59         return null;
60     }
61
62     protected abstract void onHandleIntent(Intent intent);
63 }
從代碼中可以看到,系統沒有在onStartCommand()中創建新線程,而是在onCreate()方法中建立了獨立的工作線程,這是由於onCreate()方法只會在新建服務時被調用一次,可見這樣的目的是為了讓系統在單個線程中執行多個異步任務。當系統調用Context.startService()方法時,系統將通過onStart()方法使用異步方式,調用ServiceHandler.handleMessage(msg)進行處理,而handleMessage(msg)正是調用了虛擬方法onHandleIntent(intent),然後以stopSelf()結束服務。所以用戶只需要在繼承類中重寫onHandleIntent(intent)方法,便可以以異步方法執行IntentService。
4.3 IntentService 應用
以下面一個簡單的例子說明一下IntentService的應用,建立一個MyIntentService類繼承IntentService,實現onHandleIntent(Message msg)方法。然後在MainActivity活動分別3次以不同參數調用intentService,觀察其運行的線程狀態。
 1 public class MyIntentService extends IntentService {
 2
 3     public MyIntentService() {
 4         super(null);
 5     }
 6
 7     @Override
 8     protected void onHandleIntent(Intent intent) {
 9         String msg=intent.getStringExtra("msg");
10         Log.i(Context.ACTIVITY_SERVICE,msg+"'s thread id is "+Thread.currentThread().getId());
11     }
12 }
13
14 public class MainActivity extends Activity {
15
16     @Override
17     protected void onCreate(Bundle savedInstanceState) {
18         super.onCreate(savedInstanceState);
19         setContentView(R.layout.activity_main);
20     }
21
22     public void btnStart_onclick(View view){
23         Log.i(Context.ACTIVITY_SERVICE, "----------onClick startService--------------");
24         Log.i(Context.ACTIVITY_SERVICE,"Main thread id is "+Thread.currentThread().getId());
25
26         Intent intent1=new Intent(this,MyIntentService.class);
27         intent1.putExtra("msg", "intentService1");
28         startService(intent1);
29
30         Intent intent2=new Intent(this,MyIntentService.class);
31         intent2.putExtra("msg", "intentService2");
32         startService(intent2);
33
34         Intent intent3=new Intent(this,MyIntentService.class);
35         intent3.putExtra("msg", "intentService3");
36         startService(intent3);
37     }
38
39     public void btnStop_onclick(View view){
40         Intent intent=new Intent(MainActivity.this,MyIntentService.class);
41         Log.i(Context.ACTIVITY_SERVICE, "----------onClick stopService-------------");
42         stopService(intent);
43     }
44 }
在AndroidManifest.xml 文件設置服務
1    <application>
2         ..........
3         <service
4             android:name="android.services.MyIntentService"
5             android:enabled="true">
6         </service>
7     </application>
從運行結果中可以看出,同一時間多次啟動startService()調用intentService,它們都將運行於同一個異步線程當中,這一點在這裡得到了證實。

回到目錄
五、淺談 Remote Service 原理
5.1 跨進程通信的使用場景
以上章節所舉的例子都是使用Local Service 技術,Serivce服務端與Client客戶端都是在於同一進程當中,當APP被卸御,Service服務也被同時卸御。要是想把服務端與客戶端分別放在不同的進程當中進行跨進程信息交換的話,就需要使用到下面介紹的遠程通信服務 Remote Service。使用Remote Service可以把服務端與客戶端分離,當一方被卸御,另一方不會被影響。當今有很多企業都有多個獨立的APP,如阿裡巴巴旗下就天貓、淘寶、聚劃算、支付寶等多個APP,這時候就有需要把Service服務放在一獨立的後台進程當中,作為多個APP之間信息交換的橋梁。這樣如用戶信息,用戶登錄,身份驗證等多個共用的模塊都可以在Service服務中實現,以供不同的APP進行調用。而且當APP被關閉時,Service服務還會寄存在後台當中,對用戶的操作進行檢測。如今越來越多的企業都使用這種開發方式,以收集用戶像所在地點,通信錄,短信,彩信等個人信息,方便企業針對用戶的個人資料進行產品推廣。
5.2 Remote Service 技術背景
Android 系統與 Windows 系統的通信原則基本一致,進程就是安全策略的邊界,不同的APP屬於不同進程 Process,一個進程不能直接訪問其他進程的資源。需要實現多進程間的通信,就要使用IPC(Inter Process Commnication)進程間通信技術。Android 系統的 IPC 機制是基於 RPC (Remote Proceduce Call) 遠程過程調用協議建立的,與 Java 使用的 RMI(Rmote Methed Invocation)遠程方法調用相比,不同之處在於Android的IPC機制是基於AIDL(Android Interface Definition Language)接口定義語言定制進程間的通訊規則的。系統會基於 AIDL 規則把信息進行序列化處理,然後發送到另一個進程當中,Android 系統把這種基於跨進程通信的服務稱作 Remote Service 。
5.3 IPC 運作原理
從底層架構分析, Android 系統中 IPC 的運作主要依賴於 “ServiceManager” 和 “Binder Driver” 兩個核心元件,下面給大家簡單介紹一下它們的運作原理:
ServiceManager是Android系統內的服務管理器,主要負責管理 Service 服務的管理,注冊,調用等任務。在Google提供的Android原始代碼中可以找到(文件夾路徑:frameworks/base/cmds/servicemanager),有C語言開發基礎且有興趣的朋友可以下載看一下,當中包含了幾個核心的函數:
int svcmgr_handler(struct binder_state *bs, struct binder_txn *txn, struct binder_io *msg, struct binder_io *reply)
int do_add_service(struct binder_state *bs, uint16_t *s, unsigned len, void *ptr, unsigned uid)
void *do_find_service(struct binder_state *bs, uint16_t *s, unsigned len)
void binder_loop(struct binder_state *bs, binder_handler func)
ServiceManager 啟動後會通過 binder_loop 循環對 Binder Driver 進行監聽,當發現了有新的Service服務請求後,就會調用 svcmgr_handler() 函數對檢測的Service服務進行處理,通過*do_find_service()函數可以在svclist集中檢測Service服務,若當前svclist服務集中未存在當前服務,就會通過do_add_service()進行注冊,把當前服務及其唯一標識符加入到svclist中,這樣當前的 Service 服務被綁定後就完成在ServiceManager的注冊。Binder Driver 會按照規定的格式把它轉化為 Binder 實體發送到內核當中,當被 Client 調用時 ServiceManager 會根據 Service 服務的標識符在 svclist 中找到該 Binder 實體,並把 Binder 實體的引用發送給Client。完成計算後 Binder Driver 會進行數據處理,把計算結果發回到Client客戶端。由於Binder實體是以強類型的形式存在,所以即使被多次引用,系統都會指向同一個Binder實體,除非所有都結束鏈接,否則Binder實體會一直存在。
圖 5.3
Binder Driver運行於Android 內核當中,它以 “字符驅動設備” 中的 “misc設備注冊” 存在於設備目錄 dev/binder,由於權限問題,在一般手機中沒有權限進行復制,對此有興趣的朋友可以在google 提供的 android 源代碼中查看。它提供open(),mmap(),poll(),ioctl() 等函數進行標准化文件操作,負責進程之間Binder通信的建立,Binder實體在進程之間的傳遞,Binder實體引用的計數管理,數據包在進程之間的傳遞與交互等一系列底層操作。
5.4 Remote Service 常用接口
在 5.3 節以 Android 底層結構的方式簡單介紹了一下 IPC 通信的原理,下面將以 JAVA 應用層方式再作介紹。
IBinder 是 Remote Service 遠程服務的常用接口,Binder是它的實現類,它是為高性能而設計的輕量級遠程調用機制的核心部分。IBinder 內部比較重要的方法就是 boolean transact(int code, Parcel data, Parcel reply, int flags) ,它負責在服務器與客戶端之間進行信息交換,調用遠程方法進行處理,然後把返回值轉換成可序列化對象送回客戶端。
5.5 Remote Service 開發實例
首先新建一個項目作為服務端, 建立 AIDL 文件 ITimerService.aidl,系統會根據接口描述自動在gen文件夾內生成對應的類文件 ITimerService.java ,當中 Stub 擴展了 android.os.Binder 並利用 transact ()實現了 ITimerService 接口中方法的遠程調用。
1 package com.example.remoteservice;
2
3 interface ITimerService{
4     String getTimeNow();
5 }
gen\com\example\remoteservice\ITimerService.java (自動生成)
 1 package com.example.remoteservice;
 2 public interface ITimerService extends android.os.IInterface
 3 {
 4 /** Local-side IPC implementation stub class. */
 5 public static abstract class Stub extends android.os.Binder implements com.example.remoteservice.ITimerService
 6 {
 7 private static final java.lang.String DESCRIPTOR = "com.example.remoteservice.ITimerService";
 8 /** Construct the stub at attach it to the interface. */
 9 public Stub()
10 {
11 this.attachInterface(this, DESCRIPTOR);
12 }
13 /**
14  * Cast an IBinder object into an com.example.remoteservice.ITimerService interface,
15  * generating a proxy if needed.
16  */
17 public static com.example.remoteservice.ITimerService asInterface(android.os.IBinder obj)
18 {
19 if ((obj==null)) {
20 return null;
21 }
22 android.os.IInterface iin = obj.queryLocalInterface(DESCRIPTOR);
23 if (((iin!=null)&&(iin instanceof com.example.remoteservice.ITimerService))) {
24 return ((com.example.remoteservice.ITimerService)iin);
25 }
26 return new com.example.remoteservice.ITimerService.Stub.Proxy(obj);
27 }
28 @Override public android.os.IBinder asBinder()
29 {
30 return this;
31 }
32 @Override public boolean onTransact(int code, android.os.Parcel data, android.os.Parcel reply, int flags) throws android.os.RemoteException
33 {
34 switch (code)
35 {
36 case INTERFACE_TRANSACTION:
37 {
38 reply.writeString(DESCRIPTOR);
39 return true;
40 }
41 case TRANSACTION_getTimeNow:
42 {
43 data.enforceInterface(DESCRIPTOR);
44 java.lang.String _result = this.getTimeNow();
45 reply.writeNoException();
46 reply.writeString(_result);
47 return true;
48 }
49 }
50 return super.onTransact(code, data, reply, flags);
51 }
52 private static class Proxy implements com.example.remoteservice.ITimerService
53 {
54 private android.os.IBinder mRemote;
55 Proxy(android.os.IBinder remote)
56 {
57 mRemote = remote;
58 }
59 @Override public android.os.IBinder asBinder()
60 {
61 return mRemote;
62 }
63 public java.lang.String getInterfaceDescriptor()
64 {
65 return DESCRIPTOR;
66 }
67 @Override public java.lang.String getTimeNow() throws android.os.RemoteException
68 {
69 android.os.Parcel _data = android.os.Parcel.obtain();
70 android.os.Parcel _reply = android.os.Parcel.obtain();
71 java.lang.String _result;
72 try {
73 _data.writeInterfaceToken(DESCRIPTOR);
74 mRemote.transact(Stub.TRANSACTION_getTimeNow, _data, _reply, 0);
75 _reply.readException();
76 _result = _reply.readString();
77 }
78 finally {
79 _reply.recycle();
80 _data.recycle();
81 }
82 return _result;
83 }
84 }
85 static final int TRANSACTION_getTimeNow = (android.os.IBinder.FIRST_CALL_TRANSACTION + 0);
86 }
87 public java.lang.String getTimeNow() throws android.os.RemoteException;
88 }
然後建立服務TimerService,建立內置類TimerServiceImpl實現接口ITimerService中的方法,由於使用 Remote Service 只能使用 bindService()方式對服務進行遠程綁定,所以TimerService中須利用 onBind() 方法綁定 TimerServiceImpl 對象。
 1 public class TimerService extends Service {
 2
 3     @Override
 4     public IBinder onBind(Intent intent) {
 5         // TODO 自動生成的方法存根
 6         return new TimerServiceImpl();
 7     }
 8
 9     public class TimerServiceImpl extends ITimerService.Stub{
10
11         @Override
12         public String getTimeNow() throws RemoteException {
13             // 獲取當時時間與服務器端的進程Id
14             Date date=new Date();
15             SimpleDateFormat formatter = new SimpleDateFormat("E yyyy.MM.dd 'at' hh:mm:ss a zzz");
16             return  "Time now is "+ formatter.format(date)+"\nService processId is "+Process.myPid();
17         }
18     }
19 }
在 AndroidManifest.xml 文件設置服務綁定,在 action 項的 android:name 中綁定當前服務的接口
1     <application>
2         ........
3         <service android:name=".TimerService" android:process=":remote">
4             <intent-filter>
5                 <action android:name="com.example.remoteservice.ITimerService"/>
6             </intent-filter>
7         </service>
8     </application>
服務器端完成配置後建立一個客戶端項目,把ITimerService.aidl文件copy到客戶端,此時客戶端也會在gen文件夾中自動生成ITimerService.java文件。在Activity中調用Remote Service時請注意,android 4.0 及以下版本,可通過 Intent(string action) 構造函數生成後直接調用。android 5.0 及以上版本需通過intent.setPackage(string packageName)指定action的包名稱。
 1 public class MainActivity extends Activity {
 2     private MyServiceConnection serviceConnection;
 3     private boolean connected;
 4
 5     @Override
 6     protected void onCreate(Bundle savedInstanceState) {
 7         super.onCreate(savedInstanceState);
 8         setContentView(R.layout.activity_main);
 9         //建立ServiceConnection對象
10         serviceConnection=new MyServiceConnection();
11     }
12
13     public void btnBind_onclick(View view){
14         Intent intent=new Intent();
15         //綁定遠程服務接口
16         intent.setAction("com.example.remoteservice.ITimerService");
17         intent.setPackage("com.example.remoteservice");
18         this.connected=true;
19         Log.i(Context.ACTIVITY_SERVICE, "-------onClick bindService--------");
20         bindService(intent,this.serviceConnection,Context.BIND_AUTO_CREATE);
21     }
22
23     public void btnUnbind_onclick(View view){
24         Log.i(Context.ACTIVITY_SERVICE, "-------onClick unbindService---------");
25         if(connected){
26            unbindService(serviceConnection);
27            connected=false;
28         }
29     }
30 }
31
32 public class MyServiceConnection implements ServiceConnection{
33
34     @Override
35     public void onServiceConnected(ComponentName name, IBinder service){
36         // TODO 自動生成的方法存根
37         Log.i(Context.ACTIVITY_SERVICE, "Service Connected");
38         //獲取遠程對象
39         ITimerService timerService=ITimerService.Stub.asInterface(service);
40         String data=null;
41
42         try {
43             data=timerService.getTimeNow()+"\nClient processId is "+Process.myPid();
44         } catch (RemoteException e) {
45             // TODO 自動生成的 catch 塊
46             e.printStackTrace();
47         }
48
49         Log.i(Context.ACTIVITY_SERVICE,data);
50     }
51 }
從運行結果可清晰看到Service與Client運行於不同的進程當中

5.6 Remote Service 復雜類型數據傳輸
當 Remote Service 需要使用自定義類型的數據進行傳輸時,數據對象需要經過序列化處理,而 Android 對象的序列化處理有兩種方式,一是常用方式 Serializable 接口,另一個是 Android 獨有的Parcelable 接口。由於常用的 Serializable 接口,會使用大量的臨時變量耗費內存而導致大量的GC垃圾回收,引起手機資源不足,因此 Android 研發出 Parcelable 接口實現對象的序列化。它可被看作為一個 Parcel 容器,通過 writeToParcel() 與 createFormParcel() 方法把對象讀寫到 Parcel 當中,Parcelable接口如下:
 1 public interface Parcelable
 2 {
 3     //內容描述接口
 4     public int describeContents();
 5     //對象序列化方式
 6     public void writeToParcel(Parcel dest, int flags);
 7
 8     //反序列化對象,使用泛型方式在Parcel中構造一個實現了Parcelable的類的實例處理。
 9     //接口分別定義了單個實例和多個實例
10     public interface Creator<T>
11     {
12         public T createFromParcel(Parcel source);
13         public T[] newArray(int size);
14     }
15 }
首先建立服務端,新建Person.aidl文件
1 package com.example.remoteservice;
2
3 parcelable Person;
建立Person類,實現Parcelable接口
 1 public class Person implements Parcelable {
 2    private String name;
 3    private Integer age;
 4    private String desc;
 5
 6    public Person(){
 7
 8    }
 9
10    public Person(String name, Integer age, String desc) {
11     // TODO 自動生成的構造函數存根
12        this.name=name;
13        this.age=age;
14        this.desc=desc;
15    }
16
17    public String getName(){
18        return this.name;
19    }
20
21    public void setName(String name){
22        this.name=name;
23    }
24
25    public Integer getAge(){
26        return this.age;
27    }
28
29    public void setAge(Integer age){
30        this.age=age;
31    }
32
33    public String getDesc(){
34        return this.desc;
35    }
36
37    public void setDesc(String desc){
38        this.desc=desc;
39    }
40
41     @Override
42     public int describeContents() {
43         // TODO 自動生成的方法存根
44         return 0;
45     }
46
47     @Override
48     public void writeToParcel(Parcel dest, int flags) {
49         // TODO 自動生成的方法存根
50         dest.writeString(name);
51         dest.writeInt(age);
52         dest.writeString(desc);
53     }
54
55     public static final Parcelable.Creator<Person> CREATOR = new Creator<Person>() {
56
57         /**
58          * 創建一個要序列號的實體類的數組,數組中存儲的都設置為null
59          */
60         @Override
61         public Person[] newArray(int size) {
62             return new Person[size];
63         }
64
65         /***
66          * 根據序列號的Parcel對象,反序列號為原本的實體對象
67          * 讀出順序要和writeToParcel的寫入順序相同
68          */
69         @Override
70         public Person createFromParcel(Parcel source) {
71             String name = source.readString();
72             int age = source.readInt();
73             String desc = source.readString();
74             Person Person = new Person();
75             Person.setName(name);
76             Person.setAge(age);
77             Person.setDesc(desc);
78
79             return Person;
80         }
81     };
82 }
建立服務IPersonService.aidl文件
1 package com.example.remoteservice;
2
3 import com.example.remoteservice.Person;
4
5 interface IPersonService{
6     Person getPerson(String number);
7 }
此時在gen\com\example\remoteservice文件夾內將自動生成成IPersonService.java類
  1 /*
  2  * This file is auto-generated.  DO NOT MODIFY.
  3  * Original file: D:\\Java_Projects\\RemoteService\\src\\com\\example\\remoteservice\\IPersonService.aidl
  4  */
  5 package com.example.remoteservice;
  6 public interface IPersonService extends android.os.IInterface
  7 {
  8 /** Local-side IPC implementation stub class. */
  9 public static abstract class Stub extends android.os.Binder implements com.example.remoteservice.IPersonService
 10 {
 11 private static final java.lang.String DESCRIPTOR = "com.example.remoteservice.IPersonService";
 12 /** Construct the stub at attach it to the interface. */
 13 public Stub()
 14 {
 15 this.attachInterface(this, DESCRIPTOR);
 16 }
 17 /**
 18  * Cast an IBinder object into an com.example.remoteservice.IPersonService interface,
 19  * generating a proxy if needed.
 20  */
 21 public static com.example.remoteservice.IPersonService asInterface(android.os.IBinder obj)
 22 {
 23 if ((obj==null)) {
 24 return null;
 25 }
 26 android.os.IInterface iin = obj.queryLocalInterface(DESCRIPTOR);
 27 if (((iin!=null)&&(iin instanceof com.example.remoteservice.IPersonService))) {
 28 return ((com.example.remoteservice.IPersonService)iin);
 29 }
 30 return new com.example.remoteservice.IPersonService.Stub.Proxy(obj);
 31 }
 32 @Override public android.os.IBinder asBinder()
 33 {
 34 return this;
 35 }
 36 @Override public boolean onTransact(int code, android.os.Parcel data, android.os.Parcel reply, int flags) throws android.os.RemoteException
 37 {
 38 switch (code)
 39 {
 40 case INTERFACE_TRANSACTION:
 41 {
 42 reply.writeString(DESCRIPTOR);
 43 return true;
 44 }
 45 case TRANSACTION_getPerson:
 46 {
 47 data.enforceInterface(DESCRIPTOR);
 48 java.lang.String _arg0;
 49 _arg0 = data.readString();
 50 com.example.remoteservice.Person _result = this.getPerson(_arg0);
 51 reply.writeNoException();
 52 if ((_result!=null)) {
 53 reply.writeInt(1);
 54 _result.writeToParcel(reply, android.os.Parcelable.PARCELABLE_WRITE_RETURN_VALUE);
 55 }
 56 else {
 57 reply.writeInt(0);
 58 }
 59 return true;
 60 }
 61 }
 62 return super.onTransact(code, data, reply, flags);
 63 }
 64 private static class Proxy implements com.example.remoteservice.IPersonService
 65 {
 66 private android.os.IBinder mRemote;
 67 Proxy(android.os.IBinder remote)
 68 {
 69 mRemote = remote;
 70 }
 71 @Override public android.os.IBinder asBinder()
 72 {
 73 return mRemote;
 74 }
 75 public java.lang.String getInterfaceDescriptor()
 76 {
 77 return DESCRIPTOR;
 78 }
 79 @Override public com.example.remoteservice.Person getPerson(java.lang.String number) throws android.os.RemoteException
 80 {
 81 android.os.Parcel _data = android.os.Parcel.obtain();
 82 android.os.Parcel _reply = android.os.Parcel.obtain();
 83 com.example.remoteservice.Person _result;
 84 try {
 85 _data.writeInterfaceToken(DESCRIPTOR);
 86 _data.writeString(number);
 87 mRemote.transact(Stub.TRANSACTION_getPerson, _data, _reply, 0);
 88 _reply.readException();
 89 if ((0!=_reply.readInt())) {
 90 _result = com.example.remoteservice.Person.CREATOR.createFromParcel(_reply);
 91 }
 92 else {
 93 _result = null;
 94 }
 95 }
 96 finally {
 97 _reply.recycle();
 98 _data.recycle();
 99 }
100 return _result;
101 }
102 }
103 static final int TRANSACTION_getPerson = (android.os.IBinder.FIRST_CALL_TRANSACTION + 0);
104 }
105 public com.example.remoteservice.Person getPerson(java.lang.String number) throws android.os.RemoteException;
106 }
然後建立服務PersonService,建立內置類PersonServiceImpl實現接口IPersonService中的方法,在 PersonService 中須利用 onBind() 方法綁定 PersonServiceImpl 對象。
 1 public class PersonService extends Service {
 2
 3     @Override
 4     public IBinder onBind(Intent intent) {
 5         // TODO 自動生成的方法存根
 6         return new PersonServiceImpl();
 7     }
 8
 9     public class PersonServiceImpl extends IPersonService.Stub{
10         @Override
11         public Person getPerson(String number) throws RemoteException {
12             // TODO 自動生成的方法存根
13             switch(number){
14             case "0":
15                 return new Person("Jack Mokei",34,"Project Manager");
16             case "1":
17                 return new Person("Mike Tlea",24,"Team Leader");
18             default:
19                 return null;
20             }
21         }
22     }
23 }
在 AndroidManifest.xml 文件設置服務綁定,在 action 項的 android:name 中綁定當前服務的接口
1     <application>
2         ........
3         <service android:name=".PersonService" android:process=":remote">
4             <intent-filter>
5                 <action android:name="com.example.remoteservice.IPersonService"/>
6             </intent-filter>
7         </service>
8     </application>
服務器端完成配置後建立一個客戶端項目,把Person.aidl、IPersonService.aidl文件copy到客戶端,此時客戶端也會在gen文件夾中自動生成 Person.java和 IPersonService.java文件
 1 public class MainActivity extends Activity {
 2     private MyServiceConnection serviceConnection;
 3     private boolean connected;
 4
 5     @Override
 6     protected void onCreate(Bundle savedInstanceState) {
 7         super.onCreate(savedInstanceState);
 8         setContentView(R.layout.activity_main);
 9         //建立ServiceConnection對象
10         serviceConnection=new MyServiceConnection();
11     }
12
13     public void btnBind_onclick(View view){
14         Intent intent=new Intent();
15         //綁定遠程服務接口
16         intent.setAction("com.example.remoteservice.IPersonService");
17         intent.setPackage("com.example.remoteservice");
18         this.connected=true;
19         Log.i(Context.ACTIVITY_SERVICE, "----------onClick bindService----------");
20         bindService(intent,this.serviceConnection,Context.BIND_AUTO_CREATE);
21     }
22
23     public void btnUnbind_onclick(View view){
24         Log.i(Context.ACTIVITY_SERVICE, "----------onClick unbindService--------");
25         if(connected){
26            unbindService(serviceConnection);
27            connected=false;
28         }
29     }
30 }
31
32 public class MyServiceConnection implements ServiceConnection{
33
34     @Override
35     public void onServiceConnected(ComponentName name, IBinder service){
36         Log.i(Context.ACTIVITY_SERVICE, "Service Connected");
37         //綁定遠程對象
38         IPersonService personService=IPersonService.Stub.asInterface(service);
39         String data=null;
40
41         try {
42             Person person=personService.getPerson("0");
43             data=person.getName()+"'s age is "+person.getAge();
44         } catch (RemoteException e) {
45             // TODO 自動生成的 catch 塊
46             e.printStackTrace();
47         }
48
49         Log.i(Context.ACTIVITY_SERVICE,data);
50     }
51 }
運行結果

回到目錄
本章總結
通過文章的例子大家可以了解到Local Service本地服務與Remote Service遠程服務之間的區別,以及Context.startService()方法以及Context.bindService()方法不同的使用場景。希望文章有幫於大家對Service服務有更深入的了解,在不同的開發環境中靈活運用。由於時間倉促,文章當中有不明確的地方或有錯漏敬請點明。
Android開發筆記 全面剖釋 Android Service 服務 Cordova(PhoneGap)通過CordovaPlugin插件調用 Activity 實例 最新版Cordova 5.1.1(PhoneGap)搭建開發環境
作者:風塵浪子
http://www.cnblogs.com/leslies2/p/5401813.html
原創作品,轉載時請注明作者及出處
 添加頁面切換動畫, 避免冷啟動
添加頁面切換動畫, 避免冷啟動 在啟動Android應用時, 直接顯示頁面, 就稱之為冷啟動(Cold Start). 為了增強用戶體驗, 可以添加控件動畫, 讓啟動
 常見bug,bug
常見bug,bug 錯誤日志圖 被這弱智的錯誤吭了半個小時,項目本來好好的,然後因為改版加了很多東西,所以就超限了,一開始總是報下面那圖的錯,搞的我總以為
 Android 使用OpenCV的三種方式(Android Studio)
Android 使用OpenCV的三種方式(Android Studio) 其實最早接觸OpenCV是很久很久之前的事了,大概在2013年的5,6月份,當時還是個菜逼(雖
 android Gui系統之SurfaceFlinger(4),androidgui系統
android Gui系統之SurfaceFlinger(4),androidgui系統8.Vsync 8.1概論 VSYNC(Vertical Synchronizat